Nautilus NS75X Support and Manuals
Get Help and Manuals for this Nautilus item

View All Support Options Below
Free Nautilus NS75X manuals!
Problems with Nautilus NS75X?
Ask a Question
Free Nautilus NS75X manuals!
Problems with Nautilus NS75X?
Ask a Question
Popular Nautilus NS75X Manual Pages
Assembly Manual - Page 1

Be Strong.™
NS 75X
Assembly Manual
P/N: 001-7006 Rev A (10/04/2006)
Model: NS 75X
Assembly Manual - Page 3

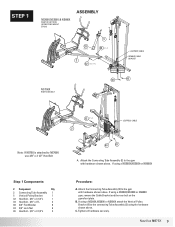
...Nautilus NS75X Or you can simplify each process and save yourself extra time and effort. 1. To make the assembly process go faster, gather the pieces you need for each step and
thoroughly read the assembly instructions... the bolt holes to help guide the bolt
through the holes. 4. As a general rule, and for the step. 2. When tightening a locknut on your NS75X Bench, turn bolts or nuts...
Assembly Manual - Page 4
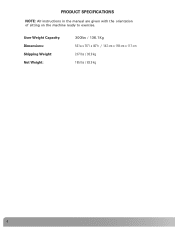
product Specifications
NOTE: All instructions in the manual are given with the orientation of sitting on the machine ready to exercise. User Weight Capacity: Dimensions: Shipping Weight: Net Weight:
300lbs / 136.1Kg 56"w x 76"l x 46"h / 142 cm x 193 cm x 117 cm 207 lbs / 93.9 kg 185 lbs / 83.9 kg
Assembly Manual - Page 5

Parts list / Box Contents
# DESCRIPTION
QTY
1 Main Base Assembly 1 2 Connecting Tube Assembly 1 3 Seat...Power Link 1 16 Seat Back Support Assembly ......... 1 17 Seat Back Adjuster 1 18 Ab Crunch Support Arm 1 19 Ab Crunch Arm 1 20 Ab Crunch Handle 1 21 Ab Crunch Pad Support 1 22 Ab Crunch Pad 1...Washer 1 42 1/2" Lock Nut 3 43 3/8" Lock Nut 30 44 Step Spacer - 5/8"H 8
Nautilus NS75X
Assembly Manual - Page 7

Hardware and tools
NS-75 Nautilus NS75X
Assembly Manual - Page 8

You may also mount the Ab Crunch arm on the NS300X ,NS200X, NS600X and NS700X. NS75X Leg Press attachment can be assembled in a right or left configuration for use on either side to most efficiently use space.
Assembly Manual - Page 9
...
8
43 3/8" Lock Nut
6
45 Hex Bolt - 3/8" x 3 1/2"L
2
Procedure:
A. If using a NS200X,NS300X or NS600X attach the Vertical Pulley Bracket (5) to the gym with hardware shown above.
B. Nautilus NS75X If using the hardware shown above .
Attach the Connecting Tube Assembly (2) to NS700X use 3/8" x 3 1/2" Hex Bolt
40
43
A. If using a NS200X,NS300X or NS600X gym...
Assembly Manual - Page 10

... with hardware shown above . Tighten all hardware securely.
B.
After the cable is routed in Step #6
D. Secure parts with hardware shown above, but do not tighten. Position the Seat Back Support Assembly (16) over the Seat Back Support Assembly (16) and the Main Base Assembly (1). STEP 2
Assembly
3/8" x 3 1/4"L
3/8" x 2 3/4"L
32
4
34
16
3
33
3/8" x 3"L
33
3/8" x 3"L
32...
Assembly Manual - Page 11

... short end of Leg Press Power Link (15) up. Attach the Foot Plate Assembly (9) to the Leg Press
Top Link (8) using the hardware shown above . C. G. Nautilus NS75X 11 B. E. STEP 3
Assembly
29
11
9
38
8 13
39 31 1/2" x 3"L
15 14
42
Step 3 Components:
# Component
Qty
8 Leg Press Top Link
1
9 Foot Plate Assembly
1
10 Leg...
Assembly Manual - Page 12

...over the Shim Washer (41).
E.
Attach the Ab Crunch Pad Support (21) to the Ab Crunch Arm (19) using the hardware shown above . (This...3/8" x 3"L
41 28
Step 4 Components:
# Component
Qty
7 Angled Pulley Bracket
1
18 Ab Crunch Support Arm
1
19 Ab Crunch Arm
1
20 Ab Crunch Handle
1
21 Ab Crunch Pad Support
1
28 Round Plastic Cap
1
30 Hex Bolt - 1/2" x 7"L
1
33 Hex Bolt - 3/8" x...
Assembly Manual - Page 13

... Back Adjuster in to the Seat Tube Assembly using the hardware shown.
Attach the Seat Back Pad (24) to the Ab Crunch Pad Support using the hardware shown above . Nautilus NS75X 13 STEP 5
Assembly
22
17 24
76543
23
37 3/8" x 1"L
40
37 3/8" x 1"L
37 3/8" x 1"L
Step 5 Components:
# Component
Qty
17 Seat Back Adjuster
1
22 Ab...
Assembly Manual - Page 14

...to the Angled Pulley Bracket (7). Adjust the cable tension using the adjustments located on the Seat Back Support Assembly using the hardware shown and the L Cable Retainer (6) to the Leg Press Power Arm using... shown above. Wrap the cable around a 4 1/2" Pulley and secure in the Seat Back Support Assembly using the hardware shown. Pass the Leg Press Cable over the 3 1/2" Pulleys and attach...
Assembly Manual - Page 15

... purchaser.
You may also contact a Nautilus company representative at its option, will repair any person other rights which vary from state to the original purchaser from date of purchase.
How To Get Service
To obtain service for ten years to state. What We Will Do
Nautilus Fitness Products will either replace your Nautilus Home Gym or refund your...
Assembly Manual - Page 16

... Way Louisville, Colorado, USA 80027 Phone: 800-864-1270 Fax: 800-898-9410
• CORPORATE HEADQUARTERS Nautilus, Inc. Nautilus Drive Vancouver, Washington, USA 98683 Phone: 800-NAUTILUS
INTERNATIONAL CUSTOMER SERVICE
• INTERNATIONAL OFFICE Nautilus International S.A. World Headquarters 16400 S.E. World Headquarters 16400 S.E. Rue Jean Prouvé 6 1762 Givisiez / Switzerland Tel: +41...
Assembly Manual - Page 17
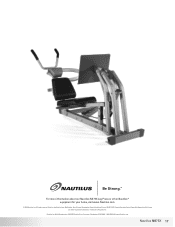
..., 1-800-628-8458, www.Nautilus.com. Nautilus NS75X 17
Nautilus, Inc. All rights reserved.
Be Strong.™
For more information about our Nautilus NS75X Leg Press or other Nautilus® equipment for your home, visit www.Nautilus.com.
© 2006 Nautilus, Inc. Nautilus, the Nautilus logo, My Nautilus, Heart Strong, Changing the Game in Health and Fitness, REACT, ROC, Remote Operation...
Nautilus NS75X Reviews
We have not received any reviews for Nautilus yet.