

Owners Manual
Page 2
... logos. Table of their respective owners. 2 Assembly 3 Important Safety Instructions - Operation 14 Specifications 4 Features 17 Before Assembly 5 Operations 25 Tools 6 Maintenance 31 Hardware 6 Troubleshooting 36 Parts 7 Contacts 38 Assembly 8 Guide de Montage et du Propriétaire 39 Leveling the Machine 13 Patent Information This product may be covered by US and Foreign Patents and Patents Pending. © 2010 Nautilus, Inc., All rights reserved...
... logos. Table of their respective owners. 2 Assembly 3 Important Safety Instructions - Operation 14 Specifications 4 Features 17 Before Assembly 5 Operations 25 Tools 6 Maintenance 31 Hardware 6 Troubleshooting 36 Parts 7 Contacts 38 Assembly 8 Guide de Montage et du Propriétaire 39 Leveling the Machine 13 Patent Information This product may be covered by US and Foreign Patents and Patents Pending. © 2010 Nautilus, Inc., All rights reserved...
Owners Manual
Page 3
... machine into service until instructed to use genuine replacement parts can void the warranty. • If replacement parts are assembling at all warnings on this machine before first use only genuine Nautilus® replacement parts and hardware. This could result in accordance with the Owner's Manual. • Read and understand the complete Owner's Manual supplied with this machine. Obey the following warnings: Read and understand all times. • Do not connect power...
... machine into service until instructed to use genuine replacement parts can void the warranty. • If replacement parts are assembling at all warnings on this machine before first use only genuine Nautilus® replacement parts and hardware. This could result in accordance with the Owner's Manual. • Read and understand the complete Owner's Manual supplied with this machine. Obey the following warnings: Read and understand all times. • Do not connect power...

Owners Manual
Page 4
.../h 0-12% Component Specifications Frame, Folding Steel Motor 2.75 CHP DC Deck Size 20" x 55" / 51 x 140 cm Belt Heart Rate Monitor Heart Rate Chest Strap Display Built-In Fan 2 ply Contact, Telemetry Polar® Backlit LCD 3-speed Capacities Maximum User Weight Workout Programs Speed Range Elevation Range 350 lb / 158 kg 21 0.5-15 mph / 0.8-24.1 km/h 0-15% Component Specifications Frame, Folding Steel Motor 3.2 CHP DC Deck Size 20" x 58" / 51 x 147 cm Belt Heart Rate Monitor Heart Rate Chest Strap Display Built-In...
.../h 0-12% Component Specifications Frame, Folding Steel Motor 2.75 CHP DC Deck Size 20" x 55" / 51 x 140 cm Belt Heart Rate Monitor Heart Rate Chest Strap Display Built-In Fan 2 ply Contact, Telemetry Polar® Backlit LCD 3-speed Capacities Maximum User Weight Workout Programs Speed Range Elevation Range 350 lb / 158 kg 21 0.5-15 mph / 0.8-24.1 km/h 0-15% Component Specifications Frame, Folding Steel Motor 3.2 CHP DC Deck Size 20" x 58" / 51 x 147 cm Belt Heart Rate Monitor Heart Rate Chest Strap Display Built-In...
Owners Manual
Page 5
... a workout area of minimum 201" x 71" (5.1m x 1.8m). Do not connect the treadmill to loosen, unless instructed otherwise. 4. If they have the test and reset button, it is designed to plug into a grounded, non-GFI outlet only. To determine if your outlet or circuit breaker is GFI, look through the bolt holes to set up and operate your machine: 1. Collect...
... a workout area of minimum 201" x 71" (5.1m x 1.8m). Do not connect the treadmill to loosen, unless instructed otherwise. 4. If they have the test and reset button, it is designed to plug into a grounded, non-GFI outlet only. To determine if your outlet or circuit breaker is GFI, look through the bolt holes to set up and operate your machine: 1. Collect...

Owners Manual
Page 14
... locations. • Keep at any opening of this machine. Contact Nautilus® Customer Service for future reference. Read and understand all warnings on machine motor cover or front trim cover • Keep power cord away from the machine. Before using this machine outdoors or in your doctor before cleaning, maintaining or repairing this machine to persons, read and understand the complete Owner's Manual. Use the supplied foot support platforms for replacement...
... locations. • Keep at any opening of this machine. Contact Nautilus® Customer Service for future reference. Read and understand all warnings on machine motor cover or front trim cover • Keep power cord away from the machine. Before using this machine outdoors or in your doctor before cleaning, maintaining or repairing this machine to persons, read and understand the complete Owner's Manual. Use the supplied foot support platforms for replacement...

Owners Manual
Page 15
... not remove the machine motor cover, dangerous voltages are serviceable only by an approved technician before you operate this equipment or serious injury can cause serious injury or health problems. 1. Safety Warning Labels and Serial Number Type 1 WARNING Description Failure to use only. 7. The Maximum user Weight for safety by approved service personnel. • The electrical wiring for Residential use , read and understand the Owner's Manual, including...
... not remove the machine motor cover, dangerous voltages are serviceable only by an approved technician before you operate this equipment or serious injury can cause serious injury or health problems. 1. Safety Warning Labels and Serial Number Type 1 WARNING Description Failure to use only. 7. The Maximum user Weight for safety by approved service personnel. • The electrical wiring for Residential use , read and understand the Owner's Manual, including...

Owners Manual
Page 16
... pincer ou écraser Record serial number on Contacts page at end of this end - This means that is equipped with and/or being injured on the machine - Do not change the plug on the machine. Be sure to your clothing during your workout. Always attach the Safety Key Clip to remove the Safety Key for this machine. Do not lift or...
... pincer ou écraser Record serial number on Contacts page at end of this end - This means that is equipped with and/or being injured on the machine - Do not change the plug on the machine. Be sure to your clothing during your workout. Always attach the Safety Key Clip to remove the Safety Key for this machine. Do not lift or...
Owners Manual
Page 18
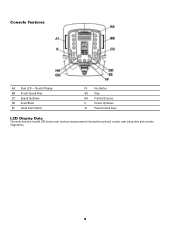
Backlit Display BB Preset Speed Keys CC Speed Up/Down DD Enter/Reset EE Quick Start (Start) FF Fan Button GG Stop HH Profiles/Courses II Incline Up/Down JJ Preset Incline Keys LCD Display Data The multi-function, backlit LCD shows your workout measurements (during the workout), results, user setup data and console diagnostics. 18 Console Features AA Dual LCD -
Backlit Display BB Preset Speed Keys CC Speed Up/Down DD Enter/Reset EE Quick Start (Start) FF Fan Button GG Stop HH Profiles/Courses II Incline Up/Down JJ Preset Incline Keys LCD Display Data The multi-function, backlit LCD shows your workout measurements (during the workout), results, user setup data and console diagnostics. 18 Console Features AA Dual LCD -
Owners Manual
Page 20
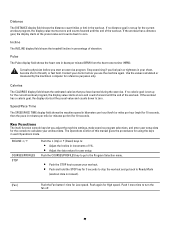
... your chest, become short of breath, or feel pain or tightness in each Operations mode. Calories The CALORIES display field shows the estimated calories that you adjust the machine settings, make exercise program selections, and enter user setup data for the console to calculate your workout. • Push and hold the STOP key for user setup. Speed/Pace Time The SPEED/PACE TIME display field shows the machine speed in kilometers...
... your chest, become short of breath, or feel pain or tightness in each Operations mode. Calories The CALORIES display field shows the estimated calories that you adjust the machine settings, make exercise program selections, and enter user setup data for the console to calculate your workout. • Push and hold the STOP key for user setup. Speed/Pace Time The SPEED/PACE TIME display field shows the machine speed in kilometers...
Owners Manual
Page 21
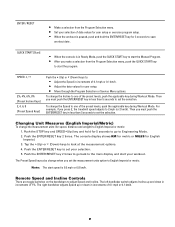
... display and start speed is 0.5 mph or 0.8 km/h. Push the ENTER/RESET key 2 times. Remote Speed and Incline Controls There are toggle switches on the handlebars to look at the measurement options. 4. ENTER / RESET • Make a selection from the Program Selection menu. • Set your selection of data values for user setup or exercise program setup. • When the workout is in Ready Mode, push the QUICK START key to start the Manual Program...
... display and start speed is 0.5 mph or 0.8 km/h. Push the ENTER/RESET key 2 times. Remote Speed and Incline Controls There are toggle switches on the handlebars to look at the measurement options. 4. ENTER / RESET • Make a selection from the Program Selection menu. • Set your selection of data values for user setup or exercise program setup. • When the workout is in Ready Mode, push the QUICK START key to start the Manual Program...

Owners Manual
Page 22
... (BPM). Adjust the strap length to fit snugly and comfortably against your exercise. Attach the transmitter to keep your hands free during your doctor before using a wireless chest strap or other telemetric heart rate monitor. The heart rate transmitter is also included. Chest Strap Using the heart rate transmitter chest strap lets you have a pacemaker or other implanted electronic device, consult your workout. The Console shows your workout. A Heart Rate Chest Strap Transmitter is attached to a chest strap to the elastic chest strap.
... (BPM). Adjust the strap length to fit snugly and comfortably against your exercise. Attach the transmitter to keep your hands free during your doctor before using a wireless chest strap or other telemetric heart rate monitor. The heart rate transmitter is also included. Chest Strap Using the heart rate transmitter chest strap lets you have a pacemaker or other implanted electronic device, consult your workout. The Console shows your workout. A Heart Rate Chest Strap Transmitter is attached to a chest strap to the elastic chest strap.

Owners Manual
Page 23
... using an age related formula. Heart Rate Calculations Your maximum heart rate usually decreases from 220 Beats Per Minute (BPM) in the transmitter. Consult your physician for each year. Clean the chest strap regularly with your skin. As noted above, your optimal target rate may need further assistance, call your Nautilus® Representative. Individuals of what is more fat your body...
... using an age related formula. Heart Rate Calculations Your maximum heart rate usually decreases from 220 Beats Per Minute (BPM) in the transmitter. Consult your physician for each year. Clean the chest strap regularly with your skin. As noted above, your optimal target rate may need further assistance, call your Nautilus® Representative. Individuals of what is more fat your body...

Owners Manual
Page 25
... the walking belt. After each step in your chest, become short of the Safety Key Port, the treadmill turns off the treadmill, or when you feel faint. Put the power cord along the machine, to warm up a User profile, go to the On position. Walk slowly to keep clearance for your workout. 1. The maximum time is 99:59. Stop exercising if you change speed or incline. 5. If the key pulls...
... the walking belt. After each step in your chest, become short of the Safety Key Port, the treadmill turns off the treadmill, or when you feel faint. Put the power cord along the machine, to warm up a User profile, go to the On position. Walk slowly to keep clearance for your workout. 1. The maximum time is 99:59. Stop exercising if you change speed or incline. 5. If the key pulls...

Owners Manual
Page 26
... to Ready Mode and no workout data is saved. Push the STOP key for 5 minutes, the console goes back to a different program. The Program Display shows SELECT USER AGE and the TIME display flashes 30 (default age). The available range is set during setup. Note: Different machine models can push the ENTER/RESET key to go to Ready Mode. The data displays show average speed, total time, total distance and...
... to Ready Mode and no workout data is saved. Push the STOP key for 5 minutes, the console goes back to a different program. The Program Display shows SELECT USER AGE and the TIME display flashes 30 (default age). The available range is set during setup. Note: Different machine models can push the ENTER/RESET key to go to Ready Mode. The data displays show average speed, total time, total distance and...

Owners Manual
Page 29
... programs use the default calorie setting (500 Kcal), and start the workout. You can push the QUICK START key to find the CUSTOM USER options (CUSTOM USER 1, etc.) Note: Different machine models can edit your age and other columns. 4. Then push the QUICK START key to work correctly. To use from a Heart Rate Monitor (HRM) chest strap. Adjust the value for the HRC program to start the TIME setup. Push the ENTER/RESET key to start the workout...
... programs use the default calorie setting (500 Kcal), and start the workout. You can push the QUICK START key to find the CUSTOM USER options (CUSTOM USER 1, etc.) Note: Different machine models can edit your age and other columns. 4. Then push the QUICK START key to work correctly. To use from a Heart Rate Monitor (HRM) chest strap. Adjust the value for the HRC program to start the TIME setup. Push the ENTER/RESET key to start the workout...

Owners Manual
Page 30
... START key to exercise in your user profile. It may overestimate body fat in your user profile. Or you can push the QUICK START key to adjust your workout: 1. You can push ENTER/RESET to use the calculated heart rate and the default time period, and start the workout. Then push the QUICK START key to start the workout, or push ENTER/RESET to adjust your workout: 1. You can push ENTER/RESET to continue program setup...
... START key to exercise in your user profile. It may overestimate body fat in your user profile. Or you can push the QUICK START key to adjust your workout: 1. You can push ENTER/RESET to use the calculated heart rate and the default time period, and start the workout. Then push the QUICK START key to start the workout, or push ENTER/RESET to adjust your workout: 1. You can push ENTER/RESET to continue program setup...

Owners Manual
Page 31
... not slip. 31 Prevent getting too much moisture to turn the right and left tension bolts 1/2 turn, first one bolt and then the other bolt until the repair is done. Wipe the treadmill down after 50 hours-Lubricate the walking belt. It may be replaced immediately or the equipment removed from the belt, painted parts and the display. Use a damp cloth to 3 mph. 2. Use a 6 mm hex key to the Console.
... not slip. 31 Prevent getting too much moisture to turn the right and left tension bolts 1/2 turn, first one bolt and then the other bolt until the repair is done. Wipe the treadmill down after 50 hours-Lubricate the walking belt. It may be replaced immediately or the equipment removed from the belt, painted parts and the display. Use a damp cloth to 3 mph. 2. Use a 6 mm hex key to the Console.

Owners Manual
Page 33
... Power Switch is turned Off, and disconnect the power cord. Make sure that is easy to you use a degreaser like WD-40® as this manual). These parts do not lock in use the walking belt or rear roller to one side of your treadmill makes movement of the machine easier and reduces the amount of slipping, be sure the deck area is free from the machine. Lubricate the belt...
... Power Switch is turned Off, and disconnect the power cord. Make sure that is easy to you use a degreaser like WD-40® as this manual). These parts do not lock in use the walking belt or rear roller to one side of your treadmill makes movement of the machine easier and reduces the amount of slipping, be sure the deck area is free from the machine. Lubricate the belt...

Owners Manual
Page 36
... Console operation. 6. Damage to its new location. This can occur. NOTICE: Move the machine carefully so that it is not accurate Unit operates but Contact HR not displayed or E4 error occurs Troubleshooting Things to Check Outlet Power cord not plugged in Power switch turned off Safety key not plugged in this manual.) Change display to lift or move the treadmill. Condition/Problem Unit does not power up/turn on/start Speed display is on. Remove Safety Key...
... Console operation. 6. Damage to its new location. This can occur. NOTICE: Move the machine carefully so that it is not accurate Unit operates but Contact HR not displayed or E4 error occurs Troubleshooting Things to Check Outlet Power cord not plugged in Power switch turned off Safety key not plugged in this manual.) Change display to lift or move the treadmill. Condition/Problem Unit does not power up/turn on/start Speed display is on. Remove Safety Key...

Owners Manual
Page 37
... a Pulse Simulator and does not receive the signal, contact Customer Care for adjusting tension and aligning the belt in this manual. HR cable connection at Console Sensor grip Dry or calloused hands No Heart Rate display while using chest strap Transmitter contact with skin Electromagnetic interference Chest strap transmitter HR receiver Walking belt not aligned Machine leveling Walking belt tension and alignment Motor sounds strained or E1 error occurs Silicone lubrication on the chest strap. Refer...
... a Pulse Simulator and does not receive the signal, contact Customer Care for adjusting tension and aligning the belt in this manual. HR cable connection at Console Sensor grip Dry or calloused hands No Heart Rate display while using chest strap Transmitter contact with skin Electromagnetic interference Chest strap transmitter HR receiver Walking belt not aligned Machine leveling Walking belt tension and alignment Motor sounds strained or E1 error occurs Silicone lubrication on the chest strap. Refer...


