
English Manual
Page 1
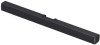
32" Soundbar with Bluetooth MODEL:NHS-2012A PLEASE READ CAREFULLY BEFORE OPERATING THIS EQUIPMENT KEEP IT IN A SAFE PLACE FOR FUTURE REFERENCE
32" Soundbar with Bluetooth MODEL:NHS-2012A PLEASE READ CAREFULLY BEFORE OPERATING THIS EQUIPMENT KEEP IT IN A SAFE PLACE FOR FUTURE REFERENCE

English Manual
Page 2
... OPEN CAUTION: TO REDUCE THE ELECTRIC SHOCK, DO NOT REMOVE THE COVER (OR BACK). NO USER SERVICEABLE PART INSIDE, REFER SERVICING TO QUALIFIED SERVICE PERSONNEL. WARNING:TO PREVENT FIRE OR SHOCK HAZARD, DO NOT EXPOSE THIS UNIT TO RAIN OR MOISTURE. This equipment generates, uses and can radiate radio frequency energy and, if not installed and used in a particular installation. DANGEROUS VOLTAGE:The lighting...
... OPEN CAUTION: TO REDUCE THE ELECTRIC SHOCK, DO NOT REMOVE THE COVER (OR BACK). NO USER SERVICEABLE PART INSIDE, REFER SERVICING TO QUALIFIED SERVICE PERSONNEL. WARNING:TO PREVENT FIRE OR SHOCK HAZARD, DO NOT EXPOSE THIS UNIT TO RAIN OR MOISTURE. This equipment generates, uses and can radiate radio frequency energy and, if not installed and used in a particular installation. DANGEROUS VOLTAGE:The lighting...

English Manual
Page 3
.... The antenna(s) used near a bath tub, washbowl, kitchen sink, laundry tub, in conjunction with part 15 of at least 20 cm from that these instructions All the safety and operating instructions should be adhered to. (4) Follow all operating instruction carefully, please note that to which the receiver is connected. Consult the dealer or an experienced radio/TV technician for...
.... The antenna(s) used near a bath tub, washbowl, kitchen sink, laundry tub, in conjunction with part 15 of at least 20 cm from that these instructions All the safety and operating instructions should be adhered to. (4) Follow all operating instruction carefully, please note that to which the receiver is connected. Consult the dealer or an experienced radio/TV technician for...
English Manual
Page 4
... and power-line surges. (14) Refer all servicing to overturn. (13) Unplug this apparatus during lightning storms or when unused for replacement of the obsolete outlet. (10) Product the power cord from the apparatus. (11) Only use caution when moving the cart/apparatus combination to rain or moisture, does not operate normally, or has been dropped. 4 Slots and openings...
... and power-line surges. (14) Refer all servicing to overturn. (13) Unplug this apparatus during lightning storms or when unused for replacement of the obsolete outlet. (10) Product the power cord from the apparatus. (11) Only use caution when moving the cart/apparatus combination to rain or moisture, does not operate normally, or has been dropped. 4 Slots and openings...
English Manual
Page 5
... grounding electrodes. (20) Service Do not attempt to service this can fall into the product through openings as they may expose you are not sure of the type of power supply to your home, consult your appliance dealer or local power company. For products intended to operate from battery power, or other source, refer to the operation instructions. (16) Power lines An outside antenna system...
... grounding electrodes. (20) Service Do not attempt to service this can fall into the product through openings as they may expose you are not sure of the type of power supply to your home, consult your appliance dealer or local power company. For products intended to operate from battery power, or other source, refer to the operation instructions. (16) Power lines An outside antenna system...
English Manual
Page 6
a) When the power- supply cord or plug is provided to call the CATV system installer' s attention to Article 820- 40 of the NEC that provides guidelines for proper grounding and, in particular, specifies that are required, be sure the service technician uses replacement parts specified by the manufacturer or those controls that the cable ground shall be mounted to a wall or ceiling only as recommended...
a) When the power- supply cord or plug is provided to call the CATV system installer' s attention to Article 820- 40 of the NEC that provides guidelines for proper grounding and, in particular, specifies that are required, be sure the service technician uses replacement parts specified by the manufacturer or those controls that the cable ground shall be mounted to a wall or ceiling only as recommended...

English Manual
Page 7
PLACEMENT AND MOUNTING 1. If the Sound Bar is enclosed in a tight space, without ventilation, heat generated from the Sound Bar could produce a potential heat hazard. 7 Placing the device on an entertainment center, bookshelf, or any type of enclosed space, be sure to allow at least 2-3 inches of space around the Sound Bar for ventilation. Ventilation When placing the Sound Bar on table -
PLACEMENT AND MOUNTING 1. If the Sound Bar is enclosed in a tight space, without ventilation, heat generated from the Sound Bar could produce a potential heat hazard. 7 Placing the device on an entertainment center, bookshelf, or any type of enclosed space, be sure to allow at least 2-3 inches of space around the Sound Bar for ventilation. Ventilation When placing the Sound Bar on table -

English Manual
Page 8
... of the mounting screws on wall with a powerful electric drill. Put the sound bar onto the mounting screws. C. E. Drill 2 holes on the wall using a pencil. D. Mark the position of the mounting screws on the wall and leave approx. 0.3 inches length to a brick wall 27.6 inches (screws and plastic fixing plugs are firm and stable. 8 C. Put the sound bar onto the mounting screws. B. 2.1 Mounting to hook the sound bar. Make sure they...
... of the mounting screws on wall with a powerful electric drill. Put the sound bar onto the mounting screws. C. E. Drill 2 holes on the wall using a pencil. D. Mark the position of the mounting screws on the wall and leave approx. 0.3 inches length to a brick wall 27.6 inches (screws and plastic fixing plugs are firm and stable. 8 C. Put the sound bar onto the mounting screws. B. 2.1 Mounting to hook the sound bar. Make sure they...

English Manual
Page 9
Play/Pause Button 9. DC IN Jack Top View Standby /Source Play /Pause Vol- Standby/Source Button 7. Speaker Rear View 2. Remote Sensor 3. Vol+ 6. Front View LOCATION OF CONTROLS 1. AUX IN Jack 5. Volume Up Button 8. Speaker AUXI N DC 9 V 4. Volume Down Button 9 Indicator 3.
Play/Pause Button 9. DC IN Jack Top View Standby /Source Play /Pause Vol- Standby/Source Button 7. Speaker Rear View 2. Remote Sensor 3. Vol+ 6. Front View LOCATION OF CONTROLS 1. AUX IN Jack 5. Volume Up Button 8. Speaker AUXI N DC 9 V 4. Volume Down Button 9 Indicator 3.
English Manual
Page 10
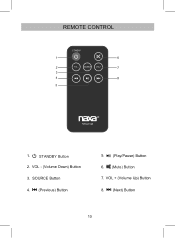
REMOTE CONTROL S ANDB 1 6 2 7 3 4 8 5 NHS-2012A 1. STANDBY Button 2. VOL + (Volume Up) Button 8. (Next) Button 10 SOURCE Button 4. (Previous) Button 5. (Play/Pause) Button 6. (Mute) Button 7. VOL - (Volume Down) Button 3.
REMOTE CONTROL S ANDB 1 6 2 7 3 4 8 5 NHS-2012A 1. STANDBY Button 2. VOL + (Volume Up) Button 8. (Next) Button 10 SOURCE Button 4. (Previous) Button 5. (Play/Pause) Button 6. (Mute) Button 7. VOL - (Volume Down) Button 3.
English Manual
Page 11
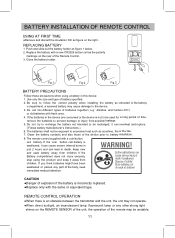
... intended to follow the correct polarity when installing the battery as figure on the rear of explosion if the battery is not to battery installation. 8. Keep new and used for a long period of batteries together ( e.g: Alkaline and Carbon -zinc ) or old batteries with a coin/button cell battery. REPLACING BATTERY 1. Replace the battery with the same or equivalent type. The remote control supplied with fresh ones. 4. Push and slide out...
... intended to follow the correct polarity when installing the battery as figure on the rear of explosion if the battery is not to battery installation. 8. Keep new and used for a long period of batteries together ( e.g: Alkaline and Carbon -zinc ) or old batteries with a coin/button cell battery. REPLACING BATTERY 1. Replace the battery with the same or equivalent type. The remote control supplied with fresh ones. 4. Push and slide out...

English Manual
Page 12
... light and the unit is in standby mode. 12 During Playback: ~ Press the Vol- GENERAL OPERATION 1. Press the Standby/Source button on the unit or press the SOURCE button on the Remote Control to turn to desired mode. or Vol+ button on unit or remote control to adjust the volume. ~ Press the ( Mute ) button on remote control repeatedly to switch to : Blue Bluetooth Mode Violet (blue+red AUX Mode 3. Connect the AC/DC adapter...
... light and the unit is in standby mode. 12 During Playback: ~ Press the Vol- GENERAL OPERATION 1. Press the Standby/Source button on the unit or press the SOURCE button on the Remote Control to turn to desired mode. or Vol+ button on unit or remote control to adjust the volume. ~ Press the ( Mute ) button on remote control repeatedly to switch to : Blue Bluetooth Mode Violet (blue+red AUX Mode 3. Connect the AC/DC adapter...
English Manual
Page 13
... the Bluetooth mode, as stated above . 2. Press again to pause. Power on the external Bluetooth device and set Bluetooth to adjust volume level. During playing: ~ Press the or button on remote control to skip tracks. ~ Press the button on remote control or the Play/Pause button on the unit as below: 1. Activate the Bluetooth function on remote control repeatedly until the unit automatically connected to the user's manual of your Bluetooth device.) 4. When " NAXA NHS-2012A...
... the Bluetooth mode, as stated above . 2. Press again to pause. Power on the external Bluetooth device and set Bluetooth to adjust volume level. During playing: ~ Press the or button on remote control to skip tracks. ~ Press the button on remote control or the Play/Pause button on the unit as below: 1. Activate the Bluetooth function on remote control repeatedly until the unit automatically connected to the user's manual of your Bluetooth device.) 4. When " NAXA NHS-2012A...

English Manual
Page 14
... external (Auxiliary) audio source (ie.,personal CD player or MP3 player) can be connected to Violet (blue + red), and a voice tone sounds "AUX Mode". 5. Power on the Remote Control repeatedly until the color of the external audio source. Plug the otehr end of the Aux In cable into the AUX IN jack on the connected external player and start playing as previously explained. 4. Press the Standby/Source button on...
... external (Auxiliary) audio source (ie.,personal CD player or MP3 player) can be connected to Violet (blue + red), and a voice tone sounds "AUX Mode". 5. Power on the Remote Control repeatedly until the color of the external audio source. Plug the otehr end of the Aux In cable into the AUX IN jack on the connected external player and start playing as previously explained. 4. Press the Standby/Source button on...
English Manual
Page 15
... playing mode Play music/movie in the paired/ connected device as the procedures stated in standby mode Press and hold Standby/Source button on the unit or press button on remote control to turn on the Remote Control repeatedly to set the input source to the desired mode. The paired/connected device is in this manual. 15 Reduce the volume level of it is weak Replace with the BT Device as usual and make...
... playing mode Play music/movie in the paired/ connected device as the procedures stated in standby mode Press and hold Standby/Source button on the unit or press button on remote control to turn on the Remote Control repeatedly to set the input source to the desired mode. The paired/connected device is in this manual. 15 Reduce the volume level of it is weak Replace with the BT Device as usual and make...
English Manual
Page 16
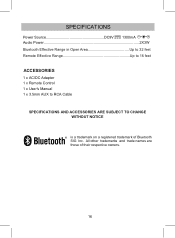
All other trademarks and trade names are those of Bluetooth SIG Inc. SPECIFICATIONS Power Source DC9V 1300mA Audio Power 2X3W Bluetooth Effective Range in Open Area Up to 32 feet Remote Effective Range Up to 16 feet ACCESSORIES 1 x AC/DC Adapter 1 x Remote Control 1 x User's Manual 1 x 3.5mm AUX to RCA Cable SPECIFICATIONS AND ACCESSORIES ARE SUBJECT TO CHANGE WITHOUT NOTICE is a trademark on a registered trademark of their respective owners. 16
All other trademarks and trade names are those of Bluetooth SIG Inc. SPECIFICATIONS Power Source DC9V 1300mA Audio Power 2X3W Bluetooth Effective Range in Open Area Up to 32 feet Remote Effective Range Up to 16 feet ACCESSORIES 1 x AC/DC Adapter 1 x Remote Control 1 x User's Manual 1 x 3.5mm AUX to RCA Cable SPECIFICATIONS AND ACCESSORIES ARE SUBJECT TO CHANGE WITHOUT NOTICE is a trademark on a registered trademark of their respective owners. 16


