NPB-266 manual - English
Page 1
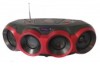
MP3/CD/USB Boombox with Bluetooth® NPB-266 Instruction Manual Please read carefully before use and keep for future reference.
MP3/CD/USB Boombox with Bluetooth® NPB-266 Instruction Manual Please read carefully before use and keep for future reference.

NPB-266 manual - English
Page 2
... Playing a Disc 11 Selecting a Desired Track/Passage 11 Programming Tracks 12 Repeat Play Modes 12 Power Source 7 Listening to USB 13 AC Power 7 About USB Drives 13 Battery Power 7 USB Operation 13 Basic Functions 8 Switching the Unit On/Off 8 Setting the Function Mode 8 Adjusting the Volume 8 Choosing an Equalizer Preset 8 ID3 Tag Display 9 Headphone Jack 9 Bluetooth® Operation 14 AUX-In Operation 15 Warnings and Precautions 16 Specifications 20 Using the Radio 9 Tuning to Radio Stations 9 Radio Auto Scan (Search 10 Radio Preset Station Memory 10 Support...
... Playing a Disc 11 Selecting a Desired Track/Passage 11 Programming Tracks 12 Repeat Play Modes 12 Power Source 7 Listening to USB 13 AC Power 7 About USB Drives 13 Battery Power 7 USB Operation 13 Basic Functions 8 Switching the Unit On/Off 8 Setting the Function Mode 8 Adjusting the Volume 8 Choosing an Equalizer Preset 8 ID3 Tag Display 9 Headphone Jack 9 Bluetooth® Operation 14 AUX-In Operation 15 Warnings and Precautions 16 Specifications 20 Using the Radio 9 Tuning to Radio Stations 9 Radio Auto Scan (Search 10 Radio Preset Station Memory 10 Support...
NPB-266 manual - English
Page 3
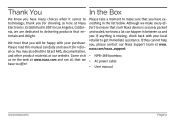
...make sure that each Naxa device is missing, check back with your local retailer to get immediate assistance. If they cannot help you, please contact our Naxa Support team at our website. thank you for reference. You may also find the latest FAQ, documentation, and other product material at www. Please read this manual... choosing us on the web at Naxa Electronics. naxa.com/naxa_support. •• NPB-266 boombox •• AC power cable •• User manual www.naxa.com Page 3 Although we know you have to delivering products that you will be happy with ...
...make sure that each Naxa device is missing, check back with your local retailer to get immediate assistance. If they cannot help you, please contact our Naxa Support team at our website. thank you for reference. You may also find the latest FAQ, documentation, and other product material at www. Please read this manual... choosing us on the web at Naxa Electronics. naxa.com/naxa_support. •• NPB-266 boombox •• AC power cable •• User manual www.naxa.com Page 3 Although we know you have to delivering products that you will be happy with ...

NPB-266 manual - English
Page 4
... battery types, e.g. The incorrect use of other stereo equipment that are humid or moist. •• Operate turning controls and switches as instructed in locations described be used again for a long period. alkaline with zinc carbonate. •• When inserting new batteries, replace all batteries at the same time. •• Before turning on top of batteries can cause electrolyte leakage and will not be - NO USER SERVICEABLE PARTS...
... battery types, e.g. The incorrect use of other stereo equipment that are humid or moist. •• Operate turning controls and switches as instructed in locations described be used again for a long period. alkaline with zinc carbonate. •• When inserting new batteries, replace all batteries at the same time. •• Before turning on top of batteries can cause electrolyte leakage and will not be - NO USER SERVICEABLE PARTS...
NPB-266 manual - English
Page 5
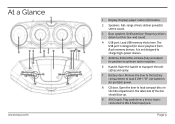
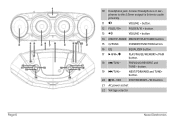
... low-end sound. 4 USB port. Open the door to this 3.5mm input jack. Play audio from flash memory devices. Page 5 Raise the handle to charge high-power devices. 5 Antenna. It is not designed to transport the unit safely and easily. 7 Battery door. The label side of the disc should face up. 9 AUX In jack. At a Glance ! Extend the antenna fully and adjust its position to load 8 UM-1 "D" size batteries for music playback from a device...
... low-end sound. 4 USB port. Open the door to this 3.5mm input jack. Play audio from flash memory devices. Page 5 Raise the handle to charge high-power devices. 5 Antenna. It is not designed to transport the unit safely and easily. 7 Battery door. The label side of the disc should face up. 9 AUX In jack. At a Glance ! Extend the antenna fully and adjust its position to load 8 UM-1 "D" size batteries for music playback from a device...
NPB-266 manual - English
Page 6
STANDBY/FUNCTION button. 16 EQ EQUALIZER button. 17 /M+/ PLAY/PAUSE/MEMORY+/PAIR button. 18 /TUN.- button. 12 FOLD./10+ FOLDER/10 + button. 13 VOLUME + button 14 MEM/P-MODE MEMORY/PLAY MODE button. 15 /FUNC. ! PREVIOUS/REVERSE and TUNE- button. 19 /TUN.+ NEXT/FORWARD and TUNE+ button. 20 /M-/ID3 STOP/MEMORY-/ID3 button. 21 AC power socket 22 Voltage selector Naxa Electronics Connect headphones or earphones to this 3.5mm output to listen to audio privately. 11 VOLUME - Page 6 10 Headphone jack.
STANDBY/FUNCTION button. 16 EQ EQUALIZER button. 17 /M+/ PLAY/PAUSE/MEMORY+/PAIR button. 18 /TUN.- button. 12 FOLD./10+ FOLDER/10 + button. 13 VOLUME + button 14 MEM/P-MODE MEMORY/PLAY MODE button. 15 /FUNC. ! PREVIOUS/REVERSE and TUNE- button. 19 /TUN.+ NEXT/FORWARD and TUNE+ button. 20 /M-/ID3 STOP/MEMORY-/ID3 button. 21 AC power socket 22 Voltage selector Naxa Electronics Connect headphones or earphones to this 3.5mm output to listen to audio privately. 11 VOLUME - Page 6 10 Headphone jack.
NPB-266 manual - English
Page 7
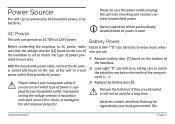
... plug this unit into is working and receives constant (unswitched) power. Battery Power Install 8 UM-1 "D" size batteries to enjoy music wherever you are. 1) Remove battery door [7] found on the bottom of the boombox. 2) Load eight "D" size batteries, taking care to AC power, make sure that may be powered by AC household power, or by your household outlet. Power Source The unit can operate on AC 110 V or 220 V power. Before connecting...
... plug this unit into is working and receives constant (unswitched) power. Battery Power Install 8 UM-1 "D" size batteries to enjoy music wherever you are. 1) Remove battery door [7] found on the bottom of the boombox. 2) Load eight "D" size batteries, taking care to AC power, make sure that may be powered by AC household power, or by your household outlet. Power Source The unit can operate on AC 110 V or 220 V power. Before connecting...
NPB-266 manual - English
Page 8
...-audio or CD-MP3). •• USB: Play MP3s from the boombox when you want to use the batteries if the power cable is on, press the /FUNC. Page 8 Naxa Electronics Disconnect the cable from USB memory sticks. button [15] to the AC power socket. LLThe boombox will be shown on the display when you turn the unit ON or OFF. Setting the Function Mode While the boombox is connected...
...-audio or CD-MP3). •• USB: Play MP3s from the boombox when you want to use the batteries if the power cable is on, press the /FUNC. Page 8 Naxa Electronics Disconnect the cable from USB memory sticks. button [15] to the AC power socket. LLThe boombox will be shown on the display when you turn the unit ON or OFF. Setting the Function Mode While the boombox is connected...
NPB-266 manual - English
Page 9
... to turn the ID3 tag display on the FM band, fully extend the telescopic antenna and adjust its orientation. ID3 Tag Display Some MP3 files are connected. When the ID3 tag display is shown on , the unit will be best when the boombox is called an "ID3 tag". ⚠⚠Using headphones for AM stations, gently reposition the boombox. Tuning to Radio Stations 1.
... to turn the ID3 tag display on the FM band, fully extend the telescopic antenna and adjust its orientation. ID3 Tag Display Some MP3 files are connected. When the ID3 tag display is shown on , the unit will be best when the boombox is called an "ID3 tag". ⚠⚠Using headphones for AM stations, gently reposition the boombox. Tuning to Radio Stations 1.
NPB-266 manual - English
Page 10
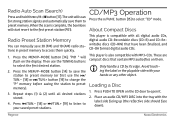
... CD-DA format digital audio CDs. CD/MP3 Operation Press the /FUNC. "P01 " will start revert to open it. 2. Radio Auto Scan (Search) Press and hold the /M+/ button [17]. Press the MEM/P-MODE button [14] to save them to select "CD" mode. The unit will scan for strong station signals and automatically save the station to preset memory (or first use the TUNING buttons to preset memory). 3. button [15] to preset memory. Then use the...
... CD-DA format digital audio CDs. CD/MP3 Operation Press the /FUNC. "P01 " will start revert to open it. 2. Radio Auto Scan (Search) Press and hold the /M+/ button [17]. Press the MEM/P-MODE button [14] to save them to select "CD" mode. The unit will scan for strong station signals and automatically save the station to preset memory (or first use the TUNING buttons to preset memory). 3. button [15] to preset memory. Then use the...
NPB-266 manual - English
Page 11
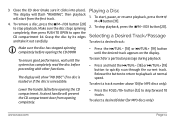
... other functions. 3. To ensure good performance, wait until the desired track appears on the display. To stop playback. The display will start , pause, or resume playback, press the / M+/ button [17]. 2. The display will flash "READING", then playback will show "NO DISC" if no disc is loaded or if the disc is unreadable. To remove a disc, press the /M-/ID3 button [20] to playback at normal speed. Close the CD door (make...
... other functions. 3. To ensure good performance, wait until the desired track appears on the display. To stop playback. The display will start , pause, or resume playback, press the / M+/ button [17]. 2. The display will flash "READING", then playback will show "NO DISC" if no disc is loaded or if the disc is unreadable. To remove a disc, press the /M-/ID3 button [20] to playback at normal speed. Close the CD door (make...
NPB-266 manual - English
Page 12
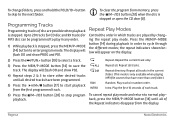
... folder. (This mode is only available when playing MP3 file sources that have been programmed. 5) Press the /M+/ button [17] to start playback from memory, press the /M-/ID3 button [20] when the disc is stopped or open the CD door [8]. Repeat. To cancel repeat play mode and return to enter program mode. Up to 20 tracks for CD disc and 99 tracks for MP3 disc can be programmed to play mode. Repeat all . The display...
... folder. (This mode is only available when playing MP3 file sources that have been programmed. 5) Press the /M+/ button [17] to start playback from memory, press the /M-/ID3 button [20] when the disc is stopped or open the CD door [8]. Repeat. To cancel repeat play mode and return to enter program mode. Up to 20 tracks for CD disc and 99 tracks for MP3 disc can be programmed to play mode. Repeat all . The display...
NPB-266 manual - English
Page 13
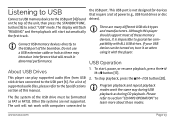
... the USB port [4]. The file system of these modes. www.naxa.com Page 13 Although this manual. To stop playback, press the /M-/ID3 button [20]. The unit will not work the same way during CD playback. LLThere are not supported. If your USB device can play supported audio files from USB stick drives connected to select "USB" mode. LLProgram playback and repeat playback modes work with the player. the USB port. To start automatically the first track. The display will flash "READING...
... the USB port [4]. The file system of these modes. www.naxa.com Page 13 Although this manual. To stop playback, press the /M-/ID3 button [20]. The unit will not work the same way during CD playback. LLThere are not supported. If your USB device can play supported audio files from USB stick drives connected to select "USB" mode. LLProgram playback and repeat playback modes work with the player. the USB port. To start automatically the first track. The display will flash "READING...
NPB-266 manual - English
Page 14
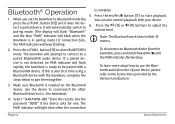
... /FUNC. Make sure Bluetooth is in pairing mode.) If connection fails, the PAIR indicator will blink when the Boombox is enabled on the Bluetooth device. Select " NAXA NPB-266 " from the boombox, press and hold the /M+/ until the PAIR indicator flashes blue. button [15]) and it does not detect a paired device, it will automatically switch to a paired Bluetooth® audio device. Bluetooth® Operation 1. When you set the Boombox to the instructions provided by...
... /FUNC. Make sure Bluetooth is in pairing mode.) If connection fails, the PAIR indicator will blink when the Boombox is enabled on the Bluetooth device. Select " NAXA NPB-266 " from the boombox, press and hold the /M+/ until the PAIR indicator flashes blue. button [15]) and it does not detect a paired device, it will automatically switch to a paired Bluetooth® audio device. Bluetooth® Operation 1. When you set the Boombox to the instructions provided by...
NPB-266 manual - English
Page 15
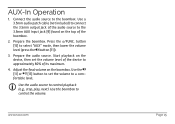
... the audio source. Use a 3.5mm audio patch cable (not included) to connect the 3.5mm output jack of the audio source to the 3.5mm AUX Input jack [9] found on the top of its maximum. 4. Prepare the boombox. Start playback on the boombox. Use the boombox to select "AUX" mode, then lower the volume level (press the button [11]). 3. Press the /FUNC. button [15] to control the volume. Connect the audio source to control playback (e.g., stop, play, next). Use...
... the audio source. Use a 3.5mm audio patch cable (not included) to connect the 3.5mm output jack of the audio source to the 3.5mm AUX Input jack [9] found on the top of its maximum. 4. Prepare the boombox. Start playback on the boombox. Use the boombox to select "AUX" mode, then lower the volume level (press the button [11]). 3. Press the /FUNC. button [15] to control the volume. Connect the audio source to control playback (e.g., stop, play, next). Use...
NPB-266 manual - English
Page 16
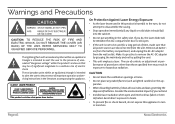
... use of controls or adjustment or performance of time, make sure that may result in exposure to disassemble the casing. • Stop operation immediately if any naked flames (such as lighted candles) on the apparatus. • When discarding batteries, follow all local rules and laws governing the disposal of important operation and servicing instructions in this product is intended to alert the user to...
... use of controls or adjustment or performance of time, make sure that may result in exposure to disassemble the casing. • Stop operation immediately if any naked flames (such as lighted candles) on the apparatus. • When discarding batteries, follow all local rules and laws governing the disposal of important operation and servicing instructions in this product is intended to alert the user to...

NPB-266 manual - English
Page 17
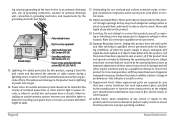
... plug is operated. 2. www.naxa.com Page 17 Follow Instructions: All operating and usage instructions should be routed so that has the same overload protection as the original plug as a bookcase or rack unless proper ventilation is a safety feature. Do not use a mounting accessory recommended by placing the product on the rating label. Power-Cord Protection: Power supply cords should be operated only from battery power...
... plug is operated. 2. www.naxa.com Page 17 Follow Instructions: All operating and usage instructions should be routed so that has the same overload protection as the original plug as a bookcase or rack unless proper ventilation is a safety feature. Do not use a mounting accessory recommended by placing the product on the rating label. Power-Cord Protection: Power supply cords should be operated only from battery power...
NPB-266 manual - English
Page 18
... or have fallen into such power lines or circuits. Page 18 Naxa Electronics Object and Liquid Entry: Never push objects of any service or repairs to this product yourself as they may result in fire, electric shock, or other hazards. Refer all servicing to ensure that your service technician has used replacement parts specified by the operating instructions as contact with them...
... or have fallen into such power lines or circuits. Page 18 Naxa Electronics Object and Liquid Entry: Never push objects of any service or repairs to this product yourself as they may result in fire, electric shock, or other hazards. Refer all servicing to ensure that your service technician has used replacement parts specified by the operating instructions as contact with them...
NPB-266 manual - English
Page 19
... an experienced radio/TV technician for a Class B digital device, pursuant to try reversing the plug. Do not attempt to provide reasonable protection against harmful interference in a particular installation. GRAPHIC SYMBOLS WITH SUPPLEMENTARY MARKINGS ARE LOCATED ON THE BOTTOM OF THE UNIT. Do not alter the plug. www.naxa.com Page 19 CAUTION This product is equipped with the instructions, may...
... an experienced radio/TV technician for a Class B digital device, pursuant to try reversing the plug. Do not attempt to provide reasonable protection against harmful interference in a particular installation. GRAPHIC SYMBOLS WITH SUPPLEMENTARY MARKINGS ARE LOCATED ON THE BOTTOM OF THE UNIT. Do not alter the plug. www.naxa.com Page 19 CAUTION This product is equipped with the instructions, may...
NPB-266 manual - English
Page 20
Specifications Support Power requirements Power (operating) Power (standby) Media Support Media Formats Wireless Source Receiving Bands Tuning Range Input AC 120 V ~60 Hz DC 9 V (6 x UM-2 "C" batteries) 12 W
Specifications Support Power requirements Power (operating) Power (standby) Media Support Media Formats Wireless Source Receiving Bands Tuning Range Input AC 120 V ~60 Hz DC 9 V (6 x UM-2 "C" batteries) 12 W

