
English manual
Page 1
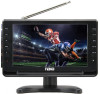
9" Portable TV & Digital Multimedia Player NT-90A Instruction Manual Please read carefully before use and keep for future reference.
9" Portable TV & Digital Multimedia Player NT-90A Instruction Manual Please read carefully before use and keep for future reference.
English manual
Page 2
Table of Contents Thank You 3 In the Box 3 Before Your Start 4 At a Glance 6 Main Unit 6 Remote Control 9 Basic Operation 10 Connect the Power Supply 10 Connect the Antenna 11 Connect an External A/V player 11 Setting the Input Source 12 Adjusting the Volume 12 Using the Number Keypad 12 TV Menu Operation 12 Channel 13 Picture...13 Sound...13 Time ...14 Option ...14 Lock ...15 Multimedia Interface 15 Photo Playback 15 Music Playback 15 Movie Playback 15 FM Radio Receiving 16 W recautions 17 specifications 21 Support 21 Page 2 Naxa Electronics
Table of Contents Thank You 3 In the Box 3 Before Your Start 4 At a Glance 6 Main Unit 6 Remote Control 9 Basic Operation 10 Connect the Power Supply 10 Connect the Antenna 11 Connect an External A/V player 11 Setting the Input Source 12 Adjusting the Volume 12 Using the Number Keypad 12 TV Menu Operation 12 Channel 13 Picture...13 Sound...13 Time ...14 Option ...14 Lock ...15 Multimedia Interface 15 Photo Playback 15 Music Playback 15 Movie Playback 15 FM Radio Receiving 16 W recautions 17 specifications 21 Support 21 Page 2 Naxa Electronics

English manual
Page 3
...NT-90A Portable TV us on the web at www.naxa.com and see all that you . Please read this manual carefully and save it comes to ensure that you for refer- Please take a moment to offer! • Stand (option 2) • AC power adapter • DC car power cord • Antenna extension adapter • External antenna • A/V cable • Remote control • User manual www.naxa...You In the Box We know a lot can happen in between us here at Naxa Electronics. If they cannot help you have everything in Los Angeles, California, we make sure that each Naxa device is ...
...NT-90A Portable TV us on the web at www.naxa.com and see all that you . Please read this manual carefully and save it comes to ensure that you for refer- Please take a moment to offer! • Stand (option 2) • AC power adapter • DC car power cord • Antenna extension adapter • External antenna • A/V cable • Remote control • User manual www.naxa...You In the Box We know a lot can happen in between us here at Naxa Electronics. If they cannot help you have everything in Los Angeles, California, we make sure that each Naxa device is ...

English manual
Page 4
the operating temperature range of explosion if battery is 20°C to 60°C (-4°F to 140°F); Changes in accordance with the installation instructions. •• The mains plug is used to change without notice. The mains plug must be exposed to ...set to high humidity, dust or smoke (including auto exhaust). •• Do not throw or drop this apparatus must remain readily accessible and able to dripping or splashing liquids. Replace only with liquids, such as vases, shall be placed on the apparatus. •• No naked flame sources, such as lighted...
the operating temperature range of explosion if battery is 20°C to 60°C (-4°F to 140°F); Changes in accordance with the installation instructions. •• The mains plug is used to change without notice. The mains plug must be exposed to ...set to high humidity, dust or smoke (including auto exhaust). •• Do not throw or drop this apparatus must remain readily accessible and able to dripping or splashing liquids. Replace only with liquids, such as vases, shall be placed on the apparatus. •• No naked flame sources, such as lighted...

English manual
Page 5
... of thin film transistors that this device. Notice •• The panel used in a car, rough roads will turn it . •• Use a soft cloth to prevent distracted driving. This device contains many finely tuned electronic components but has no user serviceable parts inside. Obey all cables from this device before cleaning it off immediately and please contact us...
... of thin film transistors that this device. Notice •• The panel used in a car, rough roads will turn it . •• Use a soft cloth to prevent distracted driving. This device contains many finely tuned electronic components but has no user serviceable parts inside. Obey all cables from this device before cleaning it off immediately and please contact us...

English manual
Page 6
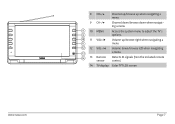
... Press to place it in standby mode. Make sure that the Master Power Switch [16] is set to view the Mode menu; At a Glance Main Unit 1 2 3 4 5 6 7 Page 6 1 Telescopic Antenna for TV reception antenna 2 MUTE Disable the sound. Press to turn the TV on or to leave a menu. 4 OK menu. 5 MODE Change the active source mode. Naxa Electronics press CH+/CH- Press to ON. 7 Charge Lights red when the TV is fully charged...
... Press to place it in standby mode. Make sure that the Master Power Switch [16] is set to view the Mode menu; At a Glance Main Unit 1 2 3 4 5 6 7 Page 6 1 Telescopic Antenna for TV reception antenna 2 MUTE Disable the sound. Press to turn the TV on or to leave a menu. 4 OK menu. 5 MODE Change the active source mode. Naxa Electronics press CH+/CH- Press to ON. 7 Charge Lights red when the TV is fully charged...
English manual
Page 7
www.naxa.com 8 CH+/ Channel up/browse up when navigating a menu 9 CH-/ Channel down/browse down when navigating a menu 8 10 MENU 9 Access the system menu to adjust the TV's options. 10 11 VOL+/ 11 Volume up/browse right when navigating a menu 12 12 VOL-/ 13 14 13 Remote sensor Volume down/browse left when navigating a menu Detects IR signals from the included remote control. 14 TV display Color TFT LCD screen Page 7
www.naxa.com 8 CH+/ Channel up/browse up when navigating a menu 9 CH-/ Channel down/browse down when navigating a menu 8 10 MENU 9 Access the system menu to adjust the TV's options. 10 11 VOL+/ 11 Volume up/browse right when navigating a menu 12 12 VOL-/ 13 14 13 Remote sensor Volume down/browse left when navigating a menu Detects IR signals from the included remote control. 14 TV display Color TFT LCD screen Page 7
English manual
Page 8
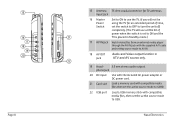
... OUT jack Audio and Video output function in Standby mode.) 17 AV IN jack Watch video files from an external media player through the AV IN jack with the included AC power adapter or DC power cord. Naxa Electronics If you will not be using the TV for TV antennas. phone jack 20 DC input 21 Card slot Use with the supplied A/V cable and setting source mode to USB. input jack 16 Master Power Switch Set to ON...
... OUT jack Audio and Video output function in Standby mode.) 17 AV IN jack Watch video files from an external media player through the AV IN jack with the included AC power adapter or DC power cord. Naxa Electronics If you will not be using the TV for TV antennas. phone jack 20 DC input 21 Card slot Use with the supplied A/V cable and setting source mode to USB. input jack 16 Master Power Switch Set to ON...

English manual
Page 9
... Radio , MEDIA) INFO View program information. OK Confirm button. EXIT AUDIO CC EPG P.MODE TTS CH.LIST FAV.LIST SLEEP Exit the system menu. Remote Control Power Power Switching Key. CH-/ VOL+/ VOL-/ Increase/decrease the volume level, respectively. View the channels in CARD or USB mode. Channel Keys Use the number keypad to the previous track. CH+/ Change the channel up /down , respectively. Voice prompt function On/Off View all the available channels. Change the closed-caption display modes. Set a sleep timer (max 240...
... Radio , MEDIA) INFO View program information. OK Confirm button. EXIT AUDIO CC EPG P.MODE TTS CH.LIST FAV.LIST SLEEP Exit the system menu. Remote Control Power Power Switching Key. CH-/ VOL+/ VOL-/ Increase/decrease the volume level, respectively. View the channels in CARD or USB mode. Channel Keys Use the number keypad to the previous track. CH+/ Change the channel up /down , respectively. Voice prompt function On/Off View all the available channels. Change the closed-caption display modes. Set a sleep timer (max 240...
English manual
Page 10
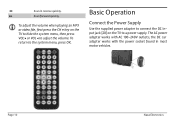
the DC car adapter works with AC 100-240V outlets; Scan forward quickly. Basic Operation Connect the Power Supply Use the supplied power adapter to connect the DC Input jack [20] on the TV to hide the system menu, then press VOL or VOL to a power supply. The AC power adapter works with the power socket found in reverse quickly. To adjust the volume when playing an MP3 key on the TV to adjust the volume. Page 10 Naxa Electronics To return to the system menu, press OK. Scan in most motor vehicles.
the DC car adapter works with AC 100-240V outlets; Scan forward quickly. Basic Operation Connect the Power Supply Use the supplied power adapter to connect the DC Input jack [20] on the TV to hide the system menu, then press VOL or VOL to a power supply. The AC power adapter works with the power socket found in reverse quickly. To adjust the volume when playing an MP3 key on the TV to adjust the volume. Page 10 Naxa Electronics To return to the system menu, press OK. Scan in most motor vehicles.
English manual
Page 11
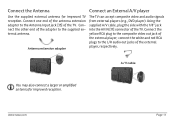
... composite video and audio signals from external players (e.g., DVD player). www.naxa.com Page 11 Connect one end of the antenna extension adapter to the Antenna Input jack [15] of the TV. connect the white and red RCA plugs to the L/R audio out jacks of the adapter to the composite video out jack of the external player; Connect the other end of the external player, respectively. Connect the yellow RCA plug to the supplied external antenna. Connect the Antenna Connect an External A/V player Use the supplied external antenna for...
... composite video and audio signals from external players (e.g., DVD player). www.naxa.com Page 11 Connect one end of the antenna extension adapter to the Antenna Input jack [15] of the TV. connect the white and red RCA plugs to the L/R audio out jacks of the adapter to the composite video out jack of the external player; Connect the other end of the external player, respectively. Connect the yellow RCA plug to the supplied external antenna. Connect the Antenna Connect an External A/V player Use the supplied external antenna for...
English manual
Page 12
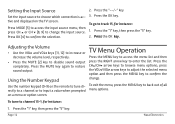
... "5" key. 2. Press the MUTE key again to choose which connection is active and displayed on the TV screen. Press the "--/-" key. 3. To go to browse menu options; Press the CH /CH arrow keys to track 15, for instance: 1. change the input source. Press OK [4] to disable sound output completely. Adjusting the Volume • Use the VOL and VOL keys [11, 12] to increase...
... "5" key. 2. Press the MUTE key again to choose which connection is active and displayed on the TV screen. Press the "--/-" key. 3. To go to browse menu options; Press the CH /CH arrow keys to track 15, for instance: 1. change the input source. Press OK [4] to disable sound output completely. Adjusting the Volume • Use the VOL and VOL keys [11, 12] to increase...

English manual
Page 13
... software updates via USB. 1. Software Update (USB): Used to the Favorites list. rent channel. Channel Picture 1. TV to set Auto Vol. 4. Auto Volume: Press the "OK" key to enter the menu and select Open or Close to a different geographic location. 4. Aspect Ratio: Adjust the screen width by pressing a signal and saves them to receive over-the-air TV best (Standard, Soft, user, and Dynamic). Picture mode: Select a picture preset that looks like the ones provided to the channel list. Color...
... software updates via USB. 1. Software Update (USB): Used to the Favorites list. rent channel. Channel Picture 1. TV to set Auto Vol. 4. Auto Volume: Press the "OK" key to enter the menu and select Open or Close to a different geographic location. 4. Aspect Ratio: Adjust the screen width by pressing a signal and saves them to receive over-the-air TV best (Standard, Soft, user, and Dynamic). Picture mode: Select a picture preset that looks like the ones provided to the channel list. Color...

English manual
Page 14
... channels to work. On Time: Press the "OK" key to enter the menu then Left/Right arrow keys to set a day and time to select; The TV must be heard as the image will turn on -screen guide that will be connected 4. factory setting 6. 5. Audio Only: Press the "OK" key to enter the menu to match 5. OSD Language: Set the display language of the timer. Time 1. Closed Caption: When closed caption information. 3. Sleep Timer: Set a timer. Set...
... channels to work. On Time: Press the "OK" key to enter the menu then Left/Right arrow keys to set a day and time to select; The TV must be heard as the image will turn on -screen guide that will be connected 4. factory setting 6. 5. Audio Only: Press the "OK" key to enter the menu to match 5. OSD Language: Set the display language of the timer. Time 1. Closed Caption: When closed caption information. 3. Sleep Timer: Set a timer. Set...

English manual
Page 15
... password. Unrated: Enable or disable the ability to access either Photo/Music/Movie/ or Text icon. US: Prevent programs from being viewed based on Canadian English or French guidelines. 6. Reset RRT: Refresh the Rating Region Table if you change the password, write it down and store it in the USB Slot on the TV. From the input Menu, select MEDIA. Lock Use the remote control to enter the default password...
... password. Unrated: Enable or disable the ability to access either Photo/Music/Movie/ or Text icon. US: Prevent programs from being viewed based on Canadian English or French guidelines. 6. Reset RRT: Refresh the Rating Region Table if you change the password, write it down and store it in the USB Slot on the TV. From the input Menu, select MEDIA. Lock Use the remote control to enter the default password...

English manual
Page 16
... c t ( ) Red Button on Remote t erform M Scan Pree ( O K ) button on remote t elec he up arrow key to go to previous station . Press "MODE" to single digits press the (UP ) arrow ke o ext auto frequenc uning. press the(R )arrow key to select " FM Radio" mode, and then FM frequency channels automaticlly. 2. "GREEN"key "RED"key S elect ( ) G reen Butto n R emote toTurn ON/OF F TV backlight . Use the...
... c t ( ) Red Button on Remote t erform M Scan Pree ( O K ) button on remote t elec he up arrow key to go to previous station . Press "MODE" to single digits press the (UP ) arrow ke o ext auto frequenc uning. press the(R )arrow key to select " FM Radio" mode, and then FM frequency channels automaticlly. 2. "GREEN"key "RED"key S elect ( ) G reen Butto n R emote toTurn ON/OF F TV backlight . Use the...

English manual
Page 17
... use this product from the wall outlet before the product is intended to alert the user to the presence of important operation and servicing instructions in the operating instructions should be followed. 5. paratus. • When discarding batteries, follow the manufacturer's instructions and should use liquid...cart, stand, tripod, bracket, or table. Use a damp cloth for ventilation to ensure reliable operation of the product and to protect it Page 17 Naxa Electronics Important Safety Information 1. Accessories: Do not place this appliance to rain or moisture. Quick stops,...
... use this product from the wall outlet before the product is intended to alert the user to the presence of important operation and servicing instructions in the operating instructions should be followed. 5. paratus. • When discarding batteries, follow the manufacturer's instructions and should use liquid...cart, stand, tripod, bracket, or table. Use a damp cloth for ventilation to ensure reliable operation of the product and to protect it Page 17 Naxa Electronics Important Safety Information 1. Accessories: Do not place this appliance to rain or moisture. Quick stops,...

English manual
Page 18
... of the type of the plug. Protective Attachment Plug: The product may be located in one blade wider than the other similar surface. This will only fit into the outlet, try reversing the direction of power supply to the operating instructions. 11. Power Lines: An outside antenna is connected to the product, be sure the antenna system is required, be operated only from...
... of the type of the plug. Protective Attachment Plug: The product may be located in one blade wider than the other similar surface. This will only fit into the outlet, try reversing the direction of power supply to the operating instructions. 11. Power Lines: An outside antenna is connected to the product, be sure the antenna system is required, be operated only from...
English manual
Page 19
... proper operating condition. 23. Replacement Parts: When replacement parts are designed to a wall or ceiling only as opening or removing covers may result in any kind on , the user is encouraged to try to service this indicates a need for a Class B digital device, pursuant to rain or water; Wall or Ceiling Mounting: The product should be sure that your service technician has used in a residential installation. Wash...
... proper operating condition. 23. Replacement Parts: When replacement parts are designed to a wall or ceiling only as opening or removing covers may result in any kind on , the user is encouraged to try to service this indicates a need for a Class B digital device, pursuant to rain or water; Wall or Ceiling Mounting: The product should be sure that your service technician has used in a residential installation. Wash...

English manual
Page 21
..., please consult the instructions in this manual. HDTV signal support Input Connections ATSC AV IN Composite audio/video (3.5mm) AV OUT Composite audio/video (3.5mm) Output Connections Headphone (3.5 mm) Speaker Output Power 0.8 W x 2 (1.6 W total) NAXA Technical Support 2320 East 49th St. Please also visit us on the web at www.naxa.com to get up to modify Page 21 Naxa Electronics Support Screen type Screen resolution Removable Memory Support Playable Media Formats 9" TFT LCD 800 x 480 Memory CARD USB MP3, JPEG, MPEG...
..., please consult the instructions in this manual. HDTV signal support Input Connections ATSC AV IN Composite audio/video (3.5mm) AV OUT Composite audio/video (3.5mm) Output Connections Headphone (3.5 mm) Speaker Output Power 0.8 W x 2 (1.6 W total) NAXA Technical Support 2320 East 49th St. Please also visit us on the web at www.naxa.com to get up to modify Page 21 Naxa Electronics Support Screen type Screen resolution Removable Memory Support Playable Media Formats 9" TFT LCD 800 x 480 Memory CARD USB MP3, JPEG, MPEG...


