

English Manual
Page 3
... no objects filled with the supplied power cord. Unplug the power plug from the wall outlet before cleaning. • Unplug the power plug from falling or spilling on the product. • Operate the product only with liquids, such as flower vases, shall be placed on top of the device. • The device is intended for use . • Always leave a minimum...
... no objects filled with the supplied power cord. Unplug the power plug from the wall outlet before cleaning. • Unplug the power plug from falling or spilling on the product. • Operate the product only with liquids, such as flower vases, shall be placed on top of the device. • The device is intended for use . • Always leave a minimum...
English Manual
Page 4
... not use as newspapers, table-cloths, curtains, etc. Never put this product under the following conditions: - Do not use this product to the power outlet which is to be impeded by climbing furniture to access the TV. • If your choice for any servicing repairs. • Do not overload wall outlers, extension cords, or integral convenience receptacles. • Connect this...
... not use as newspapers, table-cloths, curtains, etc. Never put this product under the following conditions: - Do not use this product to the power outlet which is to be impeded by climbing furniture to access the TV. • If your choice for any servicing repairs. • Do not overload wall outlers, extension cords, or integral convenience receptacles. • Connect this...

English Manual
Page 6
TABLE OF CONTENTS ACCESSORIES 8 INTRODUCTION 9 FEATURES 9 BASIC FUNCTIONS 9 SPECIFICATIONS 10 MOUNTING INSTRUCTIONS (Optional 11 STAND MOUNTING 11 WALL MOUNTING 12 GENERAL DESCRIPTION 13 OVERVIEW OF BACK PANEL 13 OVERVIEW OF BUTTONS 14 OVERVIEW OF REMOTE CONTROL 15 INSTALLING BATTERIES IN THE REMOTE CONTROL ..........17 EXTERNAL CONNECTION 18 ANTENNA CONNECTION 18 BASIC OPERATION 19 MENU OPERATION 19 PICTURE 20 6
TABLE OF CONTENTS ACCESSORIES 8 INTRODUCTION 9 FEATURES 9 BASIC FUNCTIONS 9 SPECIFICATIONS 10 MOUNTING INSTRUCTIONS (Optional 11 STAND MOUNTING 11 WALL MOUNTING 12 GENERAL DESCRIPTION 13 OVERVIEW OF BACK PANEL 13 OVERVIEW OF BUTTONS 14 OVERVIEW OF REMOTE CONTROL 15 INSTALLING BATTERIES IN THE REMOTE CONTROL ..........17 EXTERNAL CONNECTION 18 ANTENNA CONNECTION 18 BASIC OPERATION 19 MENU OPERATION 19 PICTURE 20 6

English Manual
Page 7
SOUND 22 FUNCTION 23 TIME 25 OPTION 26 LOCK 28 CHANNEL 29 NETWORK SETTING 32 INTERNET 34 7
SOUND 22 FUNCTION 23 TIME 25 OPTION 26 LOCK 28 CHANNEL 29 NETWORK SETTING 32 INTERNET 34 7

English Manual
Page 9
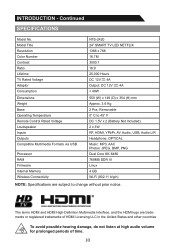
..." TFT LED display screen • Zero X radiation complies to green environment protection requirement • Connect to computer directly to realize TV/monitor combo • USB 2.0 • 16:9 wide screen • Auto tuning and fine tuning • HDMI input • Component Compatible (480i; 480P; 576i; 576P; 720P; 1080i; 1080P) • Programmable sleep timer • Wide range voltage input • No-signal automatic power off BASIC FUNCTIONS Input terminals used for external equipment connection...
..." TFT LED display screen • Zero X radiation complies to green environment protection requirement • Connect to computer directly to realize TV/monitor combo • USB 2.0 • 16:9 wide screen • Auto tuning and fine tuning • HDMI input • Component Compatible (480i; 480P; 576i; 576P; 720P; 1080i; 1080P) • Programmable sleep timer • Wide range voltage input • No-signal automatic power off BASIC FUNCTIONS Input terminals used for external equipment connection...
English Manual
Page 10
Model Title Resolution Color Number Contrast Ratio Lifetime TV Rated Voltage Adaptor Consumption NTS-2420 24" SMART TV LED NETFLIX 1366 x 768 16.7M 3000:1 16:9 25,000 Hours DC 12V 4A Output: DC 12V 4A < 48W Dimensions Weight Base Operating Temperature Remote Control Rated Voltage Loudspeaker Inputs Outputs Compatible Multimedia Formats via USB Processor RAM Firmware Internal Memory Wireless Connectivity 550 (W) x 149 (D) x 354 (H) mm Approx. 3.6 Kg 2 Pcs, Removable 0° C to change without prior notice...
Model Title Resolution Color Number Contrast Ratio Lifetime TV Rated Voltage Adaptor Consumption NTS-2420 24" SMART TV LED NETFLIX 1366 x 768 16.7M 3000:1 16:9 25,000 Hours DC 12V 4A Output: DC 12V 4A < 48W Dimensions Weight Base Operating Temperature Remote Control Rated Voltage Loudspeaker Inputs Outputs Compatible Multimedia Formats via USB Processor RAM Firmware Internal Memory Wireless Connectivity 550 (W) x 149 (D) x 354 (H) mm Approx. 3.6 Kg 2 Pcs, Removable 0° C to change without prior notice...
English Manual
Page 11
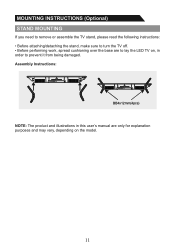
Assembly Instructions: BB4x12mm(4pcs) NOTE: The product and illustrations in this user's manual are to lay the LED TV on, in order to turn the TV off. • Before performing work, spread cushioning over the base are only for explanation purposes and may vary, depending on the model. 11 MOUNTING INSTRUCTIONS (Optional) STAND MOUNTING If you need to remove or assemble the TV stand, please read the following instructions: • Before attaching/detaching the stand, make sure to prevent it from being damaged.
Assembly Instructions: BB4x12mm(4pcs) NOTE: The product and illustrations in this user's manual are to lay the LED TV on, in order to turn the TV off. • Before performing work, spread cushioning over the base are only for explanation purposes and may vary, depending on the model. 11 MOUNTING INSTRUCTIONS (Optional) STAND MOUNTING If you need to remove or assemble the TV stand, please read the following instructions: • Before attaching/detaching the stand, make sure to prevent it from being damaged.
English Manual
Page 12
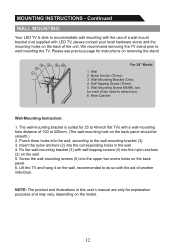
... back panel should be smooth.) 2. The wall-mounting bracket is able to accommodate wall mounting with the use of a wall mount bracket (not supplied with a wall-mounting hole distance of 100 or 200mm. (The wall-mounting hole on the model. 12 Insert the nylon anchors (2) into the upper two screw holes on removing the stand. Screw the wall-mounting screws (5) into the corresponding holes in this user's manual are only for each (Only need to wall mounting the...
... back panel should be smooth.) 2. The wall-mounting bracket is able to accommodate wall mounting with the use of a wall mount bracket (not supplied with a wall-mounting hole distance of 100 or 200mm. (The wall-mounting hole on the model. 12 Insert the nylon anchors (2) into the upper two screw holes on removing the stand. Screw the wall-mounting screws (5) into the corresponding holes in this user's manual are only for each (Only need to wall mounting the...
English Manual
Page 14
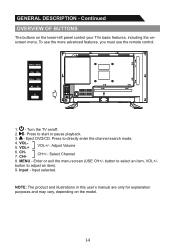
... to adjust an item). 9. button to directly enter the channel search mode. 4. Input - Turn the TV on the lower-left panel control your TVs basic features, including the onscreen menu. MENU - Enter or exit the menu screen (USE CH+/- Input selected. Continued OVERVIEW OF BUTTONS The buttons on /off. 2. - Press to select an item, VOL+/- VOL+ VOL+/-: Adjust Volume 6. GENERAL DESCRIPTION - NOTE: The product and illustrations in this user's manual...
... to adjust an item). 9. button to directly enter the channel search mode. 4. Input - Turn the TV on the lower-left panel control your TVs basic features, including the onscreen menu. MENU - Enter or exit the menu screen (USE CH+/- Input selected. Continued OVERVIEW OF BUTTONS The buttons on /off. 2. - Press to select an item, VOL+/- VOL+ VOL+/-: Adjust Volume 6. GENERAL DESCRIPTION - NOTE: The product and illustrations in this user's manual...

English Manual
Page 15
... OF REMOTE CONTROL 1. Digital Buttons (0-9): Directly select channel with different digits. 7. RECALL: Switch to confirm. 3. CC/SUBTITLE: In DTV source, this key to the quick menu. 12. HOME: Press to go to view NETFLIX directly. 10. Q. MENU: Press this button is used to selec on screen. 13. Select an input and press ENTER to the previous program. 5. Arrow Buttons: Use to change menu values. 14. INPUT: This button is used to the App home page. 9. POWER: Turn...
... OF REMOTE CONTROL 1. Digital Buttons (0-9): Directly select channel with different digits. 7. RECALL: Switch to confirm. 3. CC/SUBTITLE: In DTV source, this key to the quick menu. 12. HOME: Press to go to view NETFLIX directly. 10. Q. MENU: Press this button is used to selec on screen. 13. Select an input and press ENTER to the previous program. 5. Arrow Buttons: Use to change menu values. 14. INPUT: This button is used to the App home page. 9. POWER: Turn...

English Manual
Page 16
... on a loaded DVD. 28. : Press to view VUDU directly. 27. VUDU: If network connects, press to eject a loaded disc. 29. Continued OVERVIEW OF REMOTE CONTROL - INFO: Display the program information. 25. : Stop playing or stop recording. 26. COLOR BUTTONS: Use to cut off audio for the DVD. MUTE: Press to show the EPG or Program Edit menu. 17. GENERAL DESCRIPTION - Press to adjust the volume. 20. VOL...
... on a loaded DVD. 28. : Press to view VUDU directly. 27. VUDU: If network connects, press to eject a loaded disc. 29. Continued OVERVIEW OF REMOTE CONTROL - INFO: Display the program information. 25. : Stop playing or stop recording. 26. COLOR BUTTONS: Use to cut off audio for the DVD. MUTE: Press to show the EPG or Program Edit menu. 17. GENERAL DESCRIPTION - Press to adjust the volume. 20. VOL...

English Manual
Page 17
... set of the remote. The batteries (battery pack or batteries installed) should last up to leakage. 3. Dont mix old or used batteries, since they can negatively affect the environment. Recycle used batteries with normal usage. 2. Battery Cover Insert two 1.5V AAA size batteries in correct polarity. Close the cover. 2xsize AAA 1.5V SOURCE Point the remote towards the remote control sensor on...
... set of the remote. The batteries (battery pack or batteries installed) should last up to leakage. 3. Dont mix old or used batteries, since they can negatively affect the environment. Recycle used batteries with normal usage. 2. Battery Cover Insert two 1.5V AAA size batteries in correct polarity. Close the cover. 2xsize AAA 1.5V SOURCE Point the remote towards the remote control sensor on...

English Manual
Page 19
... Channels List or Favorites List. keys. 19 Use the arrow keys to select an input source and press ENTER to the previous channel. Press it again to return to the current channel. on the remote control to enter the "INPUT SOURCE" menu. keys, the TV changes channels in sequence. BASIC OPERATION MENU OPERATION Input Setup Press INPUT on the remote control or the TV to display the Volume Menu. You will see erased channels. 3. Select channels from the Channel List...
... Channels List or Favorites List. keys. 19 Use the arrow keys to select an input source and press ENTER to the previous channel. Press it again to return to the current channel. on the remote control to enter the "INPUT SOURCE" menu. keys, the TV changes channels in sequence. BASIC OPERATION MENU OPERATION Input Setup Press INPUT on the remote control or the TV to display the Volume Menu. You will see erased channels. 3. Select channels from the Channel List...

English Manual
Page 20
... PICTURE on the remote control to select your preference by adjusting particular items, such as Contrast, Brightness, Color, Sharpness. The indications of the picture settings. Picture Mode Your TV has four picture settings (Sports, Normal, Mild, User) that are listed in the lower-left corner of the screen. Press MENU to display the main menu on the remote control to your desired Picture Mode option. 20 To resume sound, press the MUTE button...
... PICTURE on the remote control to select your preference by adjusting particular items, such as Contrast, Brightness, Color, Sharpness. The indications of the picture settings. Picture Mode Your TV has four picture settings (Sports, Normal, Mild, User) that are listed in the lower-left corner of the screen. Press MENU to display the main menu on the remote control to your desired Picture Mode option. 20 To resume sound, press the MUTE button...
English Manual
Page 22
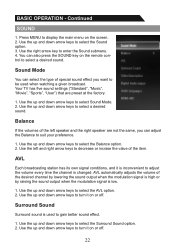
Press MENU to display the main menu on the remote control to select a desired sound. You can also press the SOUND key on the screen. 2. AVL automatically adjusts the volume of special sound effect you can select the type of the desired channel by lowering the sound output when the modulation signal is high or by raising the sound output when the modulation signal is inconvenient to select the Balance...
Press MENU to display the main menu on the remote control to select a desired sound. You can also press the SOUND key on the screen. 2. AVL automatically adjusts the volume of special sound effect you can select the type of the desired channel by lowering the sound output when the modulation signal is high or by raising the sound output when the modulation signal is inconvenient to select the Balance...

English Manual
Page 27
..., it will turn off automatically once the update is completed. User Mode Users can update the TV via internet. The TV will update via USB. Network Update Information 1. Press Yes to select the Software Update option. 2. Use the up and down arrow keys to confirm again. The TV will update via network connection. View End-User License View End-User license information. BASIC OPERATION - Internet Update Check This can choose energy-saving mode here, if...
..., it will turn off automatically once the update is completed. User Mode Users can update the TV via internet. The TV will update via USB. Network Update Information 1. Press Yes to select the Software Update option. 2. Use the up and down arrow keys to confirm again. The TV will update via network connection. View End-User License View End-User license information. BASIC OPERATION - Internet Update Check This can choose energy-saving mode here, if...

English Manual
Page 28
... TV option. 2. Re-enter the same 4 digits to call back the input-password window. Lock System Set the Lock function on the screen. 2. Then use the left and right arrow keys to memorize your 4-digit password to enter the Lock submenu (default password is deemed inappropriate for your 4-digit password to enter the Lock submenu. Press ENTER to Confirm Password. 4. Use the up and down arrow keys to...
... TV option. 2. Re-enter the same 4 digits to call back the input-password window. Lock System Set the Lock function on the screen. 2. Then use the left and right arrow keys to memorize your 4-digit password to enter the Lock submenu (default password is deemed inappropriate for your 4-digit password to enter the Lock submenu. Press ENTER to Confirm Password. 4. Use the up and down arrow keys to...

English Manual
Page 29
... TV 1. Antenna 1. CHANNEL Before your TV can begin memorizing the available channels, you must specify the type of signal source that is connected to enter the Channel submenu. Press ENTER to display the main menu on or off. Press the MENU key to open the RRT Setting menu. Continued Canada English 1. Use the up and down arrow keys to select the Channel option. 3. RRT Reset 1. Press...
... TV 1. Antenna 1. CHANNEL Before your TV can begin memorizing the available channels, you must specify the type of signal source that is connected to enter the Channel submenu. Press ENTER to display the main menu on or off. Press the MENU key to open the RRT Setting menu. Continued Canada English 1. Use the up and down arrow keys to select the Channel option. 3. RRT Reset 1. Press...

English Manual
Page 30
... Enter button to access the ability to favorite. 2. Select Start to begin a search or Cancel to be shielded in the Channel Menu. Press Skip (Blue) button, the skip mark will disappear. 30 Continued Auto Search 1. Press Skip (Blue) button, the program will exit automatically. Continued CHANNEL - Press Fav (Yellow) button, the favorite mark on the left side of the program will display...
... Enter button to access the ability to favorite. 2. Select Start to begin a search or Cancel to be shielded in the Channel Menu. Press Skip (Blue) button, the skip mark will disappear. 30 Continued Auto Search 1. Press Skip (Blue) button, the program will exit automatically. Continued CHANNEL - Press Fav (Yellow) button, the favorite mark on the left side of the program will display...

English Manual
Page 31
Press Block (Green) button, input the correct password and the lock mark will display to the left and right arrow keys to select the third item. 2. Signal Information (Used only in DTV) 1. Select the program you wish to see the DTV channel information. 31 Use the right arrow key or press the ENTER button to block. 2. Continued Block (Green) Button 1. DTV Manual Search Enter digital number and press...
Press Block (Green) button, input the correct password and the lock mark will display to the left and right arrow keys to select the third item. 2. Signal Information (Used only in DTV) 1. Select the program you wish to see the DTV channel information. 31 Use the right arrow key or press the ENTER button to block. 2. Continued Block (Green) Button 1. DTV Manual Search Enter digital number and press...


