English manual
Page 2
... Changes or modifications to this unit not expressly approved by one or more of the following measures: • Reorient or relocate the receiving antenna. • Increase the separation between the equipment and receiver. • Connect the equipment into an outlet on the web at www.naxa.com...Naxa Technical Support. If this manual. NOTE: This equipment has been tested and found to comply with the limits for help. SUPPORT If you have problems with your device. Please also visit us on a circuit different from that to which can radiate radio frequency and, if not installed and used...
... Changes or modifications to this unit not expressly approved by one or more of the following measures: • Reorient or relocate the receiving antenna. • Increase the separation between the equipment and receiver. • Connect the equipment into an outlet on the web at www.naxa.com...Naxa Technical Support. If this manual. NOTE: This equipment has been tested and found to comply with the limits for help. SUPPORT If you have problems with your device. Please also visit us on a circuit different from that to which can radiate radio frequency and, if not installed and used...
English manual
Page 3
... TV set for ventilation. • Place the TV set away from the mains, the disconnect device shall remain readily operate. • Apparatus with class 1 construction shall be fully inserted to prevent blade expose. When the TV set is not used as sunshine, fire, or the like. • Mains plug is a thunderstorm (please, pull out the power cord and antenna). -
... TV set for ventilation. • Place the TV set away from the mains, the disconnect device shall remain readily operate. • Apparatus with class 1 construction shall be fully inserted to prevent blade expose. When the TV set is not used as sunshine, fire, or the like. • Mains plug is a thunderstorm (please, pull out the power cord and antenna). -
English manual
Page 5
... children about the dangers of the television set or its controls. When the power plug is used to reach the television set . - This equipment should conduct internal adjustments, maintenance, and checks. Do not overload the power cord or power socket. A television set is trampled on cloth or other cables across a walkway in case it should be located between the television set in the TV. Important Safety Precautions SAFETY...
... children about the dangers of the television set or its controls. When the power plug is used to reach the television set . - This equipment should conduct internal adjustments, maintenance, and checks. Do not overload the power cord or power socket. A television set is trampled on cloth or other cables across a walkway in case it should be located between the television set in the TV. Important Safety Precautions SAFETY...
English manual
Page 6
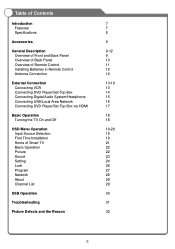
... Specifications Accessories General Description Overview of Front and Back Panel Overview of Back Panel Overview of Remote Control Installing Batteries in Remote Control Antenna Connection External Connection Connecting VCR Connecting DVD Player/Set-Top Box Connecting Digital Audio System/Headphone Connecting USB/Local Area Network Connecting DVD Player/Set-Top Box via HDMI Basic Operation Turning the TV On and Off OSD Menu Operation Input Source Selection First Time Installation Home of Smart TV Basic Operation Picture Sound Setting Lock Program Network About Channel List USB Operation...
... Specifications Accessories General Description Overview of Front and Back Panel Overview of Back Panel Overview of Remote Control Installing Batteries in Remote Control Antenna Connection External Connection Connecting VCR Connecting DVD Player/Set-Top Box Connecting Digital Audio System/Headphone Connecting USB/Local Area Network Connecting DVD Player/Set-Top Box via HDMI Basic Operation Turning the TV On and Off OSD Menu Operation Input Source Selection First Time Installation Home of Smart TV Basic Operation Picture Sound Setting Lock Program Network About Channel List USB Operation...
English manual
Page 7
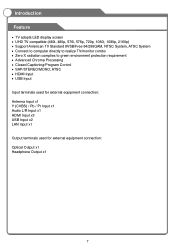
... System, ATSC System • Connect to computer directly to realize TV/monitor combo • Zero X radiation complies to green environment protection requirement • Advanced Chroma Processing • Closed Captioning/Program Control • SAP/STEREO/MONO; ATSC • HDMI Input • USB Input Input terminals used for external equipment connection: Antenna Input x1 Y (CVBS) / Pb / Pr Input x1 Audio L/R Input x1 HDMI Input x3 USB Input x2 LAN Input x1 Output terminals used for external equipment connection: Optical Output x1 Headphone Output x1 7
... System, ATSC System • Connect to computer directly to realize TV/monitor combo • Zero X radiation complies to green environment protection requirement • Advanced Chroma Processing • Closed Captioning/Program Control • SAP/STEREO/MONO; ATSC • HDMI Input • USB Input Input terminals used for external equipment connection: Antenna Input x1 Y (CVBS) / Pb / Pr Input x1 Audio L/R Input x1 HDMI Input x3 USB Input x2 LAN Input x1 Output terminals used for external equipment connection: Optical Output x1 Headphone Output x1 7
English manual
Page 8
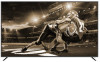
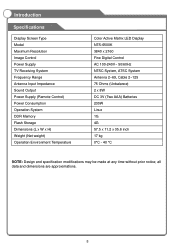
all data and dimensions are approximations. 8 Introduction Specifications Display Screen Type Model Maximum Resolution Image Control Power Supply TV Receiving System Frequency Range Antenna Input Impedance Sound Output Power Supply (Remote Control) Power Consumption Operation System DDR Memory Flash Storage Dimensions (L x W x H) Weight (Net weight) Operation Environment Temperature Color Active Matrix LED Display NTS-6500K 3840 x 2160 Fine Digital Control AC 100-240V~ 50/60Hz NTSC System, ATSC System Antenna 2~69, Cable 2~125 75 Ohms (Unbalance) 2 x 8W DC 3V (Two AAA) Batteries 230W Linux ...
all data and dimensions are approximations. 8 Introduction Specifications Display Screen Type Model Maximum Resolution Image Control Power Supply TV Receiving System Frequency Range Antenna Input Impedance Sound Output Power Supply (Remote Control) Power Consumption Operation System DDR Memory Flash Storage Dimensions (L x W x H) Weight (Net weight) Operation Environment Temperature Color Active Matrix LED Display NTS-6500K 3840 x 2160 Fine Digital Control AC 100-240V~ 50/60Hz NTSC System, ATSC System Antenna 2~69, Cable 2~125 75 Ohms (Unbalance) 2 x 8W DC 3V (Two AAA) Batteries 230W Linux ...
English manual
Page 11
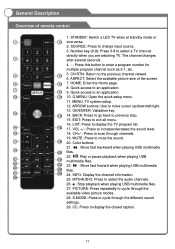
... the available picture size of remote control 1. CH+/-: Press to the previous channel viewed. 6. MTS/AUDIO: Press to cycle through the available video picture modes. 28. S.MODE: Press to select the audio channels. 26. ■ : Stop playback when playing USB multimedia files. 27. Quick access to exit all menu. 16. EXIT: Press to an application. 9. LIST: Press to display the closed caption. 11 CC: Press to display the TV program list. 17. The channel changes after several...
... the available picture size of remote control 1. CH+/-: Press to the previous channel viewed. 6. MTS/AUDIO: Press to cycle through the available video picture modes. 28. S.MODE: Press to select the audio channels. 26. ■ : Stop playback when playing USB multimedia files. 27. Quick access to exit all menu. 16. EXIT: Press to an application. 9. LIST: Press to display the closed caption. 11 CC: Press to display the TV program list. 17. The channel changes after several...
English manual
Page 12
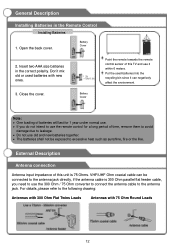
... the remote control sensor of this unit is 300 Ohm parallel flat feeder cable, you do not intend to use the remote control for a long period of this TV and use it can be exposed to the antenna jack. External Description Antenna connection Antenna input impedance of time, remove them to avoid damage due to leakage. • Do not use the 300 Ohm / 75 Ohm converter to connect the antenna cable...
... the remote control sensor of this unit is 300 Ohm parallel flat feeder cable, you do not intend to use the remote control for a long period of this TV and use it can be exposed to the antenna jack. External Description Antenna connection Antenna input impedance of time, remove them to avoid damage due to leakage. • Do not use the 300 Ohm / 75 Ohm converter to connect the antenna cable...
English manual
Page 13
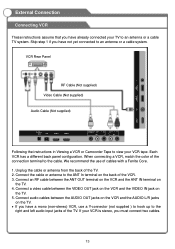
... the use a Y-connector (not supplied ) to hook up to view your VCR is stereo, you have not yet connected to an antenna or a cable TV system. If your VCR tape. Connect the cable or antenna to the cable. Connect audio cables between the VIDEO OUT jack on the VCR and the VIDEO IN jack on the TV. 4. VCR Rear Panel RF Cable (Not supplied) Video Cable (Not supplied) Audio Cable (Not supplied) Following the instructions in Viewing a VCR...
... the use a Y-connector (not supplied ) to hook up to view your VCR is stereo, you have not yet connected to an antenna or a cable TV system. If your VCR tape. Connect the cable or antenna to the cable. Connect audio cables between the VIDEO OUT jack on the VCR and the VIDEO IN jack on the TV. 4. VCR Rear Panel RF Cable (Not supplied) Video Cable (Not supplied) Audio Cable (Not supplied) Following the instructions in Viewing a VCR...
English manual
Page 14
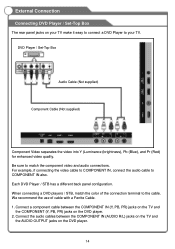
... connecting a DVD players / STB, match the color of cable with a Ferrite Cable. 1. DVD Player / Set-Top Box Audio Cable (Not supplied) Component Cable (Not supplied) Component Video separates the video into Y (Luminance (brightness), Pb (Blue), and Pr (Red) for enhanced video quality. Connect the audio cables between the COMPONENT IN (Y, PB, PR) jacks on the TV and the COMPONENT (Y, PB, PR) jacks on the DVD player. 2. External Connection Connecting DVD Player / Set-Top Box The rear panel jacks on the DVD player. 14 For example, if connecting the video cable to COMPONENT IN, connect...
... connecting a DVD players / STB, match the color of cable with a Ferrite Cable. 1. DVD Player / Set-Top Box Audio Cable (Not supplied) Component Cable (Not supplied) Component Video separates the video into Y (Luminance (brightness), Pb (Blue), and Pr (Red) for enhanced video quality. Connect the audio cables between the COMPONENT IN (Y, PB, PR) jacks on the TV and the COMPONENT (Y, PB, PR) jacks on the DVD player. 2. External Connection Connecting DVD Player / Set-Top Box The rear panel jacks on the DVD player. 14 For example, if connecting the video cable to COMPONENT IN, connect...
English manual
Page 15
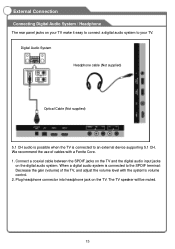
... terminal: Decrease the gain (volume) of cables with the system's volume control. 2. Connect a coaxial cable between the SPDIF jacks on the TV and the digital audio input jacks on the TV. When a digital audio system is connected to your TV make it easy to connect a digital audio system to an external device supporting 5.1 CH. The TV speaker will be muted. 15 External Connection Connecting Digital Audio System / Headphone The rear panel jacks on your TV...
... terminal: Decrease the gain (volume) of cables with the system's volume control. 2. Connect a coaxial cable between the SPDIF jacks on the TV and the digital audio input jacks on the TV. When a digital audio system is connected to your TV make it easy to connect a digital audio system to an external device supporting 5.1 CH. The TV speaker will be muted. 15 External Connection Connecting Digital Audio System / Headphone The rear panel jacks on your TV...

English manual
Page 17
... panel configuration. We recommend the use of digital audio and video signals using a single cable without compression. Multimedia interface is HDMI? HDMI, or high-definition multimedia interface, is a next-generation interface that enables the transmission of cables with a Ferrite Core. • Connect an HDMI cable between HDMI and DVI is that HDMI device is smaller in size, has the HDCP (High Bandwidth Digital Cop Protection) coding feature installed, and supports multi-channel digital audio. External Connection Connecting DVD Player / Set...
... panel configuration. We recommend the use of digital audio and video signals using a single cable without compression. Multimedia interface is HDMI? HDMI, or high-definition multimedia interface, is a next-generation interface that enables the transmission of cables with a Ferrite Core. • Connect an HDMI cable between HDMI and DVI is that HDMI device is smaller in size, has the HDCP (High Bandwidth Digital Cop Protection) coding feature installed, and supports multi-channel digital audio. External Connection Connecting DVD Player / Set...
English manual
Page 18
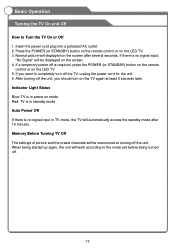
... signal input in standby mode Auto Power Off If there is required, press the POWER (or STANDBY) button on the remote control or on the LED TV. 5. Indicator Light Status Blue: TV is in power on mode Red: TV is in TV mode, the TV will be memorized at least 5 seconds later. Memory Before Turning TV Off The settings of picture and the preset channels will be displayed on the screen. 4. Insert the power cord plug...
... signal input in standby mode Auto Power Off If there is required, press the POWER (or STANDBY) button on the remote control or on the LED TV. 5. Indicator Light Status Blue: TV is in power on mode Red: TV is in TV mode, the TV will be memorized at least 5 seconds later. Memory Before Turning TV Off The settings of picture and the preset channels will be displayed on the screen. 4. Insert the power cord plug...
English manual
Page 20
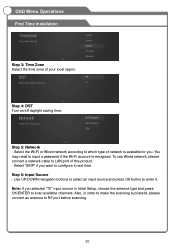
... antenna to enter it next time. Note: If you . Step 5: Network - Select the Wi-Fi or Wired network according to which type of your local region. To use Wired network, please connect a network cable to scan available channels. Step 4: DST Turn on/off daylight saving time. Use UP/DOWN navigation buttons to select an input source and press OK button to RF port before scanning. 20 Also, in Initial Setup, choose the antenna type...
... antenna to enter it next time. Note: If you . Step 5: Network - Select the Wi-Fi or Wired network according to which type of your local region. To use Wired network, please connect a network cable to scan available channels. Step 4: DST Turn on/off daylight saving time. Use UP/DOWN navigation buttons to select an input source and press OK button to RF port before scanning. 20 Also, in Initial Setup, choose the antenna type...
English manual
Page 25
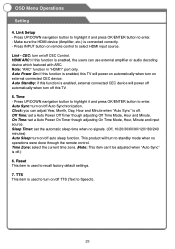
... power off automatically when turn on remote control to recall factory default settings. 7. Auto Standby: if this function is enabled, the users can adjust Year, Month, Day, Hour and Minute when "Auto Sync" is off this function is enabled, external connected CEC device will power on /off auto sleep function. OSD Menu Operations Setting 4. Press INPUT button on external connected CEC device. Clock: you can use external amplifier or audio decoding device which featured with ARC. HDMI ARC: if this TV. 5. Auto Power...
... power off automatically when turn on remote control to recall factory default settings. 7. Auto Standby: if this function is enabled, the users can adjust Year, Month, Day, Hour and Minute when "Auto Sync" is off this function is enabled, external connected CEC device will power on /off auto sleep function. OSD Menu Operations Setting 4. Press INPUT button on external connected CEC device. Clock: you can use external amplifier or audio decoding device which featured with ARC. HDMI ARC: if this TV. 5. Auto Power...
English manual
Page 27
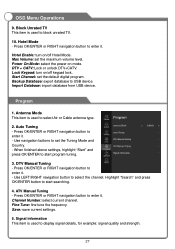
... from USB device. Highlight "Search" and press OK/ENTER button to display signal details, for example: signal quality and strength. 27 Backup Database: export database to select the channel. Use LEFT/RIGHT navigation button to USB device. Hotel Mode - ATV Manual Tuning - Save: save current settings. 5. Antenna Mode This item is used to start program tuning. 3. Lock Keypad: turn on mode. OSD Menu Operations 9. DTV + CATV: Lock or unlock DTV+CATV. Channel Number: select current channel.
... from USB device. Highlight "Search" and press OK/ENTER button to display signal details, for example: signal quality and strength. 27 Backup Database: export database to select the channel. Use LEFT/RIGHT navigation button to USB device. Hotel Mode - ATV Manual Tuning - Save: save current settings. 5. Antenna Mode This item is used to start program tuning. 3. Lock Keypad: turn on mode. OSD Menu Operations 9. DTV + CATV: Lock or unlock DTV+CATV. Channel Number: select current channel.
English manual
Page 28
.../off Wake on -screen keyboard. Press OK/ENTER to connect the network. 2. Use navigation buttons to input a name. Use navigation buttons to select DHCP or Static configuration. - Also you area, plug a LAN cable into LAN terminal on LAN. 4. Access "YouTube" on the remote control to turn this TV to pair your Smart Phone and find the icon to standby mode. Then press STANDBY button on your Smart Phone...
.../off Wake on -screen keyboard. Press OK/ENTER to connect the network. 2. Use navigation buttons to input a name. Use navigation buttons to select DHCP or Static configuration. - Also you area, plug a LAN cable into LAN terminal on LAN. 4. Access "YouTube" on the remote control to turn this TV to pair your Smart Phone and find the icon to standby mode. Then press STANDBY button on your Smart Phone...
English manual
Page 29
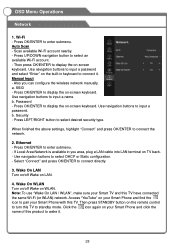
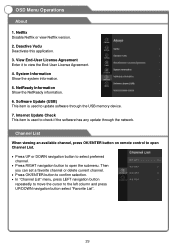
... information. 6. Channel List When viewing an available channel, press OK/ENTER button on remote control to open Channel List. • Press UP or DOWN navigation button to select preferred channel. • Press RIGHT navigation button to the left column and press UP/DOWN navigation button select "Favorite List". 29 OSD Menu Operations About 1. Netflix Disable Netflix or view Netflix version. 2. Internet Update Check This item is used to view the End-User License...
... information. 6. Channel List When viewing an available channel, press OK/ENTER button on remote control to open Channel List. • Press UP or DOWN navigation button to select preferred channel. • Press RIGHT navigation button to the left column and press UP/DOWN navigation button select "Favorite List". 29 OSD Menu Operations About 1. Netflix Disable Netflix or view Netflix version. 2. Internet Update Check This item is used to view the End-User License...
English manual
Page 30
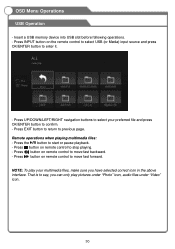
... can only play pictures under "Photo" icon, audio files under "Video" icon.. 30 OSD Menu Operations USB Operation - Press button on the remote control to select USB (or Media) input source and press OK/ENTER button to confirm. - NOTE: To play your preferred file and press OK/ENTER button to enter it. - Press INPUT button on remote control to say, you have selected correct icon in the above interface. Remote operations when playing multimedia files...
... can only play pictures under "Photo" icon, audio files under "Video" icon.. 30 OSD Menu Operations USB Operation - Press button on the remote control to select USB (or Media) input source and press OK/ENTER button to confirm. - NOTE: To play your preferred file and press OK/ENTER button to enter it. - Press INPUT button on remote control to say, you have selected correct icon in the above interface. Remote operations when playing multimedia files...
English manual
Page 31
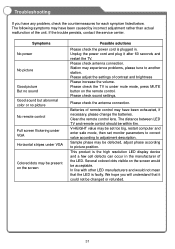
Unplug the power cord and plug it could not be defected, adjust phase according to picture position. Please adjust the settings of the LED. Several colored dots visible on the screen would not mean that it after 60 seconds and restart the TV. If the trouble persists, contact the service center. Please check the antenna connection. This product is the high resolution LED display device and a few cell...
Unplug the power cord and plug it could not be defected, adjust phase according to picture position. Please adjust the settings of the LED. Several colored dots visible on the screen would not mean that it after 60 seconds and restart the TV. If the trouble persists, contact the service center. Please check the antenna connection. This product is the high resolution LED display device and a few cell...


