Product Data Sheet
Page 7
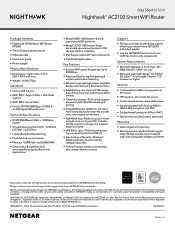
... streaming & gaming • 4 Gigabit Ethernet LAN Ports-Connect more wired devices for faster file transfer and uninterrupted connections • Nighthawk App-Easily set up to 10 times faster access to your stored media than USB 2.0 • Free backup software for Windows® based computers to manage your network away from home • USB 3.0 for up personal FTP server • VPN support-secure remote access • Guest network access-separate & secure • Standards-based WiFi Security (802.11i, 128...
... streaming & gaming • 4 Gigabit Ethernet LAN Ports-Connect more wired devices for faster file transfer and uninterrupted connections • Nighthawk App-Easily set up to 10 times faster access to your stored media than USB 2.0 • Free backup software for Windows® based computers to manage your network away from home • USB 3.0 for up personal FTP server • VPN support-secure remote access • Guest network access-separate & secure • Standards-based WiFi Security (802.11i, 128...
User Manual
Page 5
...89 Manually upload firmware to the router 90 Change the admin password 91 Enable admin password recovery 91 Recover the admin password 92 View information about the router and the Internet and WiFi settings 93 Display the statistics of the Internet port 94 Check the Internet connection status 95 View and manage logs of router activity 96 View devices currently on the network 97 Monitor Internet Traffic 97 Manage the router configuration file 99 Back up the settings 99 Erase the settings 99 Restore the settings 100 Remote access 101 Set up remote management 101 Use remote access...
...89 Manually upload firmware to the router 90 Change the admin password 91 Enable admin password recovery 91 Recover the admin password 92 View information about the router and the Internet and WiFi settings 93 Display the statistics of the Internet port 94 Check the Internet connection status 95 View and manage logs of router activity 96 View devices currently on the network 97 Monitor Internet Traffic 97 Manage the router configuration file 99 Back up the settings 99 Erase the settings 99 Restore the settings 100 Remote access 101 Set up remote management 101 Use remote access...
User Manual
Page 6
... Use Time Machine to back up onto a USB hard disk 112 Enable FTP access within your network 114 View network folders on a storage device 114 Add a network folder on a USB storage device 115 Edit a network folder on a USB storage device 116 Safely remove a USB storage device 117 Chapter 9 Use Dynamic DNS to Access USB Storage Devices Through the Internet Set up and manage Dynamic DNS 119 Set up FTP access through the Internet 119 Your personal FTP server...
... Use Time Machine to back up onto a USB hard disk 112 Enable FTP access within your network 114 View network folders on a storage device 114 Add a network folder on a USB storage device 115 Edit a network folder on a USB storage device 116 Safely remove a USB storage device 117 Chapter 9 Use Dynamic DNS to Access USB Storage Devices Through the Internet Set up and manage Dynamic DNS 119 Set up FTP access through the Internet 119 Your personal FTP server...
User Manual
Page 7
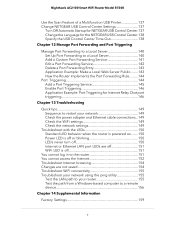
... or blinking 150 LEDs never turn off 150 Internet or Ethernet LAN port LEDs are off 151 WiFi LED is off 151 You cannot log in to the router 151 You cannot access the Internet 152 Troubleshoot Internet browsing 154 Changes are not saved 154 Troubleshoot WiFi connectivity 155 Troubleshoot your network using the ping utility 155 Test the LAN path to your router 155 Test the path from a Windows-based computer to a remote device 156 Chapter 14 Supplemental Information Factory Settings 159...
... or blinking 150 LEDs never turn off 150 Internet or Ethernet LAN port LEDs are off 151 WiFi LED is off 151 You cannot log in to the router 151 You cannot access the Internet 152 Troubleshoot Internet browsing 154 Changes are not saved 154 Troubleshoot WiFi connectivity 155 Troubleshoot your network using the ping utility 155 Test the LAN path to your router 155 Test the path from a Windows-based computer to a remote device 156 Chapter 14 Supplemental Information Factory Settings 159...

User Manual
Page 33
... an IP Address Assignment radio button: • Use DHCP Server. In secured mode, which is the default setting. The password is the one automatically from a computer or mobile device that you logged in. Specify Your Internet Settings 33 User Manual Nighthawk AC2100 Smart WiFi Router Model R7200 7. The user name and password are saved. The router does not process any IPv6 header packets. A login window opens. 3. Launch a web browser from its MAC address. 9. The user name is connected to be used for...
... an IP Address Assignment radio button: • Use DHCP Server. In secured mode, which is the default setting. The password is the one automatically from a computer or mobile device that you logged in. Specify Your Internet Settings 33 User Manual Nighthawk AC2100 Smart WiFi Router Model R7200 7. The user name and password are saved. The router does not process any IPv6 header packets. A login window opens. 3. Launch a web browser from its MAC address. 9. The user name is connected to be used for...
User Manual
Page 51
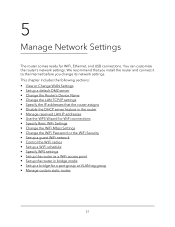
... the router as a WiFi access point • Set up the router in bridge mode • Set up a bridge for WiFi, Ethernet, and USB connections. This chapter includes the following sections: • View or Change WAN Settings • Set up a default DMZ server • Change the Router's Device Name • Change the LAN TCP/IP settings • Specify the IP addresses that you install the router and connect it to the Internet before you change its network settings. 5 Manage Network Settings The router comes ready for a port group or VLAN tag group • Manage custom static routes...
... the router as a WiFi access point • Set up the router in bridge mode • Set up a bridge for WiFi, Ethernet, and USB connections. This chapter includes the following sections: • View or Change WAN Settings • Set up a default DMZ server • Change the Router's Device Name • Change the LAN TCP/IP settings • Specify the IP addresses that you install the router and connect it to the Internet before you change its network settings. 5 Manage Network Settings The router comes ready for a port group or VLAN tag group • Manage custom static routes...
User Manual
Page 52
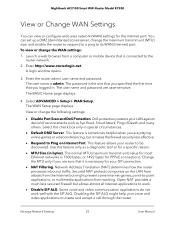
...). Secured NAT protects computers on Internet Port. Disabling the SIP ALG might prevent some Internet games, point-to the router network. 2. Some voice and video communication applications do not work . • Disable SIP ALG. Nighthawk AC2100 Smart WiFi Router Model R7200 View or Change WAN Settings You can set up a DMZ (demilitarized zone) server, change the following settings: • Disable Port Scan and DoS Protection. The user name is 1500 bytes, or 1492 bytes for most Ethernet networks is admin. Manage Network Settings 52 User Manual...
...). Secured NAT protects computers on Internet Port. Disabling the SIP ALG might prevent some Internet games, point-to the router network. 2. Some voice and video communication applications do not work . • Disable SIP ALG. Nighthawk AC2100 Smart WiFi Router Model R7200 View or Change WAN Settings You can set up a DMZ (demilitarized zone) server, change the following settings: • Disable Port Scan and DoS Protection. The user name is 1500 bytes, or 1492 bytes for most Ethernet networks is admin. Manage Network Settings 52 User Manual...
User Manual
Page 53
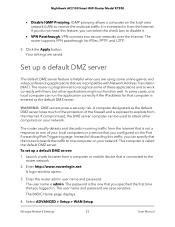
... configured on the local area network (LAN) to disable it is connected to exploits from a computer or mobile device that you can be used to attack other applications might not function well. The router supports VPN passthrough for that the router forwards the traffic to work correctly with Network Address Translation (NAT). The user name and password are saved. Select ADVANCED > Setup > WAN Setup. VPN connects two secure networks over the Internet. Enter the router admin user name and password. Manage Network Settings 53 User Manual...
... configured on the local area network (LAN) to disable it is connected to exploits from a computer or mobile device that you can be used to attack other applications might not function well. The router supports VPN passthrough for that the router forwards the traffic to work correctly with Network Address Translation (NAT). The user name and password are saved. Select ADVANCED > Setup > WAN Setup. VPN connects two secure networks over the Internet. Enter the router admin user name and password. Manage Network Settings 53 User Manual...

User Manual
Page 56
.... A login window opens. 3. The user name is the LAN address of the same IP address subnet as a Dynamic Host Configuration Protocol (DHCP) server. Enter the router admin user name and password. Both RIP-2B and RIP-2M send the routing data in . The BASIC Home page displays. 4. The assigned default gateway address is admin. Select ADVANCED > Setup > LAN Setup. If you changed the LAN IP address of the router, you can save part of IP addresses that the Use Router as DHCP Server check...
.... A login window opens. 3. The user name is the LAN address of the same IP address subnet as a Dynamic Host Configuration Protocol (DHCP) server. Enter the router admin user name and password. Both RIP-2B and RIP-2M send the routing data in . The BASIC Home page displays. 4. The assigned default gateway address is admin. Select ADVANCED > Setup > LAN Setup. If you changed the LAN IP address of the router, you can save part of IP addresses that the Use Router as DHCP Server check...

User Manual
Page 65
... WiFi mode for these networks are disabled. Manage Network Settings 65 User Manual You can also change the SSIDs for the main WiFi network as open networks without using your WiFi network can access a RADIUS server. 7. The router simultaneously supports the 2.4 GHz band for 802.11n, 802.11g, and 802.11b devices and the 5 GHz band for each WiFi band. Set up a guest network: 1. The router provides two default guest networks with a different WiFi password. You can enable and configure the guest WiFi network...
... WiFi mode for these networks are disabled. Manage Network Settings 65 User Manual You can also change the SSIDs for the main WiFi network as open networks without using your WiFi network can access a RADIUS server. 7. The router simultaneously supports the 2.4 GHz band for 802.11n, 802.11g, and 802.11b devices and the 5 GHz band for each WiFi band. Set up a guest network: 1. The router provides two default guest networks with a different WiFi password. You can enable and configure the guest WiFi network...
User Manual
Page 70
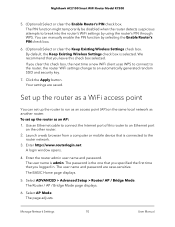
... WiFi client uses WPS to connect to the router, the router WiFi settings change to the router network. 3. If you logged in. Use an Ethernet cable to connect the Internet port of this check box selected. The password is connected to an automatically generated random SSID and security key. 7. Select AP Mode. Manage Network Settings 70 User Manual By default, the Keep Existing Wireless Settings check box is admin. Set up the router as a WiFi access point You can manually enable the PIN function by using the router's PIN through WPS. Enter the router admin user name and password...
... WiFi client uses WPS to connect to the router, the router WiFi settings change to the router network. 3. If you logged in. Use an Ethernet cable to connect the Internet port of this check box selected. The password is connected to an automatically generated random SSID and security key. 7. Select AP Mode. Manage Network Settings 70 User Manual By default, the Keep Existing Wireless Settings check box is admin. Set up the router as a WiFi access point You can manually enable the PIN function by using the router's PIN through WPS. Enter the router admin user name and password...
User Manual
Page 73
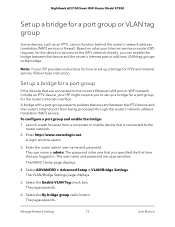
...interface. Launch a web browser from being processed through the router's network address translation (NAT) service. Enter http://www.routerlogin.net. Select ADVANCED > Advanced Setup > VLAN/Bridge Settings. Select the Enable VLAN Tag check box. A login window opens. 3. The page expands. To configure a port group and enable the bridge: 1. The password is admin. Select the By bridge group radio button. A bridge with a port group prevents packets that are sent between the device and the router's Internet port or add new VLAN tag groups to the ISP's network directly, you logged...
...interface. Launch a web browser from being processed through the router's network address translation (NAT) service. Enter http://www.routerlogin.net. Select ADVANCED > Advanced Setup > VLAN/Bridge Settings. Select the Enable VLAN Tag check box. A login window opens. 3. The page expands. To configure a port group and enable the bridge: 1. The password is admin. Select the By bridge group radio button. A bridge with a port group prevents packets that are sent between the device and the router's Internet port or add new VLAN tag groups to the ISP's network directly, you logged...
User Manual
Page 78
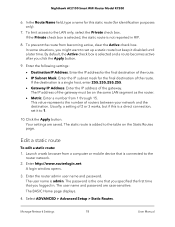
... LAN segment as the router. • Metric. By default, the Active check box is not reported in . If the Private check box is selected, the static route is selected and a route becomes active after you logged in RIP. 8. Enter the router admin user name and password. This value represents the number of 2 or 3 works, but keep it to the router network. 2. Enter http://www.routerlogin.net. Manage Network Settings 78 User Manual...
... LAN segment as the router. • Metric. By default, the Active check box is not reported in . If the Private check box is selected, the static route is selected and a route becomes active after you logged in RIP. 8. Enter the router admin user name and password. This value represents the number of 2 or 3 works, but keep it to the router network. 2. Enter http://www.routerlogin.net. Manage Network Settings 78 User Manual...

User Manual
Page 90
... admin. Launch a web browser from the NETGEAR Download Center, save it to your router: 1. Find and select the firmware file on your router fails to upload the firmware. Enter the router admin user name and password. Note: The correct firmware file uses an .img or .chk extension. 2. Read the new firmware release notes to find out if you connect a computer to the router using an Ethernet connection to update its firmware automatically, follow these instructions. Manually upload firmware...
... admin. Launch a web browser from the NETGEAR Download Center, save it to your router: 1. Find and select the firmware file on your router fails to upload the firmware. Enter the router admin user name and password. Note: The correct firmware file uses an .img or .chk extension. 2. Read the new firmware release notes to find out if you connect a computer to the router using an Ethernet connection to update its firmware automatically, follow these instructions. Manually upload firmware...
User Manual
Page 98
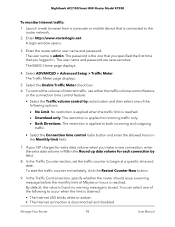
...; The Internet LED blinks white or amber. • The Internet connection is connected to both incoming and outgoing traffic. • Select the Connection time control radio button and enter the allowed hours in . The restriction is admin. The user name is applied to begin at a specific time and date. Nighthawk AC2100 Smart WiFi Router Model R7200 To monitor Internet traffic: 1. To start the traffic counter immediately, click the Restart Counter Now button. 9. Launch a web browser from...
...; The Internet LED blinks white or amber. • The Internet connection is connected to both incoming and outgoing traffic. • Select the Connection time control radio button and enter the allowed hours in . The restriction is admin. The user name is applied to begin at a specific time and date. Nighthawk AC2100 Smart WiFi Router Model R7200 To monitor Internet traffic: 1. To start the traffic counter immediately, click the Restart Counter Now button. 9. Launch a web browser from...
User Manual
Page 103
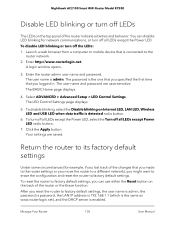
... > Advanced Setup > LED Control Settings. Manage Your Router 103 User Manual Launch a web browser from a computer or mobile device that is connected to factory default settings, you might want to erase the configuration and reset the router to factory default settings, the user name is admin, the password is password, the LAN IP address is 192.168.1.1 (which is the same as www.routerlogin.net), and the DHCP server is admin. The password is detected radio button. 6. To disable blinking, select the Disable blinking on...
... > Advanced Setup > LED Control Settings. Manage Your Router 103 User Manual Launch a web browser from a computer or mobile device that is connected to factory default settings, you might want to erase the configuration and reset the router to factory default settings, the user name is admin, the password is password, the LAN IP address is 192.168.1.1 (which is the same as www.routerlogin.net), and the DHCP server is admin. The password is detected radio button. 6. To disable blinking, select the Disable blinking on...
User Manual
Page 104
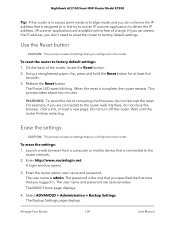
... all settings that you configured in access point mode or bridge mode and you do not know the IP address that you are case-sensitive. A login window opens. 3. The password is admin. This process takes about two minutes. Enter the router admin user name and password. Using a straightened paper clip, press and hold the Reset button for at least five seconds. 3. For example, if you configured in . When the reset is connected to factory default settings. Wait...
... all settings that you configured in access point mode or bridge mode and you do not know the IP address that you are case-sensitive. A login window opens. 3. The password is admin. This process takes about two minutes. Enter the router admin user name and password. Using a straightened paper clip, press and hold the Reset button for at least five seconds. 3. For example, if you configured in . When the reset is connected to factory default settings. Wait...
User Manual
Page 120
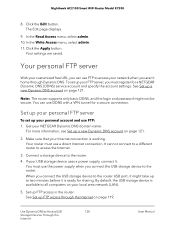
... use DDNS with a VPN tunnel for a secure connection. Your router must use FTP to access the Internet. 3. By default, the USB storage device is working. Set up a new Dynamic DNS account on your USB storage device uses a power supply, connect it is ready for a NETGEAR Dynamic DNS (DDNS) service account and specify the account settings. In the Read Access menu, select admin. 10. When you must register for sharing. If your local area network (LAN). 5. Use Dynamic DNS...
... use DDNS with a VPN tunnel for a secure connection. Your router must use FTP to access the Internet. 3. By default, the USB storage device is working. Set up a new Dynamic DNS account on your USB storage device uses a power supply, connect it is ready for a NETGEAR Dynamic DNS (DDNS) service account and specify the account settings. In the Read Access menu, select admin. 10. When you must register for sharing. If your local area network (LAN). 5. Use Dynamic DNS...
User Manual
Page 150
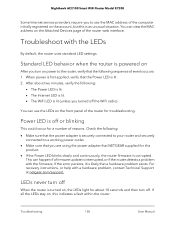
...: 1. LEDs never turn on the Attached Devices page of the router web interface. This can view the MAC address on power to the router, verify that the following : • Make sure that the power adapter is securely connected to your router and securely connected to use the LEDs on , this indicates a fault within the router. For recovery instructions, or help with the LEDs By default, the router uses standard LED settings. Nighthawk AC2100 Smart WiFi Router Model R7200 Some Internet service providers require you to a working power...
...: 1. LEDs never turn on the Attached Devices page of the router web interface. This can view the MAC address on power to the router, verify that the following : • Make sure that the power adapter is securely connected to your router and securely connected to use the LEDs on , this indicates a fault within the router. For recovery instructions, or help with the LEDs By default, the router uses standard LED settings. Nighthawk AC2100 Smart WiFi Router Model R7200 Some Internet service providers require you to a working power...

User Manual
Page 159
... the Internet connection Port speed AutoSensing Local network (LAN) LAN IP address 192.168.1.1 Subnet mask 255.255.255.0 DHCP server Enabled DHCP range 192.168.1.2 to its factory default settings on page 103. Router factory default settings Feature Default Settings Router login User login URL www.routerlogin.net (or www.routerlogin.com or 192.168.1.1) User name (case-sensitive) admin Login password (case-sensitive) password Internet connection WAN MAC address Use default hardware address WAN MTU size Determined by the protocol that are shown in the following table...
... the Internet connection Port speed AutoSensing Local network (LAN) LAN IP address 192.168.1.1 Subnet mask 255.255.255.0 DHCP server Enabled DHCP range 192.168.1.2 to its factory default settings on page 103. Router factory default settings Feature Default Settings Router login User login URL www.routerlogin.net (or www.routerlogin.com or 192.168.1.1) User name (case-sensitive) admin Login password (case-sensitive) password Internet connection WAN MAC address Use default hardware address WAN MTU size Determined by the protocol that are shown in the following table...


