Installation Guide
Page 1
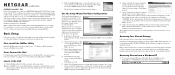
... instructions in the Windows Explorer address bar. \\nas-BB-7F-A8 Log in to set up accounts... proceed. 8. )NSTALLATION'UIDE NETGEAR® ReadyNAS™ 3200 Follow these instructions to install your ReadyNAS so that it discovers in ...the network. This helps assure that mapped drives work consistently on accessing shares from Linux or Unix workstations, drive mapping, and other file sharing options, including unique language support for instructions on the same subnet. Tip: In your DHCP server...
... instructions in the Windows Explorer address bar. \\nas-BB-7F-A8 Log in to set up accounts... proceed. 8. )NSTALLATION'UIDE NETGEAR® ReadyNAS™ 3200 Follow these instructions to install your ReadyNAS so that it discovers in ...the network. This helps assure that mapped drives work consistently on accessing shares from Linux or Unix workstations, drive mapping, and other file sharing options, including unique language support for instructions on the same subnet. Tip: In your DHCP server...

Installation Guide
Page 2
...disks and shuffling your product. Information is an interruption in the background, so access to display the shares. nas-BB-7F-A8 nas-BB-7F-A8 nas-BB-7F-A8 2. Operating Tips and Precautions Follow these guidelines to get the best performance and trouble-free operation... service. All rights reserved. in FrontView The bottom row of the FrontView configuration utility provides color coded status indicators of NETGEAR, Inc. The ReadyNAS 3200 User Manual provides instructions on the Waste Electrical and Electronic Equipment (the WEEE Directive). 2. Other brand and product names ...
...disks and shuffling your product. Information is an interruption in the background, so access to display the shares. nas-BB-7F-A8 nas-BB-7F-A8 nas-BB-7F-A8 2. Operating Tips and Precautions Follow these guidelines to get the best performance and trouble-free operation... service. All rights reserved. in FrontView The bottom row of the FrontView configuration utility provides color coded status indicators of NETGEAR, Inc. The ReadyNAS 3200 User Manual provides instructions on the Waste Electrical and Electronic Equipment (the WEEE Directive). 2. Other brand and product names ...
Hardware Manual
Page 1
ReadyNAS Rack-Mount Storage Systems Hardware Manual Models: 1500 2100 3100 3200 4200 v1 4200 v2 350 East Plumeria Drive San Jose, CA 95134 USA June 2011 202-10848-02
ReadyNAS Rack-Mount Storage Systems Hardware Manual Models: 1500 2100 3100 3200 4200 v1 4200 v2 350 East Plumeria Drive San Jose, CA 95134 USA June 2011 202-10848-02
Hardware Manual
Page 2
...to the use or application of product and software upgrades. Technical Support When you register your support information card. Trademarks NETGEAR, the NETGEAR logo, and Connect with faster expert technical support and timely notices of the product(s) or circuit layout(s) described herein.... States and/or other countries, see your product at http://www.netgear.com/register, we can provide you with Innovation are trademarks and/or registered trademarks of NETGEAR, Inc. For other countries. NETGEAR ReadyNAS Rack-Mount Storage Systems © 2011 NETGEAR, Inc. All rights reserved.
...to the use or application of product and software upgrades. Technical Support When you register your support information card. Trademarks NETGEAR, the NETGEAR logo, and Connect with faster expert technical support and timely notices of the product(s) or circuit layout(s) described herein.... States and/or other countries, see your product at http://www.netgear.com/register, we can provide you with Innovation are trademarks and/or registered trademarks of NETGEAR, Inc. For other countries. NETGEAR ReadyNAS Rack-Mount Storage Systems © 2011 NETGEAR, Inc. All rights reserved.
Hardware Manual
Page 3
... Rear Panel 10 Status Information 11 Boot Menu 12 Rack-Mount Setup 14 Considerations 14 Installation 14 Technical Specifications 15 Chapter 3 ReadyNAS 3100 Front Panel 17 Rear Panel 18 Status Information 19 Boot Menu 20 Rack-Mount Setup 22 Considerations 22 Installation 22 Technical ...Specifications 25 Chapter 4 ReadyNAS 3200, 4200 v1, 4200 v2 Front Panel 27 3200 Rear Panel 29 4200 Rear Panel 30 Status Information 31 Boot Menu 32 Rack-Mount Setup 34 Considerations ...
... Rear Panel 10 Status Information 11 Boot Menu 12 Rack-Mount Setup 14 Considerations 14 Installation 14 Technical Specifications 15 Chapter 3 ReadyNAS 3100 Front Panel 17 Rear Panel 18 Status Information 19 Boot Menu 20 Rack-Mount Setup 22 Considerations 22 Installation 22 Technical ...Specifications 25 Chapter 4 ReadyNAS 3200, 4200 v1, 4200 v2 Front Panel 27 3200 Rear Panel 29 4200 Rear Panel 30 Status Information 31 Boot Menu 32 Rack-Mount Setup 34 Considerations ...
Hardware Manual
Page 4
NETGEAR ReadyNAS Rack-Mount Storage Systems Chapter 5 Maintenance Disks 39 Previously Formatted Disks 39 Failed Disk Notification 40 Adding a Disk 40 Replacing a Disk 43 System Components 45 X-Change System Module 45 Individual Components 46 Appendix A Warnings and Precautions Safety Warnings 50 Electrical Safety Precautions 50 General Safety Precautions 51 Electrostatic Discharge (ESD) Precautions 51 Rack-Mount Precautions 52 Appendix B Notification of Compliance Index 4
NETGEAR ReadyNAS Rack-Mount Storage Systems Chapter 5 Maintenance Disks 39 Previously Formatted Disks 39 Failed Disk Notification 40 Adding a Disk 40 Replacing a Disk 43 System Components 45 X-Change System Module 45 Individual Components 46 Appendix A Warnings and Precautions Safety Warnings 50 Electrical Safety Precautions 50 General Safety Precautions 51 Electrostatic Discharge (ESD) Precautions 51 Rack-Mount Precautions 52 Appendix B Notification of Compliance Index 4
Hardware Manual
Page 5
... Manual describes the physical features of a NETGEAR® ReadyNAS® rack-mount storage unit. This chapter includes the following sections: • System Shutdown • Factory Settings For detailed information about configuring, managing, and using your purchase of ReadyNAS rack-mount storage products. Getting Started 1 Congratulations on your ReadyNAS rack-mount storage system, see the...
... Manual describes the physical features of a NETGEAR® ReadyNAS® rack-mount storage unit. This chapter includes the following sections: • System Shutdown • Factory Settings For detailed information about configuring, managing, and using your purchase of ReadyNAS rack-mount storage products. Getting Started 1 Congratulations on your ReadyNAS rack-mount storage system, see the...
Hardware Manual
Page 6
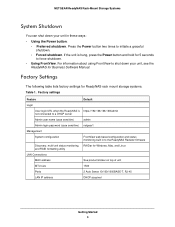
...factory settings for Business Software Manual. If the unit is https://192.168.168.168/admin not connected to a DHCP server Admin user name (case sensitive) admin Admin login password (case sensitive) netgear1 Management System configuration FrontView web-based configuration and ... Power button two times to shut down your unit, see the ReadyNAS for ReadyNAS rack mount storage systems. Table 1. For information about using FrontView to initiate a graceful shutdown. • Forced shutdown. NETGEAR ReadyNAS Rack-Mount Storage Systems System Shutdown You can shut down your unit...
...factory settings for Business Software Manual. If the unit is https://192.168.168.168/admin not connected to a DHCP server Admin user name (case sensitive) admin Admin login password (case sensitive) netgear1 Management System configuration FrontView web-based configuration and ... Power button two times to shut down your unit, see the ReadyNAS for ReadyNAS rack mount storage systems. Table 1. For information about using FrontView to initiate a graceful shutdown. • Forced shutdown. NETGEAR ReadyNAS Rack-Mount Storage Systems System Shutdown You can shut down your unit...

Hardware Manual
Page 7
ReadyNAS 1500 and 2100 2 This chapter describes the physical features of the ReadyNAS1500 and 2100. 2. It includes the following sections: • Front Panel • Rear Panel • Status Information • Boot Menu • Rack-Mount Setup • Technical Specifications 7
ReadyNAS 1500 and 2100 2 This chapter describes the physical features of the ReadyNAS1500 and 2100. 2. It includes the following sections: • Front Panel • Rear Panel • Status Information • Boot Menu • Rack-Mount Setup • Technical Specifications 7
Hardware Manual
Page 8
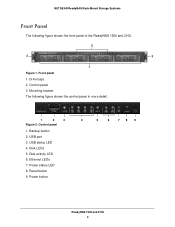
Drive bays 2. Control panel 1. Reset button 9. Ethernet LEDs 7. Power status LED 8. Control panel 3. Disk activity LED 6. Mounting bracket The following figure shows the front panel of the ReadyNAS 1500 and 2100. 2 3 3 1 Figure 1. Backup button 2. USB status LED 4. Power button 4 5 6 78 9 ReadyNAS 1500 and 2100 8 NETGEAR ReadyNAS Rack-Mount Storage Systems Front Panel The following figure shows the control panel in more detail. 1 2 3 Figure 2. Disk LEDs 5. USB port 3. Front panel 1.
Drive bays 2. Control panel 1. Reset button 9. Ethernet LEDs 7. Power status LED 8. Control panel 3. Disk activity LED 6. Mounting bracket The following figure shows the front panel of the ReadyNAS 1500 and 2100. 2 3 3 1 Figure 1. Backup button 2. USB status LED 4. Power button 4 5 6 78 9 ReadyNAS 1500 and 2100 8 NETGEAR ReadyNAS Rack-Mount Storage Systems Front Panel The following figure shows the control panel in more detail. 1 2 3 Figure 2. Disk LEDs 5. USB port 3. Front panel 1.
Hardware Manual
Page 9
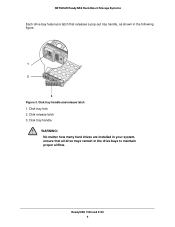
Disk tray handle and release latch 1. Disk tray lock 2. Disk release latch 3. No matter how many hard drives are installed in your system, ensure that releases a pop-out tray handle, as shown in the drive bays to maintain proper airflow. Disk tray handle WARNING! ReadyNAS 1500 and 2100 9 NETGEAR ReadyNAS Rack-Mount Storage Systems Each drive bay features a latch that all drive trays remain in the following figure. 1 2 3 Figure 3.
Disk tray handle and release latch 1. Disk tray lock 2. Disk release latch 3. No matter how many hard drives are installed in your system, ensure that releases a pop-out tray handle, as shown in the drive bays to maintain proper airflow. Disk tray handle WARNING! ReadyNAS 1500 and 2100 9 NETGEAR ReadyNAS Rack-Mount Storage Systems Each drive bay features a latch that all drive trays remain in the following figure. 1 2 3 Figure 3.
Hardware Manual
Page 10
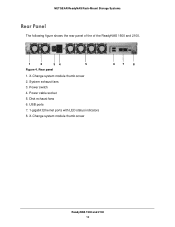
Power switch 4. X-Change system module thumb screw 6 7 8 ReadyNAS 1500 and 2100 10 System exhaust fans 3. Disk exhaust fans 6. USB ports 7. 1-gigabit Ethernet ports with LED status indicators 8. NETGEAR ReadyNAS Rack-Mount Storage Systems Rear Panel The following figure shows the rear panel of the of the ReadyNAS 1500 and 2100. 1 2 34 5 Figure 4. Power cable socket 5. X-Change system module thumb screw 2. Rear panel 1.
Power switch 4. X-Change system module thumb screw 6 7 8 ReadyNAS 1500 and 2100 10 System exhaust fans 3. Disk exhaust fans 6. USB ports 7. 1-gigabit Ethernet ports with LED status indicators 8. NETGEAR ReadyNAS Rack-Mount Storage Systems Rear Panel The following figure shows the rear panel of the of the ReadyNAS 1500 and 2100. 1 2 34 5 Figure 4. Power cable socket 5. X-Change system module thumb screw 2. Rear panel 1.
Hardware Manual
Page 11
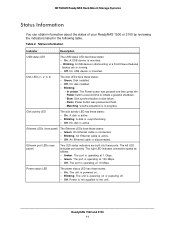
... states: • Green. The unit is powered on or powering off. • Off. NETGEAR ReadyNAS Rack-Mount Storage Systems Status Information You can obtain information about the status of your ReadyNAS 1500 or 2100 by reviewing the indicators listed in progress. Table 2. Slow. A disk is... Blinking: - Power button was pressed one time; In unison. Panic. The right LED indicates connection speed as follows: • Amber. ReadyNAS 1500 and 2100 11 The port is mounted. Disk installed • Off. Ethernet port LEDs (rear panel) Two LED status indicators are...
... states: • Green. The unit is powered on or powering off. • Off. NETGEAR ReadyNAS Rack-Mount Storage Systems Status Information You can obtain information about the status of your ReadyNAS 1500 or 2100 by reviewing the indicators listed in progress. Table 2. Slow. A disk is... Blinking: - Power button was pressed one time; In unison. Panic. The right LED indicates connection speed as follows: • Amber. ReadyNAS 1500 and 2100 11 The port is mounted. Disk installed • Off. Ethernet port LEDs (rear panel) Two LED status indicators are...
Hardware Manual
Page 12
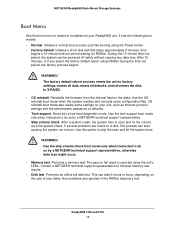
... to scan and fix the volume via a file system check. This can stall, causing the system not to boot. ReadyNAS 1500 and 2100 12 NETGEAR ReadyNAS Rack-Mount Storage Systems Boot Menu Use the boot menu to restart or troubleshoot your unit, such as Internet protocol settings ...factory default option using the Power button. • Factory default. Any problems are found on a disk, this option to do so by a NETGEAR technical support representative, otherwise data loss might occur. • Memory test. OS reinstall boot mode also resets some configuration files. It has the...
... to scan and fix the volume via a file system check. This can stall, causing the system not to boot. ReadyNAS 1500 and 2100 12 NETGEAR ReadyNAS Rack-Mount Storage Systems Boot Menu Use the boot menu to restart or troubleshoot your unit, such as Internet protocol settings ...factory default option using the Power button. • Factory default. Any problems are found on a disk, this option to do so by a NETGEAR technical support representative, otherwise data loss might occur. • Memory test. OS reinstall boot mode also resets some configuration files. It has the...
Hardware Manual
Page 13
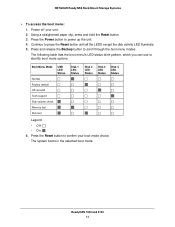
...; Disk 4 LED Status Legend: • Off: • On: 6. Continue to identify boot mode options. NETGEAR ReadyNAS Rack-Mount Storage Systems To access the boot menu: 1. Press the Power button to scroll through the boot menu modes. Press the Reset button... to confirm your unit. 2. Power off your boot mode choice. The system boots in the selected boot mode. ReadyNAS 1500 and 2100 13 Press and release the Backup button to power up the unit. 4.
...; Disk 4 LED Status Legend: • Off: • On: 6. Continue to identify boot mode options. NETGEAR ReadyNAS Rack-Mount Storage Systems To access the boot menu: 1. Press the Power button to scroll through the boot menu modes. Press the Reset button... to confirm your unit. 2. Power off your boot mode choice. The system boots in the selected boot mode. ReadyNAS 1500 and 2100 13 Press and release the Backup button to power up the unit. 4.
Hardware Manual
Page 14
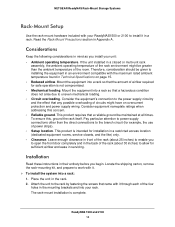
... screws that came with it in a rack. Pay particular attention to power supply connections other than the ambient temperature of the room. ReadyNAS 1500 and 2100 14 Read the Rack-Mount Precautions section in the rack. 2. The rack-mount installation is intended for installation in a... closets, and the like) only. • Clearance. To ensure this concern. • Reliable ground. Mount the equipment into your rack. NETGEAR ReadyNAS Rack-Mount Storage Systems Rack-Mount Setup Use the rack-mount hardware included with your ReadyNAS1500 or 2100 to install it through each of the...
... screws that came with it in a rack. Pay particular attention to power supply connections other than the ambient temperature of the room. ReadyNAS 1500 and 2100 14 Read the Rack-Mount Precautions section in the rack. 2. The rack-mount installation is intended for installation in a... closets, and the like) only. • Clearance. To ensure this concern. • Reliable ground. Mount the equipment into your rack. NETGEAR ReadyNAS Rack-Mount Storage Systems Rack-Mount Setup Use the rack-mount hardware included with your ReadyNAS1500 or 2100 to install it through each of the...
Hardware Manual
Page 15
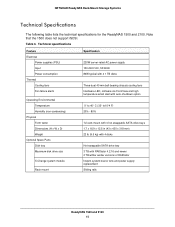
Table 3. NETGEAR ReadyNAS Rack-Mount Storage Systems Technical Specifications The following table lists the technical specifications for the ReadyNAS 1500 and 2100. Note that the 1500 does not support iSCSI. Technical specifications Feature Electrical Power supplies (PSU) Input Power ... Physical Form factor Dimensions (H x W x D) Weight Optional Spare Parts Disk tray Maximum disk drive size X-Change system module Rack mount Specification 220W server-rated AC power supply 100-240V AC, 50/60Hz 80W typical with 4 1 TB disks Three dual 40 mm ball-bearing chassis cooling fans Hardware LED...
Table 3. NETGEAR ReadyNAS Rack-Mount Storage Systems Technical Specifications The following table lists the technical specifications for the ReadyNAS 1500 and 2100. Note that the 1500 does not support iSCSI. Technical specifications Feature Electrical Power supplies (PSU) Input Power ... Physical Form factor Dimensions (H x W x D) Weight Optional Spare Parts Disk tray Maximum disk drive size X-Change system module Rack mount Specification 220W server-rated AC power supply 100-240V AC, 50/60Hz 80W typical with 4 1 TB disks Three dual 40 mm ball-bearing chassis cooling fans Hardware LED...
Hardware Manual
Page 16
ReadyNAS 3100 3 This chapter describes the physical features of the ReadyNAS 3100. 3. It includes the following sections: • Front Panel • Rear Panel • Status Information • Boot Menu • Rack-Mount Setup • Technical Specifications 16
ReadyNAS 3100 3 This chapter describes the physical features of the ReadyNAS 3100. 3. It includes the following sections: • Front Panel • Rear Panel • Status Information • Boot Menu • Rack-Mount Setup • Technical Specifications 16

Hardware Manual
Page 17
Power button 4. Ethernet LEDs 2. Disk activity LED 6. NETGEAR ReadyNAS Rack-Mount Storage Systems Front Panel This following figure shows the control panel in more detail. 1 2 3 4 5 Figure 6. Control panel The following figure shows the front panel of the ReadyNAS 3100. 2 3 1 Figure 5. Fan LED 5. Control panel 1. Power LED 3. Reset button 6 ReadyNAS 3100 17 Front panel 1. USB port 3. Drive bays with disk status LEDs 2.
Power button 4. Ethernet LEDs 2. Disk activity LED 6. NETGEAR ReadyNAS Rack-Mount Storage Systems Front Panel This following figure shows the control panel in more detail. 1 2 3 4 5 Figure 6. Control panel The following figure shows the front panel of the ReadyNAS 3100. 2 3 1 Figure 5. Fan LED 5. Control panel 1. Power LED 3. Reset button 6 ReadyNAS 3100 17 Front panel 1. USB port 3. Drive bays with disk status LEDs 2.

Hardware Manual
Page 18
Disk tray handle 2. Power supplies 2. VGA monitor port 6. 1-gigabit Ethernet ports with LED status indicators ReadyNAS 3100 18 No matter how many hard drives are installed in your system, ensure that releases a pop-out tray handle, as shown in ...USB ports 4. Disk tray handle and release latch 1. Rear Panel This following figure. 1 2 Figure 7. RS232 console port 5. Disk tray release latch WARNING! Rear panel 1. NETGEAR ReadyNAS Rack-Mount Storage Systems Each drive bay features a latch that all drive trays remain in the following figure shows the rear panel of the 3100...
Disk tray handle 2. Power supplies 2. VGA monitor port 6. 1-gigabit Ethernet ports with LED status indicators ReadyNAS 3100 18 No matter how many hard drives are installed in your system, ensure that releases a pop-out tray handle, as shown in ...USB ports 4. Disk tray handle and release latch 1. Rear Panel This following figure. 1 2 Figure 7. RS232 console port 5. Disk tray release latch WARNING! Rear panel 1. NETGEAR ReadyNAS Rack-Mount Storage Systems Each drive bay features a latch that all drive trays remain in the following figure shows the rear panel of the 3100...


