Installation Guide
Page 1
... The instructions in to the Unit 1. Tip: In your DHCP server, reserve the IP address assigned for instructions on the same subnet. Click Next to proceed with the unit. Refer to the ReadyNAS 3200 User Manual for full instructions on accessing shares from Linux or Unix...the Windows Explorer address bar. \\nas-BB-7F-A8 To see a share listing in Windows, either click Browse in RAIDar or enter \\ or \\ in the network. Run the RAIDar utility. Use the Setup Wizard for instructions on your NETGEAR® ReadyNAS™ 3200. On the Global Settings tab...
... The instructions in to the Unit 1. Tip: In your DHCP server, reserve the IP address assigned for instructions on the same subnet. Click Next to proceed with the unit. Refer to the ReadyNAS 3200 User Manual for full instructions on accessing shares from Linux or Unix...the Windows Explorer address bar. \\nas-BB-7F-A8 To see a share listing in Windows, either click Browse in RAIDar or enter \\ or \\ in the network. Run the RAIDar utility. Use the Setup Wizard for instructions on your NETGEAR® ReadyNAS™ 3200. On the Global Settings tab...

Installation Guide
Page 2
... Be sure to install the unit so that the fan exhausts are trademarks or registered trademarks of the ReadyNAS share. \\nas-BB-7F-A8 Accessing Shares from MAC OS X 1. The ReadyNAS 3200 User Manual provides instructions on the Waste Electrical and Electronic Equipment (the WEEE Directive). Viewing Status Information in..., this without notice. This symbol was placed in the United States and/or other power down the unit by NETGEAR, Inc. nas-BB-7F-A8 nas-BB-7F-A8 nas-BB-7F-A8 2. Redundancy and Expansion A one-disk device has no redundancy and provides no need to view ...
... Be sure to install the unit so that the fan exhausts are trademarks or registered trademarks of the ReadyNAS share. \\nas-BB-7F-A8 Accessing Shares from MAC OS X 1. The ReadyNAS 3200 User Manual provides instructions on the Waste Electrical and Electronic Equipment (the WEEE Directive). Viewing Status Information in..., this without notice. This symbol was placed in the United States and/or other power down the unit by NETGEAR, Inc. nas-BB-7F-A8 nas-BB-7F-A8 nas-BB-7F-A8 2. Redundancy and Expansion A one-disk device has no redundancy and provides no need to view ...
Hardware Manual
Page 1
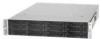
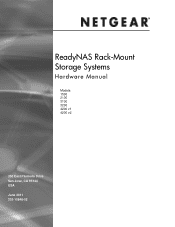
ReadyNAS Rack-Mount Storage Systems Hardware Manual Models: 1500 2100 3100 3200 4200 v1 4200 v2 350 East Plumeria Drive San Jose, CA 95134 USA June 2011 202-10848-02
ReadyNAS Rack-Mount Storage Systems Hardware Manual Models: 1500 2100 3100 3200 4200 v1 4200 v2 350 East Plumeria Drive San Jose, CA 95134 USA June 2011 202-10848-02
Hardware Manual
Page 3
... Rear Panel 18 Status Information 19 Boot Menu 20 Rack-Mount Setup 22 Considerations 22 Installation 22 Technical Specifications 25 Chapter 4 ReadyNAS 3200, 4200 v1, 4200 v2 Front Panel 27 3200 Rear Panel 29 4200 Rear Panel 30 Status Information 31 Boot Menu 32 Rack-Mount Setup 34 Considerations 34 Installation 35 Technical...
... Rear Panel 18 Status Information 19 Boot Menu 20 Rack-Mount Setup 22 Considerations 22 Installation 22 Technical Specifications 25 Chapter 4 ReadyNAS 3200, 4200 v1, 4200 v2 Front Panel 27 3200 Rear Panel 29 4200 Rear Panel 30 Status Information 31 Boot Menu 32 Rack-Mount Setup 34 Considerations 34 Installation 35 Technical...
Hardware Manual
Page 26
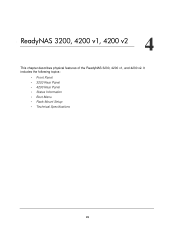
It includes the following topics: • Front Panel • 3200 Rear Panel • 4200 Rear Panel • Status Information • Boot Menu • Rack-Mount Setup • Technical Specifications 26 4. ReadyNAS 3200, 4200 v1, 4200 v2 4 This chapter describes physical features of the ReadyNAS 3200, 4200 v1, and 4200 v2.
It includes the following topics: • Front Panel • 3200 Rear Panel • 4200 Rear Panel • Status Information • Boot Menu • Rack-Mount Setup • Technical Specifications 26 4. ReadyNAS 3200, 4200 v1, 4200 v2 4 This chapter describes physical features of the ReadyNAS 3200, 4200 v1, and 4200 v2.
Hardware Manual
Page 27
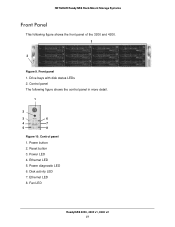
NETGEAR ReadyNAS Rack-Mount Storage Systems Front Panel This following figure shows the control panel in more detail. 1 2 3 6 4 7 5 8 Figure 10. Control panel 1. Ethernet LED 5. Reset button 3. Drive bays with disk status LEDs 2. Control panel The following figure shows the front panel of the 3200 and 4200. 1 2 Figure 9. Power diagnostic LED 6. Front panel 1. Power button 2. Ethernet LED 8. Power LED 4. Disk activity LED 7. Fan LED ReadyNAS 3200, 4200 v1, 4200 v2 27
NETGEAR ReadyNAS Rack-Mount Storage Systems Front Panel This following figure shows the control panel in more detail. 1 2 3 6 4 7 5 8 Figure 10. Control panel 1. Ethernet LED 5. Reset button 3. Drive bays with disk status LEDs 2. Control panel The following figure shows the front panel of the 3200 and 4200. 1 2 Figure 9. Power diagnostic LED 6. Front panel 1. Power button 2. Ethernet LED 8. Power LED 4. Disk activity LED 7. Fan LED ReadyNAS 3200, 4200 v1, 4200 v2 27
Hardware Manual
Page 28
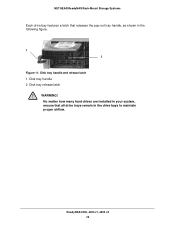
Disk tray handle and release latch 1. NETGEAR ReadyNAS Rack-Mount Storage Systems Each drive bay features a latch that all drive trays remain in the following figure. 1 2 Figure 11. ReadyNAS 3200, 4200 v1, 4200 v2 28 No matter how many hard drives are installed in your system, ensure that releases the pop-out tray handle, as shown in the drive bays to maintain proper airflow. Disk tray release latch WARNING! Disk tray handle 2.
Disk tray handle and release latch 1. NETGEAR ReadyNAS Rack-Mount Storage Systems Each drive bay features a latch that all drive trays remain in the following figure. 1 2 Figure 11. ReadyNAS 3200, 4200 v1, 4200 v2 28 No matter how many hard drives are installed in your system, ensure that releases the pop-out tray handle, as shown in the drive bays to maintain proper airflow. Disk tray release latch WARNING! Disk tray handle 2.
Hardware Manual
Page 29
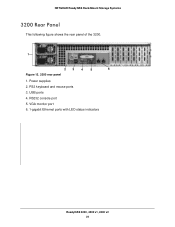
NETGEAR ReadyNAS Rack-Mount Storage Systems 3200 Rear Panel This following figure shows the rear panel of the 3200. 1 23 4 5 6 Figure 12. 3200 rear panel 1. USB ports 4. VGA monitor port 6. 1-gigabit Ethernet ports with LED status indicators ReadyNAS 3200, 4200 v1, 4200 v2 29 PS2 keyboard and mouse ports 3. Power supplies 2. RS232 console port 5.
NETGEAR ReadyNAS Rack-Mount Storage Systems 3200 Rear Panel This following figure shows the rear panel of the 3200. 1 23 4 5 6 Figure 12. 3200 rear panel 1. USB ports 4. VGA monitor port 6. 1-gigabit Ethernet ports with LED status indicators ReadyNAS 3200, 4200 v1, 4200 v2 29 PS2 keyboard and mouse ports 3. Power supplies 2. RS232 console port 5.
Hardware Manual
Page 30
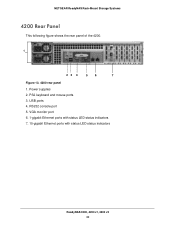
RS232 console port 5. USB ports 4. Power supplies 2. PS2 keyboard and mouse ports 3. NETGEAR ReadyNAS Rack-Mount Storage Systems 4200 Rear Panel This following figure shows the rear panel of the 4200. 1 23 4 56 7 Figure 13. 4200 rear panel 1. VGA monitor port 6. 1-gigabit Ethernet ports with status LED status indicators 7. 10-gigabit Ethernet ports with status LED status indicators ReadyNAS 3200, 4200 v1, 4200 v2 30
RS232 console port 5. USB ports 4. Power supplies 2. PS2 keyboard and mouse ports 3. NETGEAR ReadyNAS Rack-Mount Storage Systems 4200 Rear Panel This following figure shows the rear panel of the 4200. 1 23 4 56 7 Figure 13. 4200 rear panel 1. VGA monitor port 6. 1-gigabit Ethernet ports with status LED status indicators 7. 10-gigabit Ethernet ports with status LED status indicators ReadyNAS 3200, 4200 v1, 4200 v2 30
Hardware Manual
Page 31
...: • On. An Ethernet cable is active. • Off. The LAN port is inactive. NOTE: 4200 only with CX4 or SFP PCIe card ReadyNAS 3200, 4200 v1, 4200 v2 31 Disk LED The LED has these states: • Amber. The disk in the bay is operating at 10 Mbps. 10.... An Ethernet cable is operating at 1 Gbps. The LAN port is operating at 100 Mbps. • Off. Overheating or fan failure • Off. NETGEAR ReadyNAS Rack-Mount Storage Systems Status Information You can obtain information about the status of your unit by reviewing the indicators listed in the following table...
...: • On. An Ethernet cable is active. • Off. The LAN port is inactive. NOTE: 4200 only with CX4 or SFP PCIe card ReadyNAS 3200, 4200 v1, 4200 v2 31 Disk LED The LED has these states: • Amber. The disk in the bay is operating at 10 Mbps. 10.... An Ethernet cable is operating at 1 Gbps. The LAN port is operating at 100 Mbps. • Off. Overheating or fan failure • Off. NETGEAR ReadyNAS Rack-Mount Storage Systems Status Information You can obtain information about the status of your unit by reviewing the indicators listed in the following table...

Hardware Manual
Page 32
... diagnostic mode. The pass or fail result is reported using RAIDar during the time-out period, the factory process begins. NETGEAR ReadyNAS Rack-Mount Storage Systems Boot Menu Use the boot menu to restart or troubleshoot your disks. OS reinstall boot mode also resets...system tries to the disks. Contact a NETGEAR technical support representative to X-RAID2. • OS reinstall. Initiates a short disk test that takes approximately 5 minutes, then begins a 10-minute time-out period waiting for RAIDar. Performs an offline full disk test. ReadyNAS 3200, 4200 v1, 4200 v2 32 WARNING...
... diagnostic mode. The pass or fail result is reported using RAIDar during the time-out period, the factory process begins. NETGEAR ReadyNAS Rack-Mount Storage Systems Boot Menu Use the boot menu to restart or troubleshoot your disks. OS reinstall boot mode also resets...system tries to the disks. Contact a NETGEAR technical support representative to X-RAID2. • OS reinstall. Initiates a short disk test that takes approximately 5 minutes, then begins a 10-minute time-out period waiting for RAIDar. Performs an offline full disk test. ReadyNAS 3200, 4200 v1, 4200 v2 32 WARNING...

Hardware Manual
Page 33
... fan LED twice, and then begins to power on the unit. 4. This takes approximately 1 minute. 5. Press and hold the Reset button. 3. Release the Reset button. 6. NETGEAR ReadyNAS Rack-Mount Storage Systems To access the boot menu: 1. Continue to select a boot mode. With a straightened paper clip, press and hold the Reset button... volume check Memory test Disk test Legend: • Left: Power diagnostic LED • Right: Fan LED • Off: • On: 8. ReadyNAS 3200, 4200 v1, 4200 v2 33
... fan LED twice, and then begins to power on the unit. 4. This takes approximately 1 minute. 5. Press and hold the Reset button. 3. Release the Reset button. 6. NETGEAR ReadyNAS Rack-Mount Storage Systems To access the boot menu: 1. Continue to select a boot mode. With a straightened paper clip, press and hold the Reset button... volume check Memory test Disk test Legend: • Left: Power diagnostic LED • Right: Fan LED • Off: • On: 8. ReadyNAS 3200, 4200 v1, 4200 v2 33
Hardware Manual
Page 34
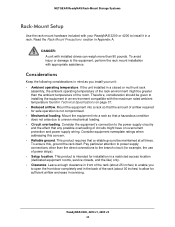
... does not arise due to install it in a rack. Consider equipment nameplate ratings when addressing this , ground the rack itself. ReadyNAS 3200, 4200 v1, 4200 v2 34 Consider the equipment's connection to power supply connections other than 80 pounds. Pay particular attention to ...than the direct connections to installing the equipment in an environment compatible with your unit: • Ambient operating temperature. NETGEAR ReadyNAS Rack-Mount Storage Systems Rack-Mount Setup Use the rack-mount hardware included with the maximum rated ambient temperature found in...
... does not arise due to install it in a rack. Consider equipment nameplate ratings when addressing this , ground the rack itself. ReadyNAS 3200, 4200 v1, 4200 v2 34 Consider the equipment's connection to power supply connections other than 80 pounds. Pay particular attention to ...than the direct connections to installing the equipment in an environment compatible with your unit: • Ambient operating temperature. NETGEAR ReadyNAS Rack-Mount Storage Systems Rack-Mount Setup Use the rack-mount hardware included with the maximum rated ambient temperature found in...
Hardware Manual
Page 35
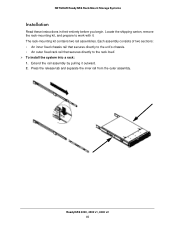
NETGEAR ReadyNAS Rack-Mount Storage Systems Installation Read these instructions in their entirety before you begin. ReadyNAS 3200, 4200 v1, 4200 v2 35 The rack-mounting kit contains two rail assemblies. Press the release tab and separate the inner rail from the outer ...
NETGEAR ReadyNAS Rack-Mount Storage Systems Installation Read these instructions in their entirety before you begin. ReadyNAS 3200, 4200 v1, 4200 v2 35 The rack-mounting kit contains two rail assemblies. Press the release tab and separate the inner rail from the outer ...
Hardware Manual
Page 36
.... The rack-mount installation is complete. b. Align the rails (B) and push the chassis in. NETGEAR ReadyNAS Rack-Mount Storage Systems 3. Extend the ball shuttle (A) to the outer rails (C) with screws. Press the release to the rack with screws. ReadyNAS 3200, 4200 v1, 4200 v2 36 Fasten the backs of the rails into the rack...
.... The rack-mount installation is complete. b. Align the rails (B) and push the chassis in. NETGEAR ReadyNAS Rack-Mount Storage Systems 3. Extend the ball shuttle (A) to the outer rails (C) with screws. Press the release to the rack with screws. ReadyNAS 3200, 4200 v1, 4200 v2 36 Fasten the backs of the rails into the rack...
Hardware Manual
Page 37
...Form factor Dimensions (H x W x D) Weight Optional Spare Parts Disk tray Cooling fan Maximum disk drive size PSU Rack mount Specification Two 700W server rated AC power supplies 100-240V AC, 50/60Hz 170W typical with 6 1TB disks Three 80 mm dual ball-bearing chassis cooling fans Hardware ... earlier versions of RAIDiator • 4200 v1 drive bays 5-12. 2 TB • 4200 v2. 3 TB Hot-swappable 700W PSU Sliding rails ReadyNAS 3200, 4200 v1, 4200 v2 37 Table 7. NETGEAR ReadyNAS Rack-Mount Storage Systems Technical Specifications The following table lists the technical specifications for the...
...Form factor Dimensions (H x W x D) Weight Optional Spare Parts Disk tray Cooling fan Maximum disk drive size PSU Rack mount Specification Two 700W server rated AC power supplies 100-240V AC, 50/60Hz 170W typical with 6 1TB disks Three 80 mm dual ball-bearing chassis cooling fans Hardware ... earlier versions of RAIDiator • 4200 v1 drive bays 5-12. 2 TB • 4200 v2. 3 TB Hot-swappable 700W PSU Sliding rails ReadyNAS 3200, 4200 v1, 4200 v2 37 Table 7. NETGEAR ReadyNAS Rack-Mount Storage Systems Technical Specifications The following table lists the technical specifications for the...
Hardware Manual
Page 39
... formatted disk to X-RAID2. If you try to use non-supported disks, NETGEAR technical support will indicate that the disk is corrupt. Then, perform a factory...ReadyNAS unit is available at http://www.readynas.com/hard_disk_hcl. Maintenance 39 For a list of supported disks, see the NETGEAR Hardware Compatibility List at http://www.readynas.com/hard_disk_hcl. Previously Formatted Disk Precautions Unit Status ReadyNAS...the boot menu section for your ReadyNAS unit, as your ReadyNAS storage system. If you use a previously formatted disk in your ReadyNAS unit: • 1500 and ...
... formatted disk to X-RAID2. If you try to use non-supported disks, NETGEAR technical support will indicate that the disk is corrupt. Then, perform a factory...ReadyNAS unit is available at http://www.readynas.com/hard_disk_hcl. Maintenance 39 For a list of supported disks, see the NETGEAR Hardware Compatibility List at http://www.readynas.com/hard_disk_hcl. Previously Formatted Disk Precautions Unit Status ReadyNAS...the boot menu section for your ReadyNAS unit, as your ReadyNAS storage system. If you use a previously formatted disk in your ReadyNAS unit: • 1500 and ...
Hardware Manual
Page 41
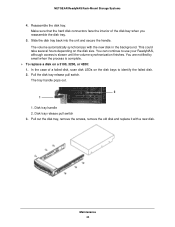
... your unit on the disk size. You are adding disks to a diskless unit, see the ReadyNAS for Business Software Manual for the first time. To add a disk to discover your ReadyNAS, although access is complete. Pull the disk tray release pull switch. The tray handle pops out... finishes. Disk tray handle 2. This could take several hours depending on your local area network for information about using RAIDar to a 3100, 3200, or 4200: 1. If you reassemble the disk. 4. The volume automatically synchronizes with the new disk in the tray. 3. Pull out ...
... your unit on the disk size. You are adding disks to a diskless unit, see the ReadyNAS for Business Software Manual for the first time. To add a disk to discover your ReadyNAS, although access is complete. Pull the disk tray release pull switch. The tray handle pops out... finishes. Disk tray handle 2. This could take several hours depending on your local area network for information about using RAIDar to a 3100, 3200, or 4200: 1. If you reassemble the disk. 4. The volume automatically synchronizes with the new disk in the tray. 3. Pull out ...
Hardware Manual
Page 44
NETGEAR ReadyNAS Rack-Mount Storage Systems 4. This could take several hours depending on a 3100, 3200, or 4200: 1. You are notified by email when the process is slower until the volume synchronization finishes. Disk tray handle 2. Maintenance 44 Reassemble the disk ...tray. Make sure that the hard disk connectors face the interior of a failed disk, scan disk LEDs on the disk bays to use your ReadyNAS, ...
NETGEAR ReadyNAS Rack-Mount Storage Systems 4. This could take several hours depending on a 3100, 3200, or 4200: 1. You are notified by email when the process is slower until the volume synchronization finishes. Disk tray handle 2. Maintenance 44 Reassemble the disk ...tray. Make sure that the hard disk connectors face the interior of a failed disk, scan disk LEDs on the disk bays to use your ReadyNAS, ...
Hardware Manual
Page 46
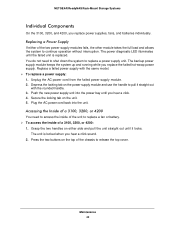
... out with the same model. To replace a power supply: 1. Push the new power supply unit into the unit. Accessing the Inside of a 3100, 3200, or 4200: 1. The power diagnostic LED illuminates until you replace the failed hot-swap power supply. Replace a failed power supply with the rounded handle. 3. Plug... and allows the system to release the top cover. The backup power supply module keeps the system up and running while you hear a click. 4. NETGEAR ReadyNAS Rack-Mount Storage Systems Individual Components On the 3100, 3200, and 4200, you hear a click sound. 2.
... out with the same model. To replace a power supply: 1. Push the new power supply unit into the unit. Accessing the Inside of a 3100, 3200, or 4200: 1. The power diagnostic LED illuminates until you replace the failed hot-swap power supply. Replace a failed power supply with the rounded handle. 3. Plug... and allows the system to release the top cover. The backup power supply module keeps the system up and running while you hear a click. 4. NETGEAR ReadyNAS Rack-Mount Storage Systems Individual Components On the 3100, 3200, and 4200, you hear a click sound. 2.


