
Hardware Manual
Page 13
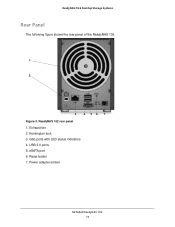
Reset button 7. GbE ports with LED status indicators 4. ReadyNAS OS 6 Desktop Storage Systems Rear Panel The following figure shows the rear panel of the ReadyNAS 102. 1 2 3 4 56 7 Figure 3. Kensington lock 3. USB 3.0 ports 5. Power adapter socket NETGEAR ReadyNAS 102 13 Exhaust fan 2. eSATA port 6. ReadyNAS 102 rear panel 1.
Reset button 7. GbE ports with LED status indicators 4. ReadyNAS OS 6 Desktop Storage Systems Rear Panel The following figure shows the rear panel of the ReadyNAS 102. 1 2 3 4 56 7 Figure 3. Kensington lock 3. USB 3.0 ports 5. Power adapter socket NETGEAR ReadyNAS 102 13 Exhaust fan 2. eSATA port 6. ReadyNAS 102 rear panel 1.

Hardware Manual
Page 16
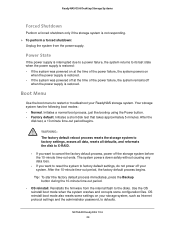
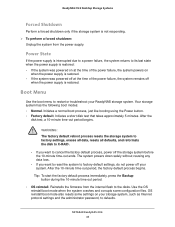
...booting using the storage system's LEDs. OS reinstall boot mode also resets some configuration files. Use the tech support boot mode only when a NETGEAR technical support representative instructs you want to reset the system to rescue data off the storage system before the 10...6.2 Software Manual, which is reported using the Power button. • Factory default. NETGEAR ReadyNAS 102 16 Your storage system has the following boot modes: • Normal. Contact a NETGEAR technical support representative to restart or troubleshoot your system. After the disk test, a ...
...booting using the storage system's LEDs. OS reinstall boot mode also resets some configuration files. Use the tech support boot mode only when a NETGEAR technical support representative instructs you want to reset the system to rescue data off the storage system before the 10...6.2 Software Manual, which is reported using the Power button. • Factory default. NETGEAR ReadyNAS 102 16 Your storage system has the following boot modes: • Normal. Contact a NETGEAR technical support representative to restart or troubleshoot your system. After the disk test, a ...

Hardware Manual
Page 17
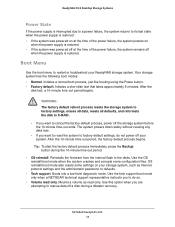
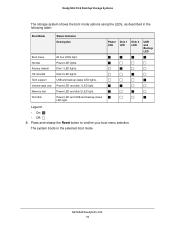
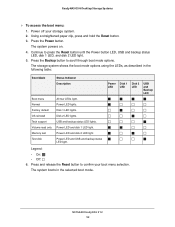
...Test disk All four LEDs light. The storage system shows the boot mode options using the LEDs, as described in the selected boot mode. NETGEAR ReadyNAS 102 17 Power LED lights. Disk 1 LED lights. Power LED and USB and backup status LED light. Disk 2 LED lights. Power...61539; Legend: • On: • Off: 6. Press and release the Reset button to confirm your storage system. 2. Press the Backup button to press the Reset button until the Power button LED, USB and backup status LED, disk 1 LED, and disk 2 LED light. 5. USB and...
...Test disk All four LEDs light. The storage system shows the boot mode options using the LEDs, as described in the selected boot mode. NETGEAR ReadyNAS 102 17 Power LED lights. Disk 1 LED lights. Power LED and USB and backup status LED light. Disk 2 LED lights. Power...61539; Legend: • On: • Off: 6. Press and release the Reset button to confirm your storage system. 2. Press the Backup button to press the Reset button until the Power button LED, USB and backup status LED, disk 1 LED, and disk 2 LED light. 5. USB and...

Hardware Manual
Page 21
... OS 6 Desktop Storage Systems Rear Panel The following figure shows the rear panel of the ReadyNAS 104. 23 4 5 1 6 7 Figure 6. Reset button 3. USB 3.0 ports 4. They can be used as two separate Ethernet connections, or can be configured as a single, bonded port with LED... status indicators Note: The two GbE ports are equivalent. Kensington lock NETGEAR ReadyNAS 104 21 For information on how to configure a bonded port, and the network configuration requirements needed to support 2 Gbps, see the ReadyNAS ...
... OS 6 Desktop Storage Systems Rear Panel The following figure shows the rear panel of the ReadyNAS 104. 23 4 5 1 6 7 Figure 6. Reset button 3. USB 3.0 ports 4. They can be used as two separate Ethernet connections, or can be configured as a single, bonded port with LED... status indicators Note: The two GbE ports are equivalent. Kensington lock NETGEAR ReadyNAS 104 21 For information on how to configure a bonded port, and the network configuration requirements needed to support 2 Gbps, see the ReadyNAS ...
Hardware Manual
Page 24
After the disk test, a 10-minute time-out period begins. If you want to reset the system to the disks. NETGEAR ReadyNAS 104 24 Power State If the power supply is interrupted due to a power failure, the system returns to its last state .... • Factory default. Initiates a short disk test that takes approximately 5 minutes. WARNING: The factory default reboot process resets the storage system to factory settings, erases all data, resets all defaults, and reformats the disk to cancel the factory default process, power off your ReadyNAS storage system. Use the OS...
After the disk test, a 10-minute time-out period begins. If you want to reset the system to the disks. NETGEAR ReadyNAS 104 24 Power State If the power supply is interrupted due to a power failure, the system returns to its last state .... • Factory default. Initiates a short disk test that takes approximately 5 minutes. WARNING: The factory default reboot process resets the storage system to factory settings, erases all data, resets all defaults, and reformats the disk to cancel the factory default process, power off your ReadyNAS storage system. Use the OS...

Hardware Manual
Page 25
...ReadyNAS OS 6 Desktop Storage Systems • Tech support. Use the tech support boot mode only when a NETGEAR technical support representative instructs you need, press and release the Reset button to rescue data off your storage system. 2. The pass or fail result is available at http://support...disk test. Using a straightened paper clip, press and hold the Reset button. 3. The status display screen shows the current boot mode option. 6. Power off a disk during a disaster recovery. • Memory test. NETGEAR ReadyNAS 104 25 Use this option when you are reported in the...
...ReadyNAS OS 6 Desktop Storage Systems • Tech support. Use the tech support boot mode only when a NETGEAR technical support representative instructs you need, press and release the Reset button to rescue data off your storage system. 2. The pass or fail result is available at http://support...disk test. Using a straightened paper clip, press and hold the Reset button. 3. The status display screen shows the current boot mode option. 6. Power off a disk during a disaster recovery. • Memory test. NETGEAR ReadyNAS 104 25 Use this option when you are reported in the...

Hardware Manual
Page 30
... a bonded port, and the network configuration requirements needed to support 2 Gbps, see the ReadyNAS OS 6.2 Software Manual, which is available at http://support.netgear.com/product/ReadyNAS-OS6. 6. Reset button 7. eSATA port 5. ReadyNAS OS 6 Desktop Storage Systems Rear Panel The following figure shows the rear panel of the ReadyNAS 202. 1 2 3 4 56 7 Figure...
... a bonded port, and the network configuration requirements needed to support 2 Gbps, see the ReadyNAS OS 6.2 Software Manual, which is available at http://support.netgear.com/product/ReadyNAS-OS6. 6. Reset button 7. eSATA port 5. ReadyNAS OS 6 Desktop Storage Systems Rear Panel The following figure shows the rear panel of the ReadyNAS 202. 1 2 3 4 56 7 Figure...
Hardware Manual
Page 33
... internal flash to X-RAID. - After the 10-minute time-out period, the factory default process begins. OS reinstall boot mode also resets some configuration files. Your storage system has the following boot modes: • Normal. If you want to cancel the factory default process... 5 minutes. WARNING: The factory default reboot process resets the storage system to factory settings, erases all data, resets all defaults, and reformats the disk to the disks. Use the tech support boot mode only when a NETGEAR technical support representative instructs you are attempting to do ...
... internal flash to X-RAID. - After the 10-minute time-out period, the factory default process begins. OS reinstall boot mode also resets some configuration files. Your storage system has the following boot modes: • Normal. If you want to cancel the factory default process... 5 minutes. WARNING: The factory default reboot process resets the storage system to factory settings, erases all data, resets all defaults, and reformats the disk to the disks. Use the tech support boot mode only when a NETGEAR technical support representative instructs you are attempting to do ...

Hardware Manual
Page 34
Performs an offline full disk test. Press the Power button. Press the Backup button to press the Reset button until the Power button LED, USB and backup status LED, disk 1 LED, and disk 2 LED light. 5. The memory test runs for 8hrs. For more , ... OS 6.2 Software Manual, which is reported using the storage system LEDs, as described in the system logs. Using a straightened paper clip, press and hold the Reset button. 3. Continue to scroll through boot mode options. NETGEAR ReadyNAS 202 34 The current status and the pass or fail result is available at http://support...
Performs an offline full disk test. Press the Power button. Press the Backup button to press the Reset button until the Power button LED, USB and backup status LED, disk 1 LED, and disk 2 LED light. 5. The memory test runs for 8hrs. For more , ... OS 6.2 Software Manual, which is reported using the storage system LEDs, as described in the system logs. Using a straightened paper clip, press and hold the Reset button. 3. Continue to scroll through boot mode options. NETGEAR ReadyNAS 202 34 The current status and the pass or fail result is available at http://support...
Hardware Manual
Page 35
... Description Boot menu Normal Factory default OS reinstall Tech support Volume read only Memory test Test disk All four LEDs light. Press and release the Reset button to confirm your boot menu selection. USB and backup status LED lights. Power LED and USB and backup status LED light. Disk 2 LED lights...
... Description Boot menu Normal Factory default OS reinstall Tech support Volume read only Memory test Test disk All four LEDs light. Press and release the Reset button to confirm your boot menu selection. USB and backup status LED lights. Power LED and USB and backup status LED light. Disk 2 LED lights...

Hardware Manual
Page 40
...or can be configured as a single, bonded port with LED status indicators Note: The two LAN ports are equivalent. Reset button 3. Exhaust fan 7. Kensington lock NETGEAR ReadyNAS 204 40 USB 3.0 ports 4. ReadyNAS 204 rear panel 1. For information on how to configure a bonded port, ...and the network configuration requirements needed to support 2 Gbps, see the ReadyNAS OS 6.2 Software Manual, which is available at http://support.netgear.com/product/ReadyNAS-OS6. 5. LAN ports with a 2 Gbps potential speed. Power cable socket 6. eSATA port 2. ReadyNAS OS 6 Desktop Storage...
...or can be configured as a single, bonded port with LED status indicators Note: The two LAN ports are equivalent. Reset button 3. Exhaust fan 7. Kensington lock NETGEAR ReadyNAS 204 40 USB 3.0 ports 4. ReadyNAS 204 rear panel 1. For information on how to configure a bonded port, ...and the network configuration requirements needed to support 2 Gbps, see the ReadyNAS OS 6.2 Software Manual, which is available at http://support.netgear.com/product/ReadyNAS-OS6. 5. LAN ports with a 2 Gbps potential speed. Power cable socket 6. eSATA port 2. ReadyNAS OS 6 Desktop Storage...
Hardware Manual
Page 43
... disk to cancel the factory default process, power off the storage system before the 10-minute time-out ends. If you want to reset the system to factory default settings, do not power off when the power supply is restored. Use the OS reinstall boot mode when ... normal boot process, just like booting using the Power button. • Factory default. After the disk test, a 10-minute time-out period begins. NETGEAR ReadyNAS 204 43 Initiates a short disk test that takes approximately 5 minutes. After the 10-minute time-out period, the factory default process begins. Reinstalls the...
... disk to cancel the factory default process, power off the storage system before the 10-minute time-out ends. If you want to reset the system to factory default settings, do not power off when the power supply is restored. Use the OS reinstall boot mode when ... normal boot process, just like booting using the Power button. • Factory default. After the disk test, a 10-minute time-out period begins. NETGEAR ReadyNAS 204 43 Initiates a short disk test that takes approximately 5 minutes. After the 10-minute time-out period, the factory default process begins. Reinstalls the...

Hardware Manual
Page 44
Use the tech support boot mode only when a NETGEAR technical support representative instructs you to do so. • Volume read -only. Performs an offline full disk test. Power off a disk during a disaster recovery. • Memory test. Press the Backup button to press the Reset button until the status display screen shows a boot menu...
Use the tech support boot mode only when a NETGEAR technical support representative instructs you to do so. • Volume read -only. Performs an offline full disk test. Power off a disk during a disaster recovery. • Memory test. Press the Backup button to press the Reset button until the status display screen shows a boot menu...
Hardware Manual
Page 48
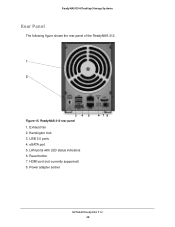
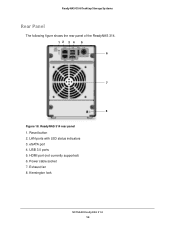
ReadyNAS 312 rear panel 1. LAN ports with LED status indicators 6. Kensington lock 3. USB 3.0 ports 4. HDMI port (not currently supported) 8. ReadyNAS OS 6 Desktop Storage Systems Rear Panel The following figure shows the rear panel of the ReadyNAS 312. 1 2 345 Figure 15. Power adapter socket 6 78 NETGEAR ReadyNAS 312 48 Exhaust fan 2. Reset button 7. eSATA port 5.
ReadyNAS 312 rear panel 1. LAN ports with LED status indicators 6. Kensington lock 3. USB 3.0 ports 4. HDMI port (not currently supported) 8. ReadyNAS OS 6 Desktop Storage Systems Rear Panel The following figure shows the rear panel of the ReadyNAS 312. 1 2 345 Figure 15. Power adapter socket 6 78 NETGEAR ReadyNAS 312 48 Exhaust fan 2. Reset button 7. eSATA port 5.

Hardware Manual
Page 51
...the factory default process immediately, press the Backup button during a disaster recovery. • Memory test. OS reinstall boot mode also resets some configuration files. This process can take four hours or more information about viewing the system logs, see the ReadyNAS OS 6.2 Software...short disk test that takes approximately 5 minutes. Reinstalls the firmware from the internal flash to interpret memory test results. • Test disk. NETGEAR ReadyNAS 312 51 Initiates a normal boot process, just like booting using the storage system's LEDs. After the disk test, a 10-minute ...
...the factory default process immediately, press the Backup button during a disaster recovery. • Memory test. OS reinstall boot mode also resets some configuration files. This process can take four hours or more information about viewing the system logs, see the ReadyNAS OS 6.2 Software...short disk test that takes approximately 5 minutes. Reinstalls the firmware from the internal flash to interpret memory test results. • Test disk. NETGEAR ReadyNAS 312 51 Initiates a normal boot process, just like booting using the storage system's LEDs. After the disk test, a 10-minute ...
Hardware Manual
Page 52
...light. Using a straightened paper clip, press and hold the Reset button. 3. Power LED lights. Disk 1 LED lights. ReadyNAS OS 6 Desktop Storage Systems To access the boot menu: 1. NETGEAR ReadyNAS 312 52 Press and release the Reset button to scroll through boot mode options. Power off your... boot menu selection. Press the Power button. Continue to press the Reset button until the Power button LED, USB and backup ...
...light. Using a straightened paper clip, press and hold the Reset button. 3. Power LED lights. Disk 1 LED lights. ReadyNAS OS 6 Desktop Storage Systems To access the boot menu: 1. NETGEAR ReadyNAS 312 52 Press and release the Reset button to scroll through boot mode options. Power off your... boot menu selection. Press the Power button. Continue to press the Reset button until the Power button LED, USB and backup ...
Hardware Manual
Page 56
eSATA port 4. Power cable socket 7. Exhaust fan 8. HDMI port (not currently supported) 6. LAN ports with LED status indicators 3. ReadyNAS 314 rear panel 1. Kensington lock NETGEAR ReadyNAS 314 56 Reset button 2. USB 3.0 ports 5. ReadyNAS OS 6 Desktop Storage Systems Rear Panel The following figure shows the rear panel of the ReadyNAS 314. 12 3 4 5 6 7 8 Figure 18.
eSATA port 4. Power cable socket 7. Exhaust fan 8. HDMI port (not currently supported) 6. LAN ports with LED status indicators 3. ReadyNAS 314 rear panel 1. Kensington lock NETGEAR ReadyNAS 314 56 Reset button 2. USB 3.0 ports 5. ReadyNAS OS 6 Desktop Storage Systems Rear Panel The following figure shows the rear panel of the ReadyNAS 314. 12 3 4 5 6 7 8 Figure 18.

Hardware Manual
Page 59
...Backup button during a disaster recovery. • Memory test. Performs a memory test. The pass or fail result is available at http://support.netgear.com/product/ReadyNAS-OS6. The system powers down . This process can take four hours or more information about viewing the system logs, see ...a disk during the 10-minute time-out period. • OS reinstall. Use the tech support boot mode only when a NETGEAR technical support representative instructs you want to reset the system to factory default settings, do so. • Volume read -only. WARNING: The factory default reboot process...
...Backup button during a disaster recovery. • Memory test. Performs a memory test. The pass or fail result is available at http://support.netgear.com/product/ReadyNAS-OS6. The system powers down . This process can take four hours or more information about viewing the system logs, see ...a disk during the 10-minute time-out period. • OS reinstall. Use the tech support boot mode only when a NETGEAR technical support representative instructs you want to reset the system to factory default settings, do so. • Volume read -only. WARNING: The factory default reboot process...
Hardware Manual
Page 60
.... 3. Press the Backup button to press the Reset button until the status display screen shows a boot menu message. 5. ReadyNAS OS 6 Desktop Storage Systems To access the boot menu: 1. Press the Power button. The status display screen shows the current boot mode option. 6. NETGEAR ReadyNAS 314 60 The systems powers on. 4. Continue...
.... 3. Press the Backup button to press the Reset button until the status display screen shows a boot menu message. 5. ReadyNAS OS 6 Desktop Storage Systems To access the boot menu: 1. Press the Power button. The status display screen shows the current boot mode option. 6. NETGEAR ReadyNAS 314 60 The systems powers on. 4. Continue...
Hardware Manual
Page 64
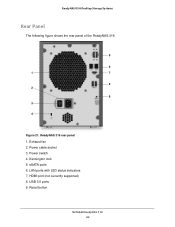
Exhaust fan 2. Power switch 4. HDMI port (not currently supported) 8. LAN ports with LED status indicators 7. eSATA ports 6. USB 3.0 ports 9. Reset button NETGEAR ReadyNAS 316 64 Power cable socket 3. Kensington lock 5. ReadyNAS OS 6 Desktop Storage Systems Rear Panel The following figure shows the rear panel of the ReadyNAS 316. 5 6 1 7 8 2 9 3 4 Figure 21. ReadyNAS 316 rear panel 1.
Exhaust fan 2. Power switch 4. HDMI port (not currently supported) 8. LAN ports with LED status indicators 7. eSATA ports 6. USB 3.0 ports 9. Reset button NETGEAR ReadyNAS 316 64 Power cable socket 3. Kensington lock 5. ReadyNAS OS 6 Desktop Storage Systems Rear Panel The following figure shows the rear panel of the ReadyNAS 316. 5 6 1 7 8 2 9 3 4 Figure 21. ReadyNAS 316 rear panel 1.


