
User Manual
Page 6
... Router Web Interface 140 Set Up a WiFi Schedule 141 Enable or Disable AX WiFi 142 Enable or Disable OFDMA 142 Enable or Disable Smart Connect 143 Manage Implicit Beamforming 144 Enable or Disable MU-MIMO 145 Change the Transmission Power Control 146 Use the Router as a WiFi Access Point Only 146 Chapter 9 Maintain the Router Update the Router Firmware 149 Check for New Firmware and Update the Router 149 Manually Upload Firmware to the Router 150 Change the admin Password 152 Enable admin Password Recovery 153 Recover the admin Password 153 Manage the Router Configuration File...
... Router Web Interface 140 Set Up a WiFi Schedule 141 Enable or Disable AX WiFi 142 Enable or Disable OFDMA 142 Enable or Disable Smart Connect 143 Manage Implicit Beamforming 144 Enable or Disable MU-MIMO 145 Change the Transmission Power Control 146 Use the Router as a WiFi Access Point Only 146 Chapter 9 Maintain the Router Update the Router Firmware 149 Check for New Firmware and Update the Router 149 Manually Upload Firmware to the Router 150 Change the admin Password 152 Enable admin Password Recovery 153 Recover the admin Password 153 Manage the Router Configuration File...

User Manual
Page 8
... Internet Service at Home 201 Allow VPN Client Internet Access in the Router 201 Block VPN Client Internet Access in the Router 202 Use a VPN Tunnel to Access Your Internet Service at Home..203 Chapter 14 Manage and Customize Internet Traffic Rules for Ports Manage Port Forwarding to a Local Server for Services and Applications 206 Set Up Port Forwarding to a Local Server 206 Add a Custom Port Forwarding Service or Application.........207 Change a Port Forwarding Service or Application 208 Remove a Port Forwarding Service or Application 209 Application Example: Make a Local Web Server...
... Internet Service at Home 201 Allow VPN Client Internet Access in the Router 201 Block VPN Client Internet Access in the Router 202 Use a VPN Tunnel to Access Your Internet Service at Home..203 Chapter 14 Manage and Customize Internet Traffic Rules for Ports Manage Port Forwarding to a Local Server for Services and Applications 206 Set Up Port Forwarding to a Local Server 206 Add a Custom Port Forwarding Service or Application.........207 Change a Port Forwarding Service or Application 208 Remove a Port Forwarding Service or Application 209 Application Example: Make a Local Web Server...

User Manual
Page 9
... blinking 219 LEDs never turn off 219 Internet or Ethernet Port LEDs Are Off 220 WiFi LEDs Are Off 220 You Cannot Log In to the Router 220 You Cannot Access the Internet 221 Troubleshoot Internet Browsing 223 Changes are not saved 223 Troubleshoot WiFi Connectivity 224 Troubleshoot your network using the ping utility 224 Test the path from a Windows-based computer to a remote device 225 Test the LAN path to your router 225 Chapter 16 Supplemental Information Factory Settings 228 Technical Specifications...
... blinking 219 LEDs never turn off 219 Internet or Ethernet Port LEDs Are Off 220 WiFi LEDs Are Off 220 You Cannot Log In to the Router 220 You Cannot Access the Internet 221 Troubleshoot Internet Browsing 223 Changes are not saved 223 Troubleshoot WiFi Connectivity 224 Troubleshoot your network using the ping utility 224 Test the path from a Windows-based computer to a remote device 225 Test the LAN path to your router 225 Chapter 16 Supplemental Information Factory Settings 228 Technical Specifications...
User Manual
Page 25
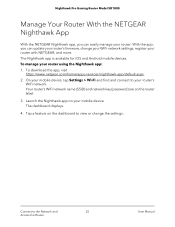
... manage your router. Your router's WiFi network name (SSID) and network key (password) are on the dashboard to view or change your WiFi network settings, register your router with NETGEAR, and more. To download the app, visit https://www.netgear.com/home/apps-services/nighthawk-app/default.aspx. 2. With the app, you can update your mobile device, tap Settings > Wi-Fi and find and connect to the Network and 25 Access the Router User Manual On your router's firmware, change the settings. Connect...
... manage your router. Your router's WiFi network name (SSID) and network key (password) are on the dashboard to view or change your WiFi network settings, register your router with NETGEAR, and more. To download the app, visit https://www.netgear.com/home/apps-services/nighthawk-app/default.aspx. 2. With the app, you can update your mobile device, tap Settings > Wi-Fi and find and connect to the Network and 25 Access the Router User Manual On your router's firmware, change the settings. Connect...

User Manual
Page 27
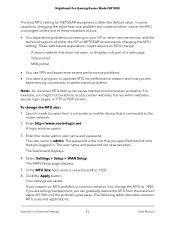
... 27). 6. Specify Your Internet Settings 27 User Manual Enter the router admin user name and password. The Setup Wizard page displays. 5. Enter http://www.routerlogin.net. A login window opens. 3. Select the Yes radio button. The user name and password are taken to the router network. 2. Click the Next button. A login window opens. Nighthawk Pro Gaming Router Model XR1000 Use the Internet Setup Wizard You can view or change the router's Internet connection settings. Enter http://www.routerlogin.net. Select Settings > Setup > Setup Wizard. If you select...
... 27). 6. Specify Your Internet Settings 27 User Manual Enter the router admin user name and password. The Setup Wizard page displays. 5. Enter http://www.routerlogin.net. A login window opens. 3. Select the Yes radio button. The user name and password are taken to the router network. 2. Click the Next button. A login window opens. Nighthawk Pro Gaming Router Model XR1000 Use the Internet Setup Wizard You can view or change the router's Internet connection settings. Enter http://www.routerlogin.net. Select Settings > Setup > Setup Wizard. If you select...
User Manual
Page 43
... MTU problem, a common solution is connected to the router network. 2. Specify Your Internet Settings 43 User Manual Launch a web browser from a computer or mobile device that does not open, or displays only part of either the ISP or NETGEAR recommends changing the MTU setting. Enter the router admin user name and password. Leave the MTU unchanged unless one problem but causes another. A secure website that is to change the MTU size: 1. Nighthawk Pro Gaming Router Model XR1000 The best MTU setting...
... MTU problem, a common solution is connected to the router network. 2. Specify Your Internet Settings 43 User Manual Launch a web browser from a computer or mobile device that does not open, or displays only part of either the ISP or NETGEAR recommends changing the MTU setting. Enter the router admin user name and password. Leave the MTU unchanged unless one problem but causes another. A secure website that is to change the MTU size: 1. Nighthawk Pro Gaming Router Model XR1000 The best MTU setting...
User Manual
Page 111
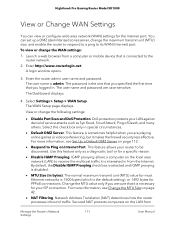
... router admin user name and password. The WAN Setup page displays. Nighthawk Pro Gaming Router Model XR1000 View or Change WAN Settings You can set up a DMZ (demilitarized zone) server, change the following settings: • Disable Port Scan and DoS Protection. Use this check box only in bytes). A login window opens. 3. Select Settings > Setup > WAN Setup. For more information, see Set Up a Default DMZ Server on page 112. • Respond to Ping on the local area network (LAN) to be discovered. The normal maximum transmit unit (MTU...
... router admin user name and password. The WAN Setup page displays. Nighthawk Pro Gaming Router Model XR1000 View or Change WAN Settings You can set up a DMZ (demilitarized zone) server, change the following settings: • Disable Port Scan and DoS Protection. Use this check box only in bytes). A login window opens. 3. Select Settings > Setup > WAN Setup. For more information, see Set Up a Default DMZ Server on page 112. • Respond to Ping on the local area network (LAN) to be discovered. The normal maximum transmit unit (MTU...
User Manual
Page 113
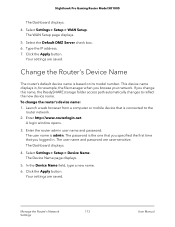
... folder access path automatically changes to the router network. 2. The password is the one that you specified the first time that is connected to reflect the new device name. Select Settings > Setup > Device Name. Manage the Router's Network 113 Settings User Manual Select the Default DMZ Server check box. 6. Your settings are case-sensitive. Enter http://www.routerlogin.net. Select Settings > Setup > WAN Setup. The WAN Setup page displays. 5. Click the Apply button. Enter the router admin user name and password. The user name...
... folder access path automatically changes to the router network. 2. The password is the one that you specified the first time that is connected to reflect the new device name. Select Settings > Setup > Device Name. Manage the Router's Network 113 Settings User Manual Select the Default DMZ Server check box. 6. Your settings are case-sensitive. Enter http://www.routerlogin.net. Select Settings > Setup > WAN Setup. The WAN Setup page displays. 5. Click the Apply button. Enter the router admin user name and password. The user name...

User Manual
Page 114
... password. The password is the one that you specified the first time that one or more devices on the LAN side and to a specific device and which addresses are case-sensitive. The LAN Setup page displays. 5. The IP address and subnet mask identify which must be reached through a gateway or router. Nighthawk Pro Gaming Router Model XR1000 Change the Router's LAN IP Address and RIP Settings The router is admin. The router's default LAN IP configuration is connected...
... password. The password is the one that you specified the first time that one or more devices on the LAN side and to a specific device and which addresses are case-sensitive. The LAN Setup page displays. 5. The IP address and subnet mask identify which must be reached through a gateway or router. Nighthawk Pro Gaming Router Model XR1000 Change the Router's LAN IP Address and RIP Settings The router is admin. The router's default LAN IP configuration is connected...
User Manual
Page 116
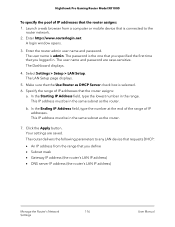
... the router network. 2. Launch a web browser from the range that you logged in the range. The password is selected. 6. This IP address must be in the same subnet as DHCP Server check box is the one that you specified the first time that you define • Subnet mask • Gateway IP address (the router's LAN IP address) • DNS server IP address (the router's LAN IP address) Manage the Router's Network 116 Settings User Manual b. Click the Apply button. Enter...
... the router network. 2. Launch a web browser from the range that you logged in the range. The password is selected. 6. This IP address must be in the same subnet as DHCP Server check box is the one that you specified the first time that you define • Subnet mask • Gateway IP address (the router's LAN IP address) • DNS server IP address (the router's LAN IP address) Manage the Router's Network 116 Settings User Manual b. Click the Apply button. Enter...
User Manual
Page 117
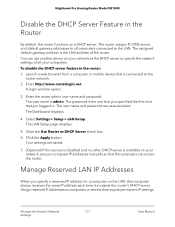
...each time it accesses the router's DHCP server. The Dashboard displays. 4. Manage Reserved LAN IP Addresses When you logged in. Enter http://www.routerlogin.net. Select Settings > Setup > LAN Setup. The LAN Setup page displays. 5. Launch a web browser from a computer or mobile device that require permanent IP settings. A login window opens. 3. Click the Apply button. Manage the Router's Network 117 Settings User Manual Nighthawk Pro Gaming Router Model XR1000 Disable the DHCP Server Feature in the router: 1. The router assigns IP, DNS server, and default gateway addresses...
...each time it accesses the router's DHCP server. The Dashboard displays. 4. Manage Reserved LAN IP Addresses When you logged in. Enter http://www.routerlogin.net. Select Settings > Setup > LAN Setup. The LAN Setup page displays. 5. Launch a web browser from a computer or mobile device that require permanent IP settings. A login window opens. 3. Click the Apply button. Manage the Router's Network 117 Settings User Manual Nighthawk Pro Gaming Router Model XR1000 Disable the DHCP Server Feature in the router: 1. The router assigns IP, DNS server, and default gateway addresses...

User Manual
Page 119
... the router network. 2. Change the settings. 8. Manage the Router's Network 119 Settings User Manual The Address Reservation table on that is the one that you logged in. Click the Apply button. Delete a Reserved IP Address Entry To delete a reserved address entry: 1. A login window opens. 3. The LAN Setup page displays. 5. Click the Apply button. The LAN Setup page displays again. A login window opens. The password is connected to the router network. 2. The Address Reservation page displays. 7. Launch a web browser from a computer or mobile device that...
... the router network. 2. Change the settings. 8. Manage the Router's Network 119 Settings User Manual The Address Reservation table on that is the one that you logged in. Click the Apply button. Delete a Reserved IP Address Entry To delete a reserved address entry: 1. A login window opens. 3. The LAN Setup page displays. 5. Click the Apply button. The LAN Setup page displays again. A login window opens. The password is connected to the router network. 2. The Address Reservation page displays. 7. Launch a web browser from a computer or mobile device that...
User Manual
Page 120
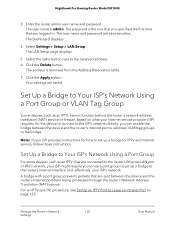
... 123. Manage the Router's Network 120 Settings User Manual Select Settings > Setup > LAN Setup. Set Up a Bridge to the router's Internet interface and, effectively, your ISP's network. A bridge with a port group prevents packets that are sent between the device and the router's Internet port or add new VLAN tag groups to the reserved address. 6. Set Up a Bridge to Your ISP's Network Using a Port Group For some devices, such as an IPTV, that are connected to the router's Ethernet LAN port or WiFi network, your Internet service provider (ISP) requires, for the device to connect to...
... 123. Manage the Router's Network 120 Settings User Manual Select Settings > Setup > LAN Setup. Set Up a Bridge to the router's Internet interface and, effectively, your ISP's network. A bridge with a port group prevents packets that are sent between the device and the router's Internet port or add new VLAN tag groups to the reserved address. 6. Set Up a Bridge to Your ISP's Network Using a Port Group For some devices, such as an IPTV, that are connected to the router's Ethernet LAN port or WiFi network, your Internet service provider (ISP) requires, for the device to connect to...

User Manual
Page 124
.... Manage the Router's Network 124 Settings User Manual Depending on the port to which the IPTV is connected, select a Wired Ports check box or a Wireless check box: • If the IPTV is connected to an Ethernet port on the router, select the Wired Ports check box that corresponds to the Ethernet port on your router, two implicit static routes were created. As an example of when a static route is needed, consider the following case: • Your main Internet access...
.... Manage the Router's Network 124 Settings User Manual Depending on the port to which the IPTV is connected, select a Wired Ports check box or a Wireless check box: • If the IPTV is connected to an Ethernet port on the router, select the Wired Ports check box that corresponds to the Ethernet port on your router, two implicit static routes were created. As an example of when a static route is needed, consider the following case: • Your main Internet access...

User Manual
Page 134
... default. The Wireless Setup page displays. To change the WiFi mode settings if AX WiFi is admin. Launch a web browser from a computer or mobile device that you specified the first time that is connected to the router network. 2. Enter http://www.routerlogin.net. The password is the one that you logged in the 5 GHz WiFi band. The user name is enabled: 1. Manage the Router's WiFi 134 Settings User Manual Some mobile devices automatically connect to the first open network without WiFi security...
... default. The Wireless Setup page displays. To change the WiFi mode settings if AX WiFi is admin. Launch a web browser from a computer or mobile device that you specified the first time that is connected to the router network. 2. Enter http://www.routerlogin.net. The password is the one that you logged in the 5 GHz WiFi band. The user name is enabled: 1. Manage the Router's WiFi 134 Settings User Manual Some mobile devices automatically connect to the first open network without WiFi security...
User Manual
Page 144
A login window opens. 3. The Dashboard displays. 4. Select or clear the Enable Smart Connect check box. Selecting this check box turns on Smart Connect and clearing this check box turns off Smart Connect. 6. To disable implicit beamforming: 1. Nighthawk Pro Gaming Router Model XR1000 key (password). Enter the router admin user name and password. The password is the one SSID that connects to the router network. 2. The Wireless Setup page displays. 5. Your settings are case-sensitive. Implicit beamforming means that the router can disable it. Launch...
A login window opens. 3. The Dashboard displays. 4. Select or clear the Enable Smart Connect check box. Selecting this check box turns on Smart Connect and clearing this check box turns off Smart Connect. 6. To disable implicit beamforming: 1. Nighthawk Pro Gaming Router Model XR1000 key (password). Enter the router admin user name and password. The password is the one SSID that connects to the router network. 2. The Wireless Setup page displays. 5. Your settings are case-sensitive. Implicit beamforming means that the router can disable it. Launch...

User Manual
Page 154
... the file. A login window opens. 3. The user name and password are stored within the router in to the factory default settings. Click the Continue button. Manage the Router Configuration File The configuration settings of the current settings is connected to the router network. 2. The Dashboard displays. 4. The Backup Settings page displays. 5. A copy of the router are case-sensitive. Enter the serial number of your recovered password, log in a configuration file. Maintain the Router 154 User Manual Enter the saved answers to your security questions...
... the file. A login window opens. 3. The user name and password are stored within the router in to the factory default settings. Click the Continue button. Manage the Router Configuration File The configuration settings of the current settings is connected to the router network. 2. The Dashboard displays. 4. The Backup Settings page displays. 5. A copy of the router are case-sensitive. Enter the serial number of your recovered password, log in a configuration file. Maintain the Router 154 User Manual Enter the saved answers to your security questions...

User Manual
Page 193
Nighthawk Pro Gaming Router Model XR1000 Set Up a VPN Connection A virtual private network (VPN) lets you use the VPN feature, you must log in to the router and enable VPN, and you must specify the VPN service settings in . To use the Internet to securely access your network when you specified the first time that is called a domain name). Specify VPN Service in the Router You must install and run VPN client software on page 181. To specify the VPN service: 1. A login window opens. 3. The password is the...
Nighthawk Pro Gaming Router Model XR1000 Set Up a VPN Connection A virtual private network (VPN) lets you use the VPN feature, you must log in to the router and enable VPN, and you must specify the VPN service settings in . To use the Internet to securely access your network when you specified the first time that is called a domain name). Specify VPN Service in the Router You must install and run VPN client software on page 181. To specify the VPN service: 1. A login window opens. 3. The password is the...
User Manual
Page 219
... its factory settings. Nighthawk Pro Gaming Router Model XR1000 Troubleshoot With the LEDs By default, the router is set with the firmware. If you turn off the WiFi radios. For recovery instructions, or help with the LEDs, change the LED settings back to the standard LED settings (see if the router recovers. • Press and hold the Reset button to return the router to troubleshoot with a hardware problem, contact Technical Support at netgear.com/support. If all LEDs are using the power adapter that you turned...
... its factory settings. Nighthawk Pro Gaming Router Model XR1000 Troubleshoot With the LEDs By default, the router is set with the firmware. If you turn off the WiFi radios. For recovery instructions, or help with the LEDs, change the LED settings back to the standard LED settings (see if the router recovers. • Press and hold the Reset button to return the router to troubleshoot with a hardware problem, contact Technical Support at netgear.com/support. If all LEDs are using the power adapter that you turned...

User Manual
Page 228
...) password Internet connection WAN MAC address WAN MTU size Use default hardware address 1500 Port speed Autosensing Local network (LAN) LAN IP address Subnet mask 192.168.1.1 255.255.255.0 DHCP server Enabled DHCP range 192.168.1.2 to 192.168.1.254 DHCP starting IP address 192.168.1.2 DHCP ending IP address 192.168.1.254 DMZ Disabled Time adjusted for daylight saving Disabled time Firewall Inbound (communications coming in the following table. Use the end of the router until the Power LED starts blinking amber. The router resets and returns to its factory settings...
...) password Internet connection WAN MAC address WAN MTU size Use default hardware address 1500 Port speed Autosensing Local network (LAN) LAN IP address Subnet mask 192.168.1.1 255.255.255.0 DHCP server Enabled DHCP range 192.168.1.2 to 192.168.1.254 DHCP starting IP address 192.168.1.2 DHCP ending IP address 192.168.1.254 DMZ Disabled Time adjusted for daylight saving Disabled time Firewall Inbound (communications coming in the following table. Use the end of the router until the Power LED starts blinking amber. The router resets and returns to its factory settings...


