
User Manual
Page 2
TABLE OF CONTENTS INTRODUCTION ...5 SYSTEM REQUIREMENT ...6 MAIN FEATURES...6 PLAYER OVERVIEW ...8 DESCRIPTION OF BUTTONS ...9 POWER ON/ POWER OFF/ LOCK & UNLOCK KEY ...10 Power on...10 Power off...10 Lock & unlock ...10 CONNECTION AND DOWNLOAD ...10 Connect to the PC...10 Download files ...11 Loading DRM protected WMA audio tracks with Windows Media Player 10 11 Copying audio tracks to the player from PC ...11 Disconnect from the PC ...11 MANAGING BATTERY...12 Charging battery ...12 Low battery ...14 MAIN MENU...15 LISTENING TO MUSIC ...16 Display in Play Mode ...16 Playback ...16 1
TABLE OF CONTENTS INTRODUCTION ...5 SYSTEM REQUIREMENT ...6 MAIN FEATURES...6 PLAYER OVERVIEW ...8 DESCRIPTION OF BUTTONS ...9 POWER ON/ POWER OFF/ LOCK & UNLOCK KEY ...10 Power on...10 Power off...10 Lock & unlock ...10 CONNECTION AND DOWNLOAD ...10 Connect to the PC...10 Download files ...11 Loading DRM protected WMA audio tracks with Windows Media Player 10 11 Copying audio tracks to the player from PC ...11 Disconnect from the PC ...11 MANAGING BATTERY...12 Charging battery ...12 Low battery ...14 MAIN MENU...15 LISTENING TO MUSIC ...16 Display in Play Mode ...16 Playback ...16 1

User Manual
Page 3
Pause ...16 Volume Adjustment ...17 Moving Previous/ Next File ...17 Fast Forward/Fast Rewind ...17 Section Repeat ...17 Lyrics Synchronization ...17 Music High-Fi Output ...18 WATCHING VIDEO ...19 Convert Video File ...19 Install the AVI converter...19 Conversion: ...21 Play Video...23 Pause ...23 Volume Adjustment ...23 Moving Previous/ Next File ...23 Fast Forward/Fast Rewind ...23 RADIO FUNCTION...24 Enter Radio...24 Submenu ...24 FM Record ...25 PHOTO...26 2
Pause ...16 Volume Adjustment ...17 Moving Previous/ Next File ...17 Fast Forward/Fast Rewind ...17 Section Repeat ...17 Lyrics Synchronization ...17 Music High-Fi Output ...18 WATCHING VIDEO ...19 Convert Video File ...19 Install the AVI converter...19 Conversion: ...21 Play Video...23 Pause ...23 Volume Adjustment ...23 Moving Previous/ Next File ...23 Fast Forward/Fast Rewind ...23 RADIO FUNCTION...24 Enter Radio...24 Submenu ...24 FM Record ...25 PHOTO...26 2

User Manual
Page 7
... battery ----Can be played after 6 SYSTEM REQUIREMENT y Microsoft ® Windows 2000 and XP y Pentium II 350MHz or Higher y 64MB RAM (128MB Recommended) y USB port y 120MB Free Hard Disk Space or more y CD-ROM driver MAIN FEATURES 3.5" 262k color TFT QVGA (320×240) ----High-quality flat panel LCD, a brighter display and a smoother motion show, can be charged by connecting with PC through USB port or by power...
... battery ----Can be played after 6 SYSTEM REQUIREMENT y Microsoft ® Windows 2000 and XP y Pentium II 350MHz or Higher y 64MB RAM (128MB Recommended) y USB port y 120MB Free Hard Disk Space or more y CD-ROM driver MAIN FEATURES 3.5" 262k color TFT QVGA (320×240) ----High-quality flat panel LCD, a brighter display and a smoother motion show, can be charged by connecting with PC through USB port or by power...
User Manual
Page 10
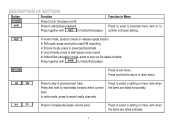
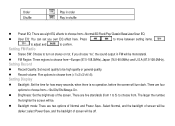
... out file delete window. In folders/files navigation mode, press to start FM recording. Press to select a setting or menu item when Press and hold /unhold player. Function in Menu Press to enter a selected menu item or to rewind/fast forward within current the items are listed vertically. 9 In record mode, press to select a setting or menu item when the items are listed horizontally. Press to start /pause playback...
... out file delete window. In folders/files navigation mode, press to start FM recording. Press to select a setting or menu item when Press and hold /unhold player. Function in Menu Press to enter a selected menu item or to rewind/fast forward within current the items are listed vertically. 9 In record mode, press to select a setting or menu item when the items are listed horizontally. Press to start /pause playback...
User Manual
Page 11
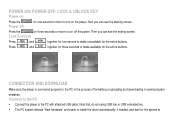
... turn off the power. Then you can see the starting screen. CONNECTION AND DOWNLOAD Make sure the player is connected properly to the PC in the process of formatting or uploading and downloading to the PC with attached USB cable. Press and together for three seconds to make unavailable for the entire buttons. Note that, do not using USB hub or USB extended line. POWER ON/ POWER OFF/ LOCK & UNLOCK KEY Power on the player...
... turn off the power. Then you can see the starting screen. CONNECTION AND DOWNLOAD Make sure the player is connected properly to the PC in the process of formatting or uploading and downloading to the PC with attached USB cable. Press and together for three seconds to make unavailable for the entire buttons. Note that, do not using USB hub or USB extended line. POWER ON/ POWER OFF/ LOCK & UNLOCK KEY Power on the player...
User Manual
Page 12
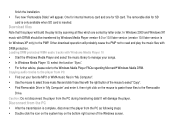
... Windows 2000 and Windows XP, music with the right button of the Windows screen. 11 It will appear. One for internal memory card and one for SD card is only available when SD card is inserted. y In Windows Media Player 10, select the function "Sync". y Use the mouse to select those music files and click those files to the player from the PC during transferring data! Copying audio tracks to the Removable Drive...
... Windows 2000 and Windows XP, music with the right button of the Windows screen. 11 It will appear. One for internal memory card and one for SD card is only available when SD card is inserted. y In Windows Media Player 10, select the function "Sync". y Use the mouse to select those music files and click those files to the player from the PC during transferring data! Copying audio tracks to the Removable Drive...
User Manual
Page 13
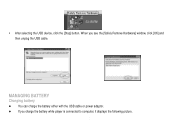
y After selecting the USB device, click the [Stop] button. z If you see the [Safely Remove Hardware] window, click [OK] and then unplug the USB cable. When you charge the battery while player is connected to computer, it displays the following picture. 12 MANAGING BATTERY Charging battery z You can charge the battery either with the USB cable or power adaptor.
y After selecting the USB device, click the [Stop] button. z If you see the [Safely Remove Hardware] window, click [OK] and then unplug the USB cable. When you charge the battery while player is connected to computer, it displays the following picture. 12 MANAGING BATTERY Charging battery z You can charge the battery either with the USB cable or power adaptor.

User Manual
Page 14
z If you can use power adapter to music or watching video while the charging is charging. Press any key now leads you to such a mode, in this mode you safely remove the player from computer while keeping the USB cable connected or use the normal function of the player such as listening to charge, it displays the following picture while the battery is going on. 13
z If you can use power adapter to music or watching video while the charging is charging. Press any key now leads you to such a mode, in this mode you safely remove the player from computer while keeping the USB cable connected or use the normal function of the player such as listening to charge, it displays the following picture while the battery is going on. 13

User Manual
Page 15
... two or three months when the player is fully charged before first use the player in battery, the system will turn the player on. 14 Cautions: 1. Otherwise, the battery voltage maybe too low to turn off automatically with power off message. Please recharge the battery when there is a message that the battery is not used for a long time. If you the following warning.
... two or three months when the player is fully charged before first use the player in battery, the system will turn the player on. 14 Cautions: 1. Otherwise, the battery voltage maybe too low to turn off automatically with power off message. Please recharge the battery when there is a message that the battery is not used for a long time. If you the following warning.
User Manual
Page 27
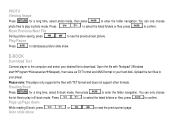
... / to your player. Open the file with TXT format and does not support other formats. Reading Book Press for a long time, select photo mode, then press to confirm. You can only choose photo files to start ÆProgramÆAccessoriesÆNotepad), then save as TXT format and ANSI format in E-book mode. E-BOOK Download Text Connect player to the computer and select your hard disk. Press Move Previous...
... / to your player. Open the file with TXT format and does not support other formats. Reading Book Press for a long time, select photo mode, then press to confirm. You can only choose photo files to start ÆProgramÆAccessoriesÆNotepad), then save as TXT format and ANSI format in E-book mode. E-BOOK Download Text Connect player to the computer and select your hard disk. Press Move Previous...
User Manual
Page 29
... driver installation is "No". RECORD Press for a long time, select "Explore" mode, then press to start/pause recording in "Voice" folder. Listen to the recorded files, enter "Music" mode, and choose files saved in the same file. It supports the Windows Operating Systems from "Yes" or "No", to choose from Windows 2000 & above. The default selection is required. 28 z Delete file. Press / to confirm. Press to save file and make the player ready...
... driver installation is "No". RECORD Press for a long time, select "Explore" mode, then press to start/pause recording in "Voice" folder. Listen to the recorded files, enter "Music" mode, and choose files saved in the same file. It supports the Windows Operating Systems from "Yes" or "No", to choose from Windows 2000 & above. The default selection is required. 28 z Delete file. Press / to confirm. Press to save file and make the player ready...
User Manual
Page 30
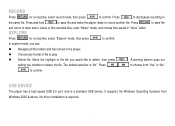
... in the operating window. DRM9 FUNCTION DRM music transfer function In Windows ME / Windows 2K / Windows XP, music with DRM should upgrade Windows Media Player to version 9.0 or 10.0 (Version 10.0 is the external SD / MMC card. Pull out the card completely after it ejects. SD/MMC CARD After connecting the player to eject. Note: Please do not insert or eject the Memory card while the PMP is for Windows XP). Removing Memory Card: Push...
... in the operating window. DRM9 FUNCTION DRM music transfer function In Windows ME / Windows 2K / Windows XP, music with DRM should upgrade Windows Media Player to version 9.0 or 10.0 (Version 10.0 is the external SD / MMC card. Pull out the card completely after it ejects. SD/MMC CARD After connecting the player to eject. Note: Please do not insert or eject the Memory card while the PMP is for Windows XP). Removing Memory Card: Push...

User Manual
Page 31
... DRM. Right-click and select "Add to choose from-Once, Repeat one Play current track repeatedly Folder Play music files in selected folder once Folder Rep Play music files in between, z Play mode: Order/Shuffle to confirm and return to confirm. F. Connect player to the player. Click "Start Sync" to transfer the music with DRM to PC. A. Choose the desired music with DRM as step B and choose "Removable Disk". D.
... DRM. Right-click and select "Add to choose from-Once, Repeat one Play current track repeatedly Folder Play music files in selected folder once Folder Rep Play music files in between, z Play mode: Order/Shuffle to confirm and return to confirm. F. Connect player to the player. Click "Start Sync" to transfer the music with DRM to PC. A. Choose the desired music with DRM as step B and choose "Removable Disk". D.
User Manual
Page 32
... Power Save, and the backlight of the screen. Order Shuffle Play in order Play in shuffle z Preset EQ: There are eight EQ effects to choose from-Normal/3D/Rock/Pop/Classic/Bass/Jazz/User EQ z User EQ: You can set you choose "no operation, before the screen will be off. 31 The larger the number, the brighter the screen will turn on...
... Power Save, and the backlight of the screen. Order Shuffle Play in order Play in shuffle z Preset EQ: There are eight EQ effects to choose from-Normal/3D/Rock/Pop/Classic/Bass/Jazz/User EQ z User EQ: You can set you choose "no operation, before the screen will be off. 31 The larger the number, the brighter the screen will turn on...
User Manual
Page 38
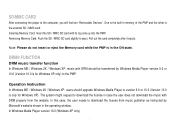
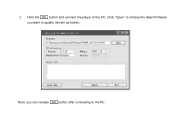
Note: you want to the PC. 37 2. Hold the button and connect the player to the PC, Click "Open" to choose the latest firmware you can release button after connecting to update (shown as below).
Note: you want to the PC. 37 2. Hold the button and connect the player to the PC, Click "Open" to choose the latest firmware you can release button after connecting to update (shown as below).

User Manual
Page 40
... to record Text displayed is deformed PMP doesn't work . Repeat the upgrading process. 39 If the problem persists, reset the PMP. The firmware upgrade software is in the PMP. Check that you must format the player before using it ON. Make sure that there is to this model of the player. A firmware upgrade is enough free memory in the ON state. The normal operations of the player would not be used for...
... to record Text displayed is deformed PMP doesn't work . Repeat the upgrading process. 39 If the problem persists, reset the PMP. The firmware upgrade software is in the PMP. Check that you must format the player before using it ON. Make sure that there is to this model of the player. A firmware upgrade is enough free memory in the ON state. The normal operations of the player would not be used for...

User Manual
Page 42
File-saving conditions Work condition Weight: Humidity
File-saving conditions Work condition Weight: Humidity
User Manual
Page 45
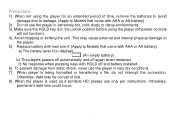
... to Models that come with AAA or AA battery) a) The battery level icon displays (An empty battery) b) The players powers off automatically and off and battery installed 6). When not using the player (otherwise controls will not function). 4). c) No response when pressing keys with AAA or AA battery) 2). When player is used as a portable HD, please use only per instructions. Do not use the player in very dry conditions. 7). Make sure the HOLD key is...
... to Models that come with AAA or AA battery) a) The battery level icon displays (An empty battery) b) The players powers off automatically and off and battery installed 6). When not using the player (otherwise controls will not function). 4). c) No response when pressing keys with AAA or AA battery) 2). When player is used as a portable HD, please use only per instructions. Do not use the player in very dry conditions. 7). Make sure the HOLD key is...
User Manual
Page 46
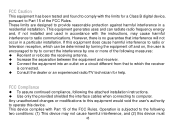
... equipment into an outlet on , the user is no guarantee that to Part 15 of the FCC Rules. Operation is connected. ◆ Consult the dealer or an experienced radio/TV technician for a Class B digital device, pursuant to which can radiate radio frequency energy and, if not installed and used in a particular installation. These limits are designed to computer. FCC...
... equipment into an outlet on , the user is no guarantee that to Part 15 of the FCC Rules. Operation is connected. ◆ Consult the dealer or an experienced radio/TV technician for a Class B digital device, pursuant to which can radiate radio frequency energy and, if not installed and used in a particular installation. These limits are designed to computer. FCC...
User Manual
Page 48
... screen on production units sold to visit our website at: www.Nextar.com Or write us at any time without prior notice. This manual was correct and complete at any time, without any prior notice. Any unauthorized distribution of Nextar, Inc. All specifications and features are simulated and may be sure to consumers. For instruction manuals, updated drivers or other information, be copied...
... screen on production units sold to visit our website at: www.Nextar.com Or write us at any time without prior notice. This manual was correct and complete at any time, without any prior notice. Any unauthorized distribution of Nextar, Inc. All specifications and features are simulated and may be sure to consumers. For instruction manuals, updated drivers or other information, be copied...


