
Reference Manual
Page 13
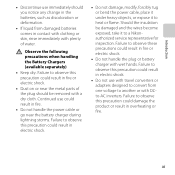
... lightning storms. Failure to observe this precaution could result in electric shock. • Do not damage, modify, forcibly tug or bend the power cable, place it under heavy objects, or expose it to a Nikonauthorized service representative for inspection. Failure to heat or flame. xi Introduction •...Keep dry. Should the insulation be removed with plenty of water. Continued use could result in fire. • Do not handle the power cable or go near the metal parts of the plug should you notice any change in the batteries, such as discoloration or deformation. • ...
... lightning storms. Failure to observe this precaution could result in electric shock. • Do not damage, modify, forcibly tug or bend the power cable, place it under heavy objects, or expose it to a Nikonauthorized service representative for inspection. Failure to heat or flame. xi Introduction •...Keep dry. Should the insulation be removed with plenty of water. Continued use could result in fire. • Do not handle the power cable or go near the metal parts of the plug should you notice any change in the batteries, such as discoloration or deformation. • ...
Reference Manual
Page 14
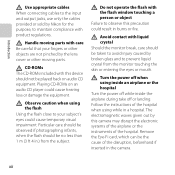
... with liquid crystal Should the monitor break, care should be the cause of the hospital. Introduction Use appropriate cables When connecting cables to the input and output jacks, use only the cables provided or sold by Nikon for the purpose, to observe this precaution could result in burns or fire. Playing CD-ROMs on...
... with liquid crystal Should the monitor break, care should be the cause of the hospital. Introduction Use appropriate cables When connecting cables to the input and output jacks, use only the cables provided or sold by Nikon for the purpose, to observe this precaution could result in burns or fire. Playing CD-ROMs on...
Reference Manual
Page 16
... York 11747-3064 USA Tel: 631-547-4200 Notice for your equipment. xiv Using other reproductive harm. Introduction Interface Cables Use the interface cables sold or provided by Nikon for customers in the State of California WARNING Handling the cord on this product will expose you to lead, a ...chemical known to the State of California to cause birth defects or other interface cables may exceed the limits of Class B...
... York 11747-3064 USA Tel: 631-547-4200 Notice for your equipment. xiv Using other reproductive harm. Introduction Interface Cables Use the interface cables sold or provided by Nikon for customers in the State of California WARNING Handling the cord on this product will expose you to lead, a ...chemical known to the State of California to cause birth defects or other interface cables may exceed the limits of Class B...
Reference Manual
Page 88
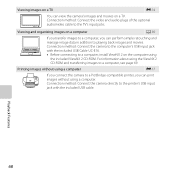
Connection method: Connect the video and audio plugs of the optional audio/video cable to the printer's USB input jack with the included USB Cable UC-E16. • Before connecting to a computer, install ViewNX 2 on a TV. For information about using the included ViewNX 2 CD-ROM. ... data in addition to a computer, see page 69. Connection method: Connect the camera to the computer's USB input jack with the included USB cable. Connection method: Connect the camera directly to the TV's input jacks. Viewing and organizing images on a computer A 69 If you transfer images ...
Connection method: Connect the video and audio plugs of the optional audio/video cable to the printer's USB input jack with the included USB Cable UC-E16. • Before connecting to a computer, install ViewNX 2 on a TV. For information about using the included ViewNX 2 CD-ROM. ... data in addition to a computer, see page 69. Connection method: Connect the camera to the computer's USB input jack with the included USB cable. Connection method: Connect the camera directly to the TV's input jacks. Viewing and organizing images on a computer A 69 If you transfer images ...

Reference Manual
Page 92
..., it to the computer. • SD card slot: If your computer is displayed prompting you to choose a program, select Nikon Transfer 2. • When using the included USB cable. Connect the camera to the computer using Windows 7 If the dialog shown at right is connected to the computer via a USB... a message is equipped with an SD card slot, the card can be copied to the computer. Wait until Nikon Transfer 2 starts. B Connecting the USB Cable 72 The connection may take a while for Nikon Transfer 2 to start. To transfer images that the memory card is inserted in the slot. • SD ...
..., it to the computer. • SD card slot: If your computer is displayed prompting you to choose a program, select Nikon Transfer 2. • When using the included USB cable. Connect the camera to the computer using Windows 7 If the dialog shown at right is connected to the computer via a USB... a message is equipped with an SD card slot, the card can be copied to the computer. Wait until Nikon Transfer 2 starts. B Connecting the USB Cable 72 The connection may take a while for Nikon Transfer 2 to start. To transfer images that the memory card is inserted in the slot. • SD ...
Reference Manual
Page 93
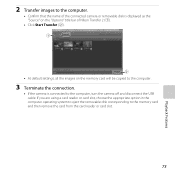
...the appropriate option in the computer operating system to eject the removable disk corresponding to the computer, turn the camera off and disconnect the USB cable. 2 Transfer images to the computer. • Confirm that the name of the connected camera or removable disk is displayed as the "Source..." on the "Options" title bar of Nikon Transfer 2 (1). • Click Start Transfer (2). 1 2 • At default settings, all the images on the memory card will be copied to the computer....
...the appropriate option in the computer operating system to eject the removable disk corresponding to the computer, turn the camera off and disconnect the USB cable. 2 Transfer images to the computer. • Confirm that the name of the connected camera or removable disk is displayed as the "Source..." on the "Options" title bar of Nikon Transfer 2 (1). • Click Start Transfer (2). 1 2 • At default settings, all the images on the memory card will be copied to the computer....

Reference Manual
Page 120
... play back images on the TV. 1 Turn off the camera. 2 Connect the camera to the TV. • Connect the yellow plug of the audio/video cable to the video-in jack and the white plug to the audio-in jack on the TV. • While connected to turn on the camera...
... play back images on the TV. 1 Turn off the camera. 2 Connect the camera to the TV. • Connect the yellow plug of the audio/video cable to the video-in jack and the white plug to the audio-in jack on the TV. • While connected to turn on the camera...
Reference Manual
Page 121
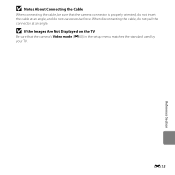
When disconnecting the cable, do not pull the connector at an angle, and do not insert the cable at an angle. B If the Images Are Not Displayed on the TV Be sure that the camera connector is properly oriented, do not use excessive force. E15 Reference Section B Notes About Connecting the Cable When connecting the cable, be sure that the camera's Video mode (E60) in the setup menu matches the standard used by your TV.
When disconnecting the cable, do not pull the connector at an angle, and do not insert the cable at an angle. B If the Images Are Not Displayed on the TV Be sure that the camera connector is properly oriented, do not use excessive force. E15 Reference Section B Notes About Connecting the Cable When connecting the cable, be sure that the camera's Video mode (E60) in the setup menu matches the standard used by your TV.
Reference Manual
Page 122
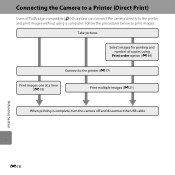
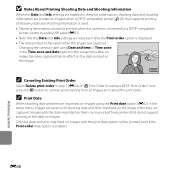
Connecting the Camera to a Printer (Direct Print) Users of copies using a computer. Follow the procedures below to the printer (E17) Print images one at a time (E19) Print multiple images (E21) When printing is complete, turn the camera off and disconnect the USB cable Reference Section E16 Take pictures Select images for printing and number of PictBridge-compatible (F20) printers can connect the camera directly to the printer and print images without using Print order option (E34) Connect to print images.
Connecting the Camera to a Printer (Direct Print) Users of copies using a computer. Follow the procedures below to the printer (E17) Print images one at a time (E19) Print multiple images (E21) When printing is complete, turn the camera off and disconnect the USB cable Reference Section E16 Take pictures Select images for printing and number of PictBridge-compatible (F20) printers can connect the camera directly to the printer and print images without using Print order option (E34) Connect to print images.
Reference Manual
Page 124
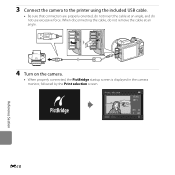
When disconnecting the cable, do not use excessive force. 3 Connect the camera to the printer using the included USB cable. • Be sure that connectors are properly oriented, do not insert the cable at an angle, and do not remove the cable at an angle. 4 Turn on the camera. • When properly connected, the PictBridge startup screen is displayed in the camera monitor, followed by the Print selection screen. Print selection 15/05 2013 NO. 32 32 Reference Section E18
When disconnecting the cable, do not use excessive force. 3 Connect the camera to the printer using the included USB cable. • Be sure that connectors are properly oriented, do not insert the cable at an angle, and do not remove the cable at an angle. 4 Turn on the camera. • When properly connected, the PictBridge startup screen is displayed in the camera monitor, followed by the Print selection screen. Print selection 15/05 2013 NO. 32 32 Reference Section E18
Reference Manual
Page 142
... date option (E52) in step 1 (E34) of "a Print Order (Creating a DPOF Print Order)" and press the k button to a DPOF-compatible printer via the included USB cable (E23). • Note that saved when the image was captured. Images with shooting date and time imprinted on them can be printed when the camera...
... date option (E52) in step 1 (E34) of "a Print Order (Creating a DPOF Print Order)" and press the k button to a DPOF-compatible printer via the included USB cable (E23). • Note that saved when the image was captured. Images with shooting date and time imprinted on them can be printed when the camera...
Reference Manual
Page 174
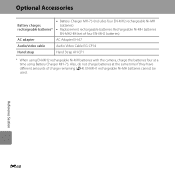
...) • Replacement rechargeable batteries: Rechargeable Ni-MH batteries EN-MH2-B4 (set of four EN-MH2 batteries) AC adapter AC Adapter EH-67 Audio/video cable Audio Video Cable EG-CP14 Hand strap Hand Strap AH-CP1 * When using Battery Charger MH-73. EN-MH1 rechargeable Ni-MH batteries cannot be used.
...) • Replacement rechargeable batteries: Rechargeable Ni-MH batteries EN-MH2-B4 (set of four EN-MH2 batteries) AC adapter AC Adapter EH-67 Audio/video cable Audio Video Cable EG-CP14 Hand strap Hand Strap AH-CP1 * When using Battery Charger MH-73. EN-MH1 rechargeable Ni-MH batteries cannot be used.

Reference Manual
Page 177
... internal memory or memory card. • Remove the memory card from internal memory to create or edit this camera. Turn camera off and reconnect USB cable. 37, 39, 46 E17 Reference Section E71 Raise the flash. Time out error while saving movie on this file. E48 The flash is protected. File...
... internal memory or memory card. • Remove the memory card from internal memory to create or edit this camera. Turn camera off and reconnect USB cable. 37, 39, 46 E17 Reference Section E71 Raise the flash. Time out error while saving movie on this file. E48 The flash is protected. File...
Reference Manual
Page 186
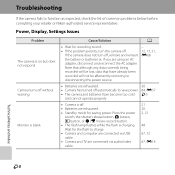
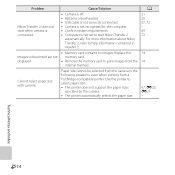
...are exhausted. 20 • Camera has turned off automatically to function as expected, check the list of common problems below before consulting your retailer or Nikon-authorized service representative. Cause/Solution A • Wait for the flash to end. • If the problem persists, turn off without warning. ...Camera turns off , remove and reinsert the battery or batteries or, if you are connected via audio/video cable. 21 20 2, 21 48 67, 72 67, E14 Technical Notes and Index F8 Wait for recording to charge. • Camera and computer...
...are exhausted. 20 • Camera has turned off automatically to function as expected, check the list of common problems below before consulting your retailer or Nikon-authorized service representative. Cause/Solution A • Wait for the flash to end. • If the problem persists, turn off without warning. ...Camera turns off , remove and reinsert the battery or batteries or, if you are connected via audio/video cable. 21 20 2, 21 48 67, 72 67, E14 Technical Notes and Index F8 Wait for recording to charge. • Camera and computer...
Reference Manual
Page 188
Disconnect USB cable. 67, 72, E17 • When camera is in images captured with flash. Lower the flash or set to W (off). 5, 47 Technical Notes and Index F10 ...
Disconnect USB cable. 67, 72, E17 • When camera is in images captured with flash. Lower the flash or set to W (off). 5, 47 Technical Notes and Index F10 ...
Reference Manual
Page 192
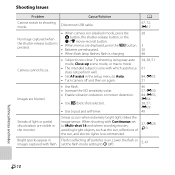
... the following situations, even when printing from the internal memory. Cannot select paper size with camera. Paper size cannot be printed are exhausted. • USB cable is not correctly connected. • Camera is not recognized by the camera. • The printer automatically selects the paper size. Problem...
... the following situations, even when printing from the internal memory. Cannot select paper size with camera. Paper size cannot be printed are exhausted. • USB cable is not correctly connected. • Camera is not recognized by the camera. • The printer automatically selects the paper size. Problem...
Reference Manual
Page 199
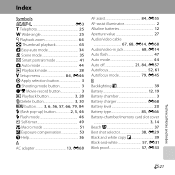
... 51 o Exposure compensation 53 j Help 36 A AC adapter 13, E68 AF assist 84, E55 AF-assist illuminator 2 Alkaline batteries 12 Aperture value 27 Audio/video cable 67, 68, E14, E68 Audio/video-in jack 68, E14 Auto flash 47 Auto mode 44 Auto off 21, 84, E57 Autofocus 52, 61 Autofocus...
... 51 o Exposure compensation 53 j Help 36 A AC adapter 13, E68 AF assist 84, E55 AF-assist illuminator 2 Alkaline batteries 12 Aperture value 27 Audio/video cable 67, 68, E14, E68 Audio/video-in jack 68, E14 Auto flash 47 Auto mode 44 Auto off 21, 84, E57 Autofocus 52, 61 Autofocus...
Reference Manual
Page 203
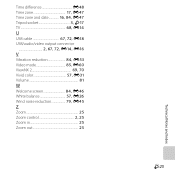
Time difference E48 Time zone 17, E47 Time zone and date 16, 84, E47 Tripod socket 3, F17 TV 68, E14 U USB cable 67, 72, E18 USB/audio/video output connector 2, 67, 72, E14, E16 V Vibration reduction 84, E53 Video mode 85, E60 ViewNX 2 69, 70 Vivid color 57, E31 Volume 81 W Welcome screen 84, E46 White balance 57, E26 Wind noise reduction 79, E45 Z Zoom 25 Zoom control 2, 25 Zoom in 25 Zoom out 25 F25 Technical Notes and Index
Time difference E48 Time zone 17, E47 Time zone and date 16, 84, E47 Tripod socket 3, F17 TV 68, E14 U USB cable 67, 72, E18 USB/audio/video output connector 2, 67, 72, E14, E16 V Vibration reduction 84, E53 Video mode 85, E60 ViewNX 2 69, 70 Vivid color 57, E31 Volume 81 W Welcome screen 84, E46 White balance 57, E26 Wind noise reduction 79, E45 Z Zoom 25 Zoom control 2, 25 Zoom in 25 Zoom out 25 F25 Technical Notes and Index


