
User Manual
Page 9
... Display Language, Date and Time 20 Inserting the Memory Card ...22 Removing the Memory Card...22 Basic Photography and Playback: A (Auto) Mode 24 Step 1 Turn the Camera On and Select A (Auto) Mode 24 Indicators Displayed in A (Auto) Mode 25 Step 2 Frame a Picture...26 Using the Zoom...27 Step 3 Focus and Shoot ...28 Step 4 Viewing and Deleting Pictures 30 Viewing Pictures (Playback Mode) ...30 Deleting Unnecessary Images...31 Using the Flash...32 Setting the Flash Mode...33 Taking Pictures with the Self-Timer 35 Taking Pictures of Smiling Faces (Smile Timer 36 Macro Mode...38 Adjusting...
... Display Language, Date and Time 20 Inserting the Memory Card ...22 Removing the Memory Card...22 Basic Photography and Playback: A (Auto) Mode 24 Step 1 Turn the Camera On and Select A (Auto) Mode 24 Indicators Displayed in A (Auto) Mode 25 Step 2 Frame a Picture...26 Using the Zoom...27 Step 3 Focus and Shoot ...28 Step 4 Viewing and Deleting Pictures 30 Viewing Pictures (Playback Mode) ...30 Deleting Unnecessary Images...31 Using the Flash...32 Setting the Flash Mode...33 Taking Pictures with the Self-Timer 35 Taking Pictures of Smiling Faces (Smile Timer 36 Macro Mode...38 Adjusting...
User Manual
Page 10
... the Internal Memory and Memory Card 107 viii Table of Copies to Take Pictures (Features 44 Taking Pictures with Easy Panorama...57 Viewing Pictures Recorded with Easy Panorama 59 Taking Pictures with Panorama Assist...60 Setting the Exposure for Shooting (A, B, C, D Modes 62 A, B, C, D Modes ...62 A (Programmed Auto) Mode...64 B (Shutter-Priority Auto) Mode ...65 C (Aperture-Priority Auto) Mode...66 D (Manual) Mode ...67 Adjusting Brightness, Vividness and Hue (A, B, C, D Modes 69 Operating the Creative Slider...69 Shooting Options: Shooting Menu (A, B, C, D Modes 72 Image Mode (Image...
... the Internal Memory and Memory Card 107 viii Table of Copies to Take Pictures (Features 44 Taking Pictures with Easy Panorama...57 Viewing Pictures Recorded with Easy Panorama 59 Taking Pictures with Panorama Assist...60 Setting the Exposure for Shooting (A, B, C, D Modes 62 A, B, C, D Modes ...62 A (Programmed Auto) Mode...64 B (Shutter-Priority Auto) Mode ...65 C (Aperture-Priority Auto) Mode...66 D (Manual) Mode ...67 Adjusting Brightness, Vividness and Hue (A, B, C, D Modes 69 Operating the Creative Slider...69 Shooting Options: Shooting Menu (A, B, C, D Modes 72 Image Mode (Image...
User Manual
Page 13
... taking pictures with this manual. This icon marks notes, C information that more clearly shown. This icon indicates that should be read before use the product will read before using the camera. C Internal Memory and Memory Cards Pictures taken with your purchase of buttons or messages displayed on the memory card and delete, playback, and format operations will be helpful when using the camera. Screen Samples In this manual, images are sometimes omitted from actual display. Illustrations and Screen Display Illustrations and text displays...
... taking pictures with this manual. This icon marks notes, C information that more clearly shown. This icon indicates that should be read before use the product will read before using the camera. C Internal Memory and Memory Cards Pictures taken with your purchase of buttons or messages displayed on the memory card and delete, playback, and format operations will be helpful when using the camera. Screen Samples In this manual, images are sometimes omitted from actual display. Illustrations and Screen Display Illustrations and text displays...

User Manual
Page 34
... camera, battery or memory card may be played back, deleted, or transferred. To use the internal memory, remove the memory card. 1 Confirm that the poweron lamp and the monitor are turned off and open the batterychamber/memory card slot cover. • Be sure to turn the camera off and confirm that the power-on lamp and the monitor are off the camera before opening the battery-chamber/memory card slot cover, turn off . Press the memory card in lightly...
... camera, battery or memory card may be played back, deleted, or transferred. To use the internal memory, remove the memory card. 1 Confirm that the poweron lamp and the monitor are turned off and open the batterychamber/memory card slot cover. • Be sure to turn the camera off and confirm that the power-on lamp and the monitor are off the camera before opening the battery-chamber/memory card slot cover, turn off . Press the memory card in lightly...

User Manual
Page 37
... subject movement and camera shake are recorded to internal memory (approx. 90 MB). C Functions Available in A (auto) mode. When a memory card is inserted, C is not displayed and pictures are recorded to specify a combination of image quality (compression ratio) and image size is displayed. Basic Photography and Playback: A (Auto) Mode Step 1 Turn the Camera On and Select A (Auto) Mode Indicators Displayed in A (Auto) Mode Shooting mode A is displayed in A (Auto) Mode • The flash mode (A32) can be adjusted, self-timer (A35), macro mode (A38) and exposure compensation (A39...
... subject movement and camera shake are recorded to internal memory (approx. 90 MB). C Functions Available in A (auto) mode. When a memory card is inserted, C is not displayed and pictures are recorded to specify a combination of image quality (compression ratio) and image size is displayed. Basic Photography and Playback: A (Auto) Mode Step 1 Turn the Camera On and Select A (Auto) Mode Indicators Displayed in A (Auto) Mode Shooting mode A is displayed in A (Auto) Mode • The flash mode (A32) can be adjusted, self-timer (A35), macro mode (A38) and exposure compensation (A39...

User Manual
Page 47
... the picture and press the shutter-release button halfway. • The focus and exposure are set. 4 Press the shutter-release button the rest of a tripod is displayed. Set Vibration reduction (A150) in the setup menu (A141) to Off when using the self-timer, use of the way down . When using a tripod to stabilize the camera. 1 Press the rotary multi selector n (self-timer). • The self-timer menu is recommended. Taking Pictures with the Self-Timer The self-timer is...
... the picture and press the shutter-release button halfway. • The focus and exposure are set. 4 Press the shutter-release button the rest of a tripod is displayed. Set Vibration reduction (A150) in the setup menu (A141) to Off when using the self-timer, use of the way down . When using a tripod to stabilize the camera. 1 Press the rotary multi selector n (self-timer). • The self-timer menu is recommended. Taking Pictures with the Self-Timer The self-timer is...
User Manual
Page 50
... the zoom indicator light in green (to lock the focus. In other shooting modes, Full-time AF is turned on automatically when macro mode is pressed halfway to the left of G), the camera can focus on the zoom position. Macro mode 3 Rotate the zoom control to frame the picture. • The closest distance at distances of less than 50 cm (1 ft. 8 in.). 1 Press the rotary multi selector p (macro mode). • The macro mode menu is displayed. 2 Use...
... the zoom indicator light in green (to lock the focus. In other shooting modes, Full-time AF is turned on automatically when macro mode is pressed halfway to the left of G), the camera can focus on the zoom position. Macro mode 3 Rotate the zoom control to frame the picture. • The closest distance at distances of less than 50 cm (1 ft. 8 in.). 1 Press the rotary multi selector p (macro mode). • The macro mode menu is displayed. 2 Use...

User Manual
Page 53
... original screen, rotate the zoom control toward g (j) to view a description (help) of that are captured using the mode dial or the scene menu, images are optimized for Shooting (Scene Mode) When one of the following shooting scenes. More on Shooting y (Scene) Press the d button to raise the flash before shooting. • Choose a scene type from the scene menu and rotate the zoom control (A4) toward g (j) again. Changes made to the image mode setting...
... original screen, rotate the zoom control toward g (j) to view a description (help) of that are captured using the mode dial or the scene menu, images are optimized for Shooting (Scene Mode) When one of the following shooting scenes. More on Shooting y (Scene) Press the d button to raise the flash before shooting. • Choose a scene type from the scene menu and rotate the zoom control (A4) toward g (j) again. Changes made to the image mode setting...

User Manual
Page 102
... function Setting Description Flash mode Continuous (A79) When Continuous, BSS, Multi-shot 16, Continuous H: 120 fps or Continuous H: 60 fps is selected for shooting, the flash is fixed at M (image size: 1280 × 960 pixels). Exposure bracketing is reset to Off when Continuous is set to any mode other than Single. The setting for shooting mode D. Self-timer/Smile timer AF area mode (A83) When Subject tracking or Face priority tracking is not available. Macro mode AF area mode...
... function Setting Description Flash mode Continuous (A79) When Continuous, BSS, Multi-shot 16, Continuous H: 120 fps or Continuous H: 60 fps is selected for shooting, the flash is fixed at M (image size: 1280 × 960 pixels). Exposure bracketing is reset to Off when Continuous is set to any mode other than Single. The setting for shooting mode D. Self-timer/Smile timer AF area mode (A83) When Subject tracking or Face priority tracking is not available. Macro mode AF area mode...

User Manual
Page 104
... on Playback Function Choose pictures Thumbnail display/ Calendar display Playback zoom Displaying the shooting information Scroll pictures recorded with easy panorama Play back movies Delete pictures Display menu 4 132 Use f (h) g (i) k l d c Description A Press H, I , J or K to scroll quickly through pictures. 10 Pictures can also be performed in full-frame playback mode. 15/05/2011 15:30 0004.JPG More on Playback Operations in Full-Frame Playback In shooting mode, press the c (playback) button to enter playback mode and play back the images that have been shot (A30). Play back...
... on Playback Function Choose pictures Thumbnail display/ Calendar display Playback zoom Displaying the shooting information Scroll pictures recorded with easy panorama Play back movies Delete pictures Display menu 4 132 Use f (h) g (i) k l d c Description A Press H, I , J or K to scroll quickly through pictures. 10 Pictures can also be performed in full-frame playback mode. 15/05/2011 15:30 0004.JPG More on Playback Operations in Full-Frame Playback In shooting mode, press the c (playback) button to enter playback mode and play back the images that have been shot (A30). Play back...
User Manual
Page 141
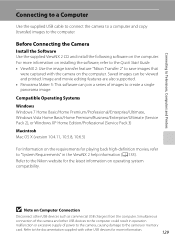
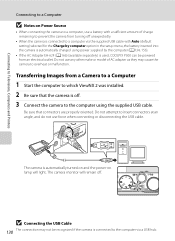
... power to the camera, causing damage to the camera or memory card. Connecting to Televisions, Computers and Printers Connecting to a Computer Use the supplied USB cable to connect the camera to a computer and copy (transfer) images to "System Requirements" in operation malfunction or excessive supply of images to the documentation supplied with the camera on the requirements for more information on installing the software, refer to the Quick Start Guide. • ViewNX 2: Use the image transfer feature "Nikon Transfer...
... power to the camera, causing damage to the camera or memory card. Connecting to Televisions, Computers and Printers Connecting to a Computer Use the supplied USB cable to connect the camera to a computer and copy (transfer) images to "System Requirements" in operation malfunction or excessive supply of images to the documentation supplied with the camera on the requirements for more information on installing the software, refer to the Quick Start Guide. • ViewNX 2: Use the image transfer feature "Nikon Transfer...
User Manual
Page 142
... camera to a computer, use a battery with Auto (default setting) selected for the Charge by the computer (A134, 156). • If the AC Adapter EH-62F (A166) (available separately) is automatically turned on and the power-on lamp will remain off . 3 Connect the camera to the computer using power supplied by computer option in the setup menu, the battery inserted into the camera is automatically charged using the supplied USB cable. The camera is used, COOLPIX P300...
... camera to a computer, use a battery with Auto (default setting) selected for the Charge by the computer (A134, 156). • If the AC Adapter EH-62F (A166) (available separately) is automatically turned on and the power-on lamp will remain off . 3 Connect the camera to the computer using power supplied by computer option in the setup menu, the battery inserted into the camera is automatically charged using the supplied USB cable. The camera is used, COOLPIX P300...
User Manual
Page 143
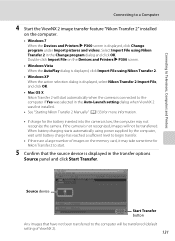
... Select Import File using Nikon Transfer 2 in the Change program dialog and click OK. Double-click Import File on the computer. • Windows 7 When the Devices and Printers K P300 screen is displayed, click Change program under Import pictures and videos. If the camera is not recognized, images will not be transferred (default setting of images on the memory card, it may not recognize the camera. Source device Start Transfer button Any images that the source device is displayed in the transfer options...
... Select Import File using Nikon Transfer 2 in the Change program dialog and click OK. Double-click Import File on the computer. • Windows 7 When the Devices and Printers K P300 screen is displayed, click Change program under Import pictures and videos. If the camera is not recognized, images will not be transferred (default setting of images on the memory card, it may not recognize the camera. Source device Start Transfer button Any images that the source device is displayed in the transfer options...

User Manual
Page 146
... mode while charging, charging will stop and the camera may start. Charging time increases when images are transferred while the battery is charging. • When the camera is in the camera's setup menu is set (A20). Charge lamp Blinks slowly (green) Off Flickers (green) Description Battery charging. See "Before Connecting the Camera" (A129) and "Transferring Images from a computer, turn the camera off while the power-on connecting the camera to a computer. Reconnect the USB cable correctly or replace the battery. • Computer is connected to supply power...
... mode while charging, charging will stop and the camera may start. Charging time increases when images are transferred while the battery is charging. • When the camera is in the camera's setup menu is set (A20). Charge lamp Blinks slowly (green) Off Flickers (green) Description Battery charging. See "Before Connecting the Camera" (A129) and "Transferring Images from a computer, turn the camera off while the power-on connecting the camera to a computer. Reconnect the USB cable correctly or replace the battery. • Computer is connected to supply power...

User Manual
Page 153
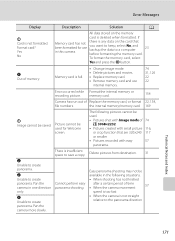
... camera battery when connecting to reduce the effects of recording on . Welcome screen A143 Choose whether or not to save power. Auto off A153 Set the time before the camera enters standby mode to display the Welcome screen on the monitor when the camera is turned on pictures. Time zone and date A144 Set camera clock and choose home and destination time zones. Language A155 Choose the language used for taking still pictures and movies. Basic Camera Setup Setup Menu Basic Camera Setup The setup menu...
... camera battery when connecting to reduce the effects of recording on . Welcome screen A143 Choose whether or not to save power. Auto off A153 Set the time before the camera enters standby mode to display the Welcome screen on the monitor when the camera is turned on pictures. Time zone and date A144 Set camera clock and choose home and destination time zones. Language A155 Choose the language used for taking still pictures and movies. Basic Camera Setup Setup Menu Basic Camera Setup The setup menu...
User Manual
Page 183
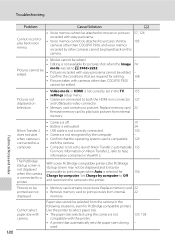
Memory card is full. • Change image mode. • Delete pictures and movies. • Replace memory card. • Remove memory card and use in this camera. N Unable to save a copy. Cannot perform easy panorama shooting. The following situations. • When shooting has not finished after a certain period of 74 o 3968×2232 • Pictures created with small picture 116, or crop function that you want to keep, select No, and backup the data to the panorama direction Technical Notes...
Memory card is full. • Change image mode. • Delete pictures and movies. • Replace memory card. • Remove memory card and use in this camera. N Unable to save a copy. Cannot perform easy panorama shooting. The following situations. • When shooting has not finished after a certain period of 74 o 3968×2232 • Pictures created with small picture 116, or crop function that you want to keep, select No, and backup the data to the panorama direction Technical Notes...

User Manual
Page 188
.... Set the correct date and time using Time zone and date in monitor. blinks for Photo info of recording are used for a long time, or when the camera is used in the setup menu. 147 Print date not available. When functions such as watches. Turn the camera off automatically, 19 on the internal memory or memory card at the time the problem occurred. Hide info is selected for three minutes, the camera turns off , remove and replace the battery, then turn it...
.... Set the correct date and time using Time zone and date in monitor. blinks for Photo info of recording are used for a long time, or when the camera is used in the setup menu. 147 Print date not available. When functions such as watches. Turn the camera off automatically, 19 on the internal memory or memory card at the time the problem occurred. Hide info is selected for three minutes, the camera turns off , remove and replace the battery, then turn it...
User Manual
Page 192
Replace memory card. 22 • Remove memory card to print pictures from the camera in the following situations, even for editing. - 108 • Pictures taken with easy panorama cannot be attached to pictures shot by 105 cameras other than COOLPIX P300 - used is compatible 129 with easy panorama. • Voice memos cannot be edited. Set Charge by computer. Cannot select paper size with the printer. • A printer that automatically sets the paper size is selected for pictures shot when the Image 74...
Replace memory card. 22 • Remove memory card to print pictures from the camera in the following situations, even for editing. - 108 • Pictures taken with easy panorama cannot be attached to pictures shot by 105 cameras other than COOLPIX P300 - used is compatible 129 with easy panorama. • Voice memos cannot be edited. Set Charge by computer. Cannot select paper size with the printer. • A printer that automatically sets the paper size is selected for pictures shot when the Image 74...

User Manual
Page 198
... Focus lock 29 Folder name 168 Food u 53 Format 23, 154 Format the internal memory 154 Format the memory card 23, 154 FSCN 168 Full-frame playback 30, 92 Functions that cannot be applied simultaneously 90 H HDMI 127, 155 HDMI device control 155 HDMI mini connector 127 Histogram 39, 71, 93 HS movie 120, 124 Hue 69, 71 I Identifier 168 Image copy 107 Image mode 74 Internal memory 22 Internal memory indicator 25 ISO...
... Focus lock 29 Folder name 168 Food u 53 Format 23, 154 Format the internal memory 154 Format the memory card 23, 154 FSCN 168 Full-frame playback 30, 92 Functions that cannot be applied simultaneously 90 H HDMI 127, 155 HDMI device control 155 HDMI mini connector 127 Histogram 39, 71, 93 HS movie 120, 124 Hue 69, 71 I Identifier 168 Image copy 107 Image mode 74 Internal memory 22 Internal memory indicator 25 ISO...

User Manual
Page 199
... Print order 99 Printer 135 Programmed auto mode 64 Protect 102 Q Quick retouch 110 R Rechargeable battery 166 Recording slow motion movies 120 Red-eye reduction 32 Reset all 159 Rotary multi selector 10 Rotate image 104 RSCN 168 S Scene auto selector x 42 Scene mode 41 Selecting pictures 103 Self-timer 35 Self-timer lamp 35 Setup menu 141 Shooting 24, 40 Shooting information 30, 93 Shooting menu 72 Shooting with Face Priority 85 Shutter sound 153 Shutter speed 63 Shutter-priority auto mode 65 Shutter...
... Print order 99 Printer 135 Programmed auto mode 64 Protect 102 Q Quick retouch 110 R Rechargeable battery 166 Recording slow motion movies 120 Red-eye reduction 32 Reset all 159 Rotary multi selector 10 Rotate image 104 RSCN 168 S Scene auto selector x 42 Scene mode 41 Selecting pictures 103 Self-timer 35 Self-timer lamp 35 Setup menu 141 Shooting 24, 40 Shooting information 30, 93 Shooting menu 72 Shooting with Face Priority 85 Shutter sound 153 Shutter speed 63 Shutter-priority auto mode 65 Shutter...


