S5100 User's Manual
Page 9
... of the Operation Controls 8 Common Menu Operations...10 Switching Between Tabs...11 The Shutter-release Button...11 Attaching the Camera Strap ...11 First Steps ...12 Inserting the Battery ...12 Removing the Battery ...13 Charging the Battery ...14 Turning On and Off the Camera...17 Setting Display Language, Date, and Time 18 Inserting...
... of the Operation Controls 8 Common Menu Operations...10 Switching Between Tabs...11 The Shutter-release Button...11 Attaching the Camera Strap ...11 First Steps ...12 Inserting the Battery ...12 Removing the Battery ...13 Charging the Battery ...14 Turning On and Off the Camera...17 Setting Display Language, Date, and Time 18 Inserting...
S5100 User's Manual
Page 16
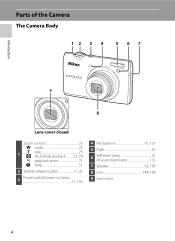
Introduction Parts of the Camera The Camera Body 12 3 4 5 67 9 8 Lens cover closed Zoom control 25 f : wide 25 1 g : tele 25 h : thumbnail playback........... 72, 74 i : playback zoom 75 j : help 51 2 Shutter-release button 11, 26 3 Power switch/power-on lamp 17, 133 4 Microphone 91, 101 5 Flash 30 6 Self-timer lamp 32 AF-assist illuminator 131 7 Speaker 92, 106 8 Lens 144, 158 9 Lens cover 4
Introduction Parts of the Camera The Camera Body 12 3 4 5 67 9 8 Lens cover closed Zoom control 25 f : wide 25 1 g : tele 25 h : thumbnail playback........... 72, 74 i : playback zoom 75 j : help 51 2 Shutter-release button 11, 26 3 Power switch/power-on lamp 17, 133 4 Microphone 91, 101 5 Flash 30 6 Self-timer lamp 32 AF-assist illuminator 131 7 Speaker 92, 106 8 Lens 144, 158 9 Lens cover 4
S5100 User's Manual
Page 17
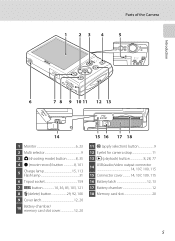
... 159 7 d button 10, 36, 83, 103, 121 8 l (delete) button 29, 92, 106 9 Cover latch 12, 20 10 Battery-chamber/ memory card slot cover 12, 20 15 16 17 18 11 k (apply selection) button 9 12 Eyelet for camera strap 11 13 c (playback) button 8, 28, 77 14 USB/audio/video output connector 14..., 107, 109, 115 15 Connector cover........... 14, 107, 109, 115 16 Battery latch 12, 13 17 Battery chamber 12 18 Memory...
... 159 7 d button 10, 36, 83, 103, 121 8 l (delete) button 29, 92, 106 9 Cover latch 12, 20 10 Battery-chamber/ memory card slot cover 12, 20 15 16 17 18 11 k (apply selection) button 9 12 Eyelet for camera strap 11 13 c (playback) button 8, 28, 77 14 USB/audio/video output connector 14..., 107, 109, 115 15 Connector cover........... 14, 107, 109, 115 16 Battery latch 12, 13 17 Battery chamber 12 18 Memory...
S5100 User's Manual
Page 18
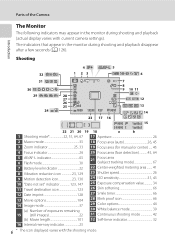
...The icon displayed varies with current camera settings). Shooting 4 5 32 10 2 1 23 6 31 30 7 8 9 10 11 29 24 28 27 26 25 +1.0 1 6 0 0 1 / 2 5 0 F 2.7 999 12 13 14 23 17 16 22 21 20 19 18 999 1 m 0 0 s 15 9999 1m00s a b 1 Shooting mode 22, 51, 64, 67 17 Aperture 26 2 Macro mode...Vibration reduction icon 23, 129 9 Motion detection icon 23, 130 10 "Date not set" indicator 123, 147 11 Travel destination icon 123 12 Date imprint 128 13 Movie options 104 14 Image mode 37 (a) Number of the Camera Introduction The Monitor The following indicators may appear in the...
...The icon displayed varies with current camera settings). Shooting 4 5 32 10 2 1 23 6 31 30 7 8 9 10 11 29 24 28 27 26 25 +1.0 1 6 0 0 1 / 2 5 0 F 2.7 999 12 13 14 23 17 16 22 21 20 19 18 999 1 m 0 0 s 15 9999 1m00s a b 1 Shooting mode 22, 51, 64, 67 17 Aperture 26 2 Macro mode...Vibration reduction icon 23, 129 9 Motion detection icon 23, 130 10 "Date not set" indicator 123, 147 11 Travel destination icon 123 12 Date imprint 128 13 Movie options 104 14 Image mode 37 (a) Number of the Camera Introduction The Monitor The following indicators may appear in the...
S5100 User's Manual
Page 19
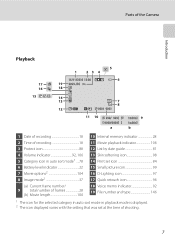
Parts of shooting. 7 J P G 18 5 6 14 13 7 8 12 999/ 999 11 10 999/ 999 9999/9999 a 1m00s 9 1m00s b 1 Date of recording 18 2 Time of recording 18 3 Protect icon 88 4 Volume...37 (a) Current frame number/ 9 total number of frames 28 (b) Movie length 106 10 Internal memory indicator 28 11 Movie playback indicator 106 12 List by date guide 81 13 Skin softening icon 98 14 Print set icon 84 15 Small picture icon 99 16 D-Lighting icon 97 17...varies with the setting that was set at the time of the Camera Introduction Playback 17 16 15 1 23 4 15/11/2010 12:00 19 9 9 9 9 .
Parts of shooting. 7 J P G 18 5 6 14 13 7 8 12 999/ 999 11 10 999/ 999 9999/9999 a 1m00s 9 1m00s b 1 Date of recording 18 2 Time of recording 18 3 Protect icon 88 4 Volume...37 (a) Current frame number/ 9 total number of frames 28 (b) Movie length 106 10 Internal memory indicator 28 11 Movie playback indicator 106 12 List by date guide 81 13 Skin softening icon 98 14 Print set icon 84 15 Small picture icon 99 16 D-Lighting icon 97 17...varies with the setting that was set at the time of the Camera Introduction Playback 17 16 15 1 23 4 15/11/2010 12:00 19 9 9 9 9 .
S5100 User's Manual
Page 24
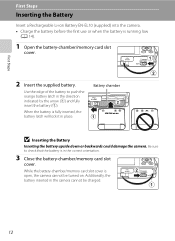
... the arrow (1) and fully insert the battery (2). Use the edge of the battery to check that the battery is open, the camera cannot be charged. 12 Be sure to push the orange battery latch in the correct orientation. 3 Close the battery-chamber/memory card slot cover. Battery chamber B Inserting the Battery...
... the arrow (1) and fully insert the battery (2). Use the edge of the battery to check that the battery is open, the camera cannot be charged. 12 Be sure to push the orange battery latch in the correct orientation. 3 Close the battery-chamber/memory card slot cover. Battery chamber B Inserting the Battery...
S5100 User's Manual
Page 26
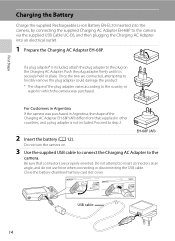
... adapter to the plug on . 3 Use the supplied USB cable to connect the Charging AC Adapter to the camera. EH-68P (AR) 2 Insert the battery (A 12). USB cable 14 First Steps Charging the Battery Charge the supplied Rechargeable Li-ion Battery EN-EL10 inserted into the camera, by connecting the supplied...
... adapter to the plug on . 3 Use the supplied USB cable to connect the Charging AC Adapter to the camera. EH-68P (AR) 2 Insert the battery (A 12). USB cable 14 First Steps Charging the Battery Charge the supplied Rechargeable Li-ion Battery EN-EL10 inserted into the camera, by connecting the supplied...
S5100 User's Manual
Page 50
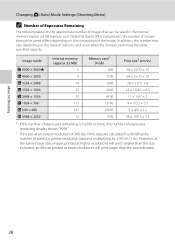
... × 1536 35 4100 17 × 13/7 × 5 N 1024 × 768 113 13700 9 × 7/3.5 × 2.5 O 640 × 480 227 29600 5 × 4/2 × 1.5 P 3968 × 2232 12 1500 34 × 19/13 × 7.5 1 If the number of exposures remaining is 10,000 or more, the number of exposures remaining display shows "9999...
... × 1536 35 4100 17 × 13/7 × 5 N 1024 × 768 113 13700 9 × 7/3.5 × 2.5 O 640 × 480 227 29600 5 × 4/2 × 1.5 P 3968 × 2232 12 1500 34 × 19/13 × 7.5 1 If the number of exposures remaining is 10,000 or more, the number of exposures remaining display shows "9999...
S5100 User's Manual
Page 59
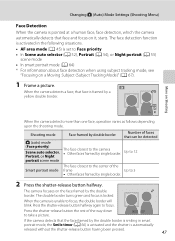
When the camera detects a face, that face is locked. Up to 12 The face closest to the center of the frame Up to focus, the double border will blink. When the camera is unable to 3 • Other ...
When the camera detects a face, that face is locked. Up to 12 The face closest to the center of the frame Up to focus, the double border will blink. When the camera is unable to 3 • Other ...
S5100 User's Manual
Page 86
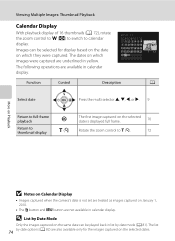
... on the selected date is displayed full frame. 70 Rotate the zoom control to calendar display. 2010 11 Su M Tu W Th F Sa 123456 7 8 9 10 11 12 13 Images can be selected for display based on the date 14 15 16 17 18 19 20 21 22 23 24 25 26 27...
... on the selected date is displayed full frame. 70 Rotate the zoom control to calendar display. 2010 11 Su M Tu W Th F Sa 123456 7 8 9 10 11 12 13 Images can be selected for display based on the date 14 15 16 17 18 19 20 21 22 23 24 25 26 27...
S5100 User's Manual
Page 96
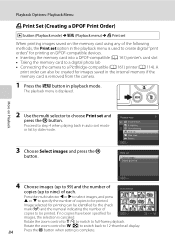
... the memory card to a digital photo lab • Connecting the camera to be printed. 1 1 3 Image selected for printing on Playback 2 Use the multi selector to 12-thumbnail display. 84 Press the k button when setting is displayed.
... the memory card to a digital photo lab • Connecting the camera to be printed. 1 1 3 Image selected for printing on Playback 2 Use the multi selector to 12-thumbnail display. 84 Press the k button when setting is displayed.
S5100 User's Manual
Page 101
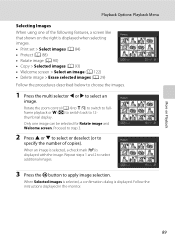
... an image (A 122) • Delete image > Erase selected images (A 29) Follow the procedures described below to choose the images. 1 Press the multi selector J or K to 12- Back ON/OFF 3 Press the k button to select additional images. When Selected images is selected, a confirmation dialog is displayed with the image. Repeat steps 1 and...
... an image (A 122) • Delete image > Erase selected images (A 29) Follow the procedures described below to choose the images. 1 Press the multi selector J or K to 12- Back ON/OFF 3 Press the k button to select additional images. When Selected images is selected, a confirmation dialog is displayed with the image. Repeat steps 1 and...
S5100 User's Manual
Page 110
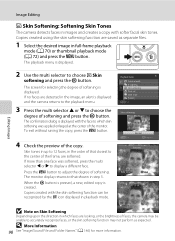
... are saved as expected. The screen for more than one face was applied enlarged at the center of the monitor. Skin tones in up to 12 faces, in full-frame playback mode (A 70) or thumbnail playback mode (A 72) and press the d button. If more information. Playback menu Quick retouch D-Lighting Skin...
... are saved as expected. The screen for more than one face was applied enlarged at the center of the monitor. Skin tones in up to 12 faces, in full-frame playback mode (A 70) or thumbnail playback mode (A 72) and press the d button. If more information. Playback menu Quick retouch D-Lighting Skin...
S5100 User's Manual
Page 128
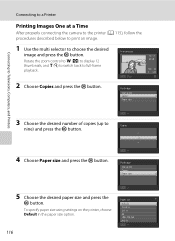
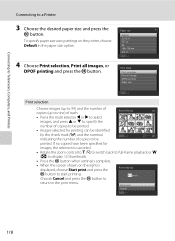
... and press the k button. NO. 32 32 2 Choose Copies and press the k button. Exit Print selection 15/11 Rotate the zoom control to f (h) to display 12 2010 thumbnails, and g (i) to switch back to choose the desired image and press the k button. Connecting to Televisions, Computers, and Printers Connecting to a Printer Printing...
... and press the k button. NO. 32 32 2 Choose Copies and press the k button. Exit Print selection 15/11 Rotate the zoom control to f (h) to display 12 2010 thumbnails, and g (i) to switch back to choose the desired image and press the k button. Connecting to Televisions, Computers, and Printers Connecting to a Printer Printing...
S5100 User's Manual
Page 130
.... • Images selected for images, the selection is canceled. • Rotate the zoom control to g (i) to switch back to full-frame playback or f (h) to display 12 thumbnails. • Press the k button when setting is complete. • When the screen shown on the right is displayed, choose Start print and press the...
.... • Images selected for images, the selection is canceled. • Rotate the zoom control to g (i) to switch back to full-frame playback or f (h) to display 12 thumbnails. • Press the k button when setting is complete. • When the screen shown on the right is displayed, choose Start print and press the...
S5100 User's Manual
Page 137
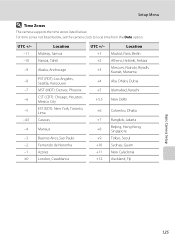
..., Kuwait, Manama +4 Abu Dhabi, Dubai +5 Islamabad, Karachi +5.5 New Delhi +6 Colombo, Dhaka +7 Bangkok, Jakarta +8 Beijing, Hong Kong, Singapore +9 Tokyo, Seoul +10 Sydney, Guam +11 New Caledonia +12 Auckland, Fiji Basic Camera Setup 125 Setup Menu D Time Zones The camera supports the time zones listed below , set the camera clock to local time...
..., Kuwait, Manama +4 Abu Dhabi, Dubai +5 Islamabad, Karachi +5.5 New Delhi +6 Colombo, Dhaka +7 Bangkok, Jakarta +8 Beijing, Hong Kong, Singapore +9 Tokyo, Seoul +10 Sydney, Guam +11 New Caledonia +12 Auckland, Fiji Basic Camera Setup 125 Setup Menu D Time Zones The camera supports the time zones listed below , set the camera clock to local time...
S5100 User's Manual
Page 157
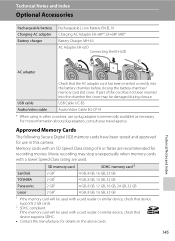
... Lexar SD memory card 2 GB1 2 GB1 2 GB1 2 GB1 SDHC memory card 2 4 GB, 8 GB, 16 GB, 32 GB 4 GB, 8 GB, 16 GB, 32 GB 4 GB, 8 GB, 12 GB, 16 GB, 24 GB, 32 GB 4 GB, 8 GB, 16 GB, 32 GB 1 If the memory card will be used with a card reader or similar...
... Lexar SD memory card 2 GB1 2 GB1 2 GB1 2 GB1 SDHC memory card 2 4 GB, 8 GB, 16 GB, 32 GB 4 GB, 8 GB, 16 GB, 32 GB 4 GB, 8 GB, 12 GB, 16 GB, 24 GB, 32 GB 4 GB, 8 GB, 16 GB, 32 GB 1 If the memory card will be used with a card reader or similar...
S5100 User's Manual
Page 159
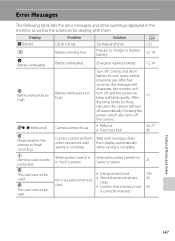
A 123 B N Battery exhausted. Battery exhausted. Pressing the power switch also turns off camera, and allow battery to charge or replace battery. 12, 14 Charge or replace battery. 12, 14 P Battery temperature high Battery temperature is Slide write-protect switch to finish recording. Q (● blinks red) P Please wait for the camera to in the...
A 123 B N Battery exhausted. Battery exhausted. Pressing the power switch also turns off camera, and allow battery to charge or replace battery. 12, 14 Charge or replace battery. 12, 14 P Battery temperature high Battery temperature is Slide write-protect switch to finish recording. Q (● blinks red) P Please wait for the camera to in the...
S5100 User's Manual
Page 162
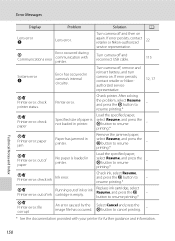
If error persists, contact retailer or Nikon-authorized 22 service representative. Check printer. Check ink, select Resume, and press the k button to resume - PR Printer error: file corrupt An error caused by ... error Q Lens error. After solving the problem, select Resume and press the k button to resume printing.* - If error persists, contact retailer or Nikonauthorized service representative. 12, 17 PR Printer error: check printer status. Turn camera off , remove and reinsert battery, and turn camera on again. Turn camera off and reconnect USB...
If error persists, contact retailer or Nikon-authorized 22 service representative. Check printer. Check ink, select Resume, and press the k button to resume - PR Printer error: file corrupt An error caused by ... error Q Lens error. After solving the problem, select Resume and press the k button to resume printing.* - If error persists, contact retailer or Nikonauthorized service representative. 12, 17 PR Printer error: check printer status. Turn camera off , remove and reinsert battery, and turn camera on again. Turn camera off and reconnect USB...
S5100 User's Manual
Page 163
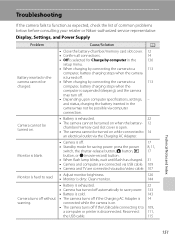
...and Power Supply Problem Cause/Solution A Battery inserted in the camera cannot be charged. • Close the battery-chamber/memory card slot cover. 12 • Confirm all connections. 14 • Off is selected for saving power: press the power switch, the shutter-release button, A button...8226; Camera has turned off automatically to function as expected, check the list of common problems below before consulting your retailer or Nikon-authorized service representative. and status, charging the battery inserted in the 136 setup menu. • When charging by connecting the...
...and Power Supply Problem Cause/Solution A Battery inserted in the camera cannot be charged. • Close the battery-chamber/memory card slot cover. 12 • Confirm all connections. 14 • Off is selected for saving power: press the power switch, the shutter-release button, A button...8226; Camera has turned off automatically to function as expected, check the list of common problems below before consulting your retailer or Nikon-authorized service representative. and status, charging the battery inserted in the 136 setup menu. • When charging by connecting the...


