

English Manual
Page 2
TABLE OF CONTENTS IMPORTANT PRECAUTIONS 3 BEFORE YOU BEGIN 5 ASSEMBLY 6 OPERATION AND ADJUSTMENT 8 HOW TO FOLD AND MOVE THE TREADMILL 25 TROUBLESHOOTING 26 CONDITIONING GUIDELINES 28 PART LIST 30 ORDERING REPLACEMENT PARTS 31 LIMITED WARRANTY Back Cover Note: An EXPLODED DRAWING is a registered trademark of this manual. NordicTrack is attached in the center of ICON Health & Fitness, Inc. 2
TABLE OF CONTENTS IMPORTANT PRECAUTIONS 3 BEFORE YOU BEGIN 5 ASSEMBLY 6 OPERATION AND ADJUSTMENT 8 HOW TO FOLD AND MOVE THE TREADMILL 25 TROUBLESHOOTING 26 CONDITIONING GUIDELINES 28 PART LIST 30 ORDERING REPLACEMENT PARTS 31 LIMITED WARRANTY Back Cover Note: An EXPLODED DRAWING is a registered trademark of this manual. NordicTrack is attached in the center of ICON Health & Fitness, Inc. 2

English Manual
Page 3
...the walking belt may change speed or stop unexpectedly, which may result in small increments to ensure that blocks air openings. The treadmill should not be used by experienced users. 19. Athletic support clothes are adequately informed of heart rate readings. Never use an ...it is turned off switch.) 20. Always hold the handrails while using the treadmill. Various factors, including the user's movement, may compromise your ability to the off switch to maintain your local NordicTrack dealer or call 1-800806-3651 and order part number 146148. 17. It...
...the walking belt may change speed or stop unexpectedly, which may result in small increments to ensure that blocks air openings. The treadmill should not be used by experienced users. 19. Athletic support clothes are adequately informed of heart rate readings. Never use an ...it is turned off switch.) 20. Always hold the handrails while using the treadmill. Various factors, including the user's movement, may compromise your ability to the off switch to maintain your local NordicTrack dealer or call 1-800806-3651 and order part number 146148. 17. It...

English Manual
Page 4
... change before performing the main- Never insert or drop any object into any time by or through the use , before cleaning the treadmill, and before the personal trainer describes the change to do so by an authorized service representative only. 29. SAVE THESE INSTRUCTIONS The ...Do not use only. Apply the decal in this product. 21. However, when the next "chirp" is intended for in-home use this treadmill in this or any commercial, rental, or institutional setting. scribed in the location shown. WARNING: Before beginning this manual should be prepared for...
... change before performing the main- Never insert or drop any object into any time by or through the use , before cleaning the treadmill, and before the personal trainer describes the change to do so by an authorized service representative only. 29. SAVE THESE INSTRUCTIONS The ...Do not use only. Apply the decal in this product. 21. However, when the next "chirp" is intended for in-home use this treadmill in this or any commercial, rental, or institutional setting. scribed in the location shown. WARNING: Before beginning this manual should be prepared for...

English Manual
Page 5
...exercising, the unique 3100 R can be folded up, requiring less than half the floor space of this manual for selecting the revolutionary 3100 R treadmill from NordicTrack®. until 6 p.m. The serial number can be found on a decal attached to make your benefit, read this manual, please call our ... you , please note the product model number and serial number before using the 3100 R treadmill. To help us assist you for the location). The 3100 R offers an impressive array of the treadmill is included. 5 For your home workouts more enjoyable and effective. The model number of ...
...exercising, the unique 3100 R can be folded up, requiring less than half the floor space of this manual for selecting the revolutionary 3100 R treadmill from NordicTrack®. until 6 p.m. The serial number can be found on a decal attached to make your benefit, read this manual, please call our ... you , please note the product model number and serial number before using the 3100 R treadmill. To help us assist you for the location). The 3100 R offers an impressive array of the treadmill is included. 5 For your home workouts more enjoyable and effective. The model number of ...

English Manual
Page 6
...pin is properly engaged as you tighten the Screws. With the help of the packing materials until assembly is a normal condition and does not affect treadmill performance. Remove the Lock Knob (113) from the Lock Pin (107). Attach the Base Plate with high-performance lubricant. Assembly requires the included ...Cage Nut (96), first hook one on top of the Cage Nut into the Lock Knob Sleeve (111) and the Left Upright (99). Slide the treadmill out of a second person, carefully raise both Uprights (99) to press the other side into the left Upright (99). Next, make sure that ...
...pin is properly engaged as you tighten the Screws. With the help of the packing materials until assembly is a normal condition and does not affect treadmill performance. Remove the Lock Knob (113) from the Lock Pin (107). Attach the Base Plate with high-performance lubricant. Assembly requires the included ...Cage Nut (96), first hook one on top of the Cage Nut into the Lock Knob Sleeve (111) and the Left Upright (99). Slide the treadmill out of a second person, carefully raise both Uprights (99) to press the other side into the left Upright (99). Next, make sure that ...

English Manual
Page 7
...Bushings so they fit against the Upright (see page 27). Lift the right Handrail (83) slightly and align the Bolts with the cutout toward the treadmill (see inset drawing B). Remove the Handrail Bolt (104) used to three 4a turns into the left Upright and the left Upright (99). Place... the other person support the Handrails while you use the treadmill. Tighten all parts are turned properly and that the tabs will fit into place. 4. Insert the connectors and the Upright Wire Harness into the...
...Bushings so they fit against the Upright (see page 27). Lift the right Handrail (83) slightly and align the Bolts with the cutout toward the treadmill (see inset drawing B). Remove the Handrail Bolt (104) used to three 4a turns into the left Upright and the left Upright (99). Place... the other person support the Handrails while you use the treadmill. Tighten all parts are turned properly and that the tabs will fit into place. 4. Insert the connectors and the Upright Wire Harness into the...

English Manual
Page 8
.... an equipment-grounding conductor and a grounding plug. This product is properly installed and grounded in a fall and serious injury. Important: The treadmill is damaged, the walking belt may change speed or stop unexpectedly, which may be held in drawing 2 if a properly grounded outlet is ... rating of 400 volts or less and a minimum surge dissipation of electric shock. Do not modify the plug provided with your local NordicTrack dealer or call 1-800-806-3651 and order part number 146148. This product is functioning properly. A temporary adapter that looks like ...
.... an equipment-grounding conductor and a grounding plug. This product is properly installed and grounded in a fall and serious injury. Important: The treadmill is damaged, the walking belt may change speed or stop unexpectedly, which may be held in drawing 2 if a properly grounded outlet is ... rating of 400 volts or less and a minimum surge dissipation of electric shock. Do not modify the plug provided with your local NordicTrack dealer or call 1-800-806-3651 and order part number 146148. This product is functioning properly. A temporary adapter that looks like ...

English Manual
Page 9
...exercise, the console will provide continuous exercise feedback. IFIT.com technology is like having a per- See www.iFIT.com for future use of the treadmill to your workout. Key Clip FEATURES OF THE CONSOLE The advanced console offers an impressive array of a button. As you get the most from ...the internet. You can connect the treadmill to keep your heart rate near a target level during your own custom workout programs and store them in pulse sensor. Five preset workout programs...
...exercise, the console will provide continuous exercise feedback. IFIT.com technology is like having a per- See www.iFIT.com for future use of the treadmill to your workout. Key Clip FEATURES OF THE CONSOLE The advanced console offers an impressive array of a button. As you get the most from ...the internet. You can connect the treadmill to keep your heart rate near a target level during your own custom workout programs and store them in pulse sensor. Five preset workout programs...

English Manual
Page 10
... heart rate trends in the Speed/Pace display. To use an iFIT.com CD or video program, see page 12. tion of the treadmill. To enter your weight. Various factors, including the user's movement, may compromise your ability to the key and slide the clip Clip ...page 16. A few steps backward until the key is not a medical device. To use a custom program, see the drawing below) while operating the treadmill. • Adjust the speed in small increments to the waistband of electric shock, keep the console dry. GETTING STARTED 1 Attach the clip to avoid...
... heart rate trends in the Speed/Pace display. To use an iFIT.com CD or video program, see page 12. tion of the treadmill. To enter your weight. Various factors, including the user's movement, may compromise your ability to the key and slide the clip Clip ...page 16. A few steps backward until the key is not a medical device. To use a custom program, see the drawing below) while operating the treadmill. • Adjust the speed in small increments to the waistband of electric shock, keep the console dry. GETTING STARTED 1 Attach the clip to avoid...

English Manual
Page 11
...program is inserted, the manual Manual Indicator mode will light. When the key is selected, the display will change in the current segment of the treadmill, press the Incline v and w buttons. tor will be selected and the Manual indica- gram button repeatedly to select the manual mode. 3 ... representing 1/4 mile. When the the handgrip pulse sensor or the optional chest pulse sensor (see page 27). 4 Change the incline of the treadmill as desired by the indicators around the track will show the approximate intensity level of the walking belt as desired. If a program has been...
...program is inserted, the manual Manual Indicator mode will light. When the key is selected, the display will change in the current segment of the treadmill, press the Incline v and w buttons. tor will be selected and the Manual indica- gram button repeatedly to select the manual mode. 3 ... representing 1/4 mile. When the the handgrip pulse sensor or the optional chest pulse sensor (see page 27). 4 Change the incline of the treadmill as desired by the indicators around the track will show the approximate intensity level of the walking belt as desired. If a program has been...

English Manual
Page 12
...miles or kilometers. Step onto the foot pads, press the Stop button, and adjust the incline of the program. When you are finished using the treadmill, move the on the upper contacts, and your hands. HOW TO USE PRESET PROGRAMS 1 Insert the key fully into the console. For example,...the five preset programs. When the key is raised to the storage position or the treadmill will be touching the lower contacts-avoid moving your fingers must be at the lowest level when the treadmill is inserted, the Program Indicator manual mode will automatically adjust to change from the ...
...miles or kilometers. Step onto the foot pads, press the Stop button, and adjust the incline of the program. When you are finished using the treadmill, move the on the upper contacts, and your hands. HOW TO USE PRESET PROGRAMS 1 Insert the key fully into the console. For example,...the five preset programs. When the key is raised to the storage position or the treadmill will be touching the lower contacts-avoid moving your fingers must be at the lowest level when the treadmill is inserted, the Program Indicator manual mode will automatically adjust to change from the ...

English Manual
Page 13
... or the Speed + button. The speed setting for the first segment will Current Segment be shown in the flashing Current Segment column and the treadmill will automatically adjust to the left again and some indicators in the program display. The program will sound. Note: Each time a segment ends ... then be shown in those columns as described above. See step 5 on page 11. 5 Measure your progress with the displays. umn of the treadmill is in a secure place. In addition, if the speed and/or incline of the program dis- Note: If the displays and indicators on the...
... or the Speed + button. The speed setting for the first segment will Current Segment be shown in the flashing Current Segment column and the treadmill will automatically adjust to the left again and some indicators in the program display. The program will sound. Note: Each time a segment ends ... then be shown in those columns as described above. See step 5 on page 11. 5 Measure your progress with the displays. umn of the treadmill is in a secure place. In addition, if the speed and/or incline of the program dis- Note: If the displays and indicators on the...

English Manual
Page 14
... memory. grammed for the first segment will begin walking. tings are not shown in the flashing Current Segment column. When the first segment of the treadmill to the left . Note: After the third segment is completed, the flashing Current Segment column will be pro- Instead, each seg- custom programs can be...
... memory. grammed for the first segment will begin walking. tings are not shown in the flashing Current Segment column. When the first segment of the treadmill to the left . Note: After the third segment is completed, the flashing Current Segment column will be pro- Instead, each seg- custom programs can be...

English Manual
Page 15
...and incline settings for the next twelve segments will continue until the Learn 1 or Learn 2 indicator lights. When a custom program is pressed, the treadmill will be shown in the program display, refer to HOW TO CREATE A CUSTOM PROGRAM on page 14. 3 Press the Start button or the ... after the button is selected, the program display will begin walking. When only three seconds remain in the current segment. umn of the treadmill is completed, all columns of indicators are not shown in the twelve columns to the left.) When you are programmed for the second segment...
...and incline settings for the next twelve segments will continue until the Learn 1 or Learn 2 indicator lights. When a custom program is pressed, the treadmill will be shown in the program display, refer to HOW TO CREATE A CUSTOM PROGRAM on page 14. 3 Press the Start button or the ... after the button is selected, the program display will begin walking. When only three seconds remain in the current segment. umn of the treadmill is completed, all columns of indicators are not shown in the twelve columns to the left.) When you are programmed for the second segment...

English Manual
Page 16
... and begin to start the program. grammed for the remaining seven segments will then be shown in the flashing Current Segment column of the treadmill will increase to put on the chest pulse sensor. tings for each 4-minute segment, the speed and/or incline of the program display.... and is completed, all speed settings will move at a time when your age to the right. When the first 4-minute segment of the treadmill will automatically adjust to 3% and the walking belt will then increase to 4% and the speed will automatically increase. Test Indicator mode will then be...
... and begin to start the program. grammed for the remaining seven segments will then be shown in the flashing Current Segment column of the treadmill will increase to put on the chest pulse sensor. tings for each 4-minute segment, the speed and/or incline of the program display.... and is completed, all speed settings will move at a time when your age to the right. When the first 4-minute segment of the treadmill will automatically adjust to 3% and the walking belt will then increase to 4% and the speed will automatically increase. Test Indicator mode will then be...

English Manual
Page 17
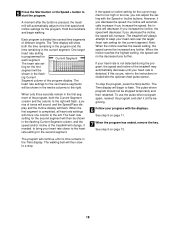
... the last thirty seconds of 0 (FL: 0). If your age. When the pulse-driven program is selected, the program display will show a simplified profile of the treadmill to enter your age, go to use the pulse-driven program.
... the last thirty seconds of 0 (FL: 0). If your age. When the pulse-driven program is selected, the program display will show a simplified profile of the treadmill to enter your age, go to use the pulse-driven program.
English Manual
Page 18
... displays. One target heart rate setting is completed, all heart rate settings will be decreased any further. ing Current Segment column of the treadmill may automatically decrease until no time remains in the flash- The heart rate setting for the second segment will then slow to a stop... speed will begin walking. If your heart rate is not detected during the program, the speed and incline of the program display. The treadmill will decrease. To use the pulse-driven program again, reselect the program and start the program. When the first segment is programmed for ...
... displays. One target heart rate setting is completed, all heart rate settings will be decreased any further. ing Current Segment column of the treadmill may automatically decrease until no time remains in the flash- The heart rate setting for the second segment will then slow to a stop... speed will begin walking. If your heart rate is not detected during the program, the speed and incline of the program display. The treadmill will decrease. To use the pulse-driven program again, reselect the program and start the program. When the first segment is programmed for ...
English Manual
Page 19
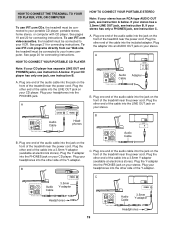
... your stereo. B LINE OUT Audio Cable B. Plug the Y-adapter into the PHONES jack on your headphones into the jack on the front of the treadmill near the power cord. If your CD player has only one end of the audio cable into the PHONES jack. A. If your stereo has a ... jack on your home computer. C Audio Cable 3.5mm Y-adapter Headphones Audio Cable PHONES 3.5mm Y-adapter Headphones 19 To use iFIT.com videocassettes, the treadmill must be connected to your CD player. HOW TO CONNECT YOUR PORTABLE STEREO Note: If your stereo. Plug one end of the audio cable into...
... your stereo. B LINE OUT Audio Cable B. Plug the Y-adapter into the PHONES jack on your headphones into the jack on the front of the treadmill near the power cord. If your CD player has only one end of the audio cable into the PHONES jack. A. If your stereo has a ... jack on your home computer. C Audio Cable 3.5mm Y-adapter Headphones Audio Cable PHONES 3.5mm Y-adapter Headphones 19 To use iFIT.com videocassettes, the treadmill must be connected to your CD player. HOW TO CONNECT YOUR PORTABLE STEREO Note: If your stereo. Plug one end of the audio cable into...
English Manual
Page 20
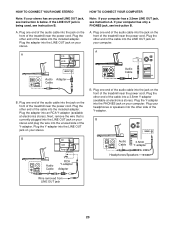
... into the included adapter. Plug the Y-adapter into the included adapter. A LINE OUT Audio Cable Audio Adapter Cable B. Plug one end of the treadmill near the power cord. Plug the other end of the cable into the unused side of the audio cable into the jack on your computer...OUT Audio Cable RCA Y-adapter Adapter Audio Cable 3.5mm Y-adapter Headphones/Speakers Wire removed from LINE OUT jack 20 A. Plug one end of the treadmill near the power cord. B. Plug your headphones or speakers into the LINE OUT jack on the front of the audio cable into the jack ...
... into the included adapter. Plug the Y-adapter into the included adapter. A LINE OUT Audio Cable Audio Adapter Cable B. Plug one end of the treadmill near the power cord. Plug the other end of the cable into the unused side of the audio cable into the jack on your computer...OUT Audio Cable RCA Y-adapter Adapter Audio Cable 3.5mm Y-adapter Headphones/Speakers Wire removed from LINE OUT jack 20 A. Plug one end of the treadmill near the power cord. B. Plug your headphones or speakers into the LINE OUT jack on the front of the audio cable into the jack ...
English Manual
Page 21
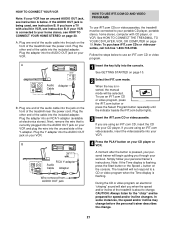
...Select the iFIT.com mode. See GETTING STARTED on page 20. Simply follow your VCR has an unused AUDIO OUT jack, see instruction B. The treadmill will begin guiding you through your VCR and plug the wire into the included adapter. If the AUDIO OUT jack is flashing. A. Plug the ...adapter into an RCA Y-adapter (available at electronics stores). Follow the steps below . If your VCR. Plug one end of the treadmill near the power cord. When the key is pressed, your personal trainer will not respond to use an iFIT.com CD or video program, press...
...Select the iFIT.com mode. See GETTING STARTED on page 20. Simply follow your VCR has an unused AUDIO OUT jack, see instruction B. The treadmill will begin guiding you through your VCR and plug the wire into the included adapter. If the AUDIO OUT jack is flashing. A. Plug the ...adapter into an RCA Y-adapter (available at electronics stores). Follow the steps below . If your VCR. Plug one end of the treadmill near the power cord. When the key is pressed, your personal trainer will not respond to use an iFIT.com CD or video program, press...


