
English Manual
Page 3
... on each side. Adjust the speed in small increments to raise, lower, or move the walking belt while the power is being administered. 15. Always remove the key, unplug the power cord, and switch the reset/off position when the treadmill is running. It is not working properly. (See BEFORE YOU BEGIN on page 5 if the treadmill is the responsibility of the owner to the off circuit...
... on each side. Adjust the speed in small increments to raise, lower, or move the walking belt while the power is being administered. 15. Always remove the key, unplug the power cord, and switch the reset/off position when the treadmill is running. It is not working properly. (See BEFORE YOU BEGIN on page 5 if the treadmill is the responsibility of the owner to the off circuit...
English Manual
Page 4
... Customer Service Department toll-free and order a free replacement decal (see ORDERING REPLACEMENT PARTS on your treadmill. Always listen for the "chirp" and be performed by an authorized service representative. tenance and adjustment procedures de- WARNING: Before beginning this product. SAVE THESE INSTRUCTIONS The decal shown at actual size. 4 In some instances, the speed and/or incline may change to the next settings of the treadmill...
... Customer Service Department toll-free and order a free replacement decal (see ORDERING REPLACEMENT PARTS on your treadmill. Always listen for the "chirp" and be performed by an authorized service representative. tenance and adjustment procedures de- WARNING: Before beginning this product. SAVE THESE INSTRUCTIONS The decal shown at actual size. 4 In some instances, the speed and/or incline may change to the next settings of the treadmill...
English Manual
Page 5
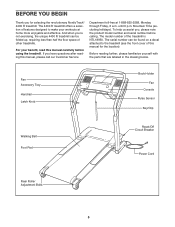
... Service Department toll-free at home more enjoyable and effective. Mountain Time (excluding holidays). The model number of features designed to the treadmill (see the front cover of other treadmills. Before reading further, please familiarize yourself with the parts that are labeled in the drawing below. Fan Accessory Tray Handrail Latch Knob Book Holder Fan Console Pulse Sensor Key/Clip Walking Belt Foot Pad Reset/Off Circuit Breaker Power Cord Rear Roller Adjustment Bolts...
... Service Department toll-free at home more enjoyable and effective. Mountain Time (excluding holidays). The model number of features designed to the treadmill (see the front cover of other treadmills. Before reading further, please familiarize yourself with the parts that are labeled in the drawing below. Fan Accessory Tray Handrail Latch Knob Book Holder Fan Console Pulse Sensor Key/Clip Walking Belt Foot Pad Reset/Off Circuit Breaker Power Cord Rear Roller Adjustment Bolts...

English Manual
Page 7
...) with the chest pulse sensor. The connectors should slide together easily and snap into the crossbar. Start all four Extension Screws before tightening them . Insert the wires into place. Attach the Pulse Bar Assembly (69) to install the receiver included with the two included small screws. If you have purchased an optional chest pulse sensor, follow step 4 to the crossbar on the Uprights (20) with four Pulse Bar Bolts (13) and...
...) with the chest pulse sensor. The connectors should slide together easily and snap into the crossbar. Start all four Extension Screws before tightening them . Insert the wires into place. Attach the Pulse Bar Assembly (69) to install the receiver included with the two included small screws. If you have purchased an optional chest pulse sensor, follow step 4 to the crossbar on the Uprights (20) with four Pulse Bar Bolts (13) and...

English Manual
Page 8
...) and the Uprights 75 (20). Firmly tighten the two Console Bolts (72) and the two Short Console Bolts. Firmly tighten the four Handrail Bolts. 70 67 66 20 75 Do Not Cut 20 67 66 8 If necessary, remove the right accessory tray (not shown) from the console assembly. 113 Connect the Upright Ground Wire (113) to the wires extending from the console assembly. Set the console assembly on the Uprights (20...
...) and the Uprights 75 (20). Firmly tighten the two Console Bolts (72) and the two Short Console Bolts. Firmly tighten the four Handrail Bolts. 70 67 66 20 75 Do Not Cut 20 67 66 8 If necessary, remove the right accessory tray (not shown) from the console assembly. 113 Connect the Upright Ground Wire (113) to the wires extending from the console assembly. Set the console assembly on the Uprights (20...

English Manual
Page 10
... 2 may result in your home's power. Failure to determine if the outlet box cover is properly installed and grounded in an increased risk of electric shock. OPERATION AND ADJUSTMENT THE PRE-LUBRICATED WALKING BELT Your treadmill features a walking belt coated with a cord having Lug Metal Screw The temporary adapter should malfunction or break down, grounding provides a path of least resistance for use on or off. IMPORTANT...
... 2 may result in your home's power. Failure to determine if the outlet box cover is properly installed and grounded in an increased risk of electric shock. OPERATION AND ADJUSTMENT THE PRE-LUBRICATED WALKING BELT Your treadmill features a walking belt coated with a cord having Lug Metal Screw The temporary adapter should malfunction or break down, grounding provides a path of least resistance for use on or off. IMPORTANT...

English Manual
Page 11
... heart rate using the built-in memory for more effective and enjoyable. In addition, the console features eight preset programs that control the speed and incline of the treadmill as a personal trainer guides you exercise, the console will display continuous exercise feedback. To purchase and download iFIT.com MP3 programs, go to your portable stereo, home stereo, computer, or VCR and play special iFIT.com MP3, CD, and video programs (iFIT.com MP3 programs...
... heart rate using the built-in memory for more effective and enjoyable. In addition, the console features eight preset programs that control the speed and incline of the treadmill as a personal trainer guides you exercise, the console will display continuous exercise feedback. To purchase and download iFIT.com MP3 programs, go to your portable stereo, home stereo, computer, or VCR and play special iFIT.com MP3, CD, and video programs (iFIT.com MP3 programs...

English Manual
Page 12
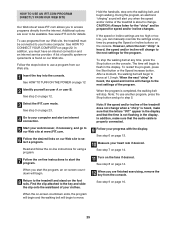
... the power is turned on, the program that the circuit breaker is in the reset position. If the key is pressed, the speed setting will be reselected. As you exercise, change the speed of the walking belt as user B, press the B button. 3 Select the manual mode. Each time a button is not pulled from the console. Note: After the buttons are pressed, it may take a moment for the treadmill to reach the selected speed setting. If...
... the power is turned on, the program that the circuit breaker is in the reset position. If the key is pressed, the speed setting will be reselected. As you exercise, change the speed of the walking belt as user B, press the B button. 3 Select the manual mode. Each time a button is not pulled from the console. Note: After the buttons are pressed, it may take a moment for the treadmill to reach the selected speed setting. If...

English Manual
Page 19
... chest pulse sensor (see page 26) to the speed and incline settings for each heart rate program is pressed, the treadmill will automatically adjust to use the heart rate programs. If you are taking medication regularly, consult your progress with the display. Each heart rate program is programmed for the next segment. 5 Follow your physician to start the program. If desired, press the Heart Rate increase and decrease buttons to change the maximum target heart rate setting. See step 7 on page 14. 7 Turn...
... chest pulse sensor (see page 26) to the speed and incline settings for each heart rate program is pressed, the treadmill will automatically adjust to use the heart rate programs. If you are taking medication regularly, consult your progress with the display. Each heart rate program is programmed for the next segment. 5 Follow your physician to start the program. If desired, press the Heart Rate increase and decrease buttons to change the maximum target heart rate setting. See step 7 on page 14. 7 Turn...
English Manual
Page 25
... handrails, step onto the walking belt, and begin to flash in the display and that the audio cable is completed, the walking belt will begin walking. If the speed or incline settings are too high or too low, you can manually override the settings at any time, press the Stop button on our Web site. To restart the program, press the Start button or the Speed increase button. HOW TO USE AN IFIT.COM PROGRAM DIRECTLY FROM...
... handrails, step onto the walking belt, and begin to flash in the display and that the audio cable is completed, the walking belt will begin walking. If the speed or incline settings are too high or too low, you can manually override the settings at any time, press the Stop button on our Web site. To restart the program, press the Start button or the Speed increase button. HOW TO USE AN IFIT.COM PROGRAM DIRECTLY FROM...

English Manual
Page 31
... exercise program. The lower two numbers are rounded off to the nearest ten years). To measure your condition, complete three workouts each workout with 5 to 10 minutes of the treadmill until your pulse is in your training zone for fat burning; For more detailed exercise information, obtain a reputable book or consult your age. For aerobic exercise, adjust the speed and incline of the treadmill until your heart rate...
... exercise program. The lower two numbers are rounded off to the nearest ten years). To measure your condition, complete three workouts each workout with 5 to 10 minutes of the treadmill until your pulse is in your training zone for fat burning; For more detailed exercise information, obtain a reputable book or consult your age. For aerobic exercise, adjust the speed and incline of the treadmill until your heart rate...

English Manual
Page 34
... Endcap Spring Belt Guide Pulse Bar Bolt Frame Pivot Bolt Walking Platform Walking Belt Front Roller Magnet Frame Spacer Upright Reed Switch Clip Reed Switch 1/2" Screw Grommet Drive Motor 1" Screw Bolt Left Rear Endcap Left Roller Guard Lift Frame Washer Motor Bolt Nut Motor Hood Control Knob Right Roller Guard Right Rear Endcap Cotter Pin Front Roller Adjustment Bolt 2" Screw Incline Motor Lower Pin Transformer Controller Foot Pad (Left) Belly Pan Power Cord Grommet Power Cord Off/Reset Circuit Breaker Support Bracket Tie Holder Releasable Tie Key No. PART LIST-Model No. NTL18950...
... Endcap Spring Belt Guide Pulse Bar Bolt Frame Pivot Bolt Walking Platform Walking Belt Front Roller Magnet Frame Spacer Upright Reed Switch Clip Reed Switch 1/2" Screw Grommet Drive Motor 1" Screw Bolt Left Rear Endcap Left Roller Guard Lift Frame Washer Motor Bolt Nut Motor Hood Control Knob Right Roller Guard Right Rear Endcap Cotter Pin Front Roller Adjustment Bolt 2" Screw Incline Motor Lower Pin Transformer Controller Foot Pad (Left) Belly Pan Power Cord Grommet Power Cord Off/Reset Circuit Breaker Support Bracket Tie Holder Releasable Tie Key No. PART LIST-Model No. NTL18950...

English Manual
Page 35
... 4 111 1 112 2 113 1 Key/Clip Console Screw Console Insert Console Cover Book Holder Idler Pulley Idler Arm Washer Plastic Spacer Allen Wrench Short Console Bolt Upright Ground Wire Key No. Description 114 1 #1 #1 #1 #1 #1 #1 Audio Wire Small Star Washer 12" Black Wire, 2 Ring 6" Black Wire, M/R 12" Blue Wire, 2F 4" Blue Wire, M/F User's Manual *Includes all parts shown in the center of this manual) • the KEY NUMBER AND DESCRIPTION OF THE PART(S) (see the PART LIST on pages 34 and...
... 4 111 1 112 2 113 1 Key/Clip Console Screw Console Insert Console Cover Book Holder Idler Pulley Idler Arm Washer Plastic Spacer Allen Wrench Short Console Bolt Upright Ground Wire Key No. Description 114 1 #1 #1 #1 #1 #1 #1 Audio Wire Small Star Washer 12" Black Wire, 2 Ring 6" Black Wire, M/R 12" Blue Wire, 2F 4" Blue Wire, M/F User's Manual *Includes all parts shown in the center of this manual) • the KEY NUMBER AND DESCRIPTION OF THE PART(S) (see the PART LIST on pages 34 and...
English Manual
Page 3
... remove the key, unplug the power cord, and switch the reset/off . Never use an extension cord. 11. The pulse sensor is running. Do not attempt to persons, read the following important precautions and information before operating the treadmill. 1. Always hold the handrails while using the treadmill. Keep the treadmill indoors, away from the treadmill at least eight feet of high speeds. Never move the walking belt while the power is...
... remove the key, unplug the power cord, and switch the reset/off . Never use an extension cord. 11. The pulse sensor is running. Do not attempt to persons, read the following important precautions and information before operating the treadmill. 1. Always hold the handrails while using the treadmill. Keep the treadmill indoors, away from the treadmill at least eight feet of high speeds. Never move the walking belt while the power is...

English Manual
Page 7
... should slide together easily and snap into place. Start all four Extension Screws before tightening them . Note: One replacement Base Pad may be included. Make sure that no wires are fully inserted into each other. With the help of the Uprights (20) in the Pulse Bar Assembly. start all four Pulse Bar Bolts before tightening them . Attach the Pulse Bar Assembly (69) to the vertical position. 2 81 82...
... should slide together easily and snap into place. Start all four Extension Screws before tightening them . Note: One replacement Base Pad may be included. Make sure that no wires are fully inserted into each other. With the help of the Uprights (20) in the Pulse Bar Assembly. start all four Pulse Bar Bolts before tightening them . Attach the Pulse Bar Assembly (69) to the vertical position. 2 81 82...

English Manual
Page 8
Make sure that no wires are pinched. Firmly tighten the two Console Bolts (72) and the two Short Console Bolts. Align the holes in the lower ends of each Upright (20) (only one side is shown). Press the right Upright Cover (75) onto the right Upright 7 (20). Set the console assembly on the other side (not shown). 20 75 7 8 Finger tighten a Console Bolt (72) with four Star Washers (67...
Make sure that no wires are pinched. Firmly tighten the two Console Bolts (72) and the two Short Console Bolts. Align the holes in the lower ends of each Upright (20) (only one side is shown). Press the right Upright Cover (75) onto the right Upright 7 (20). Set the console assembly on the other side (not shown). 20 75 7 8 Finger tighten a Console Bolt (72) with four Star Washers (67...

English Manual
Page 10
... your treadmill being turned on the front cover of elec- The surge suppressor must have a proper outlet installed by a qualified electrician. The surge suppressor must be used to connect the surge suppressor to reduce the risk of this manual and order part number 146148, or see drawing 1 at the right). If the control system is damaged, the walking belt may change speed, accelerate, or stop...
... your treadmill being turned on the front cover of elec- The surge suppressor must have a proper outlet installed by a qualified electrician. The surge suppressor must be used to connect the surge suppressor to reduce the risk of this manual and order part number 146148, or see drawing 1 at the right). If the control system is damaged, the walking belt may change speed, accelerate, or stop...

English Manual
Page 12
... attached to reach the selected speed setting. After a moment, the display will be reselected. See HOW TO TURN ON THE POWER above. 2 Identify yourself as user B, press the B button. 3 Select the manual mode. peatedly until the key is held down, the speed setting will change in the reset position. pear below the track. 4 Start the walking belt. if a button is pulled from the console, adjust the position of 0.1 mph; Note: When the power is turned...
... attached to reach the selected speed setting. After a moment, the display will be reselected. See HOW TO TURN ON THE POWER above. 2 Identify yourself as user B, press the B button. 3 Select the manual mode. peatedly until the key is held down, the speed setting will change in the reset position. pear below the track. 4 Start the walking belt. if a button is pulled from the console, adjust the position of 0.1 mph; Note: When the power is turned...

English Manual
Page 34
... Endcap Washer Latch Warning Decal 3/4" Screw Latch Plate Endcap Nut Front Right Endcap Endcap Spring Belt Guide Pulse Bar Bolt Frame Pivot Bolt Walking Platform Walking Belt Front Roller Magnet Frame Spacer Upright Reed Switch Clip Reed Switch 1/2" Screw Grommet Drive Motor 1" Screw Bolt Left Rear Endcap Left Roller Guard Lift Frame Washer Motor Bolt Nut Motor Hood Control Knob Right Roller Guard Right Rear Endcap Cotter Pin Front Roller Adjustment Bolt 2" Screw Incline Motor Lower Pin Transformer Controller Foot Pad (Left) Belly Pan Power Cord Grommet Power Cord Off/Reset Circuit Breaker...
... Endcap Washer Latch Warning Decal 3/4" Screw Latch Plate Endcap Nut Front Right Endcap Endcap Spring Belt Guide Pulse Bar Bolt Frame Pivot Bolt Walking Platform Walking Belt Front Roller Magnet Frame Spacer Upright Reed Switch Clip Reed Switch 1/2" Screw Grommet Drive Motor 1" Screw Bolt Left Rear Endcap Left Roller Guard Lift Frame Washer Motor Bolt Nut Motor Hood Control Knob Right Roller Guard Right Rear Endcap Cotter Pin Front Roller Adjustment Bolt 2" Screw Incline Motor Lower Pin Transformer Controller Foot Pad (Left) Belly Pan Power Cord Grommet Power Cord Off/Reset Circuit Breaker...
English Manual
Page 35
... Wire, M/F # 1 User's Manual #These parts are not illustrated Specifications are subject to give the following information: • the MODEL NUMBER OF THE PRODUCT (NTL1895.1) • the NAME OF THE PRODUCT (NordicTrack® 4400 R treadmill) • the SERIAL NUMBER OF THE PRODUCT (see the front cover of this manual) • the KEY NUMBER AND DESCRIPTION OF THE PART(S) (see the front cover of this manual. ORDERING REPLACEMENT PARTS To order replacement parts, see the PART LIST...
... Wire, M/F # 1 User's Manual #These parts are not illustrated Specifications are subject to give the following information: • the MODEL NUMBER OF THE PRODUCT (NTL1895.1) • the NAME OF THE PRODUCT (NordicTrack® 4400 R treadmill) • the SERIAL NUMBER OF THE PRODUCT (see the front cover of this manual) • the KEY NUMBER AND DESCRIPTION OF THE PART(S) (see the front cover of this manual. ORDERING REPLACEMENT PARTS To order replacement parts, see the PART LIST...


