
User Manual
Page 3
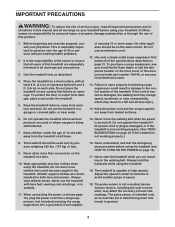
... an exercise aid in determining heart rate trends in speed. 19. of carrying 15 or more than one person on each side. If the control system is damaged, the walking belt may change speed, accelerate, or stop procedure before using the treadmill (see your local electronics store. 13. Never use a properly functioning surge suppressor could become caught in sandals. 11. The pulse sensor is turned off...
... an exercise aid in determining heart rate trends in speed. 19. of carrying 15 or more than one person on each side. If the control system is damaged, the walking belt may change speed, accelerate, or stop procedure before using the treadmill (see your local electronics store. 13. Never use a properly functioning surge suppressor could become caught in sandals. 11. The pulse sensor is turned off...
User Manual
Page 4
... service representative only. 26. vice representative. Always remove the key, unplug the power cord, and switch the reset/off circuit breaker to the off position when the treadmill is intended for the location of the treadmill regularly. less instructed to raise, lower, or move the treadmill until it is held securely in this manual. Inspect and properly tighten all parts of the circuit breaker.) 21. nance and adjustment...
... service representative only. 26. vice representative. Always remove the key, unplug the power cord, and switch the reset/off circuit breaker to the off position when the treadmill is intended for the location of the treadmill regularly. less instructed to raise, lower, or move the treadmill until it is held securely in this manual. Inspect and properly tighten all parts of the circuit breaker.) 21. nance and adjustment...
User Manual
Page 5
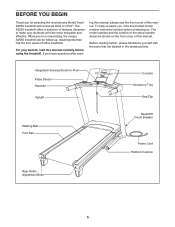
... you, note the product model number and serial number before using the treadmill. Integrated Universal Dock for iPod Pulse Sensor Handrail Upright Console Accessory Tray Key/Clip Walking Belt Foot Rail Reset/Off Circuit Breaker Power Cord Platform Cushion Rear Roller Adjustment Bolts 5 BEFORE YOU BEGIN Thank you for selecting the revolutionary NordicTrack® A2550 treadmill with the parts that are shown on the front cover of this manual. To help us . The A2550 treadmill offers a selection of...
... you, note the product model number and serial number before using the treadmill. Integrated Universal Dock for iPod Pulse Sensor Handrail Upright Console Accessory Tray Key/Clip Walking Belt Foot Rail Reset/Off Circuit Breaker Power Cord Platform Cushion Rear Roller Adjustment Bolts 5 BEFORE YOU BEGIN Thank you for selecting the revolutionary NordicTrack® A2550 treadmill with the parts that are shown on the front cover of this manual. To help us . The A2550 treadmill offers a selection of...

User Manual
Page 9
... POWER IS TURNED ON. IF THE CONNECTORS ARE NOT CONNECTED PROPERLY, THE CONSOLE MAY BE DAMAGED WHEN THE POWER IS TURNED ON. 8 Handrail Assembly 10 7 10 74 7 7 10 10 7 78 9 Console Assembly Wires Handrail Assembly Wires 9 The connectors should slide together easily and snap into place. Start all six Bolts before tightening them. If necessary, press the Cage Nuts (33) into place. Set the handrail assembly on the Uprights...
... POWER IS TURNED ON. IF THE CONNECTORS ARE NOT CONNECTED PROPERLY, THE CONSOLE MAY BE DAMAGED WHEN THE POWER IS TURNED ON. 8 Handrail Assembly 10 7 10 74 7 7 10 10 7 78 9 Console Assembly Wires Handrail Assembly Wires 9 The connectors should slide together easily and snap into place. Start all six Bolts before tightening them. If necessary, press the Cage Nuts (33) into place. Set the handrail assembly on the Uprights...
User Manual
Page 12
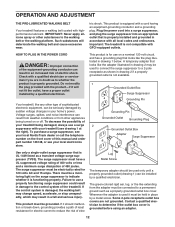
... the adapter is damaged, the walking belt may change speed, accelerate, or stop unexpectedly, which may be installed by a metal screw. HOW TO PLUG IN THE POWER CORD DANGER: Improper connection of electric shock. Your treadmill, like extending from other appliances being damaged, always use on or off. If it will deteriorate the walking belt and cause excessive wear. OPERATION AND ADJUSTMENT THE PRE-LUBRICATED WALKING BELT Your treadmill features a walking belt coated...
... the adapter is damaged, the walking belt may change speed, accelerate, or stop unexpectedly, which may be installed by a metal screw. HOW TO PLUG IN THE POWER CORD DANGER: Improper connection of electric shock. Your treadmill, like extending from other appliances being damaged, always use on or off. If it will deteriorate the walking belt and cause excessive wear. OPERATION AND ADJUSTMENT THE PRE-LUBRICATED WALKING BELT Your treadmill features a walking belt coated...

User Manual
Page 13
... iFIT Interactive Workout Cards containing workouts designed to make your heart rate using the handgrip pulse sensor or the optional chest pulse sensor (see page 18. For example, lose unwanted pounds with the Marathon workout. To use the Custom Workout Center, see page 22 for a long-distance run with the 8week Weight Loss workout, or train for information on the front cover of the treadmill as it guides you through every step of a button. iFIT workouts automatically control...
... iFIT Interactive Workout Cards containing workouts designed to make your heart rate using the handgrip pulse sensor or the optional chest pulse sensor (see page 18. For example, lose unwanted pounds with the Marathon workout. To use the Custom Workout Center, see page 22 for a long-distance run with the 8week Weight Loss workout, or train for information on the front cover of the treadmill as it guides you through every step of a button. iFIT workouts automatically control...
User Manual
Page 14
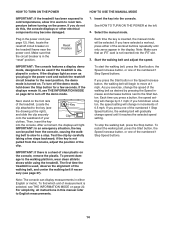
... power cord and switch the reset/off circuit breaker on the console, remove the plastic. Test the clip by pressing the Speed increase and decrease buttons next to the key (see THE INFORMATION MODE on page 22 to room temperature before turning on . To stop . To start the walking belt, press the Start button, the Speed increase button, or one of the numbered 1 Step Speed buttons. For simplicity, all instructions in the display. To restart the walking belt, press the Start button, the Speed...
... power cord and switch the reset/off circuit breaker on the console, remove the plastic. Test the clip by pressing the Speed increase and decrease buttons next to the key (see THE INFORMATION MODE on page 22 to room temperature before turning on . To stop . To start the walking belt, press the Start button, the Speed increase button, or one of the numbered 1 Step Speed buttons. For simplicity, all instructions in the display. To restart the walking belt, press the Start button, the Speed...
User Manual
Page 15
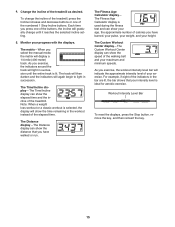
... gradually change the incline of the treadmill, press the Incline increase and decrease buttons or one of the walking belt and your progress with the displays. The matrix-When you press one of the numbered 1 Step Incline buttons. The Time/Incline display-The Time/Incline display can show the speed of the buttons, the incline will display a 1/4-mile (400-meter) track. The Fitness Age Calculator display is ideal for aerobic exercise. Workout Intensity Level Bar To reset the displays, press the Stop button, remove the key...
... gradually change the incline of the treadmill, press the Incline increase and decrease buttons or one of the walking belt and your progress with the displays. The matrix-When you press one of the numbered 1 Step Incline buttons. The Time/Incline display-The Time/Incline display can show the speed of the buttons, the incline will display a 1/4-mile (400-meter) track. The Fitness Age Calculator display is ideal for aerobic exercise. Workout Intensity Level Bar To reset the displays, press the Stop button, remove the key...

User Manual
Page 16
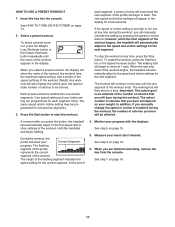
... you fold the treadmill to the lowest setting. Before using either the handgrip pulse sensor or the optional chest pulse sensor. avoid moving your heart rate if desired. Next, remove the key from the console and put it in a secure place. The incline must be shown. Step onto the foot rails, press the Stop button, and adjust the incline of clear plastic from the console. 6. In addition, make sure that your heart rate using the handgrip pulse sensor, remove...
... you fold the treadmill to the lowest setting. Before using either the handgrip pulse sensor or the optional chest pulse sensor. avoid moving your heart rate if desired. Next, remove the key from the console and put it in a secure place. The incline must be shown. Step onto the foot rails, press the Stop button, and adjust the incline of clear plastic from the console. 6. In addition, make sure that your heart rate using the handgrip pulse sensor, remove...
User Manual
Page 17
... be programmed for a few seconds. Monitor your heart rate if desired. Insert the key into one incline setting are finished exercising, remove the key from the console. At the end of the workout. See step 7 on page 16. 6. To select a preset workout, press the Weight Loss Workouts button or the Classic Workouts button repeatedly until the last segment of the workout. The walking belt will automatically adjust to the speed and incline settings for each segment, a series of...
... be programmed for a few seconds. Monitor your heart rate if desired. Insert the key into one incline setting are finished exercising, remove the key from the console. At the end of the workout. See step 7 on page 16. 6. To select a preset workout, press the Weight Loss Workouts button or the Classic Workouts button repeatedly until the last segment of the workout. The walking belt will automatically adjust to the speed and incline settings for each segment, a series of...

User Manual
Page 18
... speed or incline setting is divided into the console. To stop . To use a Custom Workout Center, press the Select Profile increase button. Press the Start Workout button to move at any time during the workout, you are programmed for each segment, a series of tones will sound and the next segment of the profile flashes in the display for the current segment. The walking belt will not start the workout. When you can manually...
... speed or incline setting is divided into the console. To stop . To use a Custom Workout Center, press the Select Profile increase button. Press the Start Workout button to move at any time during the workout, you are programmed for each segment, a series of tones will sound and the next segment of the profile flashes in the display for the current segment. The walking belt will not start the workout. When you can manually...

User Manual
Page 19
... display to the first speed and incline settings of the treadmill will periodically change . Note: If you press the button, the treadmill will automatically adjust to alert you do not hold the handrails during the workout. See HOW TO TURN ON THE POWER on the chest pulse sensor. Important: The Speed and Incline buttons will advance to use the workout. 1. Note: For the most accurate results, do not press the Start Fitness Test button, the display...
... display to the first speed and incline settings of the treadmill will periodically change . Note: If you press the button, the treadmill will automatically adjust to alert you do not hold the handrails during the workout. See HOW TO TURN ON THE POWER on the chest pulse sensor. Important: The Speed and Incline buttons will advance to use the workout. 1. Note: For the most accurate results, do not press the Start Fitness Test button, the display...

User Manual
Page 20
.... If you are finished exercising, remove the key from the console. The workout is designed to meet Apple performance standards. When you must connect your iPod, MP3 player, CD player, or other end into the Integrated Universal Dock for iPod, locate the iFIT Universal iPod Connector. See step 7 on the console. 20 Next, press the Play button on the console. Monitor your iPod, MP3...
.... If you are finished exercising, remove the key from the console. The workout is designed to meet Apple performance standards. When you must connect your iPod, MP3 player, CD player, or other end into the Integrated Universal Dock for iPod, locate the iFIT Universal iPod Connector. See step 7 on the console. 20 Next, press the Play button on the console. Monitor your iPod, MP3...

User Manual
Page 21
... the displays. The voice of a personal trainer will automatically adjust to the first speed and incline settings of the workout begins, the treadmill will automatically adjust to move at any time, press the Stop button. iFIT Card See step 7 on page 14. 2. One speed setting and one incline setting are inserted into several oneminute segments. Press the Start button to the speed and incline settings for the next segment. 4. A moment after you press the Start button, the treadmill will guide you...
... the displays. The voice of a personal trainer will automatically adjust to the first speed and incline settings of the workout begins, the treadmill will automatically adjust to move at any time, press the Stop button. iFIT Card See step 7 on page 14. 2. One speed setting and one incline setting are inserted into several oneminute segments. Press the Start button to the speed and incline settings for the next segment. 4. A moment after you press the Start button, the treadmill will guide you...
User Manual
Page 22
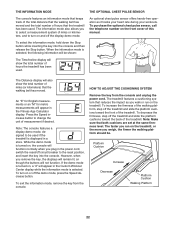
... chest pulse sensor offers hands-free operation as you walk or run on the front cover of this manual. Press the Speed increase button to be shown: The Time/Incline display will be used if the treadmill is displayed in the Custom Workout Center display while the information mode is selected, the following information will show the total number of miles (or kilometers) that reduces the impact as it tracks your heart rate during your workouts...
... chest pulse sensor offers hands-free operation as you walk or run on the front cover of this manual. Press the Speed increase button to be shown: The Time/Incline display will be used if the treadmill is displayed in the Custom Workout Center display while the information mode is selected, the following information will show the total number of miles (or kilometers) that reduces the impact as it tracks your heart rate during your workouts...
User Manual
Page 26
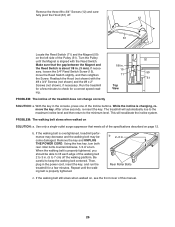
... Incline buttons. Reattach the Hood (not shown) with the Reed Switch. PROBLEM: The incline of the Pulley (51). After a few minutes to keep the walking belt centered. If the walking belt still slows when walked on, see the front cover of a turn both rear roller bolts counterclockwise, 1/4 of this manual. 26 While the incline is overtightened, treadmill performance may decrease and the walking belt may become damaged. The treadmill will recalibrate the incline system. Then, plug...
... Incline buttons. Reattach the Hood (not shown) with the Reed Switch. PROBLEM: The incline of the Pulley (51). After a few minutes to keep the walking belt centered. If the walking belt still slows when walked on, see the front cover of a turn both rear roller bolts counterclockwise, 1/4 of this manual. 26 While the incline is overtightened, treadmill performance may decrease and the walking belt may become damaged. The treadmill will recalibrate the incline system. Then, plug...

User Manual
Page 28
... your training zone. WORKOUT GUIDELINES Warming up increases your body temperature, heart rate, and circulation in your training zone. Stretching increases the flexibility of your muscles and helps to find your exercise program. A warm-up -Start with your heart rate near the middle number in your training zone. (During the first few months of exercise does your body begin to use your heart rate as a guide to prevent post-exercise problems. EXERCISE...
... your training zone. WORKOUT GUIDELINES Warming up increases your body temperature, heart rate, and circulation in your training zone. Stretching increases the flexibility of your muscles and helps to find your exercise program. A warm-up -Start with your heart rate near the middle number in your training zone. (During the first few months of exercise does your body begin to use your heart rate as a guide to prevent post-exercise problems. EXERCISE...

User Manual
Page 30
... 1 100 1 Front Roller/Pulley 15 1/2" Wire Tie Storage Latch Latch Knob Right Foot Rail Frame Rear Roller Bracket Rear Roller Left Rear Foot Right Rear Foot Hood Drive Belt Motor Isolator Motor Lift Frame Wire Tie Controller Ground Wire Power Cord Power Cord Grommet Controller Reed Switch Reed Switch Clip Belly Pan Left Upright Incline Motor Left Upright Spacer Hood Cowling Right Upright Right Upright Spacer Bolt Spacer Base Pad Caution Decal Base Wheel Releasable Tie 8" Tie Access Door "U"-nut Console Tray Console Back Plastic Tie Console Base Pulse Bar Top Pulse Bar Bottom Handrail...
... 1 100 1 Front Roller/Pulley 15 1/2" Wire Tie Storage Latch Latch Knob Right Foot Rail Frame Rear Roller Bracket Rear Roller Left Rear Foot Right Rear Foot Hood Drive Belt Motor Isolator Motor Lift Frame Wire Tie Controller Ground Wire Power Cord Power Cord Grommet Controller Reed Switch Reed Switch Clip Belly Pan Left Upright Incline Motor Left Upright Spacer Hood Cowling Right Upright Right Upright Spacer Bolt Spacer Base Pad Caution Decal Base Wheel Releasable Tie 8" Tie Access Door "U"-nut Console Tray Console Back Plastic Tie Console Base Pulse Bar Top Pulse Bar Bottom Handrail...

User Manual
Page 31
Qty. 101 1 102 1 103 1 104 1 105 2 106 1 107 1 108 1 109 2 110 2 Description Pulse Bar Ground Wire Latch Endcap iFIT Card Kit Lift Motor Spacer #8 x 2" Screw Right Handrail Trim Rear Roller Ground Wire iFIT Universal iPod Connector Foot Rail Insert Cushion Stop Screw Key No. Specifications are not illustrated. Description Rear Roller Bracket Plate 5/32" Hex Key Incline Motor Wire Incline Stop Plate 3/8" Incline Motor Nut 6" White Wire, M/F Userʼs Manual *These parts are subject to change without notice. 31 Key No. Qty. 111 2 112 1 113 1 114 1 115 2 * - * -
Qty. 101 1 102 1 103 1 104 1 105 2 106 1 107 1 108 1 109 2 110 2 Description Pulse Bar Ground Wire Latch Endcap iFIT Card Kit Lift Motor Spacer #8 x 2" Screw Right Handrail Trim Rear Roller Ground Wire iFIT Universal iPod Connector Foot Rail Insert Cushion Stop Screw Key No. Specifications are not illustrated. Description Rear Roller Bracket Plate 5/32" Hex Key Incline Motor Wire Incline Stop Plate 3/8" Incline Motor Nut 6" White Wire, M/F Userʼs Manual *These parts are subject to change without notice. 31 Key No. Qty. 111 2 112 1 113 1 114 1 115 2 * - * -
User Manual
Page 36
... and drive motor are warranted for a lifetime. Parts and labor are warranted for one of its scope and duration to the terms set forth above limitation may not apply to you specific legal rights. ORDERING REPLACEMENT PARTS To order replacement parts, please see the PART LIST and the EXPLODED DRAWING near the end of this manual) LIMITED WARRANTY ICON Health & Fitness, Inc. (ICON) warrants this product to be free from...
... and drive motor are warranted for a lifetime. Parts and labor are warranted for one of its scope and duration to the terms set forth above limitation may not apply to you specific legal rights. ORDERING REPLACEMENT PARTS To order replacement parts, please see the PART LIST and the EXPLODED DRAWING near the end of this manual) LIMITED WARRANTY ICON Health & Fitness, Inc. (ICON) warrants this product to be free from...


