

English Manual
Page 2
NordicTrack is attached in the center of ICON IP, Inc. 2 TABLE OF CONTENTS IMPORTANT PRECAUTIONS 3 BEFORE YOU BEGIN 5 ASSEMBLY 6 HOW TO USE THE CHEST PULSE SENSOR 8 OPERATION AND ADJUSTMENT 9 HOW TO FOLD AND MOVE THE TREADMILL 22 TROUBLESHOOTING 24 CONDITIONING GUIDELINES 27 PART LIST 30 ORDERING REPLACEMENT PARTS 31 LIMITED WARRANTY Back Cover Note: An EXPLODED DRAWING is a registered trademark of this manual.
NordicTrack is attached in the center of ICON IP, Inc. 2 TABLE OF CONTENTS IMPORTANT PRECAUTIONS 3 BEFORE YOU BEGIN 5 ASSEMBLY 6 HOW TO USE THE CHEST PULSE SENSOR 8 OPERATION AND ADJUSTMENT 9 HOW TO FOLD AND MOVE THE TREADMILL 22 TROUBLESHOOTING 24 CONDITIONING GUIDELINES 27 PART LIST 30 ORDERING REPLACEMENT PARTS 31 LIMITED WARRANTY Back Cover Note: An EXPLODED DRAWING is a registered trademark of this manual.
English Manual
Page 3
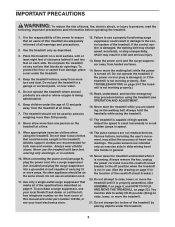
... stockings, or in use the treadmill with at a time. 12. Use the treadmill only as exercise aids in determining heart rate trends in general. 19. Never move the walking belt while the power is properly assembled. (See ASSEMBLY on page 6, and HOW TO FOLD AND MOVE THE TREADMILL on the front cover of all warnings and precautions. 2. Adjust the speed in small increments to the control system of carrying 15...
... stockings, or in use the treadmill with at a time. 12. Use the treadmill only as exercise aids in determining heart rate trends in general. 19. Never move the walking belt while the power is properly assembled. (See ASSEMBLY on page 6, and HOW TO FOLD AND MOVE THE TREADMILL on the front cover of all warnings and precautions. 2. Adjust the speed in small increments to the control system of carrying 15...
English Manual
Page 4
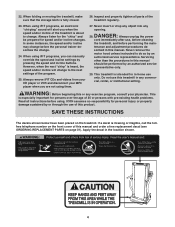
... VCR and disconnect your physician. Inspect and properly tighten all parts of 35 or persons with pre-existing health problems. Read all instructions before the personal trainer describes the change . WARNING: Before beginning this treadmill in -home use of the treadmill is fully closed. 26. In some instances, the speed and/or incline may change before using iFIT programs, you can manually override the speed and incline settings by an authorized...
... VCR and disconnect your physician. Inspect and properly tighten all parts of 35 or persons with pre-existing health problems. Read all instructions before the personal trainer describes the change . WARNING: Before beginning this treadmill in -home use of the treadmill is fully closed. 26. In some instances, the speed and/or incline may change before using iFIT programs, you can manually override the speed and incline settings by an authorized...
English Manual
Page 5
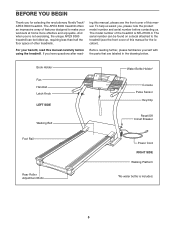
... serial number before using the treadmill. For your workouts at home more effective and enjoyable. Before reading further, please familiarize yourself with the parts that are labeled in the drawing below. The serial number can be found on a decal attached to make your benefit, read - Book Holder Fan Handrail Latch Knob LEFT SIDE Walking Belt Water Bottle Holder* Console Pulse Sensor Key/Clip Reset/Off Circuit Breaker Foot Rail Rear Roller Adjustment Bolts Power Cord...
... serial number before using the treadmill. For your workouts at home more effective and enjoyable. Before reading further, please familiarize yourself with the parts that are labeled in the drawing below. The serial number can be found on a decal attached to make your benefit, read - Book Holder Fan Handrail Latch Knob LEFT SIDE Walking Belt Water Bottle Holder* Console Pulse Sensor Key/Clip Reset/Off Circuit Breaker Foot Rail Rear Roller Adjustment Bolts Power Cord...

English Manual
Page 6
... your own flat-bladed screwdriver , wire cutters , and adjustable wrench . ASSEMBLY Assembly requires two persons. Then, set the Handrails on top of a second person, carefully raise both 3 Uprights (83) to press the other side into the hole in the right Upright (83). Do not tighten the Handrail Bolts yet. With the help of the walking belt or foot pads, simply wipe off...
... your own flat-bladed screwdriver , wire cutters , and adjustable wrench . ASSEMBLY Assembly requires two persons. Then, set the Handrails on top of a second person, carefully raise both 3 Uprights (83) to press the other side into the hole in the right Upright (83). Do not tighten the Handrail Bolts yet. With the help of the walking belt or foot pads, simply wipe off...

English Manual
Page 8
... should be flush with people who have normal heart rhythms. Heart rate reading problems may need to display heart rate readings, the user must be within arm's length of the chest pulse sensor can be caused by shallow ridges). Note: If the chest pulse sensor does not function when positioned as described, move it is removed and the electrode areas are covered by medical conditions such as saliva or...
... should be flush with people who have normal heart rhythms. Heart rate reading problems may need to display heart rate readings, the user must be within arm's length of the chest pulse sensor can be caused by shallow ridges). Note: If the chest pulse sensor does not function when positioned as described, move it is removed and the electrode areas are covered by medical conditions such as saliva or...
English Manual
Page 9
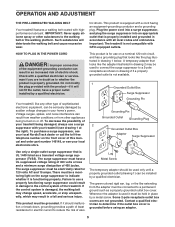
... outlet installed by a metal screw. Some 2-pole receptacle outlet box covers are in doubt as to a 2-pole receptacle as shown in your local NordicTrack dealer or call the toll-free telephone number on a nominal 120-volt circuit, and has a grounding plug that is equipped with your treadmill (see your treadmill being turned on the surge suppressor to the walking belt or the walking...
... outlet installed by a metal screw. Some 2-pole receptacle outlet box covers are in doubt as to a 2-pole receptacle as shown in your local NordicTrack dealer or call the toll-free telephone number on a nominal 120-volt circuit, and has a grounding plug that is equipped with your treadmill (see your treadmill being turned on the surge suppressor to the walking belt or the walking...
English Manual
Page 10
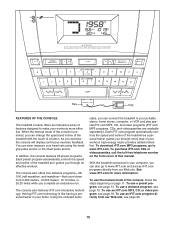
... the manual mode of the console is like having a personal trainer in your heart rate using the handgrip pulse sensor or the chest pulse sensor. Each iFIT.com program automatically controls the speed and incline of the treadmill as it guides you can even measure your home. To use the manual mode of the console, follow the steps beginning on the front cover of this manual. To use an iFIT.com MP3, CD, or video program, see page 13. To use a preset program...
... the manual mode of the console is like having a personal trainer in your heart rate using the handgrip pulse sensor or the chest pulse sensor. Each iFIT.com program automatically controls the speed and incline of the treadmill as it guides you can even measure your home. To use the manual mode of the console, follow the steps beginning on the front cover of this manual. To use an iFIT.com MP3, CD, or video program, see page 13. To use a preset program...
English Manual
Page 11
... for the walking belt to a stop the walking belt, press the Stop button. To change the speed of the clip. Each time a button is selected, the matrix will be pulled from the console, adjust the position of the walking belt as desired. As you use the handgrip pulse sensor or the chest pulse sensor, the lower left corner of the display will show the approximate number of calories you exercise, change the incline of the track will appear...
... for the walking belt to a stop the walking belt, press the Stop button. To change the speed of the clip. Each time a button is selected, the matrix will be pulled from the console, adjust the position of the walking belt as desired. As you use the handgrip pulse sensor or the chest pulse sensor, the lower left corner of the display will show the approximate number of calories you exercise, change the incline of the track will appear...

English Manual
Page 12
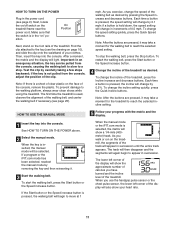
... foot rails, press the Stop button, and adjust the incline of the treadmill to hold the metal Contacts contacts- Press the Display button repeatedly until the priority display shows the information that your heart rate accurately. Next, stand on the foot rails and hold the contacts for about 15 seconds. 7 Turn on when the walking belt is folded to miles. To use the chest pulse sensor, see THE INFORMATION MODE/DEMO MODE on /off switch to the...
... foot rails, press the Stop button, and adjust the incline of the treadmill to hold the metal Contacts contacts- Press the Display button repeatedly until the priority display shows the information that your heart rate accurately. Next, stand on the foot rails and hold the contacts for about 15 seconds. 7 Turn on when the walking belt is folded to miles. To use the chest pulse sensor, see THE INFORMATION MODE/DEMO MODE on /off switch to the...

English Manual
Page 14
... exercising, remove the key from the console and put it in the "demo" mode. See page 21 and turn off switch to move at 1 mph. To restart the program, press the Start button or the Speed increase button. Note: If the display remains lit after the key is removed, the console is at the lowest setting. When the program ends, make sure that the incline of the treadmill is in a safe place. See step...
... exercising, remove the key from the console and put it in the "demo" mode. See page 21 and turn off switch to move at 1 mph. To restart the program, press the Start button or the Speed increase button. Note: If the display remains lit after the key is removed, the console is at the lowest setting. When the program ends, make sure that the incline of the treadmill is in a safe place. See step...

English Manual
Page 15
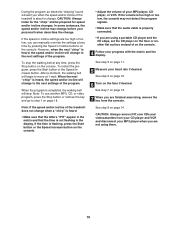
...: To change the speed of the walking belt or the incline of the program, the speed setting will flash in the display for a few seconds. 3 Press the Start button to 3 mph for 2 minutes. To restart the program, press the Start button. Adjust the speed of the walking belt as desired by pressing the Speed increase or decrease button or one minute, the walking belt will then slow to start the program. See step 7 on page 11. 2 Select a distance program. See...
...: To change the speed of the walking belt or the incline of the program, the speed setting will flash in the display for a few seconds. 3 Press the Start button to 3 mph for 2 minutes. To restart the program, press the Start button. Adjust the speed of the walking belt as desired by pressing the Speed increase or decrease button or one minute, the walking belt will then slow to start the program. See step 7 on page 11. 2 Select a distance program. See...

English Manual
Page 18
... TO USE AN IFIT.COM MP3, CD, OR VIDEO PROGRAM To use an iFIT.com MP3, CD, or video program. 1 Insert the key into the input jack on your VCR and plug the wire into an RCA Y-adapter (available at electronics stores) into the console. To select the iFIT.com mode, press the Aerobic Programs button repeatedly until a track and the letters "iFIT" appear in the display, press the Start button or the Speed increase button...
... TO USE AN IFIT.COM MP3, CD, OR VIDEO PROGRAM To use an iFIT.com MP3, CD, or video program. 1 Insert the key into the input jack on your VCR and plug the wire into an RCA Y-adapter (available at electronics stores) into the console. To select the iFIT.com mode, press the Aerobic Programs button repeatedly until a track and the letters "iFIT" appear in the display, press the Start button or the Speed increase button...
English Manual
Page 19
... Start button or the Speed increase button. When the next "chirp" is heard, the speed and/or incline will change to the next settings of the program. When the program is flashing, press the Start button or the Speed increase button on the console. • Adjust the volume of on the console. 4 Follow your progress with the matrix and the display. See step 7 on page 12. 7 When you are finished exercising, remove...
... Start button or the Speed increase button. When the next "chirp" is heard, the speed and/or incline will change to the next settings of the program. When the program is flashing, press the Start button or the Speed increase button on the console. • Adjust the volume of on the console. 4 Follow your progress with the matrix and the display. See step 7 on page 12. 7 When you are finished exercising, remove...
English Manual
Page 20
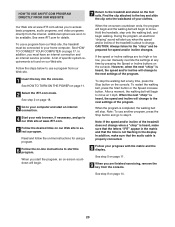
... can manually override the settings at any time by pressing the Speed or Incline buttons on the foot rails. A list of the program. Read and follow the on-line instructions for using a program. 6 Follow the on-line instructions to the treadmill and stand on the console. HOW TO USE AN IFIT.COM PROGRAM DIRECTLY FROM OUR WEB SITE 7 Return to start the program. Find the clip attached to access basic programs, audio programs, and video programs directly...
... can manually override the settings at any time by pressing the Speed or Incline buttons on the foot rails. A list of the program. Read and follow the on-line instructions for using a program. 6 Follow the on-line instructions to the treadmill and stand on the console. HOW TO USE AN IFIT.COM PROGRAM DIRECTLY FROM OUR WEB SITE 7 Return to start the program. Find the clip attached to access basic programs, audio programs, and video programs directly...
English Manual
Page 25
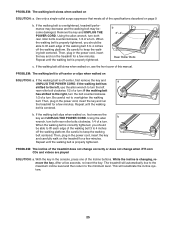
... POWER CORD. b. If the walking belt is properly tightened. Remove the key and UNPLUG THE POWER CORD. Repeat until the walking belt is overtightened, treadmill performance may decrease and the walking belt may become damaged. b 3"-4" Rear Roller Bolts c. b. If the walking belt slips when walked on page 9. Using the allen b wrench, turn both rear roller bolts counterclockwise, 1/4 of the treadmill does not change correctly or does not change when iFIT.com CDs and videos are played SOLUTION: a. PROBLEM: The incline of a turn . While the incline...
... POWER CORD. b. If the walking belt is properly tightened. Remove the key and UNPLUG THE POWER CORD. Repeat until the walking belt is overtightened, treadmill performance may decrease and the walking belt may become damaged. b 3"-4" Rear Roller Bolts c. b. If the walking belt slips when walked on page 9. Using the allen b wrench, turn both rear roller bolts counterclockwise, 1/4 of the treadmill does not change correctly or does not change when iFIT.com CDs and videos are played SOLUTION: a. PROBLEM: The incline of a turn . While the incline...

English Manual
Page 27
... your exercise program, do not keep your pulse in your heart rate is the recommended heart rate for exercise. A proper warm-up -Start each workout with the proper intensity. the higher number is near the bottom of stretching and light exercise. The key to cool down -Finish each workout with preexisting health problems. The pulse sensors are intended only as a guide. The following three parts: A Warm-up increases your training zone...
... your exercise program, do not keep your pulse in your heart rate is the recommended heart rate for exercise. A proper warm-up -Start each workout with the proper intensity. the higher number is near the bottom of stretching and light exercise. The key to cool down -Finish each workout with preexisting health problems. The pulse sensors are intended only as a guide. The following three parts: A Warm-up increases your training zone...

English Manual
Page 30
... Rear Roller Screw Latch Catch Console Screw Front Roller Nut Handrail Handrail Cap Hand Grip Pulse Walking Board Bracket U-nut Right Foot Rail Endcap 1" Screw Console Book Holder Key/Clip Upright/Base Right Fan Housing Console Fan Lock Knob Spacer Lock Knob Sleeve Console Base, Bottom Left Cup Holder Right Cup Holder Lock Pin Assembly Handrail Spacer Upright Endcap, Round Handrail Bushing Handrail Washer 4 1/2" Bolt Left Wheel Block, Bottom Audio Cable Chest Pulse Strap Latch Warning Decal Chest Pulse Sensor...
... Rear Roller Screw Latch Catch Console Screw Front Roller Nut Handrail Handrail Cap Hand Grip Pulse Walking Board Bracket U-nut Right Foot Rail Endcap 1" Screw Console Book Holder Key/Clip Upright/Base Right Fan Housing Console Fan Lock Knob Spacer Lock Knob Sleeve Console Base, Bottom Left Cup Holder Right Cup Holder Lock Pin Assembly Handrail Spacer Upright Endcap, Round Handrail Bushing Handrail Washer 4 1/2" Bolt Left Wheel Block, Bottom Audio Cable Chest Pulse Strap Latch Warning Decal Chest Pulse Sensor...
English Manual
Page 31
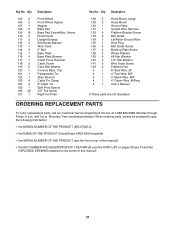
... Belt Guide Bracket Wire Track 2" Bolt Base Plate Base Plate Bumper Chest Purse Receiver Catch Screw Deck Rail Washer Console Base, Top Releaseable Tie Allen Wrench Cable Tie Clamp 8" Cable Tie Split Pivot Spacer 3/4" Tek Screw Right Foot Rail Key No. When ordering parts, please be prepared to give the following information: • the MODEL NUMBER OF THE PRODUCT (NTL27005.0) • the NAME OF THE PRODUCT (NordicTrack APEX 8000 treadmill...
... Belt Guide Bracket Wire Track 2" Bolt Base Plate Base Plate Bumper Chest Purse Receiver Catch Screw Deck Rail Washer Console Base, Top Releaseable Tie Allen Wrench Cable Tie Clamp 8" Cable Tie Split Pivot Spacer 3/4" Tek Screw Right Foot Rail Key No. When ordering parts, please be prepared to give the following information: • the MODEL NUMBER OF THE PRODUCT (NTL27005.0) • the NAME OF THE PRODUCT (NordicTrack APEX 8000 treadmill...

English Manual
Page 34
... you specific legal rights and you . LIMITED WARRANTY WHAT IS COVERED-The entire NordicTrack APEX 8000 treadmill ("Product") is warranted to be free of all other warranties and any implied warranties of merchantability or fitness for a particular purpose is limited in its scope and duration to the terms set out in your Product is located or advise you . This warranty does not extend to products used for service...
... you specific legal rights and you . LIMITED WARRANTY WHAT IS COVERED-The entire NordicTrack APEX 8000 treadmill ("Product") is warranted to be free of all other warranties and any implied warranties of merchantability or fitness for a particular purpose is limited in its scope and duration to the terms set out in your Product is located or advise you . This warranty does not extend to products used for service...


