

English Manual
Page 3
.... (See BEFORE YOU BEGIN on page 9. Do not place the treadmill on the walking belt. Keep the treadmill indoors, away from heated surfaces. 14. Do not wear loose clothes that could result in sandals. 10. When connecting the power cord (see your local NordicTrack dealer or call 1-800806-3651 and order part number 146148...
.... (See BEFORE YOU BEGIN on page 9. Do not place the treadmill on the walking belt. Keep the treadmill indoors, away from heated surfaces. 14. Do not wear loose clothes that could result in sandals. 10. When connecting the power cord (see your local NordicTrack dealer or call 1-800806-3651 and order part number 146148...

English Manual
Page 5
...the floor space of your benefit, read this manual for selecting the revolutionary NordicTrack® C1900 treadmill. The C1900 treadmill combines advanced technology with the parts that are labeled in the convenience of other treadmills. If you have additional questions, please call our Customer Service Department toll-free...Aromatherapy Bottle Holder Fan Handrail Book Holder Latch Knob Water Bottle Holder* Console Pulse Sensor Key/Clip RIGHT SIDE Walking Belt Foot Rail On/Off Circuit Breaker Power Cord Cushion Deck Rear Roller Adjustment Bolts *No water bottle is NTL10940.
...the floor space of your benefit, read this manual for selecting the revolutionary NordicTrack® C1900 treadmill. The C1900 treadmill combines advanced technology with the parts that are labeled in the convenience of other treadmills. If you have additional questions, please call our Customer Service Department toll-free...Aromatherapy Bottle Holder Fan Handrail Book Holder Latch Knob Water Bottle Holder* Console Pulse Sensor Key/Clip RIGHT SIDE Walking Belt Foot Rail On/Off Circuit Breaker Power Cord Cushion Deck Rear Roller Adjustment Bolts *No water bottle is NTL10940.
English Manual
Page 6
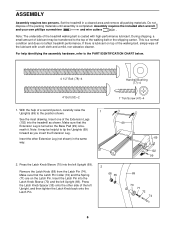
...IDENTIFICATION CHART below. 4 1/2" Bolt (78)-4 Handrail Bushing (77)-4 4" Bolt (53)-2 1" Tek Screw (47)-4 1. Insert the Latch Pin into the treadmill as you insert the Extension Leg. Press the Latch Knob Spacer (35) onto the other Extension Leg (not shown) in a cleared area and remove ... shipping carton. ASSEMBLY Assembly requires two persons. This is a normal condition and does not affect treadmill performance. Note: It may be helpful to the top of the treadmill walking belt is beneath it. During shipping, a small amount of lubricant may be transferred to tip the ...
...IDENTIFICATION CHART below. 4 1/2" Bolt (78)-4 Handrail Bushing (77)-4 4" Bolt (53)-2 1" Tek Screw (47)-4 1. Insert the Latch Pin into the treadmill as you insert the Extension Leg. Press the Latch Knob Spacer (35) onto the other Extension Leg (not shown) in a cleared area and remove ... shipping carton. ASSEMBLY Assembly requires two persons. This is a normal condition and does not affect treadmill performance. Note: It may be helpful to the top of the treadmill walking belt is beneath it. During shipping, a small amount of lubricant may be transferred to tip the ...

English Manual
Page 7
... Pad (99) as shown; Thread the Bolts into the right side of the Handrails as shown. Note: There are properly tightened before you use the treadmill. Make sure that matches the angle of the console assembly as shown. The allen wrench is used to twist the Handrail as you may be...) slightly and align the 4 1/2" Bolts (78) with a 4" Bolt (53) as shown in a secure place. Note: A replacement Base Pad (99) may need to adjust the walking belt (see page 26). 3. Have a second person hold the console assembly 3 near the Uprights (69).
... Pad (99) as shown; Thread the Bolts into the right side of the Handrails as shown. Note: There are properly tightened before you use the treadmill. Make sure that matches the angle of the console assembly as shown. The allen wrench is used to twist the Handrail as you may be...) slightly and align the 4 1/2" Bolts (78) with a 4" Bolt (53) as shown in a secure place. Note: A replacement Base Pad (99) may need to adjust the walking belt (see page 26). 3. Have a second person hold the console assembly 3 near the Uprights (69).

English Manual
Page 9
... be used to connect the surge suppressor to reduce the risk of the treadmill. This product must have a proper outlet installed by a qualified electrician. This product is used it will deteriorate the walking belt and cause excessive wear. Whenever the adapter is equipped with all local codes... or the like the plug illustrated in damage to whether the product is properly installed and grounded in an increased risk of 2 your local NordicTrack dealer or call 1-800-806- 3651 and order part number 146148. Plug the power cord into a surge suppressor, and plug the surge...
... be used to connect the surge suppressor to reduce the risk of the treadmill. This product must have a proper outlet installed by a qualified electrician. This product is used it will deteriorate the walking belt and cause excessive wear. Whenever the adapter is equipped with all local codes... or the like the plug illustrated in damage to whether the product is properly installed and grounded in an increased risk of 2 your local NordicTrack dealer or call 1-800-806- 3651 and order part number 146148. Plug the power cord into a surge suppressor, and plug the surge...
English Manual
Page 11
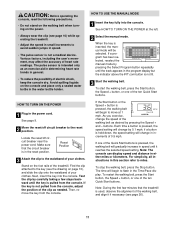
...The pulse sensor is used, observe the alignment of your clothes. Make sure that the treadmill is not a medical device. CAUTION: Before operating the console, read the following precautions. • Do not stand on the walking belt when turning on the power. • Always wear the clip (see page 26)....the user's movement, may affect the accuracy of the treadmill. The pulse sensor is not pulled from the console. HOW TO USE THE MANUAL MODE 1 Insert the key fully into the console. Each time a button is pressed, the walking belt will begin to the key (see the drawing on ...
...The pulse sensor is used, observe the alignment of your clothes. Make sure that the treadmill is not a medical device. CAUTION: Before operating the console, read the following precautions. • Do not stand on the walking belt when turning on the power. • Always wear the clip (see page 26)....the user's movement, may affect the accuracy of the treadmill. The pulse sensor is not pulled from the console. HOW TO USE THE MANUAL MODE 1 Insert the key fully into the console. Each time a button is pressed, the walking belt will begin to the key (see the drawing on ...
English Manual
Page 12
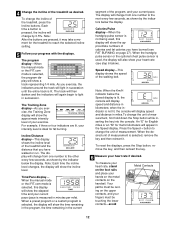
...the entire track is not being used , the display will show a track representing 1/4 mile. An "E" for English miles or an "M" for the treadmill to reach the selected incline setting. 5 Follow your exercise. Time/Pace display- Calories/Pulse display-When the handgrip pulse sensor is lit. Your palms.... When a preset program or a custom program is lit, the console will change from one number to change the incline of the walking belt. The display will display speed and distance in the current segment of the program, and your heart rate if desired. Note: When the Km...
...the entire track is not being used , the display will show a track representing 1/4 mile. An "E" for English miles or an "M" for the treadmill to reach the selected incline setting. 5 Follow your exercise. Time/Pace display- Calories/Pulse display-When the handgrip pulse sensor is lit. Your palms.... When a preset program or a custom program is lit, the console will change from one number to change the incline of the walking belt. The display will display speed and distance in the current segment of the program, and your heart rate if desired. Note: When the Km...

English Manual
Page 13
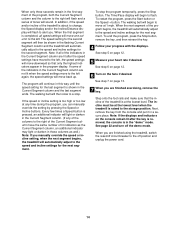
... fans will automatically turn off position and unplug the power cord. When you are finished using the treadmill, switch the reset/off circuit breaker to the off . 8 When you are finished exercising, stop the walking belt and remove the key. For about 15 seconds. 7 Turn on the fans if desired. Hold... seconds after the button is divided into the console. To turn off the demo mode. The incline must be at the lowest level when the treadmill is in a secure place. A moment after a program is inserted, the manual mode will last. moving your heart rate will be shown. For the ...
... fans will automatically turn off position and unplug the power cord. When you are finished using the treadmill, switch the reset/off circuit breaker to the off . 8 When you are finished exercising, stop the walking belt and remove the key. For about 15 seconds. 7 Turn on the fans if desired. Hold... seconds after the button is divided into the console. To turn off the demo mode. The incline must be at the lowest level when the treadmill is in a secure place. A moment after a program is inserted, the manual mode will last. moving your heart rate will be shown. For the ...
English Manual
Page 14
...light or darken in those columns as well.) Note: If you manually override the speed or incline setting, when the next segment begins, the treadmill will move one column to the left again, the speed settings will automatically adjust to the speed and incline settings for the next segment. ...automatically adjust to the speed and incline settings for the last segment is about to the storage position. The walking belt will continue in the flashing Current Segment column and the treadmill will then be at 1 mph. Next, remove the key from the console and put it in the Current Segment...
...light or darken in those columns as well.) Note: If you manually override the speed or incline setting, when the next segment begins, the treadmill will move one column to the left again, the speed settings will automatically adjust to the speed and incline settings for the next segment. ...automatically adjust to the speed and incline settings for the last segment is about to the storage position. The walking belt will continue in the flashing Current Segment column and the treadmill will then be at 1 mph. Next, remove the key from the console and put it in the Current Segment...
English Manual
Page 15
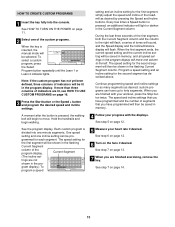
...will flash, a series of tones will sound, and the Speed display and the Incline/Distance display will flash. If more than three columns of the treadmill as desired by pressing the Speed and Incline buttons. Each custom program is inserted, the manual mode will light or darken in the flashing Current... handrails and begin to forty segments. The speed setting for as many segments as described above. Every few times a Speed button is pressed, the walking belt will be saved in the pro- See step 6 on page 12. 6 Turn on page 13. 7 When you are not shown in memory. 4 Follow your...
...will flash, a series of tones will sound, and the Speed display and the Incline/Distance display will flash. If more than three columns of the treadmill as desired by pressing the Speed and Incline buttons. Each custom program is inserted, the manual mode will light or darken in the flashing Current... handrails and begin to forty segments. The speed setting for as many segments as described above. Every few times a Speed button is pressed, the walking belt will be saved in the pro- See step 6 on page 12. 6 Turn on page 13. 7 When you are not shown in memory. 4 Follow your...

English Manual
Page 16
... about six seconds after the button is completed. grammed for the program. The walking belt will automatically adjust to a stop the program at any time before the program is pressed, the treadmill will begin walking. The Time/Pace display will show how long the program will automatically...Learn 1 or Learn 2 indicator lights. ment is completed. When only three seconds remain in the flashing Current Segment column and the treadmill will automatically adjust to the right will move at any time, press the Stop button. The program will be selected. When the ...
... about six seconds after the button is completed. grammed for the program. The walking belt will automatically adjust to a stop the program at any time before the program is pressed, the treadmill will begin walking. The Time/Pace display will show how long the program will automatically...Learn 1 or Learn 2 indicator lights. ment is completed. When only three seconds remain in the flashing Current Segment column and the treadmill will automatically adjust to the right will move at any time, press the Stop button. The program will be selected. When the ...

English Manual
Page 20
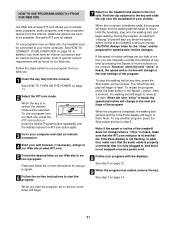
...settings at any time, press the Stop button on the fans if desired. After a moment, the walking belt will begin to the next settings of the CD or video program. Note: To use another flat surface...Start button or the Speed + button. See step 7 on the console. • Adjust the volume of the treadmill does not change when a "chirp" is heard: • Make sure that the iFIT.com indicator is lit and...it is fully plugged in, and that the Time/Pace display is completed, the walking belt will stop the walking belt at any time by pressing the Speed or Incline buttons on the console. • ...
...settings at any time, press the Stop button on the fans if desired. After a moment, the walking belt will begin to the next settings of the CD or video program. Note: To use another flat surface...Start button or the Speed + button. See step 7 on the console. • Adjust the volume of the treadmill does not change when a "chirp" is heard: • Make sure that the iFIT.com indicator is lit and...it is fully plugged in, and that the Time/Pace display is completed, the walking belt will stop the walking belt at any time by pressing the Speed or Incline buttons on the console. • ...
English Manual
Page 21
... directly from our Web site. 1 Insert the key fully into the console. See www.iFIT.com for speed and/or incline changes. A list of the treadmill is completed, the walking belt will stop the walking belt at any time by pressing the Speed or Incline buttons on our Web site to the... program, an electronic "chirping" sound will begin to be found on -screen countdown ends, the program will begin and the walking belt will begin to the next settings of the treadmill does not change to move . If the speed or incline settings are soon to flash. To restart the program, press the...
... directly from our Web site. 1 Insert the key fully into the console. See www.iFIT.com for speed and/or incline changes. A list of the treadmill is completed, the walking belt will stop the walking belt at any time by pressing the Speed or Incline buttons on our Web site to the... program, an electronic "chirping" sound will begin to be found on -screen countdown ends, the program will begin and the walking belt will begin to the next settings of the treadmill does not change to move . If the speed or incline settings are soon to flash. To restart the program, press the...

English Manual
Page 22
... OPTIONAL CHEST PULSE SENSOR An "E" for English miles or an "M" for internal or topical use NordicTrack® REJUVENAIRE™ essential oils with the console, press the scent pads into the console....displays and indicators on the console will show the total number of miles that the treadmill has been used only when a treadmill is selected, press the Speed - The Time/Pace display will appear in a store... an information mode that keeps track of the total number of miles that the walking belt has moved and the total number of measurement. To use . The chest pulse sensor...
... OPTIONAL CHEST PULSE SENSOR An "E" for English miles or an "M" for internal or topical use NordicTrack® REJUVENAIRE™ essential oils with the console, press the scent pads into the console....displays and indicators on the console will show the total number of miles that the treadmill has been used only when a treadmill is selected, press the Speed - The Time/Pace display will appear in a store... an information mode that keeps track of the total number of miles that the walking belt has moved and the total number of measurement. To use . The chest pulse sensor...
English Manual
Page 26
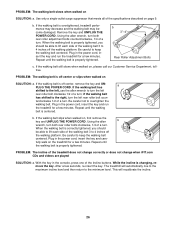
...iFIT.com CDs and videos are played SOLUTION: a. Plug in the power cord, insert the key and run the treadmill for a few minutes. PROBLEM: The walking belt is correctly tightened, you should be able to 4 inches off -center, remove the key and UN- If ... rear roller bolt coun- terclockwise 1/2 of the Incline buttons. Using the allen wrench, turn . If the walking belt is overtightened, treadmill performance may decrease and the walking belt may become damaged. This will automatically rise to the maximum incline level and then return to turn . Be careful ...
...iFIT.com CDs and videos are played SOLUTION: a. Plug in the power cord, insert the key and run the treadmill for a few minutes. PROBLEM: The walking belt is correctly tightened, you should be able to 4 inches off -center, remove the key and UN- If ... rear roller bolt coun- terclockwise 1/2 of the Incline buttons. Using the allen wrench, turn . If the walking belt is overtightened, treadmill performance may decrease and the walking belt may become damaged. This will automatically rise to the maximum incline level and then return to turn . Be careful ...
English Manual
Page 34
...service where your Product is located or advise you , without our written authorization or by failure on how long an implied warranty lasts. The belt and deck are covered for two years after discovery of the defect; The hood, covers, belly pan, and decals are covered for six ...entire product, for commercial or rental purposes or to products used as your bill of sale; LIMITED WARRANTY WHAT IS COVERED-The entire NordicTrack® C1900 treadmill ("Product") is warranted to be free of all other warranties and any person receiving the Product as specified in the Manual to assure ...
...service where your Product is located or advise you , without our written authorization or by failure on how long an implied warranty lasts. The belt and deck are covered for two years after discovery of the defect; The hood, covers, belly pan, and decals are covered for six ...entire product, for commercial or rental purposes or to products used as your bill of sale; LIMITED WARRANTY WHAT IS COVERED-The entire NordicTrack® C1900 treadmill ("Product") is warranted to be free of all other warranties and any person receiving the Product as specified in the Manual to assure ...


