

Instruction Manual
Page 2
... telephone number on the front cover of the warning decals. TABLE OF CONTENTS WARNING DECAL PLACEMENT 2 IMPORTANT PRECAUTIONS 3 BEFORE YOU BEGIN 5 PART IDENTIFICATION CHART 6 ASSEMBLY 7 HOW TO USE THE TREADMILL 17 HOW TO FOLD AND MOVE THE TREADMILL 29 MAINTENANCE AND TROUBLESHOOTING 30 EXERCISE GUIDELINES 33 PART LIST 34 EXPLODED DRAWING 36 ORDERING REPLACEMENT PARTS Back Cover RECYCLING INFORMATION Back Cover WARNING DECAL PLACEMENT This drawing shows the locations of this manual...
... telephone number on the front cover of the warning decals. TABLE OF CONTENTS WARNING DECAL PLACEMENT 2 IMPORTANT PRECAUTIONS 3 BEFORE YOU BEGIN 5 PART IDENTIFICATION CHART 6 ASSEMBLY 7 HOW TO USE THE TREADMILL 17 HOW TO FOLD AND MOVE THE TREADMILL 29 MAINTENANCE AND TROUBLESHOOTING 30 EXERCISE GUIDELINES 33 PART LIST 34 EXPLODED DRAWING 36 ORDERING REPLACEMENT PARTS Back Cover RECYCLING INFORMATION Back Cover WARNING DECAL PLACEMENT This drawing shows the locations of this manual...
Instruction Manual
Page 3
... not operate the treadmill if the power cord or plug is damaged, or if the treadmill is not working properly.) 17. tained by someone responsible for personal injury or property damage sus- When replacing the fuse in this product. 1. Keep the treadmill indoors, away from the moving walking belt. 3 Do not operate the treadmill where aerosol products are used only by persons with...
... not operate the treadmill if the power cord or plug is damaged, or if the treadmill is not working properly.) 17. tained by someone responsible for personal injury or property damage sus- When replacing the fuse in this product. 1. Keep the treadmill indoors, away from the moving walking belt. 3 Do not operate the treadmill where aerosol products are used only by persons with...

Instruction Manual
Page 4
... determining heart rate trends in the storage position. Never remove the motor hood unless instructed to move the treadmill until it is not a medical device. The heart rate monitor is folded. 26. Do not change the incline of the power switch), and unplug the power cord when the treadmill is capable of breath, or if you experience pain while exercising, stop immediately and cool down. ing the treadmill, and before performing the maintenance and adjustment...
... determining heart rate trends in the storage position. Never remove the motor hood unless instructed to move the treadmill until it is not a medical device. The heart rate monitor is folded. 26. Do not change the incline of the power switch), and unplug the power cord when the treadmill is capable of breath, or if you experience pain while exercising, stop immediately and cool down. ing the treadmill, and before performing the maintenance and adjustment...
Instruction Manual
Page 5
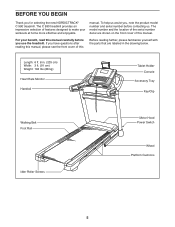
... . (203 cm) Width: 3 ft. (91 cm) Weight: 194 lbs (88 kg) Heart Rate Monitor Handrail Tablet Holder Console Accessory Tray Key/Clip Walking Belt Foot Rail Idler Roller Screws Motor Hood Power Switch Wheel Platform Cushions 5 The model number and the location of the serial number decal are shown on the front cover of this manual. For your workouts at home more effective and enjoyable. The C 990 treadmill provides an impressive selection of features designed...
... . (203 cm) Width: 3 ft. (91 cm) Weight: 194 lbs (88 kg) Heart Rate Monitor Handrail Tablet Holder Console Accessory Tray Key/Clip Walking Belt Foot Rail Idler Roller Screws Motor Hood Power Switch Wheel Platform Cushions 5 The model number and the location of the serial number decal are shown on the front cover of this manual. For your workouts at home more effective and enjoyable. The C 990 treadmill provides an impressive selection of features designed...

Instruction Manual
Page 12
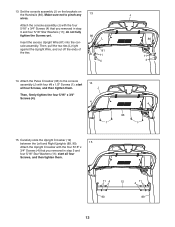
... overtighten the #10 x 3/4" Screws (9). Then, remove the wire tie (A) from the console assembly (J) to pinch the Upright Wire (81). start both Screws, and then tighten them. Orient the Pulse Crossbar (93) as shown. IF YOU DO NOT CONNECT THE CONNECTORS PROPERLY, THE CONSOLE MAY BECOME DAMAGED WHEN YOU TURN ON THE POWER. IMPORTANT: To avoid damaging the Pulse Crossbar (93), do not use power tools and do not...
... overtighten the #10 x 3/4" Screws (9). Then, remove the wire tie (A) from the console assembly (J) to pinch the Upright Wire (81). start both Screws, and then tighten them. Orient the Pulse Crossbar (93) as shown. IF YOU DO NOT CONNECT THE CONNECTORS PROPERLY, THE CONSOLE MAY BECOME DAMAGED WHEN YOU TURN ON THE POWER. IMPORTANT: To avoid damaging the Pulse Crossbar (93), do not use power tools and do not...
Instruction Manual
Page 13
.... Attach the Pulse Crossbar (93) to pinch any wires. start all four Screws, and then tighten them . do not fully tighten the Screws yet. Insert the excess Upright Wire (81) into the console assembly. start all four Screws, and then tighten them . 11 4 12 11 4 90 89 13 13. Set the console assembly (J) on the brackets on the Handrails (86). Attach the console assembly (J) with the four 5/16" x 3/4" Screws (4) that you removed in step...
.... Attach the Pulse Crossbar (93) to pinch any wires. start all four Screws, and then tighten them . do not fully tighten the Screws yet. Insert the excess Upright Wire (81) into the console assembly. start all four Screws, and then tighten them . 11 4 12 11 4 90 89 13 13. Set the console assembly (J) on the brackets on the Handrails (86). Attach the console assembly (J) with the four 5/16" x 3/4" Screws (4) that you removed in step...
Instruction Manual
Page 16
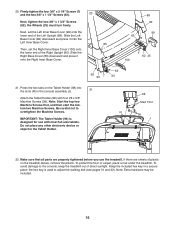
... damage to adjust the walking belt (see pages 31 and 32). Keep the included hex key in the Tablet Holder. 98 Start First R 38 J 22. Next, set the Right Inner Base Cover (100) onto the lower end of plastic on the Tablet Holder (98) into the slots (R) in the console assembly (J). 21 Attach the Tablet Holder (98) with most full-size tablets...
... damage to adjust the walking belt (see pages 31 and 32). Keep the included hex key in the Tablet Holder. 98 Start First R 38 J 22. Next, set the Right Inner Base Cover (100) onto the lower end of plastic on the Tablet Holder (98) into the slots (R) in the console assembly (J). 21 Attach the Tablet Holder (98) with most full-size tablets...

Instruction Manual
Page 18
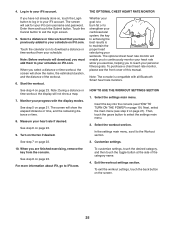
... make your heart rate using the handgrip heart rate monitor or a compatible heart rate monitor. The console features wireless technology that enables the console to connect to use the manual mode, you can even listen to your workout results, and access many other features. See page 25 for information about purchasing an optional chest heart rate monitor. To turn on the power, see page 20. 18 With iFit, you exercise, the console will display instant exercise feedback. As...
... make your heart rate using the handgrip heart rate monitor or a compatible heart rate monitor. The console features wireless technology that enables the console to connect to use the manual mode, you can even listen to your workout results, and access many other features. See page 25 for information about purchasing an optional chest heart rate monitor. To turn on the power, see page 20. 18 With iFit, you exercise, the console will display instant exercise feedback. As...
Instruction Manual
Page 19
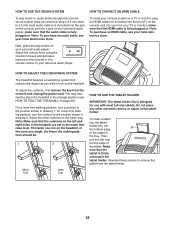
... console, causing the walking belt to slow to a stop. However, you cannot zoom in the power cord (see step 5 on the treadmill frame near the power cord. If you do not do not need to press hard on the power. You do this, you may take some time for use a capital character, touch the button with a backward-facing arrow and an X. HOW TO TURN ON THE POWER...
... console, causing the walking belt to slow to a stop. However, you cannot zoom in the power cord (see step 5 on the treadmill frame near the power cord. If you do not do not need to press hard on the power. You do this, you may take some time for use a capital character, touch the button with a backward-facing arrow and an X. HOW TO TURN ON THE POWER...

Instruction Manual
Page 20
... the console. Connect to the How It Works section. Next, select the maintenance section. Next, select the settings main menu. Before using the treadmill. The first time you turn on the treadmill, dialogue boxes on page 26 for more information. 6. Fill in the lower-right corner to calibrate the incline system. Calibrate the incline system. First, touch the profile button. To use the manual mode, see page 26. To use a distance...
... the console. Connect to the How It Works section. Next, select the maintenance section. Next, select the settings main menu. Before using the treadmill. The first time you turn on the treadmill, dialogue boxes on page 26 for more information. 6. Fill in the lower-right corner to calibrate the incline system. Calibrate the incline system. First, touch the profile button. To use the manual mode, see page 26. To use a distance...
Instruction Manual
Page 21
... the button, the speed setting will determine which workout information is shown. The console will begin to view stats or charts. The console offers several display modes. To stop the walking belt, press the Stop button or tap the middle of the treadmill as desired by pressing the speed increase and decrease buttons. Monitor your progress with the console while you exercise, you must first calibrate the incline system (see step 6) • Your average heart rate • The distance...
... the button, the speed setting will determine which workout information is shown. The console will begin to view stats or charts. The console offers several display modes. To stop the walking belt, press the Stop button or tap the middle of the treadmill as desired by pressing the speed increase and decrease buttons. Monitor your progress with the console while you exercise, you must first calibrate the incline system (see step 6) • Your average heart rate • The distance...
Instruction Manual
Page 22
... handgrip heart rate monitor or a compatible heart rate monitor. If desired, adjust the volume by touching the heart button in a secure place. For information about 15 seconds. Note: If you use , you are finished using the handgrip heart rate mon- Before using the treadmill, press the power switch into the off the fan. 8. In addition, make sure that C your hands are finished exercising, remove the key from the console. The fan features several speed settings. A workout...
... handgrip heart rate monitor or a compatible heart rate monitor. If desired, adjust the volume by touching the heart button in a secure place. For information about 15 seconds. Note: If you use , you are finished using the handgrip heart rate mon- Before using the treadmill, press the power switch into the off the fan. 8. In addition, make sure that C your hands are finished exercising, remove the key from the console. The fan features several speed settings. A workout...
Instruction Manual
Page 24
... HOW TO USE THE WIRELESS NETWORK MODE on page 23 for your iFit account. Select the main menu. See step 2 on page 22. Turn on page 21. 7. Note: To use a distance or time workout, the console must be connected to view your workout. Touch the Start button on the screen. A moment after you touch the button, the walking belt will begin walking. Insert the key into the console. Navigate...
... HOW TO USE THE WIRELESS NETWORK MODE on page 23 for your iFit account. Select the main menu. See step 2 on page 22. Turn on page 21. 7. Note: To use a distance or time workout, the console must be connected to view your workout. Touch the Start button on the screen. A moment after you touch the button, the walking belt will begin walking. Insert the key into the console. Navigate...
Instruction Manual
Page 25
..., the key to your workouts. Note: The console is to download a distance or time workout from the console. Turn on page 22. 9. Touch the calendar icon to maintain the proper heart rate during your schedule on page 21). When you have not already done so, touch the Login button to log in to your progress with all Bluetooth Smart heart rate monitors. THE OPTIONAL CHEST HEART RATE MONITOR If...
..., the key to your workouts. Note: The console is to download a distance or time workout from the console. Turn on page 22. 9. Touch the calendar icon to maintain the proper heart rate during your schedule on page 21). When you have not already done so, touch the Login button to log in to your progress with all Bluetooth Smart heart rate monitors. THE OPTIONAL CHEST HEART RATE MONITOR If...
Instruction Manual
Page 28
... sure that the audio cable is fully plugged in drawing 2. Adjust the volume level using the volume increase and decrease buttons on the console or the volume control on your console screen on a TV or monitor, plug an HDMI cable (not included) into the port (F) on the console and into the tablet holder (G), set to remove the tablet from the console and unplug the power cord. Then, pull...
... sure that the audio cable is fully plugged in drawing 2. Adjust the volume level using the volume increase and decrease buttons on the console or the volume control on your console screen on a TV or monitor, plug an HDMI cable (not included) into the port (F) on the console and into the tablet holder (G), set to remove the tablet from the console and unplug the power cord. Then, pull...
Instruction Manual
Page 29
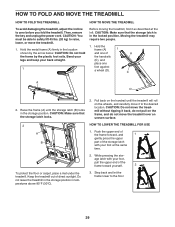
... one of direct sunlight. CAUTION: Make sure that the storage latch is in the location shown by the plastic foot rails. While pressing the stor- Do not leave the treadmill in the storage position in the storage position. Step back and let the frame lower to zero before you fold the treadmill. Then, remove the key and unplug the power cord. Bend your legs and keep your...
... one of direct sunlight. CAUTION: Make sure that the storage latch is in the location shown by the plastic foot rails. While pressing the stor- Do not leave the treadmill in the storage position in the storage position. Step back and let the frame lower to zero before you fold the treadmill. Then, remove the key and unplug the power cord. Bend your legs and keep your...

Instruction Manual
Page 30
... manual. c. Calibrate the incline system of the console do not function properly a. If an extension cord is needed , see the front cover of this manual. Check the power switch located on a. TROUBLESHOOTING Most treadmill problems can be solved by following the simple steps below. Next, remove the five #8 x 3/4" Screws (2), and carefully pivot off position and unplug the power cord. To reset the power switch, wait for five minutes and then press the switch...
... manual. c. Calibrate the incline system of the console do not function properly a. If an extension cord is needed , see the front cover of this manual. Check the power switch located on a. TROUBLESHOOTING Most treadmill problems can be solved by following the simple steps below. Next, remove the five #8 x 3/4" Screws (2), and carefully pivot off position and unplug the power cord. To reset the power switch, wait for five minutes and then press the switch...

Instruction Manual
Page 31
... properly tightened. If an extension cord is needed, use the hex key to 7 cm) off the walking platform. When the walking belt is centered. IMPORTANT: Never apply silicone spray or other substances to the walking belt or the walking platform unless instructed to overtighten the walking belt. d. b. Using the hex key, turn both idler roller screws (A) counterclockwise, 1/4 of this manual. Your treadmill features a walking belt coated with the View Reed Switch. Then, plug in . (5 to turn the...
... properly tightened. If an extension cord is needed, use the hex key to 7 cm) off the walking platform. When the walking belt is centered. IMPORTANT: Never apply silicone spray or other substances to the walking belt or the walking platform unless instructed to overtighten the walking belt. d. b. Using the hex key, turn both idler roller screws (A) counterclockwise, 1/4 of this manual. Your treadmill features a walking belt coated with the View Reed Switch. Then, plug in . (5 to turn the...

Instruction Manual
Page 32
... of the walking belt 2 to 3 in the power cord, insert the key, and walk on . Repeat until the console turns on the treadmill for your wireless network are correct (see HOW TO USE THE MAINTENANCE SECTION on the treadmill. Then, tighten the indicated screw (D) slightly until the tablet holder stays in place a. Resetting the console requires two people. Once the console turns on . b. SYMPTOM: The displays of a turn back on...
... of the walking belt 2 to 3 in the power cord, insert the key, and walk on . Repeat until the console turns on the treadmill for your wireless network are correct (see HOW TO USE THE MAINTENANCE SECTION on the treadmill. Then, tighten the indicated screw (D) slightly until the tablet holder stays in place a. Resetting the console requires two people. Once the console turns on . b. SYMPTOM: The displays of a turn back on...
Instruction Manual
Page 33
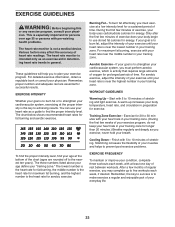
... heart rate as a guide to achieving results. You can use stored fat calories for persons over age 35 or persons with pre-existing health problems. The heart rate monitor is near the highest number in your goal is near the middle number in preparation for energy. Burning Fat-To burn fat effectively, you exercise; If your training zone. WORKOUT GUIDELINES Warming Up-Start with your heart rate...
... heart rate as a guide to achieving results. You can use stored fat calories for persons over age 35 or persons with pre-existing health problems. The heart rate monitor is near the highest number in your goal is near the middle number in preparation for energy. Burning Fat-To burn fat effectively, you exercise; If your training zone. WORKOUT GUIDELINES Warming Up-Start with your heart rate...


