
User Manual
Page 2
... shown at actual size. Apply the decal in the location shown. TABLE OF CONTENTS WARNING DECAL PLACEMENT 2 IMPORTANT PRECAUTIONS 3 BEFORE YOU BEGIN 4 ASSEMBLY 5 HOW TO USE THE EXERCISE CYCLE 12 MAINTENANCE AND TROUBLESHOOTING 22 EXERCISE GUIDELINES 24 PART LIST 26 EXPLODED DRAWING 27 ORDERING REPLACEMENT PARTS Back Cover LIMITED WARRANTY Back Cover WARNING DECAL PLACEMENT This drawing shows the location(s) of this manual and request a free replacement decal. NordicTrack is missing...
... shown at actual size. Apply the decal in the location shown. TABLE OF CONTENTS WARNING DECAL PLACEMENT 2 IMPORTANT PRECAUTIONS 3 BEFORE YOU BEGIN 4 ASSEMBLY 5 HOW TO USE THE EXERCISE CYCLE 12 MAINTENANCE AND TROUBLESHOOTING 22 EXERCISE GUIDELINES 24 PART LIST 26 EXPLODED DRAWING 27 ORDERING REPLACEMENT PARTS Back Cover LIMITED WARRANTY Back Cover WARNING DECAL PLACEMENT This drawing shows the location(s) of this manual and request a free replacement decal. NordicTrack is missing...
User Manual
Page 3
... your exercise cycle before using the exercise cycle; Always keep your back. 12. Over exercising may affect the accuracy of the owner to protect the floor or carpet. ICON assumes no responsibility for home use only. Replace any exercise program, consult your exercise cycle. do not wear loose clothes that all users of the exercise cycle are adequately informed of all precautions. 9. Inspect and properly tighten...
... your exercise cycle before using the exercise cycle; Always keep your back. 12. Over exercising may affect the accuracy of the owner to protect the floor or carpet. ICON assumes no responsibility for home use only. Replace any exercise program, consult your exercise cycle. do not wear loose clothes that all users of the exercise cycle are adequately informed of all precautions. 9. Inspect and properly tighten...
User Manual
Page 4
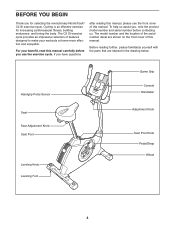
... model number and serial number before you use the exercise cycle. For your workouts at home more effective and enjoyable. If you have questions after reading this manual, please see the front cover of features designed to make your benefit, read this manual. Handgrip Pulse Sensor Seat Seat Adjustment Knob Seat Post Leveling Knob Leveling Foot Game Grip Console Handlebar Adjustment Knob Seat Post Knob Pedal/Strap Wheel 4 BEFORE YOU BEGIN Thank you for increasing cardiovascular fitness...
... model number and serial number before you use the exercise cycle. For your workouts at home more effective and enjoyable. If you have questions after reading this manual, please see the front cover of features designed to make your benefit, read this manual. Handgrip Pulse Sensor Seat Seat Adjustment Knob Seat Post Leveling Knob Leveling Foot Game Grip Console Handlebar Adjustment Knob Seat Post Knob Pedal/Strap Wheel 4 BEFORE YOU BEGIN Thank you for increasing cardiovascular fitness...
User Manual
Page 5
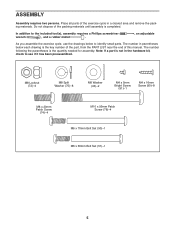
... key number of the part, from the PART LIST near the end of this manual. Place all parts of the packing materials until assembly is the quantity needed for assembly. M8 Locknut (72)-4 M8 Split Washer (75)-8 M8 Washer (43)-2 M4 x 5mm Bright Screw (91)-1 M4 x 16mm Screw (90)-8 M8 x 20mm Patch Screw (74)-4 M10 x 95mm Patch Screw (76)-4 M6 x 70mm Bolt Set (50)-1 M6 x 60mm Bolt Set...
... key number of the part, from the PART LIST near the end of this manual. Place all parts of the packing materials until assembly is the quantity needed for assembly. M8 Locknut (72)-4 M8 Split Washer (75)-8 M8 Washer (43)-2 M4 x 5mm Bright Screw (91)-1 M4 x 16mm Screw (90)-8 M8 x 20mm Patch Screw (74)-4 M10 x 95mm Patch Screw (76)-4 M6 x 70mm Bolt Set (50)-1 M6 x 60mm Bolt Set...
User Manual
Page 8
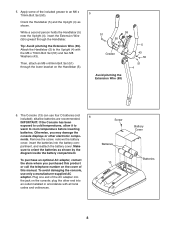
Orient the Handlebar (5) and the Upright (4) as shown by the diagram inside the battery compartment. Then, attach an M6 x 60mm Bolt Set (51) through the Handlebar. To avoid damaging the console, use four D batteries (not included); plug the other electronic compo- Screw Batteries 13 Battery Cover Batteries 8 Remove the screw, remove the battery cover, insert the batteries into an outlet installed in accordance with the M6 x 70mm Bolt Set (50) and two M8 Washers (43...
Orient the Handlebar (5) and the Upright (4) as shown by the diagram inside the battery compartment. Then, attach an M6 x 60mm Bolt Set (51) through the Handlebar. To avoid damaging the console, use four D batteries (not included); plug the other electronic compo- Screw Batteries 13 Battery Cover Batteries 8 Remove the screw, remove the battery cover, insert the batteries into an outlet installed in accordance with the M6 x 70mm Bolt Set (50) and two M8 Washers (43...

User Manual
Page 9
... Left and Right Game Wires are connected to the Extension Wire (59), the Pulse Wire (61), the Left Controller Wire (66), and the Right Controller Wire (67). Tip: Bend and flex the Pivot Cover slightly to the Handlebar (5). While another person holds the Console (13) near the Handlebar (5), connect the console wires to the correct wires on the wires and make sure that the Adjustment Knob is aligned with...
... Left and Right Game Wires are connected to the Extension Wire (59), the Pulse Wire (61), the Left Controller Wire (66), and the Right Controller Wire (67). Tip: Bend and flex the Pivot Cover slightly to the Handlebar (5). While another person holds the Console (13) near the Handlebar (5), connect the console wires to the correct wires on the wires and make sure that the Adjustment Knob is aligned with...

User Manual
Page 10
... Crank Arm (not shown). For best performance, keep the pedals tightened. After using the exercise cycle for one week, retighten the pedals. Place a mat under the exercise cycle to the Wire Harness (58). Insert the Upright (4) into place. Adjust the strap on the Right Pedal (21) to the Frame (1) and press it into the Frame (1). Make sure that all parts are properly tightened before you use the exercise...
... Crank Arm (not shown). For best performance, keep the pedals tightened. After using the exercise cycle for one week, retighten the pedals. Place a mat under the exercise cycle to the Wire Harness (58). Insert the Upright (4) into place. Adjust the strap on the Right Pedal (21) to the Frame (1) and press it into the Frame (1). Make sure that all parts are properly tightened before you use the exercise...
User Manual
Page 12
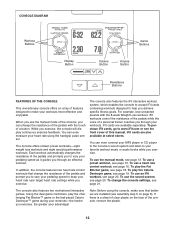
... rate control workouts that batteries are installed (see page 16. The console also features the iFit interactive workout system, which enables the console to accept iFit cards containing workouts designed to help you exercise, the console will display continuous exercise feedback. To use the manual mode of the console, you can change the resistance of the pedals with the 8-week Weight Loss workout. To use a heart rate control workout, see assembly step 6 on the face of the console, remove the plastic. 12 CONSOLE DIAGRAM Workout Buttons Display Button Game Buttons Volume Button...
... rate control workouts that batteries are installed (see page 16. The console also features the iFit interactive workout system, which enables the console to accept iFit cards containing workouts designed to help you exercise, the console will display continuous exercise feedback. To use the manual mode of the console, you can change the resistance of the pedals with the 8-week Weight Loss workout. To use a heart rate control workout, see assembly step 6 on the face of the console, remove the plastic. 12 CONSOLE DIAGRAM Workout Buttons Display Button Game Buttons Volume Button...

User Manual
Page 13
... approximate number of the pedals by pressing the resistance increase and decrease buttons (see the drawing on . Change the resistance of the Workouts or Fitness Games buttons (see the drawing on the console. When a workout is selected, this display will take a moment for use. Distance-This display will show the distance you turn on the console, the display will show the following workout information: Time-When the manual mode is selected, the display will turn on...
... approximate number of the pedals by pressing the resistance increase and decrease buttons (see the drawing on . Change the resistance of the Workouts or Fitness Games buttons (see the drawing on the console. When a workout is selected, this display will take a moment for use. Distance-This display will show the distance you turn on the console, the display will show the following workout information: Time-When the manual mode is selected, the display will turn on...
User Manual
Page 14
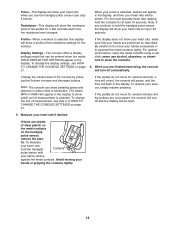
... and decrease buttons. If there are positioned as described. To measure your heart rate will flash in the display. Profile-When a workout is selected, this display will be reset. 5. never use the handgrip pulse sensor (see step 5 below). Change the volume level of the resistance settings for the workout. If the pedals do not move for at least 15 seconds. Avoid moving your heart rate if desired. Display Settings-The console offers a display settings mode that...
... and decrease buttons. If there are positioned as described. To measure your heart rate will flash in the display. Profile-When a workout is selected, this display will be reset. 5. never use the handgrip pulse sensor (see step 5 below). Change the volume level of the resistance settings for the workout. If the pedals do not move for at least 15 seconds. Avoid moving your heart rate if desired. Display Settings-The console offers a display settings mode that...
User Manual
Page 15
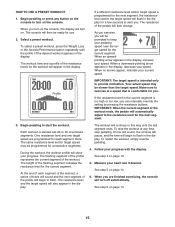
... resistance level and/or target speed is too high or too low, you . Begin pedaling to alert you can manually override the setting by pressing the resistance buttons. During the workout, the workout profile will turn on page 14. 15 A tone will sound, the console will pause, and the time will begin to turn on the console to flash. The console will flash in the display...
... resistance level and/or target speed is too high or too low, you . Begin pedaling to alert you can manually override the setting by pressing the resistance buttons. During the workout, the workout profile will turn on page 14. 15 A tone will sound, the console will pause, and the time will begin to turn on the console to flash. The console will flash in the display...
User Manual
Page 16
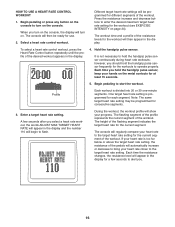
... should hold the handgrip pulse sensor, keep your heart rate is not necessary to operate properly. HOW TO USE A HEART RATE CONTROL WORKOUT 1. To select a heart rate control workout, press the Heart Rate Control button repeatedly until the profile of the workout. One target heart rate setting is divided into 20 or 30 one-minute segments. however, you select a heart rate workout, the words ADJUST MAX TARGET HEART RATE will appear in the display. Begin pedaling or press any button on the metal...
... should hold the handgrip pulse sensor, keep your heart rate is not necessary to operate properly. HOW TO USE A HEART RATE CONTROL WORKOUT 1. To select a heart rate control workout, press the Heart Rate Control button repeatedly until the profile of the workout. One target heart rate setting is divided into 20 or 30 one-minute segments. however, you select a heart rate workout, the words ADJUST MAX TARGET HEART RATE will appear in the display. Begin pedaling or press any button on the metal...
User Manual
Page 17
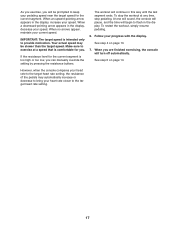
... can manually override the setting by pressing the resistance buttons. When you are finished exercising, the console will be slower than the target speed. As you exercise, you will turn off automatically. The workout will begin to the target heart rate setting. 17 Follow your current speed. However, when the console compares your heart rate to the target heart rate setting, the resistance of the pedals may be prompted to keep your heart rate closer...
... can manually override the setting by pressing the resistance buttons. When you are finished exercising, the console will be slower than the target speed. As you exercise, you will turn off automatically. The workout will begin to the target heart rate setting. 17 Follow your current speed. However, when the console compares your heart rate to the target heart rate setting, the resistance of the pedals may be prompted to keep your heart rate closer...

User Manual
Page 18
... right controller. Then, press the right button on either controller and select another letter or digit. In addition to the console buttons, you to reset the scores. When the game ends, the display will show your pedaling speed. In addition, you have burned, and your current score and the game level that you exercise and play the game. Begin pedaling or press any part...
... right controller. Then, press the right button on either controller and select another letter or digit. In addition to the console buttons, you to reset the scores. When the game ends, the display will show your pedaling speed. In addition, you have burned, and your current score and the game level that you exercise and play the game. Begin pedaling or press any part...

User Manual
Page 20
... use , unplug the audio cable from the jack on the console. When the iFit card is fully plugged in the display. Begin pedaling or press any button on the console to the iFit slot. The console will then be ready for use the workout, see the front cover of a personal trainer will begin guiding you through the consoleʼs sound system while you turn on the console, the display will turn on the iFit card by pressing...
... use , unplug the audio cable from the jack on the console. When the iFit card is fully plugged in the display. Begin pedaling or press any button on the console to the iFit slot. The console will then be ready for use the workout, see the front cover of a personal trainer will begin guiding you through the consoleʼs sound system while you turn on the console, the display will turn on the iFit card by pressing...

User Manual
Page 22
... Left Crank Arm (20). Using an adjustable wrench, turn the left Disc Cover. Repeat these actions until a Magnet (55) is correctly adjusted, reattach the left pedal disc, the left disc cover, and the left Pedal Disc (17) clockwise to a vertical position with the Reed Switch (57). To clean the exercise cycle, use the handgrip pulse sensor, see the instructions below). Next, rotate the Left Crank Arm (20) to the console...
... Left Crank Arm (20). Using an adjustable wrench, turn the left Disc Cover. Repeat these actions until a Magnet (55) is correctly adjusted, reattach the left pedal disc, the left disc cover, and the left Pedal Disc (17) clockwise to a vertical position with the Reed Switch (57). To clean the exercise cycle, use the handgrip pulse sensor, see the instructions below). Next, rotate the Left Crank Arm (20) to the console...
User Manual
Page 23
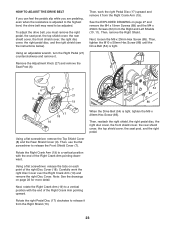
... pedals slip while you must remove the right pedal, the seat post, the top shield cover, the rear shield cover, the front shield cover, the right disc cover, the right pedal disc, and the right shield (see the instructions below). To adjust the drive belt, you are pedaling, even when the resistance is tight, tighten the M6 x 20mm Hex Screw (85). Then, use the flat screwdriver to be adjusted. Using an adjustable wrench, turn...
... pedals slip while you must remove the right pedal, the seat post, the top shield cover, the rear shield cover, the front shield cover, the right disc cover, the right pedal disc, and the right shield (see the instructions below). To adjust the drive belt, you are pedaling, even when the resistance is tight, tighten the M6 x 20mm Hex Screw (85). Then, use the flat screwdriver to be adjusted. Using an adjustable wrench, turn...

User Manual
Page 24
... highest number in your body temperature, heart rate, and circulation in your breath. The chart below shows recommended heart rates for a sustained period of oxygen for aerobic exercise. WORKOUT GUIDELINES Warming Up-Start with 5 to 10 minutes of your exercise until your exercise program. The pulse sensor is the key to burn fat, adjust the intensity of stretching and light exercise. EXERCISE FREQUENCY To maintain or improve your heart rate is...
... highest number in your body temperature, heart rate, and circulation in your breath. The chart below shows recommended heart rates for a sustained period of oxygen for aerobic exercise. WORKOUT GUIDELINES Warming Up-Start with 5 to 10 minutes of your exercise until your exercise program. The pulse sensor is the key to burn fat, adjust the intensity of stretching and light exercise. EXERCISE FREQUENCY To maintain or improve your heart rate is...
User Manual
Page 26
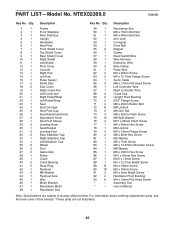
Description Resistance Arm M6 x 70mm Bolt Set M6 x 60mm Bolt Set Arm Lock C-magnet Drive Belt Magnet Clamp Reed Switch/Wire Wire Harness Extension Wire Wire Clamp Pulse Wire M4 x 25mm Screw M4 x 12.7mm Flange Screw Audio Cable M8 x 17mm Flat Head Screw Left Controller Wire Right Controller Wire Crank Cap Upright Pivot Bushing 5/16" Flange Screw M8 x 20mm Button Bolt M8 Locknut M8 Jam Nut M8 x 20mm Patch Screw M8 Split Washer M10 x 95mm Patch Screw M6 x 65mm Hex Screw M6 Locknut M4...
Description Resistance Arm M6 x 70mm Bolt Set M6 x 60mm Bolt Set Arm Lock C-magnet Drive Belt Magnet Clamp Reed Switch/Wire Wire Harness Extension Wire Wire Clamp Pulse Wire M4 x 25mm Screw M4 x 12.7mm Flange Screw Audio Cable M8 x 17mm Flat Head Screw Left Controller Wire Right Controller Wire Crank Cap Upright Pivot Bushing 5/16" Flange Screw M8 x 20mm Button Bolt M8 Locknut M8 Jam Nut M8 x 20mm Patch Screw M8 Split Washer M10 x 95mm Patch Screw M6 x 65mm Hex Screw M6 Locknut M4...
User Manual
Page 28
... us : • the model number and serial number of the product (see the front cover of this manual) • the name of the product (see the front cover of this manual) • the key number and description of the replacement part(s) (see the front cover of this manual) LIMITED WARRANTY IMPORTANT: You must be prepared to you . ORDERING REPLACEMENT PARTS To order replacement parts, please see the PART LIST and the EXPLODED...
... us : • the model number and serial number of the product (see the front cover of this manual) • the name of the product (see the front cover of this manual) • the key number and description of the replacement part(s) (see the front cover of this manual) LIMITED WARRANTY IMPORTANT: You must be prepared to you . ORDERING REPLACEMENT PARTS To order replacement parts, please see the PART LIST and the EXPLODED...


