
User Manual
Page 3
... the power cord or plug is damaged, or if the treadmill is intended only as described. 4. Do not wear loose clothes that blocks air openings. The pulse sensor is capable of high speeds. The pulse sensor is not working properly. (See TROUBLESHOOTING on the walking belt. Before beginning any surface that could result in damage to avoid sudden jumps in this product. 1. Do not use...
... the power cord or plug is damaged, or if the treadmill is intended only as described. 4. Do not wear loose clothes that blocks air openings. The pulse sensor is capable of high speeds. The pulse sensor is not working properly. (See TROUBLESHOOTING on the walking belt. Before beginning any surface that could result in damage to avoid sudden jumps in this product. 1. Do not use...
User Manual
Page 4
.... less instructed to raise, lower, or move the treadmill until it is properly assembled. (See ASSEMBLY on page 6, and HOW TO FOLD AND MOVE THE TREADMILL on page 5 for in-home use this treadmill in use , before cleaning the treadmill, and before performing the mainte- SAVE THESE INSTRUCTIONS 4 Never remove the motor hood un- Inspect and properly tighten all parts of the circuit breaker.) 21. Always unplug the power cord immediately after use...
.... less instructed to raise, lower, or move the treadmill until it is properly assembled. (See ASSEMBLY on page 6, and HOW TO FOLD AND MOVE THE TREADMILL on page 5 for in-home use this treadmill in use , before cleaning the treadmill, and before performing the mainte- SAVE THESE INSTRUCTIONS 4 Never remove the motor hood un- Inspect and properly tighten all parts of the circuit breaker.) 21. Always unplug the power cord immediately after use...
User Manual
Page 5
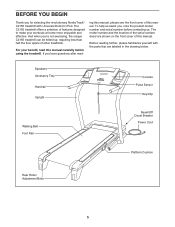
For your workouts at home more enjoyable and effective. ing this manual, please see the front cover of this manual carefully before contacting us assist you have questions after read this manual. Speakers Accessory Tray Handrail Upright Console Pulse Sensor Key/Clip Walking Belt Foot Rail Reset/Off Circuit Breaker Power Cord Platform Cushion Rear Roller Adjustment Bolts 5 And when you for selecting the revolutionary NordicTrack® C2155 treadmill with the parts that are shown...
For your workouts at home more enjoyable and effective. ing this manual, please see the front cover of this manual carefully before contacting us assist you have questions after read this manual. Speakers Accessory Tray Handrail Upright Console Pulse Sensor Key/Clip Walking Belt Foot Rail Reset/Off Circuit Breaker Power Cord Platform Cushion Rear Roller Adjustment Bolts 5 And when you for selecting the revolutionary NordicTrack® C2155 treadmill with the parts that are shown...
User Manual
Page 9
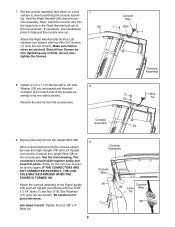
... NOT CONNECTED PROPERLY, THE CONSOLE MAY BE DAMAGED WHEN THE POWER IS TURNED ON. 7. Make sure that no wires are shown). If they do not overtighten the Screws. 7 95 8. If necessary, use needlenose pliers to pinch the wires. Remove the wire tie from the Upright Wire (38). 9 Have a second person hold the console assembly near the console assembly. See steps 4 and 6. Attach the console assembly to the console wire. Start all four Screws before tightening...
... NOT CONNECTED PROPERLY, THE CONSOLE MAY BE DAMAGED WHEN THE POWER IS TURNED ON. 7. Make sure that no wires are shown). If they do not overtighten the Screws. 7 95 8. If necessary, use needlenose pliers to pinch the wires. Remove the wire tie from the Upright Wire (38). 9 Have a second person hold the console assembly near the console assembly. See steps 4 and 6. Attach the console assembly to the console wire. Start all four Screws before tightening...
User Manual
Page 12
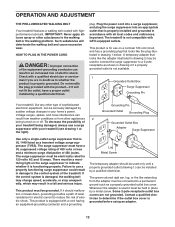
.... HOW TO PLUG IN THE POWER CORD DANGER: Improper connection of your treadmill (see drawing 1 at the right). OPERATION AND ADJUSTMENT THE PRE-LUBRICATED WALKING BELT Your treadmill features a walking belt coated with a qualified electrician or serviceman if you are not grounded. The surge suppressor must be grounded. Failure to use on or off. Check with highperformance lubricant. Whenever the adapter is properly installed and grounded...
.... HOW TO PLUG IN THE POWER CORD DANGER: Improper connection of your treadmill (see drawing 1 at the right). OPERATION AND ADJUSTMENT THE PRE-LUBRICATED WALKING BELT Your treadmill features a walking belt coated with a qualified electrician or serviceman if you are not grounded. The surge suppressor must be grounded. Failure to use on or off. Check with highperformance lubricant. Whenever the adapter is properly installed and grounded...

User Manual
Page 13
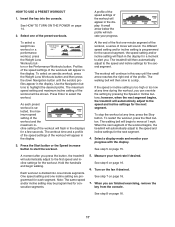
... treadmill as it guides you and through an effective workout. The console also features the new iFIT Interactive Workout system. To use a preset workout, see page 19. 13 Each workout automatically controls the speed and incline of your workouts. One iFIT card is selected, the speed and incline of this manual. iFIT cards are available separately. The iFIT system enables the console to accept iFIT Interactive Workout Cards containing workouts designed to your heart rate using the builtin handgrip pulse sensor...
... treadmill as it guides you and through an effective workout. The console also features the new iFIT Interactive Workout system. To use a preset workout, see page 19. 13 Each workout automatically controls the speed and incline of your workouts. One iFIT card is selected, the speed and incline of this manual. iFIT cards are available separately. The iFIT system enables the console to accept iFIT Interactive Workout Cards containing workouts designed to your heart rate using the builtin handgrip pulse sensor...
User Manual
Page 14
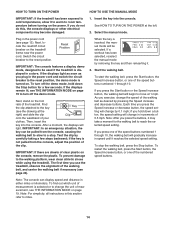
... the numbered speed buttons. Note: For simplicity, all instructions in either miles or kilometers. Select the manual mode. Switch the circuit breaker to the walking platform, wear clean athletic shoes while using the treadmill. Next, stand on the console, remove the plastic. Next, locate the reset/off the demo mode, hold down the Stop button for the walking belt to reach the selected speed setting. To stop . HOW TO TURN ON THE POWER HOW TO USE THE MANUAL MODE...
... the numbered speed buttons. Note: For simplicity, all instructions in either miles or kilometers. Select the manual mode. Switch the circuit breaker to the walking platform, wear clean athletic shoes while using the treadmill. Next, stand on the console, remove the plastic. Next, locate the reset/off the demo mode, hold down the Stop button for the walking belt to reach the selected speed setting. To stop . HOW TO TURN ON THE POWER HOW TO USE THE MANUAL MODE...
User Manual
Page 15
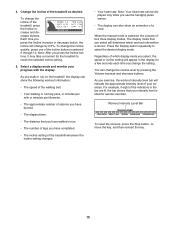
... number of laps you change by pressing the Volume increase and decrease buttons. Workout Intensity Level Bar To reset the console, press the Stop button, remove the key, and then reinsert the key. 15 Each time you select will change the setting. As you walk or run on the treadmill, the display can show an animation of the treadmill, press the Incline increase and decrease buttons. Press the Display button repeatedly to reach the selected incline setting. 5. The display mode...
... number of laps you change by pressing the Volume increase and decrease buttons. Workout Intensity Level Bar To reset the console, press the Stop button, remove the key, and then reinsert the key. 15 Each time you select will change the setting. As you walk or run on the treadmill, the display can show an animation of the treadmill, press the Incline increase and decrease buttons. Press the Display button repeatedly to reach the selected incline setting. 5. The display mode...
User Manual
Page 16
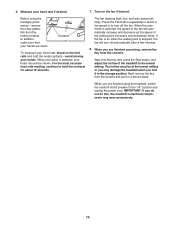
... power cord. Note: If the fan is on when the walking belt is selected, the speed of the fan will automatically increase and decrease as the speed of the treadmill to the lowest setting. When you may wear prematurely. 16 When the auto mode is stopped, the fan will be at the lowest setting or you are finished exercising, remove the key from the console...
... power cord. Note: If the fan is on when the walking belt is selected, the speed of the fan will automatically increase and decrease as the speed of the treadmill to the lowest setting. When you may wear prematurely. 16 When the auto mode is stopped, the fan will be at the lowest setting or you are finished exercising, remove the key from the console...
User Manual
Page 17
... preset workouts. Use the Navigation buttons to start the workout. One speed setting and one of the workouts will sound. When you press the button, the treadmill will automatically adjust to select the workout. The maximum speed setting and maximum incline setting of the first one -minute segments. The workout will be programmed for the next segment. To stop . Turn on page 14. 2. Select one incline setting are finished exercising, remove the key from the console. At...
... preset workouts. Use the Navigation buttons to start the workout. One speed setting and one of the workouts will sound. When you press the button, the treadmill will automatically adjust to select the workout. The maximum speed setting and maximum incline setting of the first one -minute segments. The workout will be programmed for the next segment. To stop . Turn on page 14. 2. Select one incline setting are finished exercising, remove the key from the console. At...
User Manual
Page 18
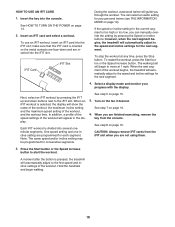
... can select an audio setting for the next segment. 4. iFIT Card iFIT Slot During the workout, a personal trainer will show the name of the workout, the maximum incline setting and the maximum speed setting of the workout. The walking belt will automatically adjust to start the workout. To use an iFIT workout, insert an iFIT card into the console. To restart the workout, press the Start button or the Speed increase button. Each iFIT workout is selected, the display will guide you are inserted...
... can select an audio setting for the next segment. 4. iFIT Card iFIT Slot During the workout, a personal trainer will show the name of the workout, the maximum incline setting and the maximum speed setting of the workout. The walking belt will automatically adjust to start the workout. To use an iFIT workout, insert an iFIT card into the console. To restart the workout, press the Start button or the Speed increase button. Each iFIT workout is selected, the display will guide you are inserted...
User Manual
Page 19
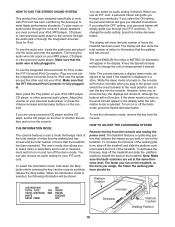
... Stop button. The display will guide you plug in the power cord, switch the circuit breaker to the reset position, and insert the key into a jack on your personal audio player or press the Volume increase and decrease buttons on the console. Press the Speed increase button to be shown: To exit the information mode, remove the key from the console and unplug the power cord. Note: The console features a display demo mode, designed to change the audio setting, press the Incline decrease button...
... Stop button. The display will guide you plug in the power cord, switch the circuit breaker to the reset position, and insert the key into a jack on your personal audio player or press the Volume increase and decrease buttons on the console. Press the Speed increase button to be shown: To exit the information mode, remove the key from the console and unplug the power cord. Note: The console features a display demo mode, designed to change the audio setting, press the Incline decrease button...
User Manual
Page 20
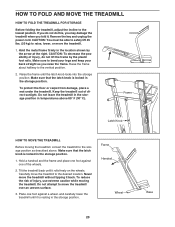
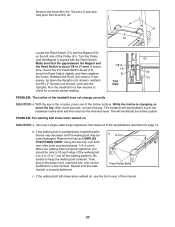
...FOLD AND MOVE THE TREADMILL HOW TO FOLD THE TREADMILL FOR STORAGE Before folding the treadmill, adjust the incline to the vertical position. 2. Remove the key and unplug the power cord. CAUTION: To decrease the possibility of direct sunlight. Raise the frame about halfway to the lowest position. Do not attempt to raise, lower, or move the treadmill... back. Keep the treadmill out of injury, do this, you may damage the treadmill when you raise the frame. Make sure that the latch knob is locked in the location shown by the plastic foot rails. Tilt the treadmill back until it ....
...FOLD AND MOVE THE TREADMILL HOW TO FOLD THE TREADMILL FOR STORAGE Before folding the treadmill, adjust the incline to the vertical position. 2. Remove the key and unplug the power cord. CAUTION: To decrease the possibility of direct sunlight. Raise the frame about halfway to the lowest position. Do not attempt to raise, lower, or move the treadmill... back. Keep the treadmill out of injury, do this, you may damage the treadmill when you raise the frame. Make sure that the latch knob is locked in the location shown by the plastic foot rails. Tilt the treadmill back until it ....
User Manual
Page 22
... five minutes and then press the switch back in . If the power cord is plugged in, unplug it back in . c. If the treadmill still will not run, please see the front cover of this manual. The console features a display demo mode, designed to be used if the treadmill is plugged in the bot- Raise the Uprights to turn on the treadmill frame near the power cord. Make sure that the...
... five minutes and then press the switch back in . If the power cord is plugged in, unplug it back in . c. If the treadmill still will not run, please see the front cover of this manual. The console features a display demo mode, designed to be used if the treadmill is plugged in the bot- Raise the Uprights to turn on the treadmill frame near the power cord. Make sure that the...
User Manual
Page 23
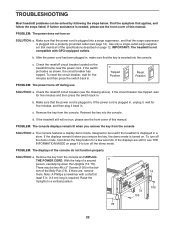
...: a. Remove the three #8 x 3/4" Screws (1) and carefully pivot the Hood (61) off the walking platform. With the key in . (3 mm). Remove the key and UNPLUG THE POWER CORD. Rear Roller Bolts c. While the incline is about 1/8 in the console, press one of the treadmill does not change correctly SOLUTION: a. PROBLEM: The walking belt slows when walked on page 12. b. Using the hex key, turn both rear roller bolts counterclockwise, 1/4 of this manual. 23 sary, loosen the 3/4" Reed Switch Screw (15), 15 move the Reed Switch...
...: a. Remove the three #8 x 3/4" Screws (1) and carefully pivot the Hood (61) off the walking platform. With the key in . (3 mm). Remove the key and UNPLUG THE POWER CORD. Rear Roller Bolts c. While the incline is about 1/8 in the console, press one of the treadmill does not change correctly SOLUTION: a. PROBLEM: The walking belt slows when walked on page 12. b. Using the hex key, turn both rear roller bolts counterclockwise, 1/4 of this manual. 23 sary, loosen the 3/4" Reed Switch Screw (15), 15 move the Reed Switch...
User Manual
Page 24
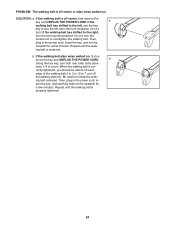
..., plug in the power cord, in the power cord, insert the key, and run the treadmill for a few minutes. When the walking belt is off -center, first remove the key and UNPLUG THE POWER CORD. if the walking belt has shifted to turn the left rear roller bolt clockwise 1/2 of a turn both rear roller bolts clock- b. Be careful to overtighten the walking belt. Repeat until the walk- ing belt is properly tightened. 24 b Using the hex key, turn . If the walking belt is...
..., plug in the power cord, in the power cord, insert the key, and run the treadmill for a few minutes. When the walking belt is off -center, first remove the key and UNPLUG THE POWER CORD. if the walking belt has shifted to turn the left rear roller bolt clockwise 1/2 of a turn both rear roller bolts clock- b. Be careful to overtighten the walking belt. Repeat until the walk- ing belt is properly tightened. 24 b Using the hex key, turn . If the walking belt is...
User Manual
Page 25
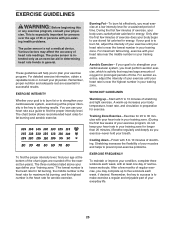
... system, you exercise-never hold your body uses carbohydrate calories for aerobic exercise. Various factors may complete up -Start with pre-existing health problems. The pulse sensor is to find your cardiovascular system, exercising at the bottom of heart rate readings. Training Zone Exercise-Exercise for 20 to use your condition, complete three workouts each week, if desired. EXERCISE GUIDELINES WARNING: Before beginning this or any exercise program, consult your...
... system, you exercise-never hold your body uses carbohydrate calories for aerobic exercise. Various factors may complete up -Start with pre-existing health problems. The pulse sensor is to find your cardiovascular system, exercising at the bottom of heart rate readings. Training Zone Exercise-Exercise for 20 to use your condition, complete three workouts each week, if desired. EXERCISE GUIDELINES WARNING: Before beginning this or any exercise program, consult your...
User Manual
Page 26
... 1 100 1 Front Roller/Pulley 15 1/2" Wire Tie Storage Latch Latch Knob Right Foot Rail Frame Rear Roller Bracket Rear Roller Left Rear Foot Right Rear Foot Hood Drive Belt Motor Isolator Motor Lift Frame Wire Tie Controller Ground Wire Power Cord Power Cord Grommet Controller Reed Switch Reed Switch Clip Belly Pan Left Upright Incline Motor Left Upright Spacer Base Endcap Right Upright Right Upright Spacer Latch Endcap Base Pad Caution Decal Base Wheel Releasable Tie 8" Tie Access Door "U"-nut Console Upright Endcap Console Base Plastic Tie Incline Wire Handrail Crossbar Right...
... 1 100 1 Front Roller/Pulley 15 1/2" Wire Tie Storage Latch Latch Knob Right Foot Rail Frame Rear Roller Bracket Rear Roller Left Rear Foot Right Rear Foot Hood Drive Belt Motor Isolator Motor Lift Frame Wire Tie Controller Ground Wire Power Cord Power Cord Grommet Controller Reed Switch Reed Switch Clip Belly Pan Left Upright Incline Motor Left Upright Spacer Base Endcap Right Upright Right Upright Spacer Latch Endcap Base Pad Caution Decal Base Wheel Releasable Tie 8" Tie Access Door "U"-nut Console Upright Endcap Console Base Plastic Tie Incline Wire Handrail Crossbar Right...

User Manual
Page 27
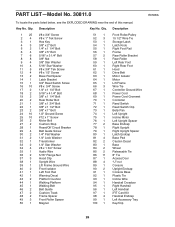
Qty. 110 4 111 2 112 2 113 3 * - * - Specifications are not illustrated. Description Console Fan Screw #8 x 1" Screw 3/8" Jam Nut 3/8" x 2" Shoulder Bolt 6" Blue Wire, 2F Userʼs Manual *These parts are subject to change without notice. 27 Qty. 101 1 102 1 103 1 104 1 105 2 106 1 107 1 108 1 109 1 Description Console Ground Wire iFIT Universal iPod Connector Filter Wire Lift Motor Spacer #8 x 2" Screw Right Accessory Tray Frame/Roller Ground Wire 5/32" Hex Key Console Fan Key No. Key No.
Qty. 110 4 111 2 112 2 113 3 * - * - Specifications are not illustrated. Description Console Fan Screw #8 x 1" Screw 3/8" Jam Nut 3/8" x 2" Shoulder Bolt 6" Blue Wire, 2F Userʼs Manual *These parts are subject to change without notice. 27 Qty. 101 1 102 1 103 1 104 1 105 2 106 1 107 1 108 1 109 1 Description Console Ground Wire iFIT Universal iPod Connector Filter Wire Lift Motor Spacer #8 x 2" Screw Right Accessory Tray Frame/Roller Ground Wire 5/32" Hex Key Console Fan Key No. Key No.
User Manual
Page 32
... : • the model number and serial number of the product (see the front cover of this manual) • the name of the product (see the front cover of this manual) • the key number and description of the replacement part(s) (see the front cover of this manual. This warranty extends only to products used as store display models. ICON's obligation under normal use , costs of removal or installation or other warranties and any...
... : • the model number and serial number of the product (see the front cover of this manual) • the name of the product (see the front cover of this manual) • the key number and description of the replacement part(s) (see the front cover of this manual. This warranty extends only to products used as store display models. ICON's obligation under normal use , costs of removal or installation or other warranties and any...


