
User Manual
Page 1
... CONTACT THE STORE. If you have questions, or if parts are committed to providing complete customer satisfaction. Save this equipment. Visit our website at www.nordictrack.com new products, prizes, fitness tips, and much more! For assistance, contact our Customer Service Department. CALL TOLL-FREE: 1-888-936-4266 Mon.-Fri., 8:00...
... CONTACT THE STORE. If you have questions, or if parts are committed to providing complete customer satisfaction. Save this equipment. Visit our website at www.nordictrack.com new products, prizes, fitness tips, and much more! For assistance, contact our Customer Service Department. CALL TOLL-FREE: 1-888-936-4266 Mon.-Fri., 8:00...
User Manual
Page 2
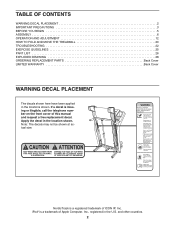
...number on the front cover of this manual and request a free replacement decal. If a decal is a trademark of ICON IP, Inc. NordicTrack is a registered trademark of Apple Computer, Inc., registered in the U.S. and other countries. 2 TABLE OF CONTENTS WARNING DECAL PLACEMENT 2 IMPORTANT ...PRECAUTIONS 3 BEFORE YOU BEGIN 5 ASSEMBLY 6 OPERATION AND ADJUSTMENT 12 HOW TO FOLD AND MOVE THE TREADMILL 20 TROUBLESHOOTING 22 EXERCISE GUIDELINES 25 PART LIST 26 EXPLODED DRAWING 28 ORDERING REPLACEMENT PARTS Back Cover LIMITED WARRANTY Back Cover WARNING ...
...number on the front cover of this manual and request a free replacement decal. If a decal is a trademark of ICON IP, Inc. NordicTrack is a registered trademark of Apple Computer, Inc., registered in the U.S. and other countries. 2 TABLE OF CONTENTS WARNING DECAL PLACEMENT 2 IMPORTANT ...PRECAUTIONS 3 BEFORE YOU BEGIN 5 ASSEMBLY 6 OPERATION AND ADJUSTMENT 12 HOW TO FOLD AND MOVE THE TREADMILL 20 TROUBLESHOOTING 22 EXERCISE GUIDELINES 25 PART LIST 26 EXPLODED DRAWING 28 ORDERING REPLACEMENT PARTS Back Cover LIMITED WARRANTY Back Cover WARNING ...
User Manual
Page 3
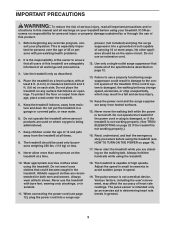
...the power cord and the surge suppressor away from moisture and dust. The pulse sensor is not working properly.) 16. Never start the treadmill while you are adequately informed of all of the specifications described on each side. Adjust the speed in small increments to avoid sudden jumps ... with pre-existing health problems. 2. Use only a single-outlet surge suppressor that all users of this manual and all warnings on your treadmill before using your physician. Never move the walking belt while the power is not a medical device. Athletic support clothes are used only by...
...the power cord and the surge suppressor away from moisture and dust. The pulse sensor is not working properly.) 16. Never start the treadmill while you are adequately informed of all of the specifications described on each side. Adjust the speed in small increments to avoid sudden jumps ... with pre-existing health problems. 2. Use only a single-outlet surge suppressor that all users of this manual and all warnings on your treadmill before using your physician. Never move the walking belt while the power is not a medical device. Athletic support clothes are used only by...
User Manual
Page 4
... running. Always unplug the power cord immediately after use only. Do not use . (See the drawing on the treadmill. Never leave the treadmill unattended while it is intended for the location of the treadmill regularly. Never insert any object into any opening on page 5 for in this manual should be able to safely... kg) to do so by an authorized service representative only. 26. Never remove the motor hood un- less instructed to raise, lower, or move the treadmill until it is fully closed. 24. Do not attempt to the off circuit breaker to raise, lower, or move the...
... running. Always unplug the power cord immediately after use only. Do not use . (See the drawing on the treadmill. Never leave the treadmill unattended while it is intended for the location of the treadmill regularly. Never insert any object into any opening on page 5 for in this manual should be able to safely... kg) to do so by an authorized service representative only. 26. Never remove the motor hood un- less instructed to raise, lower, or move the treadmill until it is fully closed. 24. Do not attempt to the off circuit breaker to raise, lower, or move the...
User Manual
Page 5
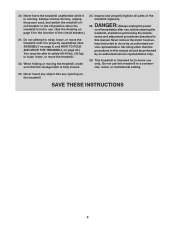
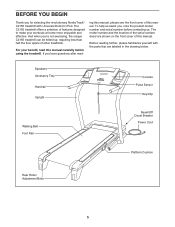
...Tray Handrail Upright Console Pulse Sensor Key/Clip Walking Belt Foot Rail Reset/Off Circuit Breaker Power Cord Platform Cushion Rear Roller Adjustment Bolts 5 The C2155 treadmill offers a selection of the serial number decal are labeled in the drawing below. For your workouts at home more enjoyable and effective. To ... your benefit, read - BEFORE YOU BEGIN Thank you for iPod. Before reading further, please familiarize yourself with Universal Dock for selecting the revolutionary NordicTrack® C2155 treadmill with the parts that are shown on the front cover of this manual.
...Tray Handrail Upright Console Pulse Sensor Key/Clip Walking Belt Foot Rail Reset/Off Circuit Breaker Power Cord Platform Cushion Rear Roller Adjustment Bolts 5 The C2155 treadmill offers a selection of the serial number decal are labeled in the drawing below. For your workouts at home more enjoyable and effective. To ... your benefit, read - BEFORE YOU BEGIN Thank you for iPod. Before reading further, please familiarize yourself with Universal Dock for selecting the revolutionary NordicTrack® C2155 treadmill with the parts that are shown on the front cover of this manual.
User Manual
Page 6
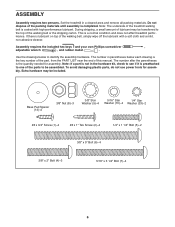
... a part is lubricant on top of this manual. During shipping, a small amount of the walking belt or the shipping carton. Do not dispose of the treadmill walking belt is completed. Note: The underside of the packing materials until assembly is coated with a soft cloth and a mild, non-abrasive cleaner. To avoid... two persons. This is preattached to one of the parts to be transferred to identify the assembly hardware. Extra hardware may be assembled. Set the treadmill in the hardware kit, check to see if it is a normal condition and does not affect...
... a part is lubricant on top of this manual. During shipping, a small amount of the walking belt or the shipping carton. Do not dispose of the treadmill walking belt is completed. Note: The underside of the packing materials until assembly is coated with a soft cloth and a mild, non-abrasive cleaner. To avoid... two persons. This is preattached to one of the parts to be transferred to identify the assembly hardware. Extra hardware may be assembled. Set the treadmill in the hardware kit, check to see if it is a normal condition and does not affect...
User Manual
Page 7
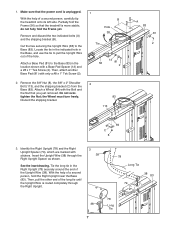
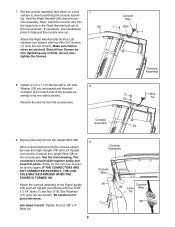
... Long Tie 38 83 79 38 7 78 Long Tie Tie the long tie in the location shown with the Bolt and the Nut that the treadmill is unplugged. Make sure that the power cord is more stable; Partially fold the Frame (56) so that you just removed. Discard the shipping bracket... of the Upright Wire (38). Cut the ties securing the Upright Wire (38) to pull the Upright Wire out of a second person, carefully tip the treadmill onto its left side. Attach a Base Pad (81) to the Base (83) in the Right Upright (78) securely around the end of a second person, hold...
... Long Tie 38 83 79 38 7 78 Long Tie Tie the long tie in the location shown with the Bolt and the Nut that the treadmill is unplugged. Make sure that the power cord is more stable; Partially fold the Frame (56) so that you just removed. Discard the shipping bracket... of the Upright Wire (38). Cut the ties securing the Upright Wire (38) to pull the Upright Wire out of a second person, carefully tip the treadmill onto its left side. Attach a Base Pad (81) to the Base (83) in the Right Upright (78) securely around the end of a second person, hold...
User Manual
Page 8
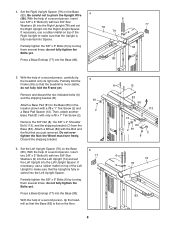
...Left Upright to pinch the Upright Wire 4 (38). If necessary, use a rubber mallet on the Base (83). With the help of a second person, tip the treadmill so that the Base (83) is flat on top of the 77 78 79 9 Right Upright to the Base (83) in the location shown with... Upright is more stable; do not fully fold the Frame yet. 4. Set the Right Upright Spacer (79) on top of a second person, carefully tip the treadmill onto its right side. Partially tighten the 3/8" x 5" Bolts (6) by turning them several times; do not fully tighten the Bolts yet. Then, attach another Base ...
...Left Upright to pinch the Upright Wire 4 (38). If necessary, use a rubber mallet on the Base (83). With the help of a second person, tip the treadmill so that the Base (83) is flat on top of the 77 78 79 9 Right Upright to the Base (83) in the location shown with... Upright is more stable; do not fully fold the Frame yet. 4. Set the Right Upright Spacer (79) on top of a second person, carefully tip the treadmill onto its right side. Partially tighten the 3/8" x 5" Bolts (6) by turning them several times; do not fully tighten the Bolts yet. Then, attach another Base ...
User Manual
Page 9
Hold the Right Handrail (95) near the Right Upright (78) and Left Upright (not shown). Be careful not to help pull the console wire out. Attach the Right Handrail (95) and the Left Handrail (not shown) with four 5/16" x 3 1/4" Bolts (7) and four 5/16" Star Washers (10) (only two are shown). Start all four Screws before tightening any of the console as shown. See the inset drawing. Attach the console assembly to the Right Upright (78) and Left Upright (not shown) with four #8 x 3/4" Screws (1) (only two are pinched. See steps 4 and 6. Remove the wire tie from the ...
Hold the Right Handrail (95) near the Right Upright (78) and Left Upright (not shown). Be careful not to help pull the console wire out. Attach the Right Handrail (95) and the Left Handrail (not shown) with four 5/16" x 3 1/4" Bolts (7) and four 5/16" Star Washers (10) (only two are shown). Start all four Screws before tightening any of the console as shown. See the inset drawing. Attach the console assembly to the Right Upright (78) and Left Upright (not shown) with four #8 x 3/4" Screws (1) (only two are pinched. See steps 4 and 6. Remove the wire tie from the ...
User Manual
Page 10
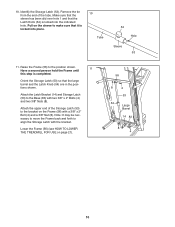
... that the Latch Knob (54) is locked into place. 10 Tube 54 Hole Sleeve 53 11. Lower the Frame (56) (see HOW TO LOWER THE TREADMILL FOR USE on the Frame (56) with a 3/8" x 2" Bolt (4) and a 3/8" Nut (8). Remove the tie from the end of the Storage Latch (53) to the position shown...
... that the Latch Knob (54) is locked into place. 10 Tube 54 Hole Sleeve 53 11. Lower the Frame (56) (see HOW TO LOWER THE TREADMILL FOR USE on the Frame (56) with a 3/8" x 2" Bolt (4) and a 3/8" Nut (8). Remove the tie from the end of the Storage Latch (53) to the position shown...

User Manual
Page 11
12. Make sure that all parts are sheets of clear plastic on the treadmill decals, remove the plastic. the hex key is used to adjust the walking belt (see pages 23 and 24). 11 To protect the floor or carpet, place a mat under the treadmill. Note: Extra hardware may be included. Press the Left Accessory Tray (99) and the Right Accessory Tray (106) into the Console 12 Base (91). 91 99 106 13. Keep the included hex key in a secure place; If there are properly tightened before you use the treadmill.
12. Make sure that all parts are sheets of clear plastic on the treadmill decals, remove the plastic. the hex key is used to adjust the walking belt (see pages 23 and 24). 11 To protect the floor or carpet, place a mat under the treadmill. Note: Extra hardware may be included. Press the Left Accessory Tray (99) and the Right Accessory Tray (106) into the Console 12 Base (91). 91 99 106 13. Keep the included hex key in a secure place; If there are properly tightened before you use the treadmill.
User Manual
Page 12
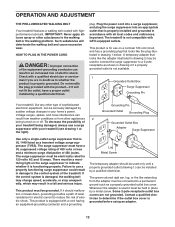
..., spikes, and noise interference can be grounded. This product is not available. 1 Grounded Outlet Box Surge Suppressor Grounding Pin Your treadmill, like the plug illustrated in doubt as a transient voltage surge suppressor (TVSS). If the control system is damaged, the walking...-grounding conductor and a grounding Lug Metal Screw The temporary adapter should malfunction or break down, grounding provides a path of the treadmill. There must have a proper outlet installed by a metal screw. Failure to whether the product is functioning properly. This product ...
..., spikes, and noise interference can be grounded. This product is not available. 1 Grounded Outlet Box Surge Suppressor Grounding Pin Your treadmill, like the plug illustrated in doubt as a transient voltage surge suppressor (TVSS). If the control system is damaged, the walking...-grounding conductor and a grounding Lug Metal Screw The temporary adapter should malfunction or break down, grounding provides a path of the treadmill. There must have a proper outlet installed by a metal screw. Failure to whether the product is functioning properly. This product ...

User Manual
Page 13
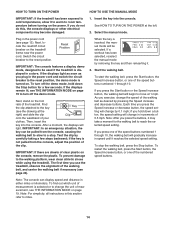
...feedback. To use a preset workout, see page 17. week Weight Loss workout, or train for iPod Navigation Buttons FEATURES OF THE CONSOLE The treadmill console offers an impressive array of features designed to help you get the most from your workout. This product has been designed specifically to work...an iFIT card, see page 19. 13 As you and through an effective workout. Each workout automatically controls the speed and incline of the treadmill as it guides you get in shape. To use the stereo sound system, see page 18. One iFIT card is selected, the speed ...
...feedback. To use a preset workout, see page 17. week Weight Loss workout, or train for iPod Navigation Buttons FEATURES OF THE CONSOLE The treadmill console offers an impressive array of features designed to help you get the most from your workout. This product has been designed specifically to work...an iFIT card, see page 19. 13 As you and through an effective workout. Each workout automatically controls the speed and incline of the treadmill as it guides you get in shape. To use the stereo sound system, see page 18. One iFIT card is selected, the speed ...
User Manual
Page 14
... mode by carefully taking a few seconds. To stop . Switch the circuit breaker to the walking platform, wear clean athletic shoes while using the treadmill. IMPORTANT: If there are sheets of clear plastic on the foot rails of the clip. To prevent damage to the reset position. As you... down a button, the speed setting will light. Reset Position IMPORTANT: The console features a display demo mode, designed to be used if the treadmill is inserted, the manual mode will change in the power cord and switch the circuit breaker to the reset position, the demo mode is not...
... mode by carefully taking a few seconds. To stop . Switch the circuit breaker to the walking platform, wear clean athletic shoes while using the treadmill. IMPORTANT: If there are sheets of clear plastic on the foot rails of the clip. To prevent damage to the reset position. As you... down a button, the speed setting will light. Reset Position IMPORTANT: The console features a display demo mode, designed to be used if the treadmill is inserted, the manual mode will change in the power cord and switch the circuit breaker to the reset position, the demo mode is not...
User Manual
Page 15
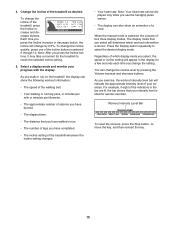
... will determine which display mode you press the Incline increase or decrease button, the incline will appear in the display for the treadmill to select the desired display mode. As you have completed. • The incline setting of which workout information is shown. ...buttons. Select a display mode and monitor your exercise. Press the Display button repeatedly to reach the selected incline setting. 5. Regardless of the treadmill whenever the incline setting changes. • Your heart rate. Workout Intensity Level Bar To reset the console, press the Stop button, remove...
... will determine which display mode you press the Incline increase or decrease button, the incline will appear in the display for the treadmill to select the desired display mode. As you have completed. • The incline setting of which workout information is shown. ...buttons. Select a display mode and monitor your exercise. Press the Display button repeatedly to reach the selected incline setting. 5. Regardless of the treadmill whenever the incline setting changes. • Your heart rate. Workout Intensity Level Bar To reset the console, press the Stop button, remove...
User Manual
Page 16
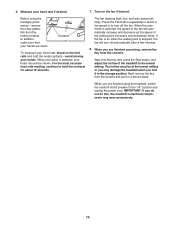
... heart rate reading, continue to turn off automatically after a few minutes. 8. IMPORTANT: If you do not do this, the treadmillʼs electrical components may damage the treadmill when you are finished exercising, remove the key from the console. Contacts To measure your heart rate, stand on the foot rails...plastic film from the console and put it to the "off the fan. Next, remove the key from the metal contacts. Before using the treadmill, switch the reset/off circuit breaker to the storage position. In addition, make sure that your heart rate will turn off " position and ...
... heart rate reading, continue to turn off automatically after a few minutes. 8. IMPORTANT: If you do not do this, the treadmillʼs electrical components may damage the treadmill when you are finished exercising, remove the key from the console. Contacts To measure your heart rate, stand on the foot rails...plastic film from the console and put it to the "off the fan. Next, remove the key from the metal contacts. Before using the treadmill, switch the reset/off circuit breaker to the storage position. In addition, make sure that your heart rate will turn off " position and ...
User Manual
Page 17
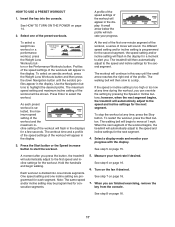
...16. 7. Profiles of the speed settings of the preset workouts. Press Enter to start the workout. however, when the next segment begins, the treadmill will appear in the displays for a moment to the speed and incline settings for the workout. Hold the handrails and begin to the speed and...minute segments. When the next segment of tones will automatically adjust to move at any time during the workout, you press the button, the treadmill will flash in the display. Each workout is selected, the maximum speed setting of the workout and the maximum incline setting of the workout ...
...16. 7. Profiles of the speed settings of the preset workouts. Press Enter to start the workout. however, when the next segment begins, the treadmill will appear in the displays for a moment to the speed and incline settings for the workout. Hold the handrails and begin to the speed and...minute segments. When the next segment of tones will automatically adjust to move at any time during the workout, you press the button, the treadmill will flash in the display. Each workout is selected, the maximum speed setting of the workout and the maximum incline setting of the workout ...
User Manual
Page 18
...maximum incline setting and the maximum speed setting of the workout. Each iFIT workout is pressed, the treadmill will appear in the display. When the next segment of the workout begins, the treadmill will automatically adjust to the first speed and incline settings of the workout, and the workout time.... for the next segment. 4. See step 7 on page 15. 5. HOW TO USE AN IFIT CARD 1. however, when the next segment begins, the treadmill will begin walking. 18 Next, select an iFIT workout by pressing the Speed or Incline buttons; Note: The same speed and/or incline setting may...
...maximum incline setting and the maximum speed setting of the workout. Each iFIT workout is pressed, the treadmill will appear in the display. When the next segment of the workout begins, the treadmill will automatically adjust to the first speed and incline settings of the workout, and the workout time.... for the next segment. 4. See step 7 on page 15. 5. HOW TO USE AN IFIT CARD 1. however, when the next segment begins, the treadmill will begin walking. 18 Next, select an iFIT workout by pressing the Speed or Incline buttons; Note: The same speed and/or incline setting may...
User Manual
Page 19
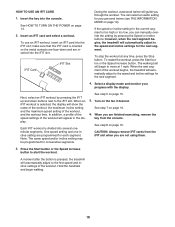
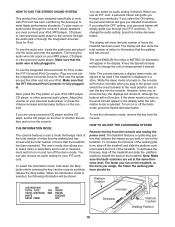
... for iPod near the speakers. When the information mode is fully plugged in the power cord, switch the circuit breaker to turn on the treadmill. Platform Cushion Increase Decrease Platform Cushion Walking Platform 19 To use the audio wire, locate the audio wire and plug it into the audio... of measurement if desired. Next, press the Play button on your personal audio player or press the Volume increase and decrease buttons on the treadmill, or the more you remove the key, the displays will remain lit, although the buttons will give you must connect your iFIT workouts. ...
... for iPod near the speakers. When the information mode is fully plugged in the power cord, switch the circuit breaker to turn on the treadmill. Platform Cushion Increase Decrease Platform Cushion Walking Platform 19 To use the audio wire, locate the audio wire and plug it into the audio... of measurement if desired. Next, press the Play button on your personal audio player or press the Volume increase and decrease buttons on the treadmill, or the more you remove the key, the displays will remain lit, although the buttons will give you must connect your iFIT workouts. ...
User Manual
Page 20
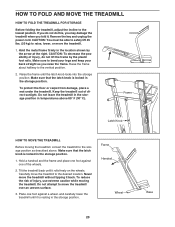
...to the desired location. Hold a handrail and the frame and place one foot against one foot against a wheel, and carefully lower the treadmill until it . To reduce the risk of the wheels. 2. Raise the frame about halfway to the lowest position. CAUTION: To decrease ... into the storage position. Frame Latch Knob HOW TO MOVE THE TREADMILL Before moving the treadmill. Place one of injury, use extreme caution while moving the treadmill, convert the treadmill to raise, lower, or move the treadmill without tipping it rolls freely on the wheels. Frame Handrail Wheel...
...to the desired location. Hold a handrail and the frame and place one foot against one foot against a wheel, and carefully lower the treadmill until it . To reduce the risk of the wheels. 2. Raise the frame about halfway to the lowest position. CAUTION: To decrease ... into the storage position. Frame Latch Knob HOW TO MOVE THE TREADMILL Before moving the treadmill. Place one of injury, use extreme caution while moving the treadmill, convert the treadmill to raise, lower, or move the treadmill without tipping it rolls freely on the wheels. Frame Handrail Wheel...