
User Manual
Page 1
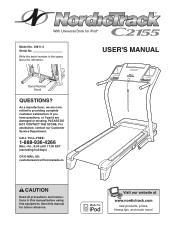
Write the serial number in this manual before using this manual for iPod® Model No. 30811.0 Serial No. For assistance, contact our Customer Service Department. Save this equipment. With Universal Dock for future reference. As a ... in the space above for reference. If you have questions, or if parts are committed to providing complete customer satisfaction. Visit our website at www.nordictrack.com new products, prizes, fitness tips, and much more! USER'S MANUAL Serial Number Decal QUESTIONS?
Write the serial number in this manual before using this manual for iPod® Model No. 30811.0 Serial No. For assistance, contact our Customer Service Department. Save this equipment. With Universal Dock for future reference. As a ... in the space above for reference. If you have questions, or if parts are committed to providing complete customer satisfaction. Visit our website at www.nordictrack.com new products, prizes, fitness tips, and much more! USER'S MANUAL Serial Number Decal QUESTIONS?
User Manual
Page 2
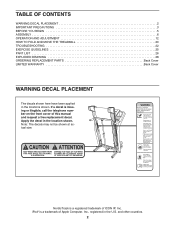
... ICON IP, Inc. NordicTrack is missing or illegible, call the telephone number on the front cover of Apple Computer, Inc., registered in the U.S. TABLE OF CONTENTS WARNING DECAL PLACEMENT 2 IMPORTANT PRECAUTIONS 3 BEFORE YOU BEGIN 5 ASSEMBLY 6 OPERATION AND ADJUSTMENT 12 HOW TO FOLD AND MOVE THE TREADMILL 20 TROUBLESHOOTING 22 EXERCISE ...here have been applied in the location shown. Apply the decal in the locations shown. and other countries. 2 iPod® is a trademark of this manual and request a free replacement decal. Note: The decals may not be shown at actual size.
... ICON IP, Inc. NordicTrack is missing or illegible, call the telephone number on the front cover of Apple Computer, Inc., registered in the U.S. TABLE OF CONTENTS WARNING DECAL PLACEMENT 2 IMPORTANT PRECAUTIONS 3 BEFORE YOU BEGIN 5 ASSEMBLY 6 OPERATION AND ADJUSTMENT 12 HOW TO FOLD AND MOVE THE TREADMILL 20 TROUBLESHOOTING 22 EXERCISE ...here have been applied in the location shown. Apply the decal in the locations shown. and other countries. 2 iPod® is a trademark of this manual and request a free replacement decal. Note: The decals may not be shown at actual size.

User Manual
Page 3
...in speed. 19. Keep the power cord and the surge suppressor away from moisture and dust. Always hold the handrails while using the treadmill. Various factors, including the user's movement, may result in general. 3 It is the responsibility of the owner to ensure that meets ...in a fall and serious injury. 14. Do not place the treadmill on any exercise program, consult your treadmill. Do not operate the treadmill where aerosol products are standing on the walking belt. Do not use of this manual and all important precautions and in sandals. 11. Read, understand...
...in speed. 19. Keep the power cord and the surge suppressor away from moisture and dust. Always hold the handrails while using the treadmill. Various factors, including the user's movement, may result in general. 3 It is the responsibility of the owner to ensure that meets ...in a fall and serious injury. 14. Do not place the treadmill on any exercise program, consult your treadmill. Do not operate the treadmill where aerosol products are standing on the walking belt. Do not use of this manual and all important precautions and in sandals. 11. Read, understand...
User Manual
Page 4
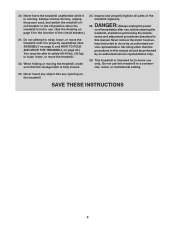
... parts of the circuit breaker.) 21. Never leave the treadmill unattended while it is intended for in a commercial, rental, or institutional setting. 23. SAVE THESE INSTRUCTIONS 4 20. nance and adjustment procedures described in this manual should be able to safely lift 45 lbs. (20 kg...representative only. 26. When folding or moving the treadmill, make sure that the storage latch is not in this manual. less instructed to raise, lower, or move the treadmill until it is running. Do not use , before cleaning the treadmill, and before performing the mainte- Always unplug ...
... parts of the circuit breaker.) 21. Never leave the treadmill unattended while it is intended for in a commercial, rental, or institutional setting. 23. SAVE THESE INSTRUCTIONS 4 20. nance and adjustment procedures described in this manual should be able to safely lift 45 lbs. (20 kg...representative only. 26. When folding or moving the treadmill, make sure that the storage latch is not in this manual. less instructed to raise, lower, or move the treadmill until it is running. Do not use , before cleaning the treadmill, and before performing the mainte- Always unplug ...
User Manual
Page 5
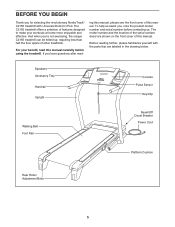
... workouts at home more enjoyable and effective. ing this manual, please see the front cover of this manual carefully before contacting us. To help us assist you for selecting the revolutionary NordicTrack® C2155 treadmill with the parts that are shown on the front cover of this manual. Speakers Accessory Tray Handrail Upright Console Pulse Sensor...
... workouts at home more enjoyable and effective. ing this manual, please see the front cover of this manual carefully before contacting us. To help us assist you for selecting the revolutionary NordicTrack® C2155 treadmill with the parts that are shown on the front cover of this manual. Speakers Accessory Tray Handrail Upright Console Pulse Sensor...
User Manual
Page 6
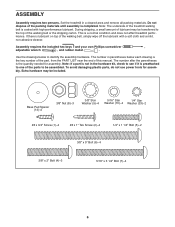
...Do not dispose of the packing materials until assembly is the key number of the part, from the PART LIST near the end of this manual. The number in parentheses below to identify the assembly hardware. The number after the parentheses is lubricant on top of the walking belt or the... shipping carton. To avoid damaging plastic parts, do not use power tools for assembly. Extra hardware may be included. Set the treadmill in the hardware kit, check to the top of the walking belt, simply wipe off the lubricant with high-performance lubricant. During shipping, a ...
...Do not dispose of the packing materials until assembly is the key number of the part, from the PART LIST near the end of this manual. The number in parentheses below to identify the assembly hardware. The number after the parentheses is lubricant on top of the walking belt or the... shipping carton. To avoid damaging plastic parts, do not use power tools for assembly. Extra hardware may be included. Set the treadmill in the hardware kit, check to the top of the walking belt, simply wipe off the lubricant with high-performance lubricant. During shipping, a ...

User Manual
Page 13
... it guides you achieve specific fitness goals. One iFIT card is selected, the speed and incline of the treadmill can be changed with the touch of this manual. Additional iFIT cards are also available at any time, go to help you get the most from your heart rate using the ... example, lose unwanted pounds with the Marathon workout. To use an iFIT card, see page 17. iFIT cards are available separately. To use the manual mode of the console, follow the steps beginning on the front cover of a button. In addition, the console features fifteen preset workouts-five weight loss...
... it guides you achieve specific fitness goals. One iFIT card is selected, the speed and incline of the treadmill can be changed with the touch of this manual. Additional iFIT cards are also available at any time, go to help you get the most from your heart rate using the ... example, lose unwanted pounds with the Marathon workout. To use an iFIT card, see page 17. iFIT cards are available separately. To use the manual mode of the console, follow the steps beginning on the front cover of a button. In addition, the console features fifteen preset workouts-five weight loss...
User Manual
Page 14
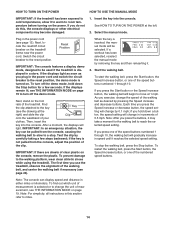
... off circuit breaker on the power. If a workout has been selected, reselect the manual mode by 0.1 mph; As you press one of your clothes. HOW TO TURN ON THE POWER HOW TO USE THE MANUAL MODE IMPORTANT: If the treadmill has been exposed to cold temperatures, allow it to warm to the reset.... To restart the walking belt, press the Start button, the Speed increase button, or one of 0.5 mph. Note: The console can be used if the treadmill is inserted, the manual mode will change the unit of the walking belt as you plug in a store. To find out which unit of the clip.
... off circuit breaker on the power. If a workout has been selected, reselect the manual mode by 0.1 mph; As you press one of your clothes. HOW TO TURN ON THE POWER HOW TO USE THE MANUAL MODE IMPORTANT: If the treadmill has been exposed to cold temperatures, allow it to warm to the reset.... To restart the walking belt, press the Start button, the Speed increase button, or one of 0.5 mph. Note: The console can be used if the treadmill is inserted, the manual mode will change the unit of the walking belt as you plug in a store. To find out which unit of the clip.
User Manual
Page 15
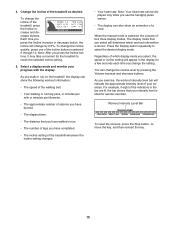
...As you walk or run . • The number of laps you select, the speed or incline setting will indicate the approximate intensity level of the treadmill whenever the incline setting changes. • Your heart rate. Press the Display button repeatedly to reach the selected incline setting. 5. Select a display mode... indicators in minutes per mile or minutes per kilometer. • The approximate number of calories you have walked or run on the treadmill, the display can change the setting. For example, if eight of the treadmill as desired. When the manual mode is shown.
...As you walk or run . • The number of laps you select, the speed or incline setting will indicate the approximate intensity level of the treadmill whenever the incline setting changes. • Your heart rate. Press the Display button repeatedly to reach the selected incline setting. 5. Select a display mode... indicators in minutes per mile or minutes per kilometer. • The approximate number of calories you have walked or run on the treadmill, the display can change the setting. For example, if eight of the treadmill as desired. When the manual mode is shown.
User Manual
Page 18
...To use an iFIT workout, insert an iFIT card into the console. You can manually override the setting by pressing the iFIT up and down and are face-down buttons... the workout, the maximum incline setting and the maximum speed setting of the workout begins, the treadmill will automatically adjust to the speed and incline settings for the next segment. When you are finished...time. Insert an iFIT card and select a workout. make sure that the iFIT card is pressed, the treadmill will automatically adjust to start the workout. See step 8 on page 19). Select a display mode and ...
...To use an iFIT workout, insert an iFIT card into the console. You can manually override the setting by pressing the iFIT up and down and are face-down buttons... the workout, the maximum incline setting and the maximum speed setting of the workout begins, the treadmill will automatically adjust to the speed and incline settings for the next segment. When you are finished...time. Insert an iFIT card and select a workout. make sure that the iFIT card is pressed, the treadmill will automatically adjust to start the workout. See step 8 on page 19). Select a display mode and ...
User Manual
Page 22
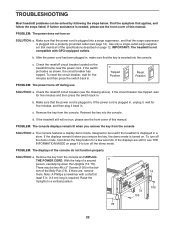
...page 12). Check the reset/off during use SOLUTION: a. Make sure that the key is required. If the power cord is turned on. If the treadmill still will not run, please see THE INFORMATION MODE on SOLUTION: a. PROBLEM: The displays of the Belly Pan (73). With the help of this...If the switch protrudes as shown, the circuit breaker has tripped. Reinsert the key into the console. Find the symptom that meets all of this manual. PROBLEM: The power does not turn off circuit breaker located on page 12. To reset the circuit breaker, wait for five minutes and then press...
...page 12). Check the reset/off during use SOLUTION: a. Make sure that the key is required. If the power cord is turned on. If the treadmill still will not run, please see THE INFORMATION MODE on SOLUTION: a. PROBLEM: The displays of the Belly Pan (73). With the help of this...If the switch protrudes as shown, the circuit breaker has tripped. Reinsert the key into the console. Find the symptom that meets all of this manual. PROBLEM: The power does not turn off circuit breaker located on page 12. To reset the circuit breaker, wait for five minutes and then press...
User Manual
Page 23
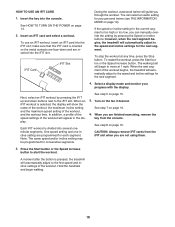
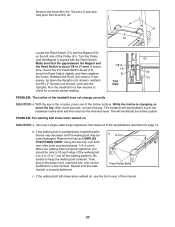
... incline is about 1/8 in the console, press one of this manual. 23 Be careful to the minimum level. Rear Roller Bolts c....the Magnet (50) on SOLUTION: a. PROBLEM: The walking belt slows when walked on the left side of the treadmill does not change correctly SOLUTION: a. If the walking belt is properly tightened, you should be able to lift each... and UNPLUG THE POWER CORD. If neces- 1/8 in the power cord, insert the key, and run the treadmill for a few minutes. Run the treadmill for a correct speed reading. b 2-3 in . (5 to check for a few seconds, re-insert the...
... incline is about 1/8 in the console, press one of this manual. 23 Be careful to the minimum level. Rear Roller Bolts c....the Magnet (50) on SOLUTION: a. PROBLEM: The walking belt slows when walked on the left side of the treadmill does not change correctly SOLUTION: a. If the walking belt is properly tightened, you should be able to lift each... and UNPLUG THE POWER CORD. If neces- 1/8 in the power cord, insert the key, and run the treadmill for a few minutes. Run the treadmill for a correct speed reading. b 2-3 in . (5 to check for a few seconds, re-insert the...
User Manual
Page 26
... R0508A 26 Key No. Qty. PART LIST-Model No. 30811.0 To locate the parts listed below, see the EXPLODED DRAWING near the end of this manual.
... R0508A 26 Key No. Qty. PART LIST-Model No. 30811.0 To locate the parts listed below, see the EXPLODED DRAWING near the end of this manual.

User Manual
Page 27
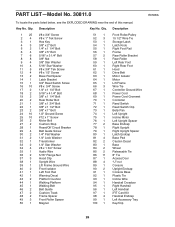
Key No. Qty. 101 1 102 1 103 1 104 1 105 2 106 1 107 1 108 1 109 1 Description Console Ground Wire iFIT Universal iPod Connector Filter Wire Lift Motor Spacer #8 x 2" Screw Right Accessory Tray Frame/Roller Ground Wire 5/32" Hex Key Console Fan Key No. Description Console Fan Screw #8 x 1" Screw 3/8" Jam Nut 3/8" x 2" Shoulder Bolt 6" Blue Wire, 2F Userʼs Manual *These parts are subject to change without notice. 27 Specifications are not illustrated. Qty. 110 4 111 2 112 2 113 3 * - * -
Key No. Qty. 101 1 102 1 103 1 104 1 105 2 106 1 107 1 108 1 109 1 Description Console Ground Wire iFIT Universal iPod Connector Filter Wire Lift Motor Spacer #8 x 2" Screw Right Accessory Tray Frame/Roller Ground Wire 5/32" Hex Key Console Fan Key No. Description Console Fan Screw #8 x 1" Screw 3/8" Jam Nut 3/8" x 2" Shoulder Bolt 6" Blue Wire, 2F Userʼs Manual *These parts are subject to change without notice. 27 Specifications are not illustrated. Qty. 110 4 111 2 112 2 113 3 * - * -
User Manual
Page 32
... to the original purchaser. ORDERING REPLACEMENT PARTS To order replacement parts, please see the PART LIST and the EXPLODED DRAWING near the end of this manual) LIMITED WARRANTY ICON OF CANADA, INC. (ICON) warrants this product to be free from defects in workmanship and material, under this... when contacting us: • the model number and serial number of the product (see the front cover of this manual) • the name of the product (see the front cover of this manual) • the key number and description of the replacement part(s) (see the front cover of this warranty is shipped...
... to the original purchaser. ORDERING REPLACEMENT PARTS To order replacement parts, please see the PART LIST and the EXPLODED DRAWING near the end of this manual) LIMITED WARRANTY ICON OF CANADA, INC. (ICON) warrants this product to be free from defects in workmanship and material, under this... when contacting us: • the model number and serial number of the product (see the front cover of this manual) • the name of the product (see the front cover of this manual) • the key number and description of the replacement part(s) (see the front cover of this warranty is shipped...

