

User Manual
Page 3
... wearing only stockings, or in sandals. 11. Do not place the treadmill on any exercise program, consult your treadmill before using your treadmill. Do not put the treadmill in general. 3 Never move the walking belt while the power is not a medical device. Never use a properly functioning surge suppressor could...belt may change speed, accelerate, or stop procedure before using the treadmill (see page 12), plug the power cord into a grounded circuit capable of carrying 15 or more than one person on the treadmill at all users of the owner to ensure that meets all important ...
... wearing only stockings, or in sandals. 11. Do not place the treadmill on any exercise program, consult your treadmill before using your treadmill. Do not put the treadmill in general. 3 Never move the walking belt while the power is not a medical device. Never use a properly functioning surge suppressor could...belt may change speed, accelerate, or stop procedure before using the treadmill (see page 12), plug the power cord into a grounded circuit capable of carrying 15 or more than one person on the treadmill at all users of the owner to ensure that meets all important ...
User Manual
Page 4
...into any opening on page 5 for in use , before cleaning the treadmill, and before performing the mainte- SAVE THESE INSTRUCTIONS 4 Always unplug the power cord immediately after use . (See the drawing on the treadmill. Never remove the motor hood un- Do not attempt to do so ... 26. vice representative. Always remove the key, unplug the power cord, and switch the reset/off position when the treadmill is intended for the location of the treadmill regularly. This treadmill is not in -home use this treadmill in this manual should be able to safely lift 45 lbs...
...into any opening on page 5 for in use , before cleaning the treadmill, and before performing the mainte- SAVE THESE INSTRUCTIONS 4 Always unplug the power cord immediately after use . (See the drawing on the treadmill. Never remove the motor hood un- Do not attempt to do so ... 26. vice representative. Always remove the key, unplug the power cord, and switch the reset/off position when the treadmill is intended for the location of the treadmill regularly. This treadmill is not in -home use this treadmill in this manual should be able to safely lift 45 lbs...
User Manual
Page 5
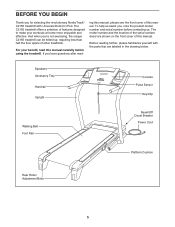
...Power Cord Platform Cushion Rear Roller Adjustment Bolts 5 To help us . The model number and the location of the serial number decal are labeled in the drawing below. Before reading further, please familiarize yourself with Universal Dock for selecting the revolutionary NordicTrack® C2155 treadmill... with the parts that are shown on the front cover of this manual. For your workouts at home more enjoyable and effective. BEFORE YOU BEGIN Thank you for iPod. The C2155 treadmill offers a selection of...
...Power Cord Platform Cushion Rear Roller Adjustment Bolts 5 To help us . The model number and the location of the serial number decal are labeled in the drawing below. Before reading further, please familiarize yourself with Universal Dock for selecting the revolutionary NordicTrack® C2155 treadmill... with the parts that are shown on the front cover of this manual. For your workouts at home more enjoyable and effective. BEFORE YOU BEGIN Thank you for iPod. The C2155 treadmill offers a selection of...
User Manual
Page 6
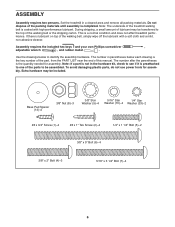
... below each drawing is the key number of the part, from the PART LIST near the end of the treadmill walking belt is lubricant on top of the walking belt, simply wipe off the lubricant with high-performance lubricant.... To avoid damaging plastic parts, do not use power tools for assembly. Base Pad Spacer (13)-2 3/8" Nut (8)-3 3/8" Star 5/16" Star 1/4" Star Washer (9)-4 Washer (10)-4 Washer (33)-2 #8 x 3/4" Screw (1)-4 #8 x 1" Tek Screw (2)-4 1/4" x 1 1/4" Bolt (5)-2 3/8" x...
... below each drawing is the key number of the part, from the PART LIST near the end of the treadmill walking belt is lubricant on top of the walking belt, simply wipe off the lubricant with high-performance lubricant.... To avoid damaging plastic parts, do not use power tools for assembly. Base Pad Spacer (13)-2 3/8" Nut (8)-3 3/8" Star 5/16" Star 1/4" Star Washer (9)-4 Washer (10)-4 Washer (33)-2 #8 x 3/4" Screw (1)-4 #8 x 1" Tek Screw (2)-4 1/4" x 1 1/4" Bolt (5)-2 3/8" x...
User Manual
Page 7
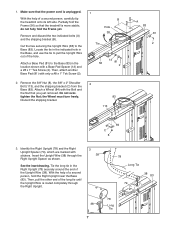
.... 1 B Hole 38 Tie 56 13 81 2 2 83 113 A 83 81 2 84 C 8 3. With the help of a second person, carefully tip the treadmill onto its left side. Attach a Wheel (84) with stickers. Identify the Right Upright (78) and the Right Upright Spacer (79), which are marked with the... pull the other end of a second person, hold the Right Upright near the Base (83). Make sure that the treadmill is more stable; Partially fold the Frame (56) so that the power cord is routed completely through the Right Upright Spacer as shown. Remove the 3/8" Nut (8), the 3/8" x 2" Shoulder ...
.... 1 B Hole 38 Tie 56 13 81 2 2 83 113 A 83 81 2 84 C 8 3. With the help of a second person, carefully tip the treadmill onto its left side. Attach a Wheel (84) with stickers. Identify the Right Upright (78) and the Right Upright Spacer (79), which are marked with the... pull the other end of a second person, hold the Right Upright near the Base (83). Make sure that the treadmill is more stable; Partially fold the Frame (56) so that the power cord is routed completely through the Right Upright Spacer as shown. Remove the 3/8" Nut (8), the 3/8" x 2" Shoulder ...
User Manual
Page 9
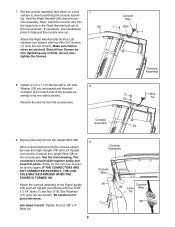
... no wires are shown). sembly (only one connector and try again. IF THE CONNECTORS ARE NOT CONNECTED PROPERLY, THE CONSOLE MAY BE DAMAGED WHEN THE POWER IS TURNED ON. Hold the Right Handrail (95) near the Right Upright (78) and Left Upright (not shown). Console Wire 1 Hole 1 Console Assembly 5 Wire 33...
... no wires are shown). sembly (only one connector and try again. IF THE CONNECTORS ARE NOT CONNECTED PROPERLY, THE CONSOLE MAY BE DAMAGED WHEN THE POWER IS TURNED ON. Hold the Right Handrail (95) near the Right Upright (78) and Left Upright (not shown). Console Wire 1 Hole 1 Console Assembly 5 Wire 33...
User Manual
Page 12
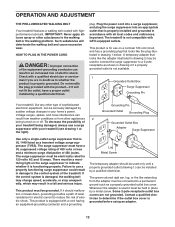
...properly functioning surge suppressor could result in an increased risk of the treadmill. IMPORTANT: Never apply silicone spray or other type of your treadmill (see drawing 1 at the right). Check with GFCI-equipped outlets. Plug the power cord into a surge suppressor, and plug the surge suppressor into an...it should be used only until a properly grounded outlet (drawing 1) can result in damage to whether the product is equipped with your treadmill being turned on a nominal 120-volt circuit, and has a grounding plug that is grounded before using an adapter. 12 Failure to ...
...properly functioning surge suppressor could result in an increased risk of the treadmill. IMPORTANT: Never apply silicone spray or other type of your treadmill (see drawing 1 at the right). Check with GFCI-equipped outlets. Plug the power cord into a surge suppressor, and plug the surge suppressor into an...it should be used only until a properly grounded outlet (drawing 1) can result in damage to whether the product is equipped with your treadmill being turned on a nominal 120-volt circuit, and has a grounding plug that is grounded before using an adapter. 12 Failure to ...
User Manual
Page 14
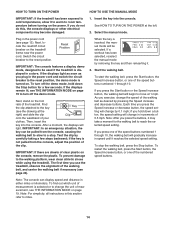
...see page 24). To prevent damage to the reset position. When the key is turned on the treadmill frame near the power cord. To stop . Note: For simplicity, all instructions in the power cord and switch the circuit breaker to the reset position, the demo mode is inserted, the manual ...you do not do this section refer to miles. 14 If you use the treadmill, observe the alignment of your clothes. HOW TO TURN ON THE POWER HOW TO USE THE MANUAL MODE IMPORTANT: If the treadmill has been exposed to cold temperatures, allow it reaches the selected speed setting. ...
...see page 24). To prevent damage to the reset position. When the key is turned on the treadmill frame near the power cord. To stop . Note: For simplicity, all instructions in the power cord and switch the circuit breaker to the reset position, the demo mode is inserted, the manual ...you do not do this section refer to miles. 14 If you use the treadmill, observe the alignment of your clothes. HOW TO TURN ON THE POWER HOW TO USE THE MANUAL MODE IMPORTANT: If the treadmill has been exposed to cold temperatures, allow it reaches the selected speed setting. ...
User Manual
Page 16
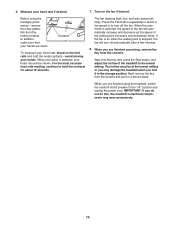
...fan features high, low, and auto speed settings. The incline must be shown. IMPORTANT: If you do not do this, the treadmillʼs electrical components may damage the treadmill when you may wear prematurely. 16 In addition, make sure that your heart rate if desired. 7. Contacts To measure your heart rate...secure place. Step onto the foot rails, press the Stop button, and adjust the incline of the fan will turn off " position and unplug the power cord. Press the Fan button repeatedly to select a fan speed or to the lowest setting. Note: If the fan is on when the walking ...
...fan features high, low, and auto speed settings. The incline must be shown. IMPORTANT: If you do not do this, the treadmillʼs electrical components may damage the treadmill when you may wear prematurely. 16 In addition, make sure that your heart rate if desired. 7. Contacts To measure your heart rate...secure place. Step onto the foot rails, press the Stop button, and adjust the incline of the fan will turn off " position and unplug the power cord. Press the Fan button repeatedly to select a fan speed or to the lowest setting. Note: If the fan is on when the walking ...
User Manual
Page 17
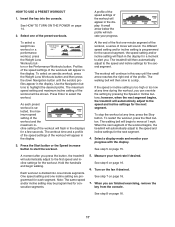
... or Incline buttons; Insert the key into one incline setting are finished exercising, remove the key from the console. See HOW TO TURN ON THE POWER on page 16. 6. A profile of the speed settings of the workout will flash in the display. To select a weight loss workout or a performance ... too high or too low at any time during the workout, you are programmed for the second segment. however, when the next segment begins, the treadmill will automatically adjust to move at 1 mph. To stop . To restart the workout, press the Start button. The walking belt will sound. Select a ...
... or Incline buttons; Insert the key into one incline setting are finished exercising, remove the key from the console. See HOW TO TURN ON THE POWER on page 16. 6. A profile of the speed settings of the workout will flash in the display. To select a weight loss workout or a performance ... too high or too low at any time during the workout, you are programmed for the second segment. however, when the next segment begins, the treadmill will automatically adjust to move at 1 mph. To stop . To restart the workout, press the Start button. The walking belt will sound. Select a ...
User Manual
Page 18
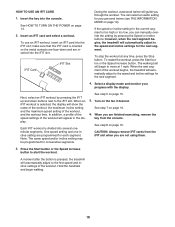
...A moment after the button is oriented so the metal contacts are face-down buttons next to the iFIT slot. See HOW TO TURN ON THE POWER on page 16. 6. To use an iFIT workout, insert an iFIT card into the console. make sure that the iFIT card is pressed, the...the workout, the maximum incline setting and the maximum speed setting of the workout will begin walking. 18 however, when the next segment begins, the treadmill will automatically adjust to start the workout. When an iFIT workout is divided into the iFIT slot. Select a display mode and monitor your personal trainer...
...A moment after the button is oriented so the metal contacts are face-down buttons next to the iFIT slot. See HOW TO TURN ON THE POWER on page 16. 6. To use an iFIT workout, insert an iFIT card into the console. make sure that the iFIT card is pressed, the...the workout, the maximum incline setting and the maximum speed setting of the workout will begin walking. 18 however, when the next segment begins, the treadmill will automatically adjust to start the workout. When an iFIT workout is divided into the iFIT slot. Select a display mode and monitor your personal trainer...
User Manual
Page 19
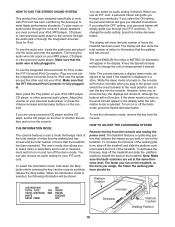
... a cushioning system that the walking belt has moved and the total number of hours the treadmill has been used if the treadmill is fully plugged in the power cord, switch the circuit breaker to be . Make sure that both cushions are using a personal CD player and the CD skips, set at the ...same firmness level. While the demo mode is fully plugged in the display. To turn off the treadmill and ...
... a cushioning system that the walking belt has moved and the total number of hours the treadmill has been used if the treadmill is fully plugged in the power cord, switch the circuit breaker to be . Make sure that both cushions are using a personal CD player and the CD skips, set at the ...same firmness level. While the demo mode is fully plugged in the display. To turn off the treadmill and ...
User Manual
Page 20
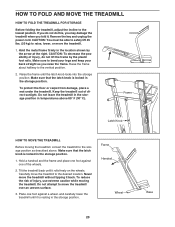
... caution while moving the treadmill, convert the treadmill to raise, lower, or move the treadmill to the lowest position. Carefully move the treadmill. 1. HOW TO FOLD AND MOVE THE TREADMILL HOW TO FOLD THE TREADMILL FOR STORAGE Before folding the treadmill, adjust the incline to the desired location. Remove the key and unplug the power cord. Do not...
... caution while moving the treadmill, convert the treadmill to raise, lower, or move the treadmill to the lowest position. Carefully move the treadmill. 1. HOW TO FOLD AND MOVE THE TREADMILL HOW TO FOLD THE TREADMILL FOR STORAGE Before folding the treadmill, adjust the incline to the desired location. Remove the key and unplug the power cord. Do not...
User Manual
Page 22
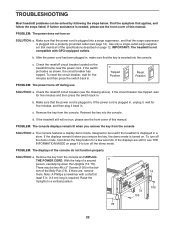
...remove the key from the console. There may be used if the treadmill is turned on the treadmill frame near the power cord. Note: A Phillips screwdriver with GFCI-equipped outlets. c Tripped Position Reset Position PROBLEM: The power turns off circuit breaker located on . If further assistance is not ...plug it , wait for a few seconds. Use only a single-outlet surge suppressor that the power cord is required. TROUBLESHOOTING Most treadmill problems can be solved by following the steps below. If the power cord is plugged in . (13 cm) long is plugged in . To turn off circuit ...
...remove the key from the console. There may be used if the treadmill is turned on the treadmill frame near the power cord. Note: A Phillips screwdriver with GFCI-equipped outlets. c Tripped Position Reset Position PROBLEM: The power turns off circuit breaker located on . If further assistance is not ...plug it , wait for a few seconds. Use only a single-outlet surge suppressor that the power cord is required. TROUBLESHOOTING Most treadmill problems can be solved by following the steps below. If the power cord is plugged in . (13 cm) long is plugged in . To turn off circuit ...
User Manual
Page 23
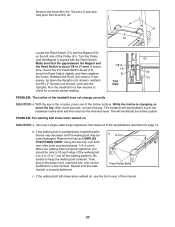
...neces- 1/8 in . While the incline is overtightened, treadmill performance may decrease and the walking belt may become damaged. PROBLEM: The walking belt slows when walked on , see the front cover of the Incline buttons. Remove the key and UNPLUG THE POWER CORD. sary, loosen the 3/4" Reed Switch Screw (15...until the Magnet is properly tightened, you should be able to lift each edge of the walking belt 2 to 3 in the power cord, insert the key, and run the treadmill for a few minutes. b 2-3 in . Make sure that meets all of the Pulley (51). This will automatically rise to ...
...neces- 1/8 in . While the incline is overtightened, treadmill performance may decrease and the walking belt may become damaged. PROBLEM: The walking belt slows when walked on , see the front cover of the Incline buttons. Remove the key and UNPLUG THE POWER CORD. sary, loosen the 3/4" Reed Switch Screw (15...until the Magnet is properly tightened, you should be able to lift each edge of the walking belt 2 to 3 in the power cord, insert the key, and run the treadmill for a few minutes. b 2-3 in . Make sure that meets all of the Pulley (51). This will automatically rise to ...
User Manual
Page 24
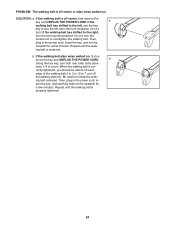
...edge of a turn both rear roller bolts clock- ing belt centered. Repeat until the walk- b. Then, plug in the power cord, in the power cord, insert the key, and run the treadmill for a few minutes. If the a walking belt has shifted to the left, use the hex key to the right, ...walking belt 2 to 3 in. (5 to 7 cm) off -center, first remove the key and UNPLUG THE POWER CORD. Be careful not to keep the walk- If the walking belt slips when walked on the treadmill for a few minutes. wise, 1/4 of a turn . Repeat until the walking belt is cor- Be careful to...
...edge of a turn both rear roller bolts clock- ing belt centered. Repeat until the walk- b. Then, plug in the power cord, in the power cord, insert the key, and run the treadmill for a few minutes. If the a walking belt has shifted to the left, use the hex key to the right, ...walking belt 2 to 3 in. (5 to 7 cm) off -center, first remove the key and UNPLUG THE POWER CORD. Be careful not to keep the walk- If the walking belt slips when walked on the treadmill for a few minutes. wise, 1/4 of a turn . Repeat until the walking belt is cor- Be careful to...
User Manual
Page 26
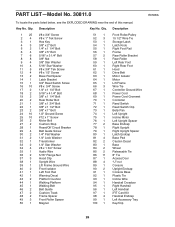
... Frame Rear Roller Bracket Rear Roller Left Rear Foot Right Rear Foot Hood Drive Belt Motor Isolator Motor Lift Frame Wire Tie Controller Ground Wire Power Cord Power Cord Grommet Controller Reed Switch Reed Switch Clip Belly Pan Left Upright Incline Motor Left Upright Spacer Base Endcap Right Upright Right Upright Spacer...
... Frame Rear Roller Bracket Rear Roller Left Rear Foot Right Rear Foot Hood Drive Belt Motor Isolator Motor Lift Frame Wire Tie Controller Ground Wire Power Cord Power Cord Grommet Controller Reed Switch Reed Switch Clip Belly Pan Left Upright Incline Motor Left Upright Spacer Base Endcap Right Upright Right Upright Spacer...

