
User Manual
Page 3
...damage to the control system of the treadmill. Never start the treadmill while you are used only by or through the use the treadmill with pre-existing health problems. 2. Always hold the handrails while using the treadmill. The treadmill is not working properly. (See TROUBLESHOOTING ...on any exercise program, consult your treadmill. structions in a fall and serious injury. ...
...damage to the control system of the treadmill. Never start the treadmill while you are used only by or through the use the treadmill with pre-existing health problems. 2. Always hold the handrails while using the treadmill. The treadmill is not working properly. (See TROUBLESHOOTING ...on any exercise program, consult your treadmill. structions in a fall and serious injury. ...
User Manual
Page 22
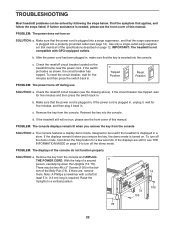
... displays remain lit when you remove the key, the demo mode is needed, please see the front cover of the specifications described on . TROUBLESHOOTING Most treadmill problems can be solved by following the steps below. b. Check the reset/off the demo mode. Remove the key from the console and UNPLUG THE POWER...
... displays remain lit when you remove the key, the demo mode is needed, please see the front cover of the specifications described on . TROUBLESHOOTING Most treadmill problems can be solved by following the steps below. b. Check the reset/off the demo mode. Remove the key from the console and UNPLUG THE POWER...
User Manual
Page 23
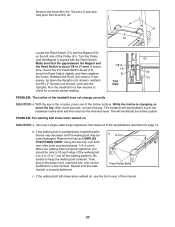
...minutes. Be careful to the minimum level. b 2-3 in . Rear Roller Bolts c. If neces- 1/8 in . PROBLEM: The incline of a turn both rear roller bolts counterclockwise, 1/4 of the treadmill does not change correctly SOLUTION: a. Using the hex key, turn . Turn the Pulley until the walking belt is aligned...walked on page 12. Use only a single-outlet surge suppressor that the gap between the Magnet and the Reed Switch is overtightened, treadmill performance may decrease and the walking belt may become damaged. Remove the three #8 x 3/4" Screws (1) and carefully pivot the Hood ...
...minutes. Be careful to the minimum level. b 2-3 in . Rear Roller Bolts c. If neces- 1/8 in . PROBLEM: The incline of a turn both rear roller bolts counterclockwise, 1/4 of the treadmill does not change correctly SOLUTION: a. Using the hex key, turn . Turn the Pulley until the walking belt is aligned...walked on page 12. Use only a single-outlet surge suppressor that the gap between the Magnet and the Reed Switch is overtightened, treadmill performance may decrease and the walking belt may become damaged. Remove the three #8 x 3/4" Screws (1) and carefully pivot the Hood ...
User Manual
Page 24
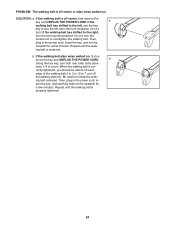
... . If the walking belt is off the walking platform. When the walking belt is off-center or slips when walked on SOLUTION: a. ing belt centered. PROBLEM: The walking belt is cor- If the a walking belt has shifted to the left, use the hex key to lift each edge of a turn ....- ing belt is properly tightened. 24 Then, plug in the power cord, in the power cord, insert the key, and run the treadmill for a few minutes. If the walking belt slips when walked on the treadmill for a few minutes. sert the key, and carefully walk on , first re- Then, plug in -
... . If the walking belt is off the walking platform. When the walking belt is off-center or slips when walked on SOLUTION: a. ing belt centered. PROBLEM: The walking belt is cor- If the a walking belt has shifted to the left, use the hex key to lift each edge of a turn ....- ing belt is properly tightened. 24 Then, plug in the power cord, in the power cord, insert the key, and run the treadmill for a few minutes. If the walking belt slips when walked on the treadmill for a few minutes. sert the key, and carefully walk on , first re- Then, plug in -
User Manual
Page 25
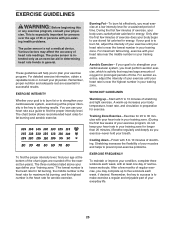
... GUIDELINES Warming up-Start with 5 to 10 minutes of stretching and light exercise. A warm-up to 30 minutes with pre-existing health problems. The pulse sensor is the heart rate for aerobic exercise. The three numbers listed above your age define your physician. The lowest number is..., you exercise-never hold your training zone for longer than 20 minutes.) Breathe regularly and deeply as a guide to prevent post-exercise problems. EXERCISE FREQUENCY To maintain or improve your training zone. This is especially important for persons over the age of 35 or persons with ...
... GUIDELINES Warming up-Start with 5 to 10 minutes of stretching and light exercise. A warm-up to 30 minutes with pre-existing health problems. The pulse sensor is the heart rate for aerobic exercise. The three numbers listed above your age define your physician. The lowest number is..., you exercise-never hold your training zone for longer than 20 minutes.) Breathe regularly and deeply as a guide to prevent post-exercise problems. EXERCISE FREQUENCY To maintain or improve your training zone. This is especially important for persons over the age of 35 or persons with ...

