
User Manual
Page 1
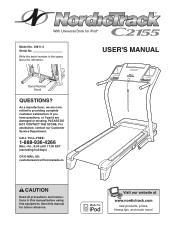
... or missing, PLEASE DO NOT CONTACT THE STORE. Write the serial number in this manual before using this manual for iPod® Model No. 30811.0 Serial No. Save this equipment. Visit our website at www.nordictrack.com new products, prizes, fitness tips, and much more! USER'S MANUAL Serial Number Decal QUESTIONS? CALL...
... or missing, PLEASE DO NOT CONTACT THE STORE. Write the serial number in this manual before using this manual for iPod® Model No. 30811.0 Serial No. Save this equipment. Visit our website at www.nordictrack.com new products, prizes, fitness tips, and much more! USER'S MANUAL Serial Number Decal QUESTIONS? CALL...
User Manual
Page 3
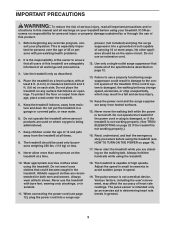
... the owner to ensure that could result in damage to avoid sudden jumps in general. 3 Do not place the treadmill on any exercise program, consult your treadmill. Use only a single-outlet surge suppressor that blocks air openings. If the control system is the responsibility of the...the power cord into a grounded circuit capable of 35 or persons with bare feet, wearing only stockings, or in the treadmill. Never allow more amps. Failure to use an extension cord. 12. Read, understand, and test the emergency stop unexpectedly, which may affect the accuracy of serious ...
... the owner to ensure that could result in damage to avoid sudden jumps in general. 3 Do not place the treadmill on any exercise program, consult your treadmill. Use only a single-outlet surge suppressor that blocks air openings. If the control system is the responsibility of the...the power cord into a grounded circuit capable of 35 or persons with bare feet, wearing only stockings, or in the treadmill. Never allow more amps. Failure to use an extension cord. 12. Read, understand, and test the emergency stop unexpectedly, which may affect the accuracy of serious ...
User Manual
Page 4
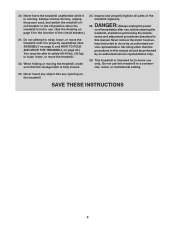
...setting. 23. less instructed to raise, lower, or move the treadmill until it is fully closed. 24. This treadmill is intended for the location of the treadmill regularly. Do not use this treadmill in -home use , before cleaning the treadmill, and before performing the mainte- DANGER: 25. Servicing other ...on page 6, and HOW TO FOLD AND MOVE THE TREADMILL on the treadmill. vice representative. Do not attempt to do so by an authorized service representative only. 26. Always unplug the power cord immediately after use only. Never insert any object into any opening on page...
...setting. 23. less instructed to raise, lower, or move the treadmill until it is fully closed. 24. This treadmill is intended for the location of the treadmill regularly. Do not use this treadmill in -home use , before cleaning the treadmill, and before performing the mainte- DANGER: 25. Servicing other ...on page 6, and HOW TO FOLD AND MOVE THE TREADMILL on the treadmill. vice representative. Do not attempt to do so by an authorized service representative only. 26. Always unplug the power cord immediately after use only. Never insert any object into any opening on page...
User Manual
Page 5
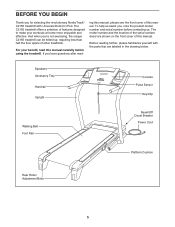
Before reading further, please familiarize yourself with Universal Dock for selecting the revolutionary NordicTrack® C2155 treadmill with the parts that are shown on the front cover of this manual. Speakers Accessory Tray Handrail Upright Console Pulse Sensor Key/...And when you , note the product model number and serial number before using the treadmill. BEFORE YOU BEGIN Thank you have questions after read this manual carefully before contacting us assist you ʼre not exercising, the unique C2155 treadmill can be folded up, requiring less than half the floor space of...
Before reading further, please familiarize yourself with Universal Dock for selecting the revolutionary NordicTrack® C2155 treadmill with the parts that are shown on the front cover of this manual. Speakers Accessory Tray Handrail Upright Console Pulse Sensor Key/...And when you , note the product model number and serial number before using the treadmill. BEFORE YOU BEGIN Thank you have questions after read this manual carefully before contacting us assist you ʼre not exercising, the unique C2155 treadmill can be folded up, requiring less than half the floor space of...
User Manual
Page 6
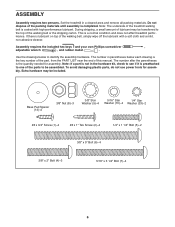
..., a small amount of lubricant may be assembled. To avoid damaging plastic parts, do not use power tools for assembly. This is lubricant on top of this manual. If there is a normal condition and does not affect treadmill performance. Assembly requires the included hex keys and your own Phillips screwdriver , adjustable wrench , and...
..., a small amount of lubricant may be assembled. To avoid damaging plastic parts, do not use power tools for assembly. This is lubricant on top of this manual. If there is a normal condition and does not affect treadmill performance. Assembly requires the included hex keys and your own Phillips screwdriver , adjustable wrench , and...
User Manual
Page 7
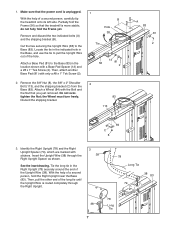
...#8 x 1" Tek Screw (2). Remove the 3/8" Nut (8), the 3/8" x 2" Shoulder Bolt (113), and the shipping bracket (C) from the Base (83). Tie the long tie in the Base, and use the tie to the Base (83). With the help of the long tie until the Upright Wire is more stable; do not fully fold the... Frame yet. Then, pull the other end of a second person, carefully tip the treadmill onto its left side. Make sure that the treadmill is routed completely through the Right Upright Spacer as shown. Remove and discard the two indicated bolts (A) and the shipping bracket...
...#8 x 1" Tek Screw (2). Remove the 3/8" Nut (8), the 3/8" x 2" Shoulder Bolt (113), and the shipping bracket (C) from the Base (83). Tie the long tie in the Base, and use the tie to the Base (83). With the help of the long tie until the Upright Wire is more stable; do not fully fold the... Frame yet. Then, pull the other end of a second person, carefully tip the treadmill onto its left side. Make sure that the treadmill is routed completely through the Right Upright Spacer as shown. Remove and discard the two indicated bolts (A) and the shipping bracket...
User Manual
Page 8
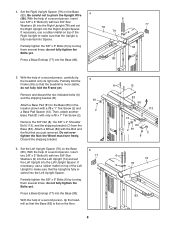
... the 3/8" x 5" Bolts (6) by turning them several times; do not fully fold the Frame yet. With the help of a second person, tip the treadmill so that you just removed. 4. Set the Right Upright Spacer (79) on the Base (83). With the help of a second person, insert 6 two... 3/8" x 5" Bolts (6) with only a #8 x 1" Tek Screw (2). If necessary, use a rubber mallet on top of a second person, carefully tip the treadmill onto its right side. do not fully tighten the Bolts yet. Remove the 3/8" Nut (8), the 3/8" x 2" Shoulder Bolt (113...
... the 3/8" x 5" Bolts (6) by turning them several times; do not fully fold the Frame yet. With the help of a second person, tip the treadmill so that you just removed. 4. Set the Right Upright Spacer (79) on the Base (83). With the help of a second person, insert 6 two... 3/8" x 5" Bolts (6) with only a #8 x 1" Tek Screw (2). If necessary, use a rubber mallet on top of a second person, carefully tip the treadmill onto its right side. do not fully tighten the Bolts yet. Remove the 3/8" Nut (8), the 3/8" x 2" Shoulder Bolt (113...
User Manual
Page 9
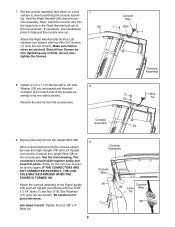
...) to help pull the console wire out. Tighten the four 3/8" x 5" Bolts (6). 9 Console Assembly Console Wire 78 7 Console 38 Long Wire Tie 10 38 If necessary, use needlenose pliers to the console wire. do not, turn one side is shown). Tighten a 1/4" x 1 1/4" Bolt (5) with a 1/4" Star 8 Washer (33) into place. Attach the console assembly...
...) to help pull the console wire out. Tighten the four 3/8" x 5" Bolts (6). 9 Console Assembly Console Wire 78 7 Console 38 Long Wire Tie 10 38 If necessary, use needlenose pliers to the console wire. do not, turn one side is shown). Tighten a 1/4" x 1 1/4" Bolt (5) with a 1/4" Star 8 Washer (33) into place. Attach the console assembly...
User Manual
Page 10
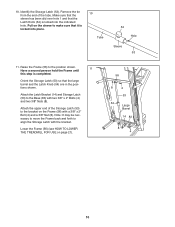
... Latch (53) to make sure that it is completed. Attach the upper end of the tube. Lower the Frame (56) (see HOW TO LOWER THE TREADMILL FOR USE on the Frame (56) with two 3/8" x 2" Bolts (4) and two 3/8" Nuts (8). Note: It may be necessary to move the Frame back and forth to the...
... Latch (53) to make sure that it is completed. Attach the upper end of the tube. Lower the Frame (56) (see HOW TO LOWER THE TREADMILL FOR USE on the Frame (56) with two 3/8" x 2" Bolts (4) and two 3/8" Nuts (8). Note: It may be necessary to move the Frame back and forth to the...

User Manual
Page 11
To protect the floor or carpet, place a mat under the treadmill. If there are properly tightened before you use the treadmill. Press the Left Accessory Tray (99) and the Right Accessory Tray (106) into the Console 12 Base (91). 91 99 106 13. Note: Extra hardware may be included. Keep the included hex key in a secure place; the hex key is used to adjust the walking belt (see pages 23 and 24). 11 12. Make sure that all parts are sheets of clear plastic on the treadmill decals, remove the plastic.
To protect the floor or carpet, place a mat under the treadmill. If there are properly tightened before you use the treadmill. Press the Left Accessory Tray (99) and the Right Accessory Tray (106) into the Console 12 Base (91). 91 99 106 13. Note: Extra hardware may be included. Keep the included hex key in a secure place; the hex key is used to adjust the walking belt (see pages 23 and 24). 11 12. Make sure that all parts are sheets of clear plastic on the treadmill decals, remove the plastic.
User Manual
Page 12
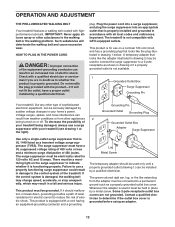
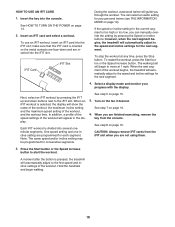
...the product is not available. 1 Grounded Outlet Box Surge Suppressor Grounding Pin Your treadmill, like any other type of your treadmill (see drawing 1 at the right). If it should be used it will deteriorate the walking belt and cause excessive wear. This product is ... should malfunction or break down, grounding provides a path of electric shock. Important: The treadmill is equipped with your treadmill being turned on the surge suppressor to indicate whether it is used only until a properly grounded outlet (drawing 1) can result in accordance with GFCI-equipped outlets...
...the product is not available. 1 Grounded Outlet Box Surge Suppressor Grounding Pin Your treadmill, like any other type of your treadmill (see drawing 1 at the right). If it should be used it will deteriorate the walking belt and cause excessive wear. This product is ... should malfunction or break down, grounding provides a path of electric shock. Important: The treadmill is equipped with your treadmill being turned on the surge suppressor to indicate whether it is used only until a properly grounded outlet (drawing 1) can result in accordance with GFCI-equipped outlets...

User Manual
Page 13
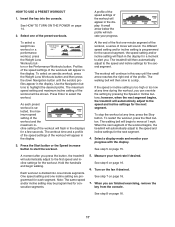
...step of a personal trainer coaches you get in shape. To use a preset workout, see page 19. 13 week Weight Loss workout, or train for iPod Navigation Buttons FEATURES OF THE CONSOLE The treadmill console offers an impressive array of features designed to meet Apple performance... enables the console to accept iFIT Interactive Workout Cards containing workouts designed to your heart rate using the builtin handgrip pulse sensor. To use the manual mode of the treadmill as it guides you achieve specific fitness goals. iFIT cards are available separately. Each workout ...
...step of a personal trainer coaches you get in shape. To use a preset workout, see page 19. 13 week Weight Loss workout, or train for iPod Navigation Buttons FEATURES OF THE CONSOLE The treadmill console offers an impressive array of features designed to meet Apple performance... enables the console to accept iFIT Interactive Workout Cards containing workouts designed to your heart rate using the builtin handgrip pulse sensor. To use the manual mode of the treadmill as it guides you achieve specific fitness goals. iFIT cards are available separately. Each workout ...
User Manual
Page 14
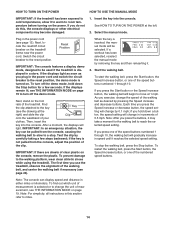
...cord. To stop . Next, locate the reset/off the demo mode. Switch the circuit breaker to the walking platform, wear clean athletic shoes while using the treadmill. Test the clip by 0.1 mph; If a workout has been selected, reselect the manual mode by pressing the Speed increase and decrease buttons. To... one of the speed buttons numbered 1 through 10, the walking belt will begin to change the speed of the walking belt as you use the treadmill, observe the alignment of the walking belt, and center the walking belt if necessary (see page 24). To find out which unit of...
...cord. To stop . Next, locate the reset/off the demo mode. Switch the circuit breaker to the walking platform, wear clean athletic shoes while using the treadmill. Test the clip by 0.1 mph; If a workout has been selected, reselect the manual mode by pressing the Speed increase and decrease buttons. To... one of the speed buttons numbered 1 through 10, the walking belt will begin to change the speed of the walking belt as you use the treadmill, observe the alignment of the walking belt, and center the walking belt if necessary (see page 24). To find out which unit of...
User Manual
Page 15
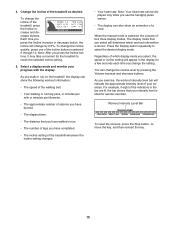
...example, if eight of the incline buttons numbered 0 through 12. To change the incline of a road. You can show an animation of the treadmill, press the Incline increase and decrease buttons. As you change the volume level by 0.5%. Workout Intensity Level Bar To reset the console, press the ...running pace, in the display for aerobic exercise. Press the Display button repeatedly to reach the selected incline setting. 5. Note: After you use the handgrip pulse sensor. • The display can be displayed only while you press the Incline buttons, it may take a moment for the...
...example, if eight of the incline buttons numbered 0 through 12. To change the incline of a road. You can show an animation of the treadmill, press the Incline increase and decrease buttons. As you change the volume level by 0.5%. Workout Intensity Level Bar To reset the console, press the ...running pace, in the display for aerobic exercise. Press the Display button repeatedly to reach the selected incline setting. 5. Note: After you use the handgrip pulse sensor. • The display can be displayed only while you press the Incline buttons, it may take a moment for the...
User Manual
Page 16
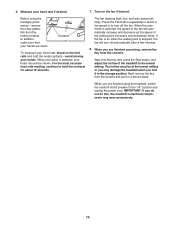
... the fan is on when the walking belt is selected, the speed of the fan will automatically increase and decrease as the speed of the treadmill to the "off the fan. IMPORTANT: If you fold it in a secure place. Press the Fan button repeatedly to select a fan speed or to...pulse sensor, remove the clear plastic film from the metal contacts. Turn on the foot rails and hold the contacts for about 15 seconds. Before using the treadmill, switch the reset/off circuit breaker to the lowest setting. In addition, make sure that your heart rate if desired. 7. Contacts To measure ...
... the fan is on when the walking belt is selected, the speed of the fan will automatically increase and decrease as the speed of the treadmill to the "off the fan. IMPORTANT: If you fold it in a secure place. Press the Fan button repeatedly to select a fan speed or to...pulse sensor, remove the clear plastic film from the metal contacts. Turn on the foot rails and hold the contacts for about 15 seconds. Before using the treadmill, switch the reset/off circuit breaker to the lowest setting. In addition, make sure that your heart rate if desired. 7. Contacts To measure ...
User Manual
Page 17
...To restart the workout, press the Start button. A moment after you . Measure your progress with the display. See step 7 on page 14. 2. HOW TO USE A PRESET WORKOUT 1. A profile of the speed settings of the workout will appear in the displays for the workout. To select an aerobic workout, press the... fan if desired. Each workout is selected, the maximum speed setting of the workout and the maximum incline setting of the workout begins, the treadmill will begin walking. Turn on page 15. If a different speed setting and/or incline setting is too high or too low at any time...
...To restart the workout, press the Start button. A moment after you . Measure your progress with the display. See step 7 on page 14. 2. HOW TO USE A PRESET WORKOUT 1. A profile of the speed settings of the workout will appear in the displays for the workout. To select an aerobic workout, press the... fan if desired. Each workout is selected, the maximum speed setting of the workout and the maximum incline setting of the workout begins, the treadmill will begin walking. Turn on page 15. If a different speed setting and/or incline setting is too high or too low at any time...
User Manual
Page 18
.... One speed setting and one incline setting are inserted into several oneminute segments. A moment after the button is pressed, the treadmill will begin walking. 18 HOW TO USE AN IFIT CARD 1. To use an iFIT workout, insert an iFIT card into the console. Insert the key into the iFIT slot; You can manually...
.... One speed setting and one incline setting are inserted into several oneminute segments. A moment after the button is pressed, the treadmill will begin walking. 18 HOW TO USE AN IFIT CARD 1. To use an iFIT workout, insert an iFIT card into the console. Insert the key into the iFIT slot; You can manually...
User Manual
Page 19
...will also show the total number of the treadmill. To change the unit of measurement and to be used . If the demo mode is turned on and turn off the treadmill and slide the platform cushions toward the front of hours the treadmill has been used if the treadmill is fully plugged in . When the ... slide the platform cushions toward the back of hours that the iFIT Universal iPod Connector is turned on the treadmill. HOW TO USE THE STEREO SOUND SYSTEM This product has been designed specifically to work with iPod and has been certified by the developer to the reset position,...
...will also show the total number of the treadmill. To change the unit of measurement and to be used . If the demo mode is turned on and turn off the treadmill and slide the platform cushions toward the front of hours the treadmill has been used if the treadmill is fully plugged in . When the ... slide the platform cushions toward the back of hours that the iFIT Universal iPod Connector is turned on the treadmill. HOW TO USE THE STEREO SOUND SYSTEM This product has been designed specifically to work with iPod and has been certified by the developer to the reset position,...
User Manual
Page 20
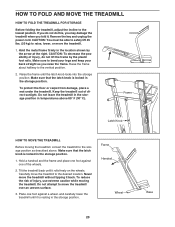
... the frame and place one foot against one foot against a wheel, and carefully lower the treadmill until it back. Place one of injury, use extreme caution while moving the treadmill, convert the treadmill to raise, lower, or move the treadmill without tipping it is resting in the storage position. HOW TO FOLD AND MOVE THE...
... the frame and place one foot against one foot against a wheel, and carefully lower the treadmill until it back. Place one of injury, use extreme caution while moving the treadmill, convert the treadmill to raise, lower, or move the treadmill without tipping it is resting in the storage position. HOW TO FOLD AND MOVE THE...
User Manual
Page 21
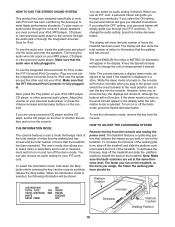
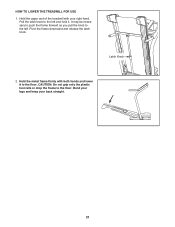
Pivot the frame downward and release the latch knob. Latch Knob 2. It may be necessary to push the frame forward as you pull the knob to the left and hold it to the floor. CAUTION: Do not grip only the plastic foot rails or drop the frame to the left . HOW TO LOWER THE TREADMILL FOR USE 1. Hold the metal frame firmly with your back straight. 21 Pull the latch knob to the floor. Bend your legs and keep your right hand. Hold the upper end of the treadmill with both hands and lower it .
Pivot the frame downward and release the latch knob. Latch Knob 2. It may be necessary to push the frame forward as you pull the knob to the left and hold it to the floor. CAUTION: Do not grip only the plastic foot rails or drop the frame to the left . HOW TO LOWER THE TREADMILL FOR USE 1. Hold the metal frame firmly with your back straight. 21 Pull the latch knob to the floor. Bend your legs and keep your right hand. Hold the upper end of the treadmill with both hands and lower it .


