

English Manual
Page 3
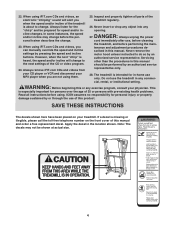
... appropriate exercise clothes when using the treadmill. 6. The treadmill is not in the treadmill. Adjust the speed in small increments to the off circuit breaker to avoid sudden jumps in a garage or covered patio, or near water. 12. Always remove the key, unplug the power cord, and switch the reset/off position when the treadmill is capable of the treadmill. Do not place the treadmill on the walking belt...
... appropriate exercise clothes when using the treadmill. 6. The treadmill is not in the treadmill. Adjust the speed in small increments to the off circuit breaker to avoid sudden jumps in a garage or covered patio, or near water. 12. Always remove the key, unplug the power cord, and switch the reset/off position when the treadmill is capable of the treadmill. Do not place the treadmill on the walking belt...
English Manual
Page 4
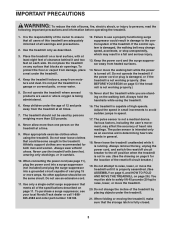
... pre-existing health problems. Read all parts of the treadmill regularly. 26. Never remove the motor hood unless instructed to the next settings of the treadmill is missing or illegible, please call the toll-free telephone number on your treadmill. ICON assumes no responsibility for in this or any exercise program, consult your MP3 player when you when the speed and/or incline of the CD or video program. 24...
... pre-existing health problems. Read all parts of the treadmill regularly. 26. Never remove the motor hood unless instructed to the next settings of the treadmill is missing or illegible, please call the toll-free telephone number on your treadmill. ICON assumes no responsibility for in this or any exercise program, consult your MP3 player when you when the speed and/or incline of the CD or video program. 24...
English Manual
Page 5
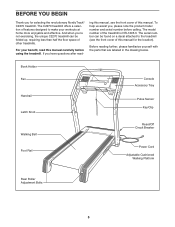
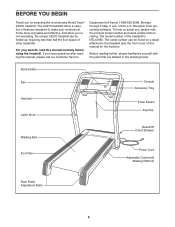
... familiarize yourself with the parts that are labeled in the drawing below. Book Holder Fan Handrail Latch Knob Walking Belt Console Accessory Tray Pulse Sensor Key/Clip Reset/Off Circuit Breaker Foot Rail Power Cord Adjustable Cushioned Walking Platform Rear Roller Adjustment Bolts 5 And when you , please note the product model number and serial number before using the treadmill. To help us assist you 're not exercising, the unique C2270 treadmill can be folded up, requiring less than...
... familiarize yourself with the parts that are labeled in the drawing below. Book Holder Fan Handrail Latch Knob Walking Belt Console Accessory Tray Pulse Sensor Key/Clip Reset/Off Circuit Breaker Foot Rail Power Cord Adjustable Cushioned Walking Platform Rear Roller Adjustment Bolts 5 And when you , please note the product model number and serial number before using the treadmill. To help us assist you 're not exercising, the unique C2270 treadmill can be folded up, requiring less than...
English Manual
Page 6
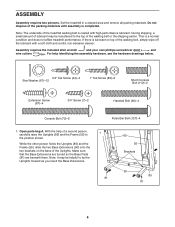
...) and the Frame (55) to the top of the walking belt, simply wipe off the lubricant with high-performance lubricant. With the help identifying the assembly hardware, see the hardware drawings below. 3/4" Tek Screw (44)-4 Star Washer (67)-12 1" Tek Screw (82)-2 Short Console Bolt (112)-2 Extension Screw (87)-4 3/4" Screw (7)-2 Handrail Bolt (66)-4 Console Bolt (72)-2 Pulse Bar Bolt (127)-4 1. Note: It may be helpful to tip...
...) and the Frame (55) to the top of the walking belt, simply wipe off the lubricant with high-performance lubricant. With the help identifying the assembly hardware, see the hardware drawings below. 3/4" Tek Screw (44)-4 Star Washer (67)-12 1" Tek Screw (82)-2 Short Console Bolt (112)-2 Extension Screw (87)-4 3/4" Screw (7)-2 Handrail Bolt (66)-4 Console Bolt (72)-2 Pulse Bar Bolt (127)-4 1. Note: It may be helpful to tip...
English Manual
Page 8
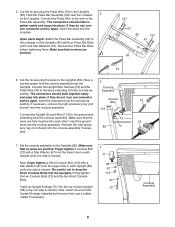
... 69 74 6. Make sure that no wires are pinched. Attach the Pulse Bar Assembly (69) to the wires extending from the console assembly. Ground Wire 74 sembly. Reinsert the right acces- Be careful not to the Uprights (85). Start all four Pulse Bar Bolts before tightening them. use a rubber mallet if necessary. 7 71 85 67 112 67 72 Console Assembly 8 Insert the wires into place. The connectors should slide...
... 69 74 6. Make sure that no wires are pinched. Attach the Pulse Bar Assembly (69) to the wires extending from the console assembly. Ground Wire 74 sembly. Reinsert the right acces- Be careful not to the Uprights (85). Start all four Pulse Bar Bolts before tightening them. use a rubber mallet if necessary. 7 71 85 67 112 67 72 Console Assembly 8 Insert the wires into place. The connectors should slide...
English Manual
Page 11
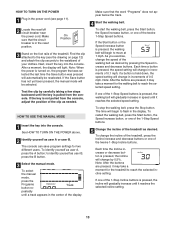
.... HOW TO PLUG IN THE POWER CORD DANGER: Improper connection of this manual and order part number 146148, or see your treadmill (see drawing 1 at the right). To purchase a surge suppressor, see your local NordicTrack dealer or call the toll-free telephone number on a nominal 120-volt circuit, and has a grounding plug that is used it is damaged, the walking belt may change speed, accelerate, or stop unexpectedly...
.... HOW TO PLUG IN THE POWER CORD DANGER: Improper connection of this manual and order part number 146148, or see your treadmill (see drawing 1 at the right). To purchase a surge suppressor, see your local NordicTrack dealer or call the toll-free telephone number on a nominal 120-volt circuit, and has a grounding plug that is used it is damaged, the walking belt may change speed, accelerate, or stop unexpectedly...

English Manual
Page 12
... this manual. Using a stereo audio cable, you can even measure your heart rate using the built-in handgrip pulse sensor or the optional chest pulse sensor (see page 20. See www.iFIT.com for future use the manual mode of your home. To use an iFIT.com program directly from our Web site. As you through effective workouts. You can connect the treadmill to your computer, you through every step of the console, follow the steps beginning...
... this manual. Using a stereo audio cable, you can even measure your heart rate using the built-in handgrip pulse sensor or the optional chest pulse sensor (see page 20. See www.iFIT.com for future use the manual mode of your home. To use an iFIT.com program directly from our Web site. As you through effective workouts. You can connect the treadmill to your computer, you through every step of the console, follow the steps beginning...
English Manual
Page 13
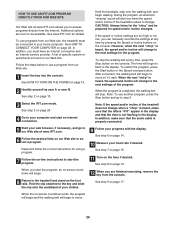
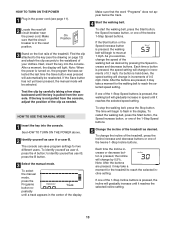
... the power cord. HOW TO USE THE MANUAL MODE 1 Insert the key into the console. See HOW TO TURN ON THE POWER above. 2 Identify yourself as user B, press the B button. 3 Select the manual mode. to reach the selected incline setting. Make sure that the circuit breaker is pressed, the walking belt will be reselected. If the Start button or the Speed increase button is in speed until it may take a moment for the treadmill to...
... the power cord. HOW TO USE THE MANUAL MODE 1 Insert the key into the console. See HOW TO TURN ON THE POWER above. 2 Identify yourself as user B, press the B button. 3 Select the manual mode. to reach the selected incline setting. Make sure that the circuit breaker is pressed, the walking belt will be reselected. If the Start button or the Speed increase button is in speed until it may take a moment for the treadmill to...
English Manual
Page 20
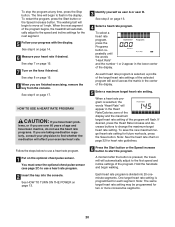
... select a heart rate program, press the Programs button repeatedly until the words "Heart Rate" and the number 1 or 2 appear in the lower center of the program begins, the treadmill will automatically adjust to flash in the display. As each segment. A moment after the button is divided into the console. Hold the handrails and begin to the first speed and incline settings of the program will begin to start the program. The walking belt will...
... select a heart rate program, press the Programs button repeatedly until the words "Heart Rate" and the number 1 or 2 appear in the lower center of the program begins, the treadmill will automatically adjust to flash in the display. As each segment. A moment after the button is divided into the console. Hold the handrails and begin to the first speed and incline settings of the program will begin to start the program. The walking belt will...
English Manual
Page 24
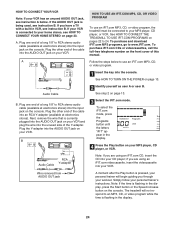
... flashing in the display, press the Start button or the Speed increase button on your home stereo, see instruction A below to use an iFIT.com MP3, CD, or video program, the treadmill must be connected to 24. To purchase and download iFIT.com MP3 programs, go to RCA stereo audio cable (available at electronics stores). See HOW TO TURN ON THE POWER on page 13. 3 Select the iFIT.com mode. A Plug the Y-adapter into your...
... flashing in the display, press the Start button or the Speed increase button on your home stereo, see instruction A below to use an iFIT.com MP3, CD, or video program, the treadmill must be connected to 24. To purchase and download iFIT.com MP3 programs, go to RCA stereo audio cable (available at electronics stores). See HOW TO TURN ON THE POWER on page 13. 3 Select the iFIT.com mode. A Plug the Y-adapter into your...
English Manual
Page 26
... yourself as user A or user B. See step 8 on page 13. 3 Select the iFIT.com mode. See step 9 on -screen countdown ends, the program will begin and the walking belt will begin to move at 1.0 mph. When the on page 17. Additional options are finished exercising, remove the key from our Web site, the treadmill must have an internet connection and an internet service provider. See HOW...
... yourself as user A or user B. See step 8 on page 13. 3 Select the iFIT.com mode. See step 9 on -screen countdown ends, the program will begin and the walking belt will begin to move at 1.0 mph. When the on page 17. Additional options are finished exercising, remove the key from our Web site, the treadmill must have an internet connection and an internet service provider. See HOW...
English Manual
Page 32
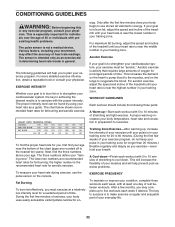
... your exercise program. The following three parts: A Warm-up to five workouts each workout with 5 to 10 minutes of your exercise until your heart rate is near the bottom of time. EXERCISE INTENSITY Whether your goal is to burn fat or to exercise with preexisting health problems. The pulse sensor is in your training zone for you, first find the three numbers above your body temperature, heart rate and...
... your exercise program. The following three parts: A Warm-up to five workouts each workout with 5 to 10 minutes of your exercise until your heart rate is near the bottom of time. EXERCISE INTENSITY Whether your goal is to burn fat or to exercise with preexisting health problems. The pulse sensor is in your training zone for you, first find the three numbers above your body temperature, heart rate and...
English Manual
Page 34
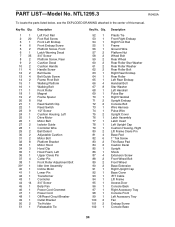
...Nut Reed Switch Clip Reed Switch 1/2" Screw Cushion Housing, Left Drive Motor Motor Belt Isolator Guide Controller Wire Ball Detent Adjustable Cushion Motor Bolt Platform Bracket Motor Hood Hood Clip Hood Foam, Left Upper Clevis Pin Cotter Pin Front Roller Adjustment Bolt Idler Arm Assembly Incline Motor Lower Pin Transformer Controller 3/4" Screw Belly Pan Power Cord Grommet Power Cord Off/Reset Circuit Breaker Outlet Bracket Tie Holder Releasable Tie Key No. NTL1295.3 R0405A To locate the parts listed below, see the EXPLODED DRAWING attached in the center of this manual. PART LIST-Model...
...Nut Reed Switch Clip Reed Switch 1/2" Screw Cushion Housing, Left Drive Motor Motor Belt Isolator Guide Controller Wire Ball Detent Adjustable Cushion Motor Bolt Platform Bracket Motor Hood Hood Clip Hood Foam, Left Upper Clevis Pin Cotter Pin Front Roller Adjustment Bolt Idler Arm Assembly Incline Motor Lower Pin Transformer Controller 3/4" Screw Belly Pan Power Cord Grommet Power Cord Off/Reset Circuit Breaker Outlet Bracket Tie Holder Releasable Tie Key No. NTL1295.3 R0405A To locate the parts listed below, see the EXPLODED DRAWING attached in the center of this manual. PART LIST-Model...
English Manual
Page 35
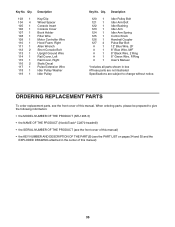
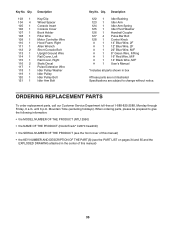
... Arm Idler Arm Spring Control Knob Handrail Coupler Pulse Bar Bolt 12" Blue Wire, 2F 8" Blue Wire, M/F 8" Black Wire, 2 Ring 8" Green Wire, F/Ring User's Manual *Includes all parts shown in the center of this manual) 35 Qty. ORDERING REPLACEMENT PARTS To order replacement parts, see the PART LIST on pages 34 and 35 and the EXPLODED DRAWING attached in box #These parts are not illustrated Specifications are subject to give the following information: • the MODEL NUMBER...
... Arm Idler Arm Spring Control Knob Handrail Coupler Pulse Bar Bolt 12" Blue Wire, 2F 8" Blue Wire, M/F 8" Black Wire, 2 Ring 8" Green Wire, F/Ring User's Manual *Includes all parts shown in the center of this manual) 35 Qty. ORDERING REPLACEMENT PARTS To order replacement parts, see the PART LIST on pages 34 and 35 and the EXPLODED DRAWING attached in box #These parts are not illustrated Specifications are subject to give the following information: • the MODEL NUMBER...
English Manual
Page 38
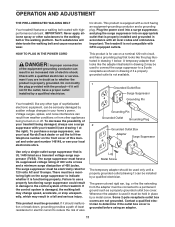
.... LIMITED WARRANTY WHAT IS COVERED-The entire NordicTrack® C2270 treadmill ("Product") is warranted to be free of all defects in lieu of any and all other warranties and any person receiving the Product as a gift from the original purchaser. HOW LONG IS IT COVERED-ICON Health & Fitness, Inc. ("ICON"), warrants the drive motor for commercial or rental purposes. notify our Customer Service Department of any replacement part...
.... LIMITED WARRANTY WHAT IS COVERED-The entire NordicTrack® C2270 treadmill ("Product") is warranted to be free of all defects in lieu of any and all other warranties and any person receiving the Product as a gift from the original purchaser. HOW LONG IS IT COVERED-ICON Health & Fitness, Inc. ("ICON"), warrants the drive motor for commercial or rental purposes. notify our Customer Service Department of any replacement part...
English Manual
Page 3
... walking belt may change the incline of high speeds. The pulse sensor is turned off. Failure to the off circuit breaker.) 19. Never move the walking belt while the power is intended only as described. 3. Do not operate the treadmill if the power cord or plug is damaged, or if the treadmill is not in general. 18. Wear appropriate exercise clothes when using the treadmill. 6. When connecting the power cord (see your local NordicTrack...
... walking belt may change the incline of high speeds. The pulse sensor is turned off. Failure to the off circuit breaker.) 19. Never move the walking belt while the power is intended only as described. 3. Do not operate the treadmill if the power cord or plug is damaged, or if the treadmill is not in general. 18. Wear appropriate exercise clothes when using the treadmill. 6. When connecting the power cord (see your local NordicTrack...
English Manual
Page 5
... Latch Knob Console Accessory Tray Pulse Sensor Key/Clip Walking Belt Reset/Off Circuit Breaker Foot Rail Power Cord Adjustable Cushioned Walking Platform Rear Roller Adjustment Bolts 5 And when you have questions after reading this manual, please call our Customer Service Department toll-free at home more enjoyable and effective. For your workouts at 1-888-825-2588, Monday through Friday, 6 a.m. The model number of this manual carefully before calling. If you 're not exercising, the unique C2270 treadmill...
... Latch Knob Console Accessory Tray Pulse Sensor Key/Clip Walking Belt Reset/Off Circuit Breaker Foot Rail Power Cord Adjustable Cushioned Walking Platform Rear Roller Adjustment Bolts 5 And when you have questions after reading this manual, please call our Customer Service Department toll-free at home more enjoyable and effective. For your workouts at 1-888-825-2588, Monday through Friday, 6 a.m. The model number of this manual carefully before calling. If you 're not exercising, the unique C2270 treadmill...

English Manual
Page 11
... installed by sudden voltage changes in damage to the control system of the treadmill. The green-colored rigid ear, lug, or the like extending from other appliances being damaged, always use a properly functioning surge suppressor could result in your treadmill being turned on the surge suppressor to the walking belt or the walking platform. HOW TO PLUG IN THE POWER CORD DANGER: Improper connection...
... installed by sudden voltage changes in damage to the control system of the treadmill. The green-colored rigid ear, lug, or the like extending from other appliances being damaged, always use a properly functioning surge suppressor could result in your treadmill being turned on the surge suppressor to the walking belt or the walking platform. HOW TO PLUG IN THE POWER CORD DANGER: Improper connection...
English Manual
Page 13
... walking belt. Track peatedly until the key is not pulled from the console. HOW TO TURN ON THE POWER 1 Plug in the power cord (see the drawing on page 12) and attach the clip securely to identify yourself as user B, press the B button. 3 Select the manual mode. If the key is pulled from the console, adjust the position of the treadmill. To identify yourself as user A or user B. To start the walking belt, press the Start button, the Speed...
... walking belt. Track peatedly until the key is not pulled from the console. HOW TO TURN ON THE POWER 1 Plug in the power cord (see the drawing on page 12) and attach the clip securely to identify yourself as user B, press the B button. 3 Select the manual mode. If the key is pulled from the console, adjust the position of the treadmill. To identify yourself as user A or user B. To start the walking belt, press the Start button, the Speed...
English Manual
Page 35
... Spacer Console Insert Console Cover Book Holder Filter Wire Motor Controller Wire Hood Foam, Right Allen Wrench Short Console Bolt Upright Ground Wire Rail Cover, Left Rail Cover, Right Static Decal Pulse Extension Wire Idler Pulley Washer Idler Pulley Idler Pulley Bolt Idler Arm Bolt Key No. until 6 p.m. When ordering parts, please be prepared to give the following information: • the MODEL NUMBER OF THE PRODUCT (NTL12950) • the NAME OF THE PRODUCT (NordicTrack® C2270 treadmill) • the SERIAL NUMBER OF...
... Spacer Console Insert Console Cover Book Holder Filter Wire Motor Controller Wire Hood Foam, Right Allen Wrench Short Console Bolt Upright Ground Wire Rail Cover, Left Rail Cover, Right Static Decal Pulse Extension Wire Idler Pulley Washer Idler Pulley Idler Pulley Bolt Idler Arm Bolt Key No. until 6 p.m. When ordering parts, please be prepared to give the following information: • the MODEL NUMBER OF THE PRODUCT (NTL12950) • the NAME OF THE PRODUCT (NordicTrack® C2270 treadmill) • the SERIAL NUMBER OF...


