
Uk Manual
Page 1
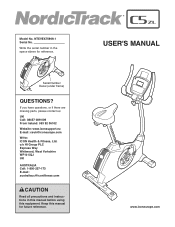
If you have questions, or if there are missing parts, please contact us: UK Call: 08457 089 009 From Ireland: 053 92 36102 Website: www.iconsupport.eu E-mail: [email protected] Write: ICON Health & Fitness, ...
If you have questions, or if there are missing parts, please contact us: UK Call: 08457 089 009 From Ireland: 053 92 36102 Website: www.iconsupport.eu E-mail: [email protected] Write: ICON Health & Fitness, ...
Uk Manual
Page 2
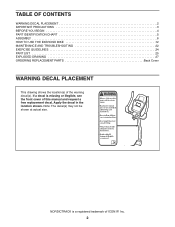
...free replacement decal. NORDICTRACK is missing or illegible, see the front cover of ICON IP, Inc. 2 TABLE OF CONTENTS WARNING DECAL PLACEMENT 2 IMPORTANT PRECAUTIONS 3 BEFORE YOU BEGIN 4 PART IDENTIFICATION CHART 5 ASSEMBLY 6 HOW TO USE THE EXERCISE BIKE 12 MAINTENANCE AND ...TROUBLESHOOTING 22 EXERCISE GUIDELINES 24 PART LIST 25 EXPLODED DRAWING 27 ORDERING REPLACEMENT PARTS Back Cover WARNING DECAL PLACEMENT This drawing shows the...
...free replacement decal. NORDICTRACK is missing or illegible, see the front cover of ICON IP, Inc. 2 TABLE OF CONTENTS WARNING DECAL PLACEMENT 2 IMPORTANT PRECAUTIONS 3 BEFORE YOU BEGIN 4 PART IDENTIFICATION CHART 5 ASSEMBLY 6 HOW TO USE THE EXERCISE BIKE 12 MAINTENANCE AND ...TROUBLESHOOTING 22 EXERCISE GUIDELINES 24 PART LIST 25 EXPLODED DRAWING 27 ORDERING REPLACEMENT PARTS Back Cover WARNING DECAL PLACEMENT This drawing shows the...

Uk Manual
Page 3
... to ensure that could become caught on a level surface with pre-existing health problems. 2. Before beginning any worn parts immediately. 3 To protect the floor or carpet from moisture and dust. The exercise bike should not be used by or through the use only. ICON assumes no responsibility for foot protection. 3. Keep children...
... to ensure that could become caught on a level surface with pre-existing health problems. 2. Before beginning any worn parts immediately. 3 To protect the floor or carpet from moisture and dust. The exercise bike should not be used by or through the use only. ICON assumes no responsibility for foot protection. 3. Keep children...
Uk Manual
Page 4
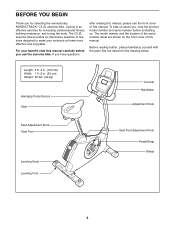
... reading further, please familiarize yourself with the parts that are shown on the front cover of this manual. Cycling is an effective exercise for selecting the revolutionary NORDICTRACK® C5 ZL exercise bike. Length: 3 ft. 4 in. (102 cm) Width: 1 ft. 9 in the drawing below. The C5 ZL exercise bike provides an impressive selection of features designed to... before you for increasing cardiovascular fitness, building endurance, and toning the body. To help us . BEFORE YOU BEGIN Thank you use the exercise bike. For your workouts at home more effective and enjoyable.
... reading further, please familiarize yourself with the parts that are shown on the front cover of this manual. Cycling is an effective exercise for selecting the revolutionary NORDICTRACK® C5 ZL exercise bike. Length: 3 ft. 4 in. (102 cm) Width: 1 ft. 9 in the drawing below. The C5 ZL exercise bike provides an impressive selection of features designed to... before you for increasing cardiovascular fitness, building endurance, and toning the body. To help us . BEFORE YOU BEGIN Thank you use the exercise bike. For your workouts at home more effective and enjoyable.
Uk Manual
Page 5
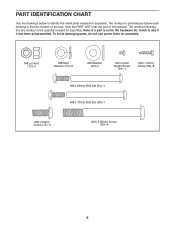
... CHART Use the drawings below each drawing is the key number of the part, from the PART LIST near the end of this manual. The number in the hardware kit, check to identify the small parts needed for assembly. The number following the key number is the quantity needed for assembly. To ...avoid damaging parts, do not use power tools for assembly. M8 Locknut (72)-4 M8 Split Washer (75)-8 M8 ...
... CHART Use the drawings below each drawing is the key number of the part, from the PART LIST near the end of this manual. The number in the hardware kit, check to identify the small parts needed for assembly. The number following the key number is the quantity needed for assembly. To ...avoid damaging parts, do not use power tools for assembly. M8 Locknut (72)-4 M8 Split Washer (75)-8 M8 ...

Uk Manual
Page 6
... 2. Attach the Rear Stabilizer (3) to the Frame (1) with two M10 x 95mm Screws (76). 2 1 3 2 76 1 6 Do not dispose of wrenches. To avoid damaging parts, do not use power tools. 1. ASSEMBLY • Assembly requires two persons. • Place all assembly steps. • To identify small... parts, see page 5. • In addition to the included tool(s), assembly requires the following tools: one adjustable wrench one Phillips screwdriver one...
... 2. Attach the Rear Stabilizer (3) to the Frame (1) with two M10 x 95mm Screws (76). 2 1 3 2 76 1 6 Do not dispose of wrenches. To avoid damaging parts, do not use power tools. 1. ASSEMBLY • Assembly requires two persons. • Place all assembly steps. • To identify small... parts, see page 5. • In addition to the included tool(s), assembly requires the following tools: one adjustable wrench one Phillips screwdriver one...
Uk Manual
Page 11
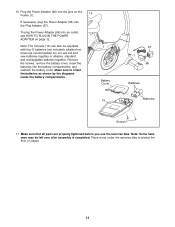
... PLUG IN THE POWER ADAPTER on the Frame (1). 10 If necessary, plug the Power Adapter (66) into the Plug Adapter (67). Make sure that all parts are recommended. alkaline batteries are properly tightened before you use old and new batteries together or alkaline, standard, and rechargeable batteries together. Battery Cover 13... sure to protect the floor or carpet. 11 10. Plug the Power Adapter (66) into the jack on page 12. Place a mat under the exercise bike to orient the batteries as shown by the diagrams inside the battery compartments. Do not use the exercise...
... PLUG IN THE POWER ADAPTER on the Frame (1). 10 If necessary, plug the Power Adapter (66) into the Plug Adapter (67). Make sure that all parts are recommended. alkaline batteries are properly tightened before you use old and new batteries together or alkaline, standard, and rechargeable batteries together. Battery Cover 13... sure to protect the floor or carpet. 11 10. Plug the Power Adapter (66) into the jack on page 12. Place a mat under the exercise bike to orient the batteries as shown by the diagrams inside the battery compartments. Do not use the exercise...
Uk Manual
Page 22
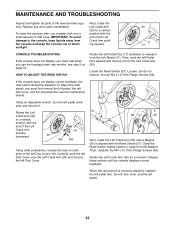
... or away from the console and keep liquids away from the Magnet. MAINTENANCE AND TROUBLESHOOTING Inspect and tighten all parts of the left pedal clockwise and remove it. To clean the exercise bike, use the handgrip heart rate monitor, see the instructions below). If the console does not display correct feedback, the... the reed switch is aligned with the end of direct sunlight. Carefully work the left pedal disc (see step 5 on each point of the exercise bike regularly. Replace any worn parts immediately.
... or away from the console and keep liquids away from the Magnet. MAINTENANCE AND TROUBLESHOOTING Inspect and tighten all parts of the left pedal clockwise and remove it. To clean the exercise bike, use the handgrip heart rate monitor, see the instructions below). If the console does not display correct feedback, the... the reed switch is aligned with the end of direct sunlight. Carefully work the left pedal disc (see step 5 on each point of the exercise bike regularly. Replace any worn parts immediately.
Uk Manual
Page 24
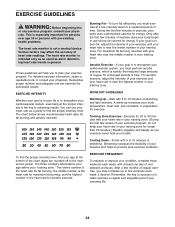
... results. Remember, the key to success is not a medical device. The heart rate monitor is to burn fat or to make exercise a regular and enjoyable part of heart rate readings. EXERCISE INTENSITY Whether your goal is intended only as a guide to 30 minutes with 5 to strengthen your cardiovascular system, you may...
... results. Remember, the key to success is not a medical device. The heart rate monitor is to burn fat or to make exercise a regular and enjoyable part of heart rate readings. EXERCISE INTENSITY Whether your goal is intended only as a guide to 30 minutes with 5 to strengthen your cardiovascular system, you may...
Uk Manual
Page 25
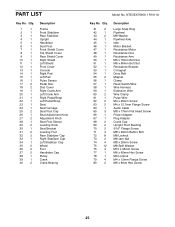
PART LIST Key No. NTEVEX75909.1 R1011A Key No. Qty. 41 2 42 1 43 2 44 1 45 1 46 1 47 1 48 1 49 1 50 1 51 1 52 1 53 1 54 1 55 2 56 1 57 1 ...
PART LIST Key No. NTEVEX75909.1 R1011A Key No. Qty. 41 2 42 1 43 2 44 1 45 1 46 1 47 1 48 1 49 1 50 1 51 1 52 1 53 1 54 1 55 2 56 1 57 1 ...

Uk Manual
Page 26
... the back cover of this manual. *These parts are subject to change without notice. Description 81 1 M5 Washer 82 1 M5 x 7mm Screw 83 1 M6 x 14.67mm Shoulder Screw 84 1 M6 Washer 85 1 M6 x ...
... the back cover of this manual. *These parts are subject to change without notice. Description 81 1 M5 Washer 82 1 M5 x 7mm Screw 83 1 M6 x 14.67mm Shoulder Screw 84 1 M6 Washer 85 1 M6 x ...

Uk Manual
Page 28
ORDERING REPLACEMENT PARTS To order replacement parts, please see the PART LIST and the EXPLODED DRAWING near the end of this manual) Part No. 313007 R1011A Printed in China © 2011 ICON IP, Inc. To help us assist you, be prepared to provide the following information when contacting us: • the model number and serial number of the product (see the front cover of this manual) • the name of the product (see the front cover of this manual) • the key number and description of the replacement part(s) (see the front cover of this manual.
ORDERING REPLACEMENT PARTS To order replacement parts, please see the PART LIST and the EXPLODED DRAWING near the end of this manual) Part No. 313007 R1011A Printed in China © 2011 ICON IP, Inc. To help us assist you, be prepared to provide the following information when contacting us: • the model number and serial number of the product (see the front cover of this manual) • the name of the product (see the front cover of this manual) • the key number and description of the replacement part(s) (see the front cover of this manual.


