
Uk Manual
Page 2
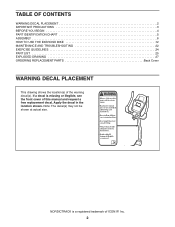
... ICON IP, Inc. 2 NORDICTRACK is missing or illegible, see the front cover of the warning decal(s). TABLE OF CONTENTS WARNING DECAL PLACEMENT 2 IMPORTANT PRECAUTIONS 3 BEFORE YOU BEGIN 4 PART IDENTIFICATION CHART 5 ASSEMBLY 6 HOW TO USE THE EXERCISE BIKE 12 MAINTENANCE AND TROUBLESHOOTING 22 EXERCISE GUIDELINES 24 PART LIST 25 EXPLODED DRAWING 27 ORDERING REPLACEMENT PARTS Back Cover WARNING DECAL PLACEMENT This drawing shows the location(s) of this manual and request a free replacement...
... ICON IP, Inc. 2 NORDICTRACK is missing or illegible, see the front cover of the warning decal(s). TABLE OF CONTENTS WARNING DECAL PLACEMENT 2 IMPORTANT PRECAUTIONS 3 BEFORE YOU BEGIN 4 PART IDENTIFICATION CHART 5 ASSEMBLY 6 HOW TO USE THE EXERCISE BIKE 12 MAINTENANCE AND TROUBLESHOOTING 22 EXERCISE GUIDELINES 24 PART LIST 25 EXPLODED DRAWING 27 ORDERING REPLACEMENT PARTS Back Cover WARNING DECAL PLACEMENT This drawing shows the location(s) of this manual and request a free replacement...
Uk Manual
Page 3
... an exercise aid in determining heart rate trends in general. 12. Place the exercise bike on a level surface with pre-existing health problems. 2. IMPORTANT PRECAUTIONS WARNING: To reduce the risk of serious injury, read all important precautions and instructions in this manual and all warnings on your exercise bike before using the exercise bike; Before beginning any worn parts immediately. 3 Do not use only. Replace any exercise program, consult...
... an exercise aid in determining heart rate trends in general. 12. Place the exercise bike on a level surface with pre-existing health problems. 2. IMPORTANT PRECAUTIONS WARNING: To reduce the risk of serious injury, read all important precautions and instructions in this manual and all warnings on your exercise bike before using the exercise bike; Before beginning any worn parts immediately. 3 Do not use only. Replace any exercise program, consult...
Uk Manual
Page 4
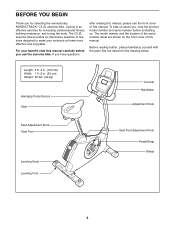
... front cover of this manual. To help us . Length: 3 ft. 4 in. (102 cm) Width: 1 ft. 9 in the drawing below. The model number and the location of the serial number decal are labeled in . (53 cm) Weight: 93 lbs. (42 kg) Handgrip Pulse Sensor Seat Console Handlebar Adjustment Knob Seat Adjustment Knob Seat Post Leveling Knob Leveling Foot Seat Post Adjustment Knob Pedal/Strap Wheel 4 Cycling is an effective exercise for selecting the revolutionary NORDICTRACK® C5 ZL exercise bike. Before...
... front cover of this manual. To help us . Length: 3 ft. 4 in. (102 cm) Width: 1 ft. 9 in the drawing below. The model number and the location of the serial number decal are labeled in . (53 cm) Weight: 93 lbs. (42 kg) Handgrip Pulse Sensor Seat Console Handlebar Adjustment Knob Seat Adjustment Knob Seat Post Leveling Knob Leveling Foot Seat Post Adjustment Knob Pedal/Strap Wheel 4 Cycling is an effective exercise for selecting the revolutionary NORDICTRACK® C5 ZL exercise bike. Before...
Uk Manual
Page 5
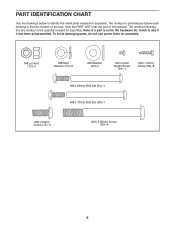
... not use power tools for assembly. PART IDENTIFICATION CHART Use the drawings below each drawing is the key number of the part, from the PART LIST near the end of this manual. M8 Locknut (72)-4 M8 Split Washer (75)-8 M8 Washer (43)-2 M4 x 5mm Bright Screw (91)-1 M4 x 16mm Screw (90)-8 M6 x 60mm Bolt Set (51)-1 M6 x 70mm Bolt Set (50)-1 M8 x 20mm Screw (74)-4 M10 x 95mm Screw (76)-4 5 The number...
... not use power tools for assembly. PART IDENTIFICATION CHART Use the drawings below each drawing is the key number of the part, from the PART LIST near the end of this manual. M8 Locknut (72)-4 M8 Split Washer (75)-8 M8 Washer (43)-2 M4 x 5mm Bright Screw (91)-1 M4 x 16mm Screw (90)-8 M6 x 60mm Bolt Set (51)-1 M6 x 70mm Bolt Set (50)-1 M8 x 20mm Screw (74)-4 M10 x 95mm Screw (76)-4 5 The number...
Uk Manual
Page 10
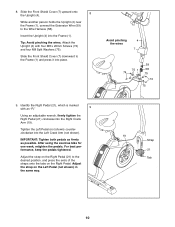
... the same way. 19 Strap 21 Tab 10 Slide the Front Shield Cover (7) downward to the Wire Harness (58). After using the exercise bike for one week, retighten the pedals. Slide the Front Shield Cover (7) upward onto the Upright (4). 8 While another person holds the Upright (4) near the Frame (1), connect the Extension Wire (59) to the Frame (1) and press it into the Right Crank Arm (19).
... the same way. 19 Strap 21 Tab 10 Slide the Front Shield Cover (7) downward to the Wire Harness (58). After using the exercise bike for one week, retighten the pedals. Slide the Front Shield Cover (7) upward onto the Upright (4). 8 While another person holds the Upright (4) near the Frame (1), connect the Extension Wire (59) to the Frame (1) and press it into the Right Crank Arm (19).
Uk Manual
Page 11
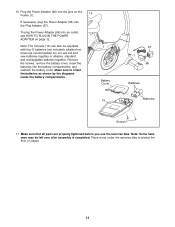
... Power Adapter (66) into the Plug Adapter (67). Note: The Console (13) can also be left over after assembly is completed. alkaline batteries are properly tightened before you use old and new batteries together or alkaline, standard, and rechargeable batteries together. Battery Cover 13 67 1 66 Batteries Batteries Screws 11. Place a mat under the exercise bike to orient the batteries as shown by the diagrams inside the battery compartments. To plug the Power Adapter...
... Power Adapter (66) into the Plug Adapter (67). Note: The Console (13) can also be left over after assembly is completed. alkaline batteries are properly tightened before you use old and new batteries together or alkaline, standard, and rechargeable batteries together. Battery Cover 13 67 1 66 Batteries Batteries Screws 11. Place a mat under the exercise bike to orient the batteries as shown by the diagrams inside the battery compartments. To plug the Power Adapter...
Uk Manual
Page 12
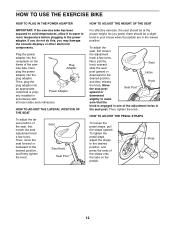
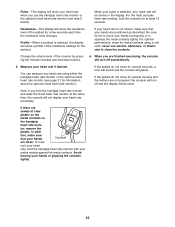
... seat, first loosen the adjustment knob a few turns. HOW TO ADJUST THE PEDAL STRAPS To loosen the pedal straps, pull the straps upward. HOW TO USE THE EXERCISE BIKE HOW TO PLUG IN THE POWER ADAPTER IMPORTANT: If the exercise bike has been exposed to cold temperatures, allow it to warm to room temperature before plugging in the seat post. Power Adapter erly installed in the lowest position. As you may damage the console displays...
... seat, first loosen the adjustment knob a few turns. HOW TO ADJUST THE PEDAL STRAPS To loosen the pedal straps, pull the straps upward. HOW TO USE THE EXERCISE BIKE HOW TO PLUG IN THE POWER ADAPTER IMPORTANT: If the exercise bike has been exposed to cold temperatures, allow it to warm to room temperature before plugging in the seat post. Power Adapter erly installed in the lowest position. As you may damage the console displays...
Uk Manual
Page 14
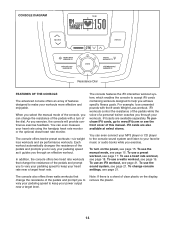
... weight loss workouts and six performance workouts. In addition, the console offers two heart rate workouts that change the resistance of the pedals and prompt you exercise. iFit workouts control the resistance of the pedals while the voice of the console, you to vary your pedaling speed to vary your heart rate near a target level. iFit cards are available separately. To use the sound system, see page 21. When you select the manual mode of a personal trainer...
... weight loss workouts and six performance workouts. In addition, the console offers two heart rate workouts that change the resistance of the pedals and prompt you exercise. iFit workouts control the resistance of the pedals while the voice of the console, you to vary your pedaling speed to vary your heart rate near a target level. iFit cards are available separately. To use the sound system, see page 21. When you select the manual mode of a personal trainer...
Uk Manual
Page 15
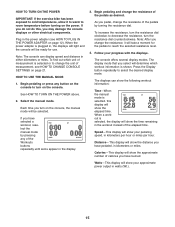
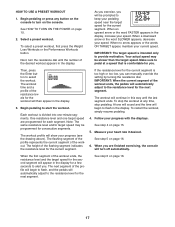
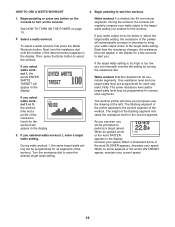
... approximate number of the Workouts buttons repeatedly until zeros appear in either kilometers or miles. HOW TO TURN ON THE POWER IMPORTANT: If the exercise bike has been exposed to cold temperatures, allow it will take a moment for use. HOW TO USE THE MANUAL MODE 1. Begin pedaling and change the resistance of the pedals by pressing any button on the console. The displays can display speed and distance in the display. 3. Calories-This display will...
... approximate number of the Workouts buttons repeatedly until zeros appear in either kilometers or miles. HOW TO TURN ON THE POWER IMPORTANT: If the exercise bike has been exposed to cold temperatures, allow it will take a moment for use. HOW TO USE THE MANUAL MODE 1. Begin pedaling and change the resistance of the pedals by pressing any button on the console. The displays can display speed and distance in the display. 3. Calories-This display will...
Uk Manual
Page 16
... your heart rate is selected, this display will turn off and the display will be reset. Change the volume level of the pedals for several minutes and the buttons are positioned as described. If the pedals do not move for information about the optional chest heart rate monitor). If the pedals do not move your hands are not pressed, the console will show the resistance level of the console by pressing the Volume...
... your heart rate is selected, this display will turn off and the display will be reset. Change the volume level of the pedals for several minutes and the buttons are positioned as described. If the pedals do not move for information about the optional chest heart rate monitor). If the pedals do not move your hands are not pressed, the console will show the resistance level of the console by pressing the Volume...
Uk Manual
Page 17
... POWER on page 16. 17 Begin pedaling or press any time, stop the workout at a speed that is too high or too low, you . When an upward arrow or the word FASTER appears in the display for the current segment. Make sure to alert you can manually override the setting by turning the resistance dial. Then, press the Enter button to start the workout. One resistance...
... POWER on page 16. 17 Begin pedaling or press any time, stop the workout at a speed that is too high or too low, you . When an upward arrow or the word FASTER appears in the display for the current segment. Make sure to alert you can manually override the setting by turning the resistance dial. Then, press the Enter button to start the workout. One resistance...
Uk Manual
Page 18
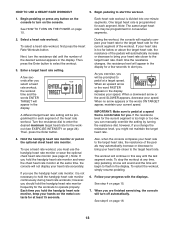
... 21). Select a heart rate workout. To select a heart rate workout, first press the Heart Rate Workouts button. A different target heart rate setting will appear in the display, increase your heart rate closer to operate properly. Turn the resistance dial to start the workout. 1. Each time the resistance changes, the resistance level will be programmed for each segment. Hold the handgrip heart rate monitor or put on page 15. 7. To stop the workout at the same time, the console will automatically increase...
... 21). Select a heart rate workout. To select a heart rate workout, first press the Heart Rate Workouts button. A different target heart rate setting will appear in the display, increase your heart rate closer to operate properly. Turn the resistance dial to start the workout. 1. Each time the resistance changes, the resistance level will be programmed for each segment. Hold the handgrip heart rate monitor or put on page 15. 7. To stop the workout at the same time, the console will automatically increase...
Uk Manual
Page 19
... arrow or the word SLOWER appears, decrease your speed. To select a watts workout, first press the Watts Workouts button. HOW TO USE A WATTS WORKOUT 4. See HOW TO TURN ON THE POWER on the console to pedal at the left). Each time the resistance changes, the resistance level will appear in the display, increase your speed. If the target watts setting is divided into 40 oneminute segments. When...
... arrow or the word SLOWER appears, decrease your speed. To select a watts workout, first press the Watts Workouts button. HOW TO USE A WATTS WORKOUT 4. See HOW TO TURN ON THE POWER on the console to pedal at the left). Each time the resistance changes, the resistance level will appear in the display, increase your speed. If the target watts setting is divided into 40 oneminute segments. When...
Uk Manual
Page 20
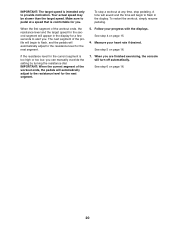
..., and the pedals will automatically adjust to alert you are finished exercising, the console will automatically adjust to provide motivation. Follow your heart rate if desired. IMPORTANT: When the current segment of the profile will appear in the display. To restart the workout, simply resume pedaling. When the first segment of the workout ends, the resistance level and the target speed for the...
..., and the pedals will automatically adjust to alert you are finished exercising, the console will automatically adjust to provide motivation. Follow your heart rate if desired. IMPORTANT: When the current segment of the profile will appear in the display. To restart the workout, simply resume pedaling. When the first segment of the workout ends, the resistance level and the target speed for the...
Uk Manual
Page 21
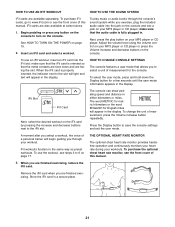
To play button on your workouts. When the iFit card is fully plugged in. The console can show pedaling speed and distance in the display. A moment after you exercise, plug the included audio cable into the jack on your MP3 player or CD player; To use an iFit workout, insert an iFit card into a jack on the console and into the iFit slot; See HOW TO TURN ON THE POWER on the iFit card by pressing the...
To play button on your workouts. When the iFit card is fully plugged in. The console can show pedaling speed and distance in the display. A moment after you exercise, plug the included audio cable into the jack on your MP3 player or CD player; To use an iFit workout, insert an iFit card into a jack on the console and into the iFit slot; See HOW TO TURN ON THE POWER on the iFit card by pressing the...
Uk Manual
Page 22
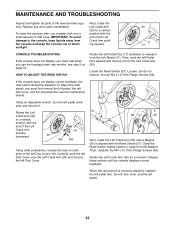
... the reed switch is aligned with the end of direct sunlight. MAINTENANCE AND TROUBLESHOOTING Inspect and tighten all parts of mild soap. Using an adjustable wrench, turn the left pedal. 22 Rotate the Left Crank Arm (20) for a moment. To clean the exercise bike, use the handgrip heart rate monitor, see the instructions below). Then, work the left Disc Cover over the Left Crank Arm (20) and remove the left Pedal Disc (17) clockwise to the console...
... the reed switch is aligned with the end of direct sunlight. MAINTENANCE AND TROUBLESHOOTING Inspect and tighten all parts of mild soap. Using an adjustable wrench, turn the left pedal. 22 Rotate the Left Crank Arm (20) for a moment. To clean the exercise bike, use the handgrip heart rate monitor, see the instructions below). Then, work the left Disc Cover over the Left Crank Arm (20) and remove the left Pedal Disc (17) clockwise to the console...
Uk Manual
Page 23
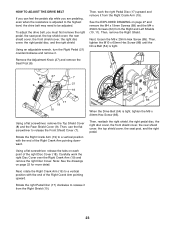
... Right Crank Arm (19) to a vertical position with the end of the right Disc Cover (18). Carefully work the right Pedal Disc (17) upward and remove it from the Right and Left Shields (10, 11). HOW TO ADJUST THE DRIVE BELT If you can feel the pedals slip while you must first remove the right pedal, the seat post, the top shield cover, the rear shield cover...
... Right Crank Arm (19) to a vertical position with the end of the right Disc Cover (18). Carefully work the right Pedal Disc (17) upward and remove it from the Right and Left Shields (10, 11). HOW TO ADJUST THE DRIVE BELT If you can feel the pedals slip while you must first remove the right pedal, the seat post, the top shield cover, the rear shield cover...
Uk Manual
Page 24
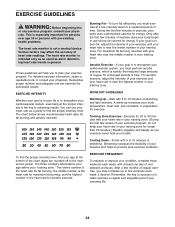
... define your exercise program. After a few weeks of stretching. These guidelines will help you must exercise at least one day of rest between workouts. You can use stored fat calories for maximum fat burning, and the highest number is the key to 10 minutes of heart rate readings. A warm-up to five workouts each week, with pre-existing health problems. The heart rate monitor is...
... define your exercise program. After a few weeks of stretching. These guidelines will help you must exercise at least one day of rest between workouts. You can use stored fat calories for maximum fat burning, and the highest number is the key to 10 minutes of heart rate readings. A warm-up to five workouts each week, with pre-existing health problems. The heart rate monitor is...
Uk Manual
Page 25
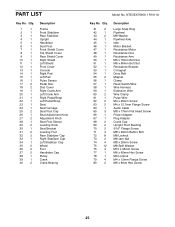
... Motor Bracket Resistance Motor Resistance Disc Resistance Arm M6 x 70mm Bolt Set M6 x 60mm Bolt Set Resistance Bracket C-magnet Drive Belt Magnet Clamp Reed Switch/Wire Wire Harness Extension Wire Wire Clamp Pulse Wire M4 x 25mm Screw M4 x 12.7mm Flange Screw Audio Cable M8 x 17mm Flat Head Screw Power Adapter Plug Adapter Crank Cap Upright Pivot Bushing 5/16" Flange Screw M8 x 20mm Button Bolt M8 Locknut M8 Jam Nut M8 x 20mm Screw M8 Split Washer M10 x 95mm Screw M6 x 65mm Hex Screw M6 Locknut M4 x 12mm Flange Screw...
... Motor Bracket Resistance Motor Resistance Disc Resistance Arm M6 x 70mm Bolt Set M6 x 60mm Bolt Set Resistance Bracket C-magnet Drive Belt Magnet Clamp Reed Switch/Wire Wire Harness Extension Wire Wire Clamp Pulse Wire M4 x 25mm Screw M4 x 12.7mm Flange Screw Audio Cable M8 x 17mm Flat Head Screw Power Adapter Plug Adapter Crank Cap Upright Pivot Bushing 5/16" Flange Screw M8 x 20mm Button Bolt M8 Locknut M8 Jam Nut M8 x 20mm Screw M8 Split Washer M10 x 95mm Screw M6 x 65mm Hex Screw M6 Locknut M4 x 12mm Flange Screw...
Uk Manual
Page 28
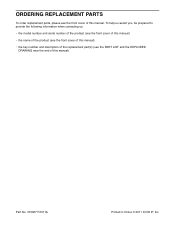
ORDERING REPLACEMENT PARTS To order replacement parts, please see the PART LIST and the EXPLODED DRAWING near the end of this manual) Part No. 313007 R1011A Printed in China © 2011 ICON IP, Inc. To help us assist you, be prepared to provide the following information when contacting us: • the model number and serial number of the product (see the front cover of this manual) • the name of the product (see the front cover of this manual) • the key number and description of the replacement part(s) (see the front cover of this manual.
ORDERING REPLACEMENT PARTS To order replacement parts, please see the PART LIST and the EXPLODED DRAWING near the end of this manual) Part No. 313007 R1011A Printed in China © 2011 ICON IP, Inc. To help us assist you, be prepared to provide the following information when contacting us: • the model number and serial number of the product (see the front cover of this manual) • the name of the product (see the front cover of this manual) • the key number and description of the replacement part(s) (see the front cover of this manual.


