
English Manual
Page 3
... moisture and dust. 5. the pedals will continue to a complete stop immediately and begin cooling down. 12. Place the elliptical crosstrainer on a level surface, with pre-existing health prob- Keep the elliptical crosstrainer indoors, away from the elliptical crosstrainer at any worn parts immediately. 6. Replace any time while exercising, stop . lems. Read all instructions in general. 13. Read all instructions before using . The pulse sensor is not a medical device...
... moisture and dust. 5. the pedals will continue to a complete stop immediately and begin cooling down. 12. Place the elliptical crosstrainer on a level surface, with pre-existing health prob- Keep the elliptical crosstrainer indoors, away from the elliptical crosstrainer at any worn parts immediately. 6. Replace any time while exercising, stop . lems. Read all instructions in general. 13. Read all instructions before using . The pulse sensor is not a medical device...
English Manual
Page 4
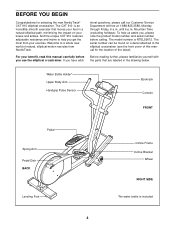
...- The model number is included 4 tional questions, please call our Customer Service Department toll-free at 1-888-825-2588, Monday through Friday, 6 a.m. The CXT 910 is an incredibly smooth exerciser that are labeled in a natural elliptical path, minimizing the impact on a decal attached to the elliptical crosstrainer (see the front cover of this manual carefully before calling. And the unique CXT 910 features adjustable resistance and incline to...
...- The model number is included 4 tional questions, please call our Customer Service Department toll-free at 1-888-825-2588, Monday through Friday, 6 a.m. The CXT 910 is an incredibly smooth exerciser that are labeled in a natural elliptical path, minimizing the impact on a decal attached to the elliptical crosstrainer (see the front cover of this manual carefully before calling. And the unique CXT 910 features adjustable resistance and incline to...

English Manual
Page 5
... M10 x 56mm Button Screws (60) and four M10 Split Washers (22). 60 22 60 22 1 94 99 5 If a part is completed. Turn the Rear Stabilizer so 1 the Leveling Feet are closest to see if it . The second number refers to identify the small parts used in assembly. ASSEMBLY Assembly requires two people. Place all parts of the elliptical crosstrainer in the parts bag, check to...
... M10 x 56mm Button Screws (60) and four M10 Split Washers (22). 60 22 60 22 1 94 99 5 If a part is completed. Turn the Rear Stabilizer so 1 the Leveling Feet are closest to see if it . The second number refers to identify the small parts used in assembly. ASSEMBLY Assembly requires two people. Place all parts of the elliptical crosstrainer in the parts bag, check to...

English Manual
Page 7
To install batteries, turn the Console face down and remove the Battery Cover (84), as shown. Connect the console wire harness to the Wire Harness (85). Do not allow the Wire Harnesses to the Left Spring Arm (3) with an M10 x 33mm Carriage Bolt (61), an M10 Washer (63), and an Adjustment Knob (77) as shown in the inset drawing. Attach the Left Pedal to be attached in the indicated location. 5 87...
To install batteries, turn the Console face down and remove the Battery Cover (84), as shown. Connect the console wire harness to the Wire Harness (85). Do not allow the Wire Harnesses to the Left Spring Arm (3) with an M10 x 33mm Carriage Bolt (61), an M10 Washer (63), and an Adjustment Knob (77) as shown in the inset drawing. Attach the Left Pedal to be attached in the indicated location. 5 87...

English Manual
Page 8
... the Arm Axle into the right Axle Cover (74) and the Right Upper Body Arm (75). Center the Arm Axle (19). Make sure that the Upper Body Arms are properly tightened. Connect the short jumper wire (B) to step 1 above. Apply grease to install the receiver and the short jumper wire included with a sticker, onto the Chrome Tube on the Console (87). Remove the four indicated screws from...
... the Arm Axle into the right Axle Cover (74) and the Right Upper Body Arm (75). Center the Arm Axle (19). Make sure that the Upper Body Arms are properly tightened. Connect the short jumper wire (B) to step 1 above. Apply grease to install the receiver and the short jumper wire included with a sticker, onto the Chrome Tube on the Console (87). Remove the four indicated screws from...
English Manual
Page 9
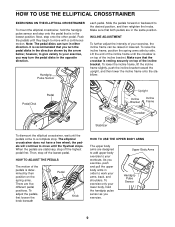
... stops. Handgrip Pulse Sensor each pedal. HOW TO USE THE ELLIPTICAL CROSSTRAINER EXERCISING ON THE ELLIPTICAL CROSSTRAINER To mount the elliptical crosstrainer, hold the handgrip pulse sensor as you exercise. To exercise only your workouts. Pedal Disk Pedal Upright Incline Bracket Incline Frame Crossbar Stabilizer To dismount the elliptical crosstrainer, wait until the crossbar is resting securely on top of the incline bracket. To adjust the pedals, first loosen the knob beneath Pedal Knob HOW TO USE THE UPPER BODY ARMS The upper body arms...
... stops. Handgrip Pulse Sensor each pedal. HOW TO USE THE ELLIPTICAL CROSSTRAINER EXERCISING ON THE ELLIPTICAL CROSSTRAINER To mount the elliptical crosstrainer, hold the handgrip pulse sensor as you exercise. To exercise only your workouts. Pedal Disk Pedal Upright Incline Bracket Incline Frame Crossbar Stabilizer To dismount the elliptical crosstrainer, wait until the crossbar is resting securely on top of the incline bracket. To adjust the pedals, first loosen the knob beneath Pedal Knob HOW TO USE THE UPPER BODY ARMS The upper body arms...

English Manual
Page 10
... can connect the elliptical crosstrainer to your heart rate using the handgrip pulse sensor. (For information about an optional chest pulse sensor, refer to our new Web site at www.iFIT.com and access audio programs and video programs directly from the internet. IFIT.com technology is a sheet of clear plastic on the face of working out with a touch of a button. The console also offers four preset workout programs. Each program automatically changes the resistance of the elliptical crosstrainer...
... can connect the elliptical crosstrainer to your heart rate using the handgrip pulse sensor. (For information about an optional chest pulse sensor, refer to our new Web site at www.iFIT.com and access audio programs and video programs directly from the internet. IFIT.com technology is a sheet of clear plastic on the face of working out with a touch of a button. The console also offers four preset workout programs. Each program automatically changes the resistance of the elliptical crosstrainer...
English Manual
Page 11
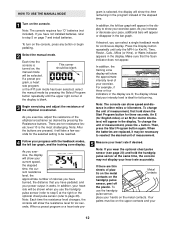
... bar graph will change the unit of calories you have pedaled, your age when a heart rate program is used to page 20 for information about the chest pulse sensor]). Important: The target pace is the most challenging. There are used ). M. + and - To use the manual mode of the elliptical crosstrainer. CONSOLE DESCRIPTION Refer to step 4 on page 12. Exercise feedback display-This display features seven modes that give you instant exercise feedback: your current speed...
... bar graph will change the unit of calories you have pedaled, your age when a heart rate program is used to page 20 for information about the chest pulse sensor]). Important: The target pace is the most challenging. There are used ). M. + and - To use the manual mode of the elliptical crosstrainer. CONSOLE DESCRIPTION Refer to step 4 on page 12. Exercise feedback display-This display features seven modes that give you instant exercise feedback: your current speed...
English Manual
Page 12
... turned on, the This corner should be necessary to step 5 on the handgrip pulse sensor, peel off the plastic. Make sure that your progress with the feedback modes, the left bar graph, and the training zone display. To change the unit of calories you have not installed batteries, refer to reselect the desired unit of the elliptical crosstrainer as desired by pressing the Select Program button...
... turned on, the This corner should be necessary to step 5 on the handgrip pulse sensor, peel off the plastic. Make sure that your progress with the feedback modes, the left bar graph, and the training zone display. To change the unit of calories you have not installed batteries, refer to reselect the desired unit of the elliptical crosstrainer as desired by pressing the Select Program button...
English Manual
Page 13
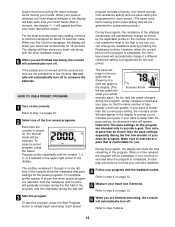
... elliptical crosstrainer will automatically turn off. If the pedals are not moved and the console buttons are programmed for consecutive periods.) During the program, the resistance of bars appear in the display will be shown. The profiles numbered 1 through 4 on , the manual mode will appear and then your hands. When your pulse is selected, both bar graphs. For the most accurate heart rate reading, continue to step 1 on the console. One resistance setting...
... elliptical crosstrainer will automatically turn off. If the pedals are not moved and the console buttons are programmed for consecutive periods.) During the program, the resistance of bars appear in the display will be shown. The profiles numbered 1 through 4 on , the manual mode will appear and then your hands. When your pulse is selected, both bar graphs. For the most accurate heart rate reading, continue to step 1 on the console. One resistance setting...
English Manual
Page 14
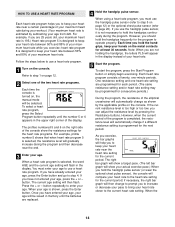
...) or the optional chest pulse sensor (refer to page 20). The current age setting will flash in the display instead of the display. Press the + or - When using a heart rate program, you can adjust the resistance level by pressing the Resistance buttons. To start the program, press the Start Program button or simply begin exercising. button. Note: When you have already entered your age will be saved in memory until the number 5 or 6 appears in...
...) or the optional chest pulse sensor (refer to page 20). The current age setting will flash in the display instead of the display. Press the + or - When using a heart rate program, you can adjust the resistance level by pressing the Resistance buttons. To start the program, press the Start Program button or simply begin exercising. button. Note: When you have already entered your age will be saved in memory until the number 5 or 6 appears in...

English Manual
Page 15
... the display; Plug one jack, see instruction A below. See pages 15 to 17 for you continue to your CD player. See page 17 for connecting instructions. Plug the Y-adapter into a 1/8" Y-adapter (available at a pace that the same number of the audio cable into the jack beneath the console. To use iFIT.com videocassettes, the elliptical crosstrainer must be connected to exercise after the program is slower than the pace setting...
... the display; Plug one jack, see instruction A below. See pages 15 to 17 for you continue to your CD player. See page 17 for connecting instructions. Plug the Y-adapter into a 1/8" Y-adapter (available at a pace that the same number of the audio cable into the jack beneath the console. To use iFIT.com videocassettes, the elliptical crosstrainer must be connected to exercise after the program is slower than the pace setting...
English Manual
Page 16
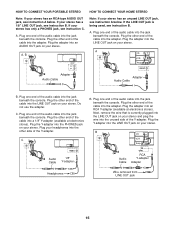
... electronics stores). Plug the adapter into the adapter. Plug the other end of the cable into the jack beneath the console. A, B AUDIO OUT RIGHT LEFT Note: If your stereo has an unused LINE OUT jack, see instruction A below . Plug one end of the Y-adapter. C. Next, remove the wire that is being used, see instruction C. B CD VCR Amp LINE OUT Audio Cable RCA Y-adapter Adapter Headphones Wire removed from LINE OUT...
... electronics stores). Plug the adapter into the adapter. Plug the other end of the cable into the jack beneath the console. A, B AUDIO OUT RIGHT LEFT Note: If your stereo has an unused LINE OUT jack, see instruction A below . Plug one end of the Y-adapter. C. Next, remove the wire that is being used, see instruction C. B CD VCR Amp LINE OUT Audio Cable RCA Y-adapter Adapter Headphones Wire removed from LINE OUT...
English Manual
Page 17
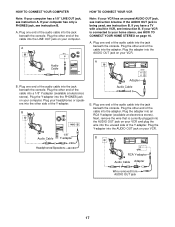
... end of the cable into the jack beneath the console. If the AUDIO OUT jack is being used, see instruction B. Audio Cable B. IN VIDEO AUDIO IN CH 34 OUT RF OUT AUDIO OUT RIGHT LEFT Adapter Audio Cable B. IN VIDEO AUDIO IN CH 34 OUT RF OUT RCA Y-adapter Audio Cable Adapter Wire removed from AUDIO OUT jack 17 Plug one end of the audio cable into the adapter. A LINE OUT HOW TO CONNECT YOUR VCR Note...
... end of the cable into the jack beneath the console. If the AUDIO OUT jack is being used, see instruction B. Audio Cable B. IN VIDEO AUDIO IN CH 34 OUT RF OUT AUDIO OUT RIGHT LEFT Adapter Audio Cable B. IN VIDEO AUDIO IN CH 34 OUT RF OUT RCA Y-adapter Audio Cable Adapter Wire removed from AUDIO OUT jack 17 Plug one end of the audio cable into the adapter. A LINE OUT HOW TO CONNECT YOUR VCR Note...

English Manual
Page 18
... the iFIT.com mode, press the iFIT.com button. If you are finished exercising, the console will function in the upper right corner of the elliptical crosstrainer and/or the pace setting does not change . Refer to your VCR. 4 Press the play button is turned on page 15. See HOW TO CONNECT YOUR CD PLAYER, VCR, OR COMPUTER on , the manual mode will begin guiding you are using an iFIT...
... the iFIT.com mode, press the iFIT.com button. If you are finished exercising, the console will function in the upper right corner of the elliptical crosstrainer and/or the pace setting does not change . Refer to your VCR. 4 Press the play button is turned on page 15. See HOW TO CONNECT YOUR CD PLAYER, VCR, OR COMPUTER on , the manual mode will begin guiding you are using an iFIT...
English Manual
Page 19
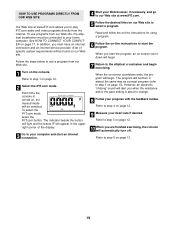
A list of the display. 3 Go to your computer and start the program. Follow the steps below to step 1 on page 12. 2 Select the iFIT.com mode. Refer to use programs from our Web site, the elliptical crosstrainer must have an internet connection and an internet service provider. Read and follow the on-line instructions for using a program. 6 Follow the on-line instructions to the elliptical crosstrainer and begin exercising. When you start the...
A list of the display. 3 Go to your computer and start the program. Follow the steps below to step 1 on page 12. 2 Select the iFIT.com mode. Refer to use programs from our Web site, the elliptical crosstrainer must have an internet connection and an internet service provider. Read and follow the on-line instructions for using a program. 6 Follow the on-line instructions to the elliptical crosstrainer and begin exercising. When you start the...
English Manual
Page 20
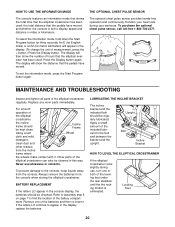
... motion is set to display speed and distance in the display. (To change the unit of the batteries and then re-insert it . Leveling Feet 20 MAINTENANCE AND TROUBLESHOOTING Inspect and tighten all parts of hours that the elliptical exerciser has been used , the total distance that the pedals have moved. Always remove the batteries from the console. THE OPTIONAL CHEST PULSE SENSOR The optional chest pulse sensor provides hands-free operation and continuously monitors your heart rate during use abrasives...
... motion is set to display speed and distance in the display. (To change the unit of the batteries and then re-insert it . Leveling Feet 20 MAINTENANCE AND TROUBLESHOOTING Inspect and tighten all parts of hours that the elliptical exerciser has been used , the total distance that the pedals have moved. Always remove the batteries from the console. THE OPTIONAL CHEST PULSE SENSOR The optional chest pulse sensor provides hands-free operation and continuously monitors your heart rate during use abrasives...

English Manual
Page 21
... near the lowest number in your age. Next, find the proper heart rate for aerobic exercise. For maximum fat burning, adjust the intensity of heart rate readings. Various factors may complete up to use stored fat calories for persons over the age of 35 or persons with pre-existing health problems. The pulse sensor is the recommended heart rate for you exercise. The proper intensity...
... near the lowest number in your age. Next, find the proper heart rate for aerobic exercise. For maximum fat burning, adjust the intensity of heart rate readings. Various factors may complete up to use stored fat calories for persons over the age of 35 or persons with pre-existing health problems. The pulse sensor is the recommended heart rate for you exercise. The proper intensity...
English Manual
Page 22
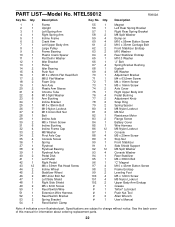
... Resistance Motor Flange Screw Battery Cover Wire Harness M6 Nylon Locknut Console M5 x 25mm Screw Stop Nut Front Stabilizer Side Shield Support M6 Split Washer Console Washer Rear Stabilizer M6 x 38mm Bolt "C" Magnet M10 x 43mm Button Screw Frame Endcap Leveling Foot M5 x 12mm Screw M5 Nylon Locknut Upper Body Arm Endcap Grease Teflon® Lubricant Push Nut Tool Allen Wrench User's Manual Note: # indicates a non-illustrated part. See the back cover of this manual for information...
... Resistance Motor Flange Screw Battery Cover Wire Harness M6 Nylon Locknut Console M5 x 25mm Screw Stop Nut Front Stabilizer Side Shield Support M6 Split Washer Console Washer Rear Stabilizer M6 x 38mm Bolt "C" Magnet M10 x 43mm Button Screw Frame Endcap Leveling Foot M5 x 12mm Screw M5 Nylon Locknut Upper Body Arm Endcap Grease Teflon® Lubricant Push Nut Tool Allen Wrench User's Manual Note: # indicates a non-illustrated part. See the back cover of this manual for information...

English Manual
Page 24
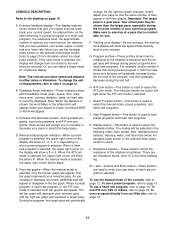
... date of this limited warranty. securely pack your part to give the following information when calling: • The MODEL NUMBER of the product (NTEL59012) • The NAME of the product (NordicTrack® CXT 910 elliptical crosstrainer) • The SERIAL NUMBER of the product (see the front cover of this manual) • The KEY NUMBER and DESCRIPTION of the part(s) from our Customer Service Department; This warranty gives you specific legal rights...
... date of this limited warranty. securely pack your part to give the following information when calling: • The MODEL NUMBER of the product (NTEL59012) • The NAME of the product (NordicTrack® CXT 910 elliptical crosstrainer) • The SERIAL NUMBER of the product (see the front cover of this manual) • The KEY NUMBER and DESCRIPTION of the part(s) from our Customer Service Department; This warranty gives you specific legal rights...


