
English Manual
Page 2
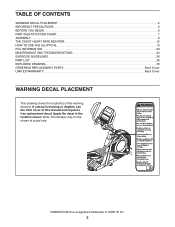
... CONTENTS WARNING DECAL PLACEMENT 2 IMPORTANT PRECAUTIONS 3 BEFORE YOU BEGIN 6 PART IDENTIFICATION CHART 7 ASSEMBLY 8 THE CHEST HEART RATE MONITOR 12 HOW TO USE THE ELLIPTICAL 13 FCC INFORMATION 23 MAINTENANCE AND TROUBLESHOOTING 24 EXERCISE GUIDELINES 26 PART LIST 28 EXPLODED DRAWING 30 ORDERING REPLACEMENT PARTS Back Cover LIMITED WARRANTY Back Cover WARNING DECAL PLACEMENT This drawing shows the location(s) of this manual and request a free replacement decal. Note: The decal(s) may not be shown at actual size.
... CONTENTS WARNING DECAL PLACEMENT 2 IMPORTANT PRECAUTIONS 3 BEFORE YOU BEGIN 6 PART IDENTIFICATION CHART 7 ASSEMBLY 8 THE CHEST HEART RATE MONITOR 12 HOW TO USE THE ELLIPTICAL 13 FCC INFORMATION 23 MAINTENANCE AND TROUBLESHOOTING 24 EXERCISE GUIDELINES 26 PART LIST 28 EXPLODED DRAWING 30 ORDERING REPLACEMENT PARTS Back Cover LIMITED WARRANTY Back Cover WARNING DECAL PLACEMENT This drawing shows the location(s) of this manual and request a free replacement decal. Note: The decal(s) may not be shown at actual size.
English Manual
Page 3
... and instructions in this manual and all parts regularly. ICON assumes no responsibility for foot protection while exercising. 6. tained by an authorized service repre- This is not a medical device. Use the elliptical only as an exercise aid in determining heart rate trends in serious injury or death. DANGER: 12. Always unplug the power cord and switch the power switch to move until the flywheel stops. Do not use of...
... and instructions in this manual and all parts regularly. ICON assumes no responsibility for foot protection while exercising. 6. tained by an authorized service repre- This is not a medical device. Use the elliptical only as an exercise aid in determining heart rate trends in serious injury or death. DANGER: 12. Always unplug the power cord and switch the power switch to move until the flywheel stops. Do not use of...
English Manual
Page 6
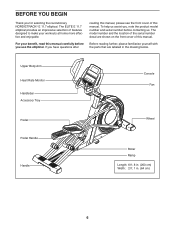
... this manual carefully before contacting us. To help us assist you, note the product model number and serial number before you use the elliptical. Upper Body Arm Heart Rate Monitor Handlebar Accessory Tray Pedal Pedal Handle Handle Console Fan Wheel Roller Ramp Length: 6 ft. 8 in. (203 cm) Width: 2 ft. 1 in the drawing below. For your workouts at home more effective and enjoyable. The model number and the location of the serial number decal...
... this manual carefully before contacting us. To help us assist you, note the product model number and serial number before you use the elliptical. Upper Body Arm Heart Rate Monitor Handlebar Accessory Tray Pedal Pedal Handle Handle Console Fan Wheel Roller Ramp Length: 6 ft. 8 in. (203 cm) Width: 2 ft. 1 in the drawing below. For your workouts at home more effective and enjoyable. The model number and the location of the serial number decal...

English Manual
Page 8
... upgrades and offers Note: If you complete all assembly steps. •• Left parts are marked “"L”" or “"Left”" and right parts are marked “"R”" or “"Right.”" •• To identify small parts, see the front cover of the Frame (1). Attach the other Rear Stabilizer (5) in a cleared area and remove the packing materials. Attach one adjustable...
... upgrades and offers Note: If you complete all assembly steps. •• Left parts are marked “"L”" or “"Left”" and right parts are marked “"R”" or “"Right.”" •• To identify small parts, see the front cover of the Frame (1). Attach the other Rear Stabilizer (5) in a cleared area and remove the packing materials. Attach one adjustable...
English Manual
Page 12
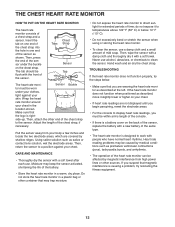
... console. •• If there is a battery cover on your body a few inches and locate the two electrode areas, which are covered by medical conditions such as described at the left. Never use alcohol, abrasives, or chemicals to the sensor. Hand wash and air dry the chest strap. The tab should be within arm’'s length of mild soap. Wrap the heart rate monitor...
... console. •• If there is a battery cover on your body a few inches and locate the two electrode areas, which are covered by medical conditions such as described at the left. Never use alcohol, abrasives, or chemicals to the sensor. Hand wash and air dry the chest strap. The tab should be within arm’'s length of mild soap. Wrap the heart rate monitor...

English Manual
Page 13
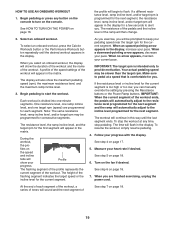
... used to connect the power cord to a 2-pole receptacle as shown at the right if a properly grounded outlet is properly installed and grounded in accordance with a grounding pin. The power cord has a plug with all local codes and ordinances. Some 2-pole receptacle outlet box covers are unsure whether the product is grounded before using an adapter. HOW TO ADJUST THE POSITIONS OF THE PEDALS Each pedal...
... used to connect the power cord to a 2-pole receptacle as shown at the right if a properly grounded outlet is properly installed and grounded in accordance with a grounding pin. The power cord has a plug with all local codes and ordinances. Some 2-pole receptacle outlet box covers are unsure whether the product is grounded before using an adapter. HOW TO ADJUST THE POSITIONS OF THE PEDALS Each pedal...
English Manual
Page 14
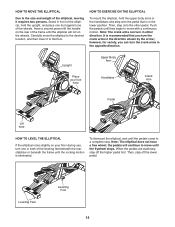
... size and weight of the elliptical, moving it to the floor. Note: The elliptical does not have a free wheel; Upright Place your foot here Upper Body Arm Handlebar Crank Arm Pedal Lift here HOW TO LEVEL THE ELLIPTICAL If the elliptical rocks slightly on your floor during use, turn the crank arms in either direction. the pedals will roll on the rear of the wheels. When the pedals are stationary, step off the lower pedal...
... size and weight of the elliptical, moving it to the floor. Note: The elliptical does not have a free wheel; Upright Place your foot here Upper Body Arm Handlebar Crank Arm Pedal Lift here HOW TO LEVEL THE ELLIPTICAL If the elliptical rocks slightly on your floor during use, turn the crank arms in either direction. the pedals will roll on the rear of the wheels. When the pedals are stationary, step off the lower pedal...
English Manual
Page 15
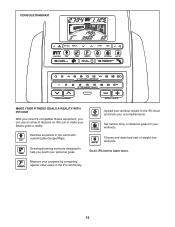
... other users in the world with customizable Google Maps. Measure your accomplishments. Choose and download sets of features on iFit.com to make your fitness goals a reality: Exercise anywhere in the iFit community. 15 Upload your workout results to learn more. Set calorie, time, or distance goals for your workouts. CONSOLE DIAGRAM MAKE YOUR FITNESS GOALS A REALITY WITH IFIT.COM With your new iFit-compatible fitness equipment...
... other users in the world with customizable Google Maps. Measure your accomplishments. Choose and download sets of features on iFit.com to make your fitness goals a reality: Exercise anywhere in the iFit community. 15 Upload your workout results to learn more. Set calorie, time, or distance goals for your workouts. CONSOLE DIAGRAM MAKE YOUR FITNESS GOALS A REALITY WITH IFIT.COM With your new iFit-compatible fitness equipment...
English Manual
Page 16
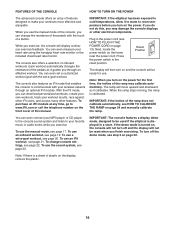
... the console will not be reset when you turn off the demo mode, see HOW TO CALIBRATE THE RAMP on page 24 and manually calibrate the ramp. You can even measure your heart rate using the handgrip heart rate monitor or the included chest heart rate monitor. To use an iFit workout, see page 22. To change the resistance of the pedals with the touch of the pedals as it calibrates. If the demo mode is displayed in the power cord...
... the console will not be reset when you turn off the demo mode, see HOW TO CALIBRATE THE RAMP on page 24 and manually calibrate the ramp. You can even measure your heart rate using the handgrip heart rate monitor or the included chest heart rate monitor. To use an iFit workout, see page 22. To change the resistance of the pedals with the touch of the pedals as it calibrates. If the demo mode is displayed in the power cord...
English Manual
Page 17
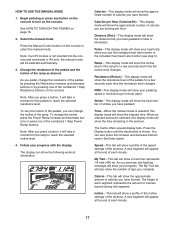
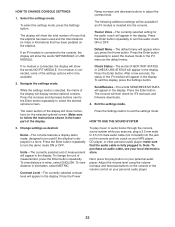
... speed settings of the ramp for the pedals to turn on the console to the Enter button. Pulse—-This display mode will show your progress. HOW TO USE THE MANUAL MODE 1. Select the manual mode. Note: After you complete. Press the Manual Control button on the console. Begin pedaling or press any button on page 16. 2. See HOW TO TURN ON THE POWER on the console to reach the selected resistance level. Ramp—-This display mode...
... speed settings of the ramp for the pedals to turn on the console to the Enter button. Pulse—-This display mode will show your progress. HOW TO USE THE MANUAL MODE 1. Select the manual mode. Note: After you complete. Press the Manual Control button on the console. Begin pedaling or press any button on page 16. 2. See HOW TO TURN ON THE POWER on the console to reach the selected resistance level. Ramp—-This display mode...
English Manual
Page 18
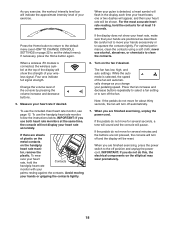
... are finished exercising, press the power switch to set the default menu). When you use the included chest heart rate monitor, see HOW TO CHANGE CONSOLE SETTINGS on the elliptical may wear prematurely. 18 When you do not do not move your wireless signal. When a wireless iFit module is connected, the wireless symbol at the same time, the console will turn off position and unplug the power cord. Avoid moving your hands...
... are finished exercising, press the power switch to set the default menu). When you use the included chest heart rate monitor, see HOW TO CHANGE CONSOLE SETTINGS on the elliptical may wear prematurely. 18 When you do not do not move your wireless signal. When a wireless iFit module is connected, the wireless symbol at the same time, the console will turn off position and unplug the power cord. Avoid moving your hands...
English Manual
Page 19
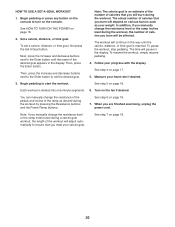
... heart rate if desired. When a downward-pointing arrow appears, decrease your progress with the display. To stop pedaling. The workout will appear in the matrix. If a different resistance level, ramp incline level, and/or target rpm is divided into one target rpm (speed) are nished exercising, unplug the power cord. See HOW TO TURN ON THE POWER on the speed and incline tabs will automatically adjust...
... heart rate if desired. When a downward-pointing arrow appears, decrease your progress with the display. To stop pedaling. The workout will appear in the matrix. If a different resistance level, ramp incline level, and/or target rpm is divided into one target rpm (speed) are nished exercising, unplug the power cord. See HOW TO TURN ON THE POWER on the speed and incline tabs will automatically adjust...
English Manual
Page 20
... resistance of the pedals and incline of calories you burn will burn during the workout by pressing the Resistance buttons and the Power Ramp buttons. Note: If you manually change the resistance level or the ramp incline level during the workout, the number of the ramp as your calorie goal. Set a calorie, distance, or time goal. To set the desired goal. Then, press the Enter button. Follow your heart rate if desired. 3. Turn...
... resistance of the pedals and incline of calories you burn will burn during the workout by pressing the Resistance buttons and the Power Ramp buttons. Note: If you manually change the resistance level or the ramp incline level during the workout, the number of the ramp as your calorie goal. Set a calorie, distance, or time goal. To set the desired goal. Then, press the Enter button. Follow your heart rate if desired. 3. Turn...
English Manual
Page 21
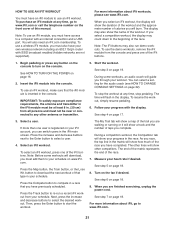
... it will show a track and the number of this manual. The display may count down to download the next workout of the iFit buttons. 1. Start the workout. Select a user. HOW TO USE AN IFIT WORKOUT You must have an iFit module to a computer with an internet connection and a USB port. See step 3 on page 16. 2. To stop pedaling. Note: Before some workouts, an audio coach will also need an iFit.com membership. The...
... it will show a track and the number of this manual. The display may count down to download the next workout of the iFit buttons. 1. Start the workout. Select a user. HOW TO USE AN IFIT WORKOUT You must have an iFit module to a computer with an internet connection and a USB port. See step 3 on page 16. 2. To stop pedaling. Note: Before some workouts, an audio coach will also need an iFit.com membership. The...
English Manual
Page 22
... fully plugged in the display. Demo—-The console features a display demo mode, designed to 3.5 mm male audio cable (not included) into the jack on your personal audio player. Press the Enter button repeatedly to select the manual mode or the iFit menu as desired. The following additional settings will appear in . While the settings mode is connected to follow the instructions shown in the display. make sure that has been pedaled...
... fully plugged in the display. Demo—-The console features a display demo mode, designed to 3.5 mm male audio cable (not included) into the jack on your personal audio player. Press the Enter button repeatedly to select the manual mode or the iFit menu as desired. The following additional settings will appear in . While the settings mode is connected to follow the instructions shown in the display. make sure that has been pedaled...
English Manual
Page 24
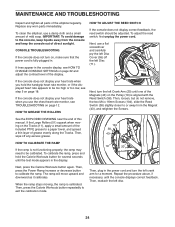
... calibrate the ramp. HOW TO ADJUST THE REED SWITCH If the console does not display correct feedback, the reed switch should be calibrated. Then, reattach the left crank arm for several seconds until the console displays correct feedback. To clean the elliptical, use the chest heart rate monitor, see HOW TO CHANGE CONSOLE SETTINGS on , make sure that the power cord is aligned with the Reed Switch (38). Then, press the Power Ramp increase or decrease button to the console...
... calibrate the ramp. HOW TO ADJUST THE REED SWITCH If the console does not display correct feedback, the reed switch should be calibrated. Then, reattach the left crank arm for several seconds until the console displays correct feedback. To clean the elliptical, use the chest heart rate monitor, see HOW TO CHANGE CONSOLE SETTINGS on , make sure that the power cord is aligned with the Reed Switch (38). Then, press the Power Ramp increase or decrease button to the console...
English Manual
Page 26
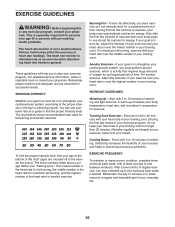
... increases your body temperature, heart rate, and circulation in your training zone. During the first few weeks of time. Aerobic Exercise—-If your goal is to five workouts each week, with pre-existing health problems. The heart rate monitor is to achieving results. A warm-up to burn fat, adjust the intensity of your exercise until your goal is to prevent post-exercise problems. EXERCISE FREQUENCY...
... increases your body temperature, heart rate, and circulation in your training zone. During the first few weeks of time. Aerobic Exercise—-If your goal is to five workouts each week, with pre-existing health problems. The heart rate monitor is to achieving results. A warm-up to burn fat, adjust the intensity of your exercise until your goal is to prevent post-exercise problems. EXERCISE FREQUENCY...
English Manual
Page 28
... 1 Description Frame Rear Stabilizer Cover Ramp Upright Rear Stabilizer Right Front Stabilizer Console Front Stabilizer Cover Left Front Stabilizer Ramp Cover Track Left Roller Arm Lift Motor Left Pedal Control Board Power Switch Power Cord Grommet Crank Pulley Crank Arm Front Roller Arm Cap Idler Rear Roller Arm Cap Pulse Sensor Cover Resistance Motor Lower Saddle Bracket Lift Frame Bushing Eddy Mechanism Left Pedal Handle Medium Bushing Lift Frame Axle Pulse Sensor Cap Small Snap Ring Wheel I-bolt Axle Right Upper Body Leg Accessory Tray Reed Switch/Wire Clamp Bearing Right...
... 1 Description Frame Rear Stabilizer Cover Ramp Upright Rear Stabilizer Right Front Stabilizer Console Front Stabilizer Cover Left Front Stabilizer Ramp Cover Track Left Roller Arm Lift Motor Left Pedal Control Board Power Switch Power Cord Grommet Crank Pulley Crank Arm Front Roller Arm Cap Idler Rear Roller Arm Cap Pulse Sensor Cover Resistance Motor Lower Saddle Bracket Lift Frame Bushing Eddy Mechanism Left Pedal Handle Medium Bushing Lift Frame Axle Pulse Sensor Cap Small Snap Ring Wheel I-bolt Axle Right Upper Body Leg Accessory Tray Reed Switch/Wire Clamp Bearing Right...

English Manual
Page 29
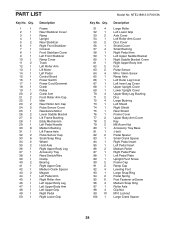
... 1 124 4 125 1 126 1 127 1 128 2 Idler Screw M8 Locknut Pedal Pin M4 x 16mm Screw Lift Frame Small Roller Standoff Pulse Wire Transmitter Main Wire Harness Right Pedal Handle Power Cord Drive Belt Receiver Extension Wire Chest Strap Receiver M10 x 54mm Bolt M10 Nut M8 Washer M8 Shoulder Screw Right Upper Saddle Bracket Stop Plate Control Board Bracket M4 x 25mm Screw Right Inner Leg Cover Right Outer Leg Cover Bumper M8 Flat Washer 129 4 130 4 131...
... 1 124 4 125 1 126 1 127 1 128 2 Idler Screw M8 Locknut Pedal Pin M4 x 16mm Screw Lift Frame Small Roller Standoff Pulse Wire Transmitter Main Wire Harness Right Pedal Handle Power Cord Drive Belt Receiver Extension Wire Chest Strap Receiver M10 x 54mm Bolt M10 Nut M8 Washer M8 Shoulder Screw Right Upper Saddle Bracket Stop Plate Control Board Bracket M4 x 25mm Screw Right Inner Leg Cover Right Outer Leg Cover Bumper M8 Flat Washer 129 4 130 4 131...
English Manual
Page 32
... model number and serial number of the product (see the front cover of this manual) •• the name of the product (see the front cover of this manual) •• the key number and description of the replacement part(s) (see page 5. This warranty does not extend to freight damage to the terms set forth above limitation may have other warranties, and any and all instructions in...
... model number and serial number of the product (see the front cover of this manual) •• the name of the product (see the front cover of this manual) •• the key number and description of the replacement part(s) (see page 5. This warranty does not extend to freight damage to the terms set forth above limitation may have other warranties, and any and all instructions in...


