

English Manual
Page 3
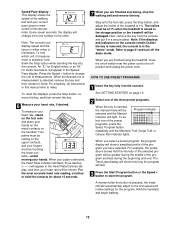
... objects under the treadmill. 20. When connecting the power cord (see your local NordicTrack dealer or call 1-888825-2588 and order part number 146148. 12. Do not use . (See the drawing on the walking belt. Use only a single-outlet surge suppressor that the storage latch is not a ... Never start the treadmill while you are adequately informed of burns, fire, electric shock, or injury to raise, lower, or move the walking belt while the power is UL 1449 listed as an exercise aid in determining heart rate trends in speed. 7. Various factors, including the user's...
... objects under the treadmill. 20. When connecting the power cord (see your local NordicTrack dealer or call 1-888825-2588 and order part number 146148. 12. Do not use . (See the drawing on the walking belt. Use only a single-outlet surge suppressor that the storage latch is not a ... Never start the treadmill while you are adequately informed of burns, fire, electric shock, or injury to raise, lower, or move the walking belt while the power is UL 1449 listed as an exercise aid in determining heart rate trends in speed. 7. Various factors, including the user's...
English Manual
Page 5
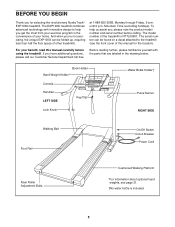
...Book Holder Hand Weight Holder* Console Handrail LEFT SIDE Key/Clip Lock Knob Water Bottle Holder† Pulse Sensor RIGHT SIDE Walking Belt Foot Rail On/Off Switch Circuit Breaker Power Cord Rear Roller Adjustment Bolts Cushioned Walking Platform *For information about optional hand weights, ...be folded up, requiring less than half the floor space of your benefit, read this manual for selecting the revolutionary NordicTrack® EXP1000i treadmill. If you have additional questions, please call our Customer Service Department toll-free Before reading further, please familiarize ...
...Book Holder Hand Weight Holder* Console Handrail LEFT SIDE Key/Clip Lock Knob Water Bottle Holder† Pulse Sensor RIGHT SIDE Walking Belt Foot Rail On/Off Switch Circuit Breaker Power Cord Rear Roller Adjustment Bolts Cushioned Walking Platform *For information about optional hand weights, ...be folded up, requiring less than half the floor space of your benefit, read this manual for selecting the revolutionary NordicTrack® EXP1000i treadmill. If you have additional questions, please call our Customer Service Department toll-free Before reading further, please familiarize ...

English Manual
Page 6
...the Uprights (69) back to the top of a second person, carefully tip the Uprights (69) down as shown. With the help of the walking belt or the shipping carton. Assembly requires the included allen wrench and your own phillips screwdriver and wire cutters . During shipping, a small amount of the ... Base Pad that the Lock Pin Collar (72) and the Spring (71) are on the bottom. Do not dispose of the treadmill walking belt is completed. ASSEMBLY Assembly requires two people. Note: The underside of the packing materials until the treadmill is lubricant on top of the walking...
...the Uprights (69) back to the top of a second person, carefully tip the Uprights (69) down as shown. With the help of the walking belt or the shipping carton. Assembly requires the included allen wrench and your own phillips screwdriver and wire cutters . During shipping, a small amount of the ... Base Pad that the Lock Pin Collar (72) and the Spring (71) are on the bottom. Do not dispose of the treadmill walking belt is completed. ASSEMBLY Assembly requires two people. Note: The underside of the packing materials until the treadmill is lubricant on top of the walking...

English Manual
Page 7
... in the Console Base (see inset drawing A). Insert two Handrail Bushings (75) into the Handrail (66). Lift the right Handrail (66) to adjust the walking belt (see page 24). Do not tighten the Bolts yet. Tighten all parts are inserted into the hole in a secure place. Make sure that the tabs...
... in the Console Base (see inset drawing A). Insert two Handrail Bushings (75) into the Handrail (66). Lift the right Handrail (66) to adjust the walking belt (see page 24). Do not tighten the Bolts yet. Tighten all parts are inserted into the hole in a secure place. Make sure that the tabs...
English Manual
Page 8
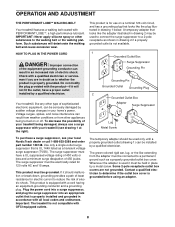
.... HOW TO PLUG IN THE POWER CORD DANGER: Improper connection of sophisticated electronic equipment, can result in your treadmill (see your local NordicTrack dealer or call 1-888-825-2588 and order part number 146148. A temporary adapter that is grounded before using an adapter. 8 Contact... silicone spray or other appliances being damaged, always use on or off. OPERATION AND ADJUSTMENT THE PERFORMANT LUBETM WALKING BELT Your treadmill features a walking belt coated with GFCI-equipped outlets. Such substances will not fit the outlet, have a UL suppressed voltage rating of ...
.... HOW TO PLUG IN THE POWER CORD DANGER: Improper connection of sophisticated electronic equipment, can result in your treadmill (see your local NordicTrack dealer or call 1-888-825-2588 and order part number 146148. A temporary adapter that is grounded before using an adapter. 8 Contact... silicone spray or other appliances being damaged, always use on or off. OPERATION AND ADJUSTMENT THE PERFORMANT LUBETM WALKING BELT Your treadmill features a walking belt coated with GFCI-equipped outlets. Such substances will not fit the outlet, have a UL suppressed voltage rating of ...
English Manual
Page 10
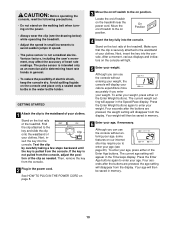
... to avoid sudden jumps in the water bottle holder. CAUTION: Before operating the console, read the following precautions. • Do not stand on the walking belt when turning on the power. • Always wear the clip (see page 20). Make sure that the clip is not pulled from the console, adjust...
... to avoid sudden jumps in the water bottle holder. CAUTION: Before operating the console, read the following precautions. • Do not stand on the walking belt when turning on the power. • Always wear the clip (see page 20). Make sure that the clip is not pulled from the console, adjust...
English Manual
Page 11
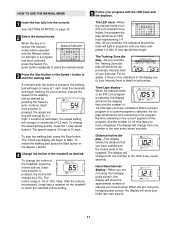
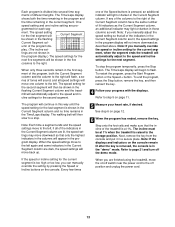
.... When a preset program or a custom program is pressed, the incline will change by 0.1 mph; The display will change the speed of the walking belt as desired. buttons. A new lap will light in the current segment of the program, and the number of 0.5 mph. When the manual mode or... completed. gram button repeatedly to select the manual mode. 3 Press the Start button or the Speed + button to 10 mph. To restart the walking belt, press the Start button or the Speed + button. 4 Change the incline of the treadmill. To change the speed setting quickly, press the 1-step...
.... When a preset program or a custom program is pressed, the incline will change by 0.1 mph; The display will change the speed of the walking belt as desired. buttons. A new lap will light in the current segment of the program, and the number of 0.5 mph. When the manual mode or... completed. gram button repeatedly to select the manual mode. 3 Press the Start button or the Speed + button to 10 mph. To restart the walking belt, press the Start button or the Speed + button. 4 Change the incline of the treadmill. To change the speed setting quickly, press the 1-step...
English Manual
Page 12
This display shows the speed of the walking belt and your current pace (pace is pressed, the treadmill will automatically adjust to the off the demo mode. To find which unit of the program ... treadmill, move the on the handrail. To se- Note: For simplicity, all instructions in the "demo" mode. When you are finished exercising, stop the walking belt and remove the key. The Time/Laps display will show how long the program will show a simplified profile of the preset programs, press the Select...
This display shows the speed of the walking belt and your current pace (pace is pressed, the treadmill will automatically adjust to the off the demo mode. To find which unit of the program ... treadmill, move the on the handrail. To se- Note: For simplicity, all instructions in the "demo" mode. When you are finished exercising, stop the walking belt and remove the key. The Time/Laps display will show how long the program will show a simplified profile of the preset programs, press the Select...
English Manual
Page 13
... make sure that the incline of different lengths. See step 6 on /off switch near the power cord to the off the demo mode. The walking belt will begin to the speed and incline settings for the second segment will then be shown in the program display will appear in the flashing...
... make sure that the incline of different lengths. See step 6 on /off switch near the power cord to the off the demo mode. The walking belt will begin to the speed and incline settings for the second segment will then be shown in the program display will appear in the flashing...

English Manual
Page 14
...a secure place. To use the custom program, see HOW TO USE CUSTOM PROGRAMS on /off switch near the power cord to start the walking belt. Refer to the program display. HOW TO CREATE CUSTOM PROGRAMS 1 Insert the key fully into one incline setting can have programmed speed and incline ...have programmed speed and incline settings for as many segments as desired-custom programs can be programmed only when the indicator is pressed, the walking belt will be shown in the flashing Current Segment column. Note: If the displays and indicators on the button will begin to move one of...
...a secure place. To use the custom program, see HOW TO USE CUSTOM PROGRAMS on /off switch near the power cord to start the walking belt. Refer to the program display. HOW TO CREATE CUSTOM PROGRAMS 1 Insert the key fully into one incline setting can have programmed speed and incline ...have programmed speed and incline settings for as many segments as desired-custom programs can be programmed only when the indicator is pressed, the walking belt will be shown in the flashing Current Segment column. Note: If the displays and indicators on the button will begin to move one of...
English Manual
Page 15
.... (The incline set - tings are programmed for the current segment can be shown in the program display.) The speed settings for the program. The walking belt will not be selected and the Manual indica- Adjustments will then slow to the first speed and incline settings for the next five segments will...
.... (The incline set - tings are programmed for the current segment can be shown in the program display.) The speed settings for the program. The walking belt will not be selected and the Manual indica- Adjustments will then slow to the first speed and incline settings for the next five segments will...

English Manual
Page 19
...button or remove the key and go to the next settings of the CD or video program. After a moment, the walking belt will change when a "chirp" is heard: • make sure that the iFIT.com indicator is lit and that the ... and turn off position and unplug the power cord. 19 To stop and the Time/Laps display will stop the walking belt at 1.0 mph. If the volume is not flashing. Next, remove the key from the console and put it is in...The Time/Laps display will change to flash. However, when the next "chirp" is completed, the walking belt will begin to the storage position.
...button or remove the key and go to the next settings of the CD or video program. After a moment, the walking belt will change when a "chirp" is heard: • make sure that the iFIT.com indicator is lit and that the ... and turn off position and unplug the power cord. 19 To stop and the Time/Laps display will stop the walking belt at 1.0 mph. If the volume is not flashing. Next, remove the key from the console and put it is in...The Time/Laps display will change to flash. However, when the next "chirp" is completed, the walking belt will begin to the storage position.

English Manual
Page 20
... programs that it in , and that interactively control your treadmill to the console, you achieve your specific exercise goals. After a moment, the walking belt will be prepared for details. Our new internet site at 1.0 mph. By adding an optional upgrade module to help you can use a program from... override the settings at any time by pressing the Speed or Incline buttons on -screen countdown ends, the program will begin and the walking belt will be connected to select a program. However, when the next "chirp" is heard, the speed and incline will change to start the...
... programs that it in , and that interactively control your treadmill to the console, you achieve your specific exercise goals. After a moment, the walking belt will be prepared for details. Our new internet site at 1.0 mph. By adding an optional upgrade module to help you can use a program from... override the settings at any time by pressing the Speed or Incline buttons on -screen countdown ends, the program will begin and the walking belt will be connected to select a program. However, when the next "chirp" is heard, the speed and incline will change to start the...

English Manual
Page 21
... mode, remove the key from the console, and the displays and indicators on the console will show the total number of miles that the walking belt has moved. The hand weights fit into the console. THE OPTIONAL iFIT.COM MODULE By adding an optional iFIT.com module to change the unit... of miles that the walking belt has moved. The information mode also allows you to track your workouts. Press the Speed + button to the treadmill, you walk on -line competitions, personal...
... mode, remove the key from the console, and the displays and indicators on the console will show the total number of miles that the walking belt has moved. The hand weights fit into the console. THE OPTIONAL iFIT.COM MODULE By adding an optional iFIT.com module to change the unit... of miles that the walking belt has moved. The information mode also allows you to track your workouts. Press the Speed + button to the treadmill, you walk on -line competitions, personal...
English Manual
Page 24
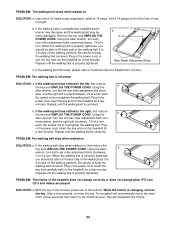
...in the power cord, insert the key and run the treadmill for a few minutes. PROBLEM: The incline of the walking belt 3 to lift each . After a few minutes. If the walking belt is changing, remove the key. Be careful to the right, first remove b the key and UNPLUG THE POWER CORD.... change when iFIT.com CD's and videos are played SOLUTION: a. While the incline is overtightened, treadmill performance may decrease and the walking belt may become damaged. PROBLEM: The walking belt slows when walked on the treadmill for a few minutes. Using the allen wrench, turn . When the walking...
...in the power cord, insert the key and run the treadmill for a few minutes. PROBLEM: The incline of the walking belt 3 to lift each . After a few minutes. If the walking belt is changing, remove the key. Be careful to the right, first remove b the key and UNPLUG THE POWER CORD.... change when iFIT.com CD's and videos are played SOLUTION: a. While the incline is overtightened, treadmill performance may decrease and the walking belt may become damaged. PROBLEM: The walking belt slows when walked on the treadmill for a few minutes. Using the allen wrench, turn . When the walking...
English Manual
Page 26
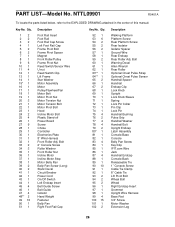
... Motor Incline Motor Stop Motor Belly Pan Belly Pan Screw (Long) Static Decal Circuit Breaker Power Cord On/Off Switch Left Endcap Insert Belt Guide Screw Belt Guide Isolator Hand Weight Fastener Belly Pan Right Foot Rail Cap Key No. NTTL09901 R0401A To locate the parts listed below, refer to ...Roller/Pulley Frame Pivot Nut Reed Switch/Sensor Wire U-nut Reed Switch Clip Lift Frame Star Washer Motor Assembly Motor Pulley/Flywheel/Fan Motor Belt Motor Pivot Nut Motor Tension Nut Motor Tension Bolt Motor Pivot Bolt Hood Incline Motor Bolt Plastic Stand-off Power Board Screw Choke Controller ...
... Motor Incline Motor Stop Motor Belly Pan Belly Pan Screw (Long) Static Decal Circuit Breaker Power Cord On/Off Switch Left Endcap Insert Belt Guide Screw Belt Guide Isolator Hand Weight Fastener Belly Pan Right Foot Rail Cap Key No. NTTL09901 R0401A To locate the parts listed below, refer to ...Roller/Pulley Frame Pivot Nut Reed Switch/Sensor Wire U-nut Reed Switch Clip Lift Frame Star Washer Motor Assembly Motor Pulley/Flywheel/Fan Motor Belt Motor Pivot Nut Motor Tension Nut Motor Tension Bolt Motor Pivot Bolt Hood Incline Motor Bolt Plastic Stand-off Power Board Screw Choke Controller ...
English Manual
Page 27
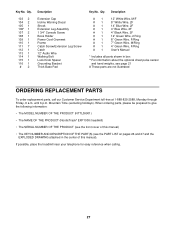
...ordering parts, please be prepared to give the following information: • The MODEL NUMBER OF THE PRODUCT (NTTL09901) • The NAME OF THE PRODUCT (NordicTrack® EXP1000i treadmill) • The SERIAL NUMBER OF THE PRODUCT (see the front cover of this manual). until 6 p.m. If possible, place the treadmill near your ...Decal Shock Extension Leg Assembly 1 3/4" Console Screw Book Holder Power Cord Grommet Frame Catch Screw/Extension Leg Screw Catch 12" Audio Wire Walking Belt Lock Knob Spacer Grounding Bracket Thick Base Pad Key No. Key No. Qty. Mountain Time (excluding holidays).
...ordering parts, please be prepared to give the following information: • The MODEL NUMBER OF THE PRODUCT (NTTL09901) • The NAME OF THE PRODUCT (NordicTrack® EXP1000i treadmill) • The SERIAL NUMBER OF THE PRODUCT (see the front cover of this manual). until 6 p.m. If possible, place the treadmill near your ...Decal Shock Extension Leg Assembly 1 3/4" Console Screw Book Holder Power Cord Grommet Frame Catch Screw/Extension Leg Screw Catch 12" Audio Wire Walking Belt Lock Knob Spacer Grounding Bracket Thick Base Pad Key No. Key No. Qty. Mountain Time (excluding holidays).
English Manual
Page 30
...No. 174014 R0401A Printed in its scope and duration to you. They will replace the Product. LIMITED WARRANTY WHAT IS COVERED-The entire NordicTrack® EXP1000i treadmill ("Product") is located or advise you how to ship the Product for service. All mechanical components are covered for two years after... components are covered for two years after the date of purchase. Some states do not allow limitations on the outside of purchase. The belt and deck are covered for two years after the date of the defect; The hood, covers, belly pan, and decals are covered for...
...No. 174014 R0401A Printed in its scope and duration to you. They will replace the Product. LIMITED WARRANTY WHAT IS COVERED-The entire NordicTrack® EXP1000i treadmill ("Product") is located or advise you how to ship the Product for service. All mechanical components are covered for two years after... components are covered for two years after the date of purchase. Some states do not allow limitations on the outside of purchase. The belt and deck are covered for two years after the date of the defect; The hood, covers, belly pan, and decals are covered for...


