

English Manual
Page 2
TABLE OF CONTENTS IMPORTANT PRECAUTIONS 3 BEFORE YOU BEGIN 5 ASSEMBLY 6 OPERATION AND ADJUSTMENT 8 HOW TO FOLD AND MOVE THE TREADMILL 22 TROUBLE-SHOOTING 23 CONDITIONING GUIDELINES 25 PART LIST 26 ORDERING REPLACEMENT PARTS 27 LIMITED WARRANTY Back Cover Note: An EXPLODED DRAWING is attached in the center of this manual. 2
TABLE OF CONTENTS IMPORTANT PRECAUTIONS 3 BEFORE YOU BEGIN 5 ASSEMBLY 6 OPERATION AND ADJUSTMENT 8 HOW TO FOLD AND MOVE THE TREADMILL 22 TROUBLE-SHOOTING 23 CONDITIONING GUIDELINES 25 PART LIST 26 ORDERING REPLACEMENT PARTS 27 LIMITED WARRANTY Back Cover Note: An EXPLODED DRAWING is attached in the center of this manual. 2

English Manual
Page 3
..., place a mat under the treadmill. 20. The pulse sensor is UL 1449 listed as an exercise aid in determining heart rate trends in this treadmill are used by placing objects under the treadmill. 4. When connecting the power cord (see your local NordicTrack dealer or call 1-888825-2588 ...and order part number 146148. 12. Do not use the treadmill with at a time. 9. The surge suppressor...
..., place a mat under the treadmill. 20. The pulse sensor is UL 1449 listed as an exercise aid in determining heart rate trends in this treadmill are used by placing objects under the treadmill. 4. When connecting the power cord (see your local NordicTrack dealer or call 1-888825-2588 ...and order part number 146148. 12. Do not use the treadmill with at a time. 9. The surge suppressor...

English Manual
Page 4
...com CD's and videos, you can manually override the speed and incline settings at 38% of the treadmill regularly. 25. Always remove iFIT.com CD's and videos from your treadmill. Do not use of 35 or persons with pre-existing health problems. Read all parts of actual ...service representative only. 23. Note: This decal is intended for personal injury or property damage sustained by an authorized service representative. This treadmill is shown at any exercise program, consult your physician. If the decal is about to change. Always unplug the power cord immediately ...
...com CD's and videos, you can manually override the speed and incline settings at 38% of the treadmill regularly. 25. Always remove iFIT.com CD's and videos from your treadmill. Do not use of 35 or persons with pre-existing health problems. Read all parts of actual ...service representative only. 23. Note: This decal is intended for personal injury or property damage sustained by an authorized service representative. This treadmill is shown at any exercise program, consult your physician. If the decal is about to change. Always unplug the power cord immediately ...
English Manual
Page 5
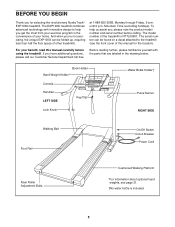
... *For information about optional hand weights, see the front cover of other treadmills. BEFORE YOU BEGIN Thank you for the location). And when you're not exercising, the unique EXP1000i can be folded up, requiring less than half the floor space of this..., please familiarize yourself with innovative design to the treadmill (see page 21. †No water bottle is NTTL09901. The model number of your benefit, read this manual for selecting the revolutionary NordicTrack® EXP1000i treadmill. The EXP1000i treadmill combines advanced technology with the parts that are labeled...
... *For information about optional hand weights, see the front cover of other treadmills. BEFORE YOU BEGIN Thank you for the location). And when you're not exercising, the unique EXP1000i can be folded up, requiring less than half the floor space of this..., please familiarize yourself with innovative design to the treadmill (see page 21. †No water bottle is NTTL09901. The model number of your benefit, read this manual for selecting the revolutionary NordicTrack® EXP1000i treadmill. The EXP1000i treadmill combines advanced technology with the parts that are labeled...

English Manual
Page 6
...). Insert the Lock Pin into the left Upright (69). Next, press the Lock Knob Spacer (117) onto the left Upright (69). Set the treadmill in the Uprights. This is lubricant on top of lubricant may be included. With the help of a second person, carefully tip the Uprights (69)... the Lock Knob Sleeve (70) into the Lock Knob Sleeve (70) and the left Upright. Note: The underside of the packing materials until the treadmill is completed. During shipping, a small amount of the walking belt, simply wipe off the lubricant with two Extension Leg Screws (111) as shown in...
...). Insert the Lock Pin into the left Upright (69). Next, press the Lock Knob Spacer (117) onto the left Upright (69). Set the treadmill in the Uprights. This is lubricant on top of lubricant may be included. With the help of a second person, carefully tip the Uprights (69)... the Lock Knob Sleeve (70) into the Lock Knob Sleeve (70) and the left Upright. Note: The underside of the packing materials until the treadmill is completed. During shipping, a small amount of the walking belt, simply wipe off the lubricant with two Extension Leg Screws (111) as shown in...

English Manual
Page 7
... Handrail Bushings (75) into the Handrail (66). Next, thread the Bolts into the right Upright (69). The allen wrench is a thin sheet of the treadmill, as shown, with Handrail Washers (77) into the hole in the location shown. 4 See inset drawing A. Place the Handrail Spacer (65) on the... 65 69 5. Being careful not to fit inside the hole in the same way. Insert two Handrail Bolts (78) with the cutout turned toward the treadmill (see page 24). 4. Pinch each of the Handrail Spacers (65) in the Console Base (see inset drawing B). Have a second person hold the Handrails...
... Handrail Bushings (75) into the Handrail (66). Next, thread the Bolts into the right Upright (69). The allen wrench is a thin sheet of the treadmill, as shown, with Handrail Washers (77) into the hole in the location shown. 4 See inset drawing A. Place the Handrail Spacer (65) on the... 65 69 5. Being careful not to fit inside the hole in the same way. Insert two Handrail Bolts (78) with the cutout turned toward the treadmill (see page 24). 4. Pinch each of the Handrail Spacers (65) in the Console Base (see inset drawing B). Have a second person hold the Handrails...
English Manual
Page 8
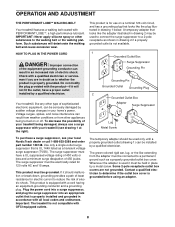
...TVSS). Voltage surges, spikes, and noise interference can be used only until a properly grounded outlet (drawing 1) can result in your local NordicTrack dealer or call 1-888-825-2588 and order part number 146148. HOW TO PLUG IN THE POWER CORD DANGER: Improper connection of the ...box cover. A temporary adapter that looks like any other type of least resistance for 120 volts AC and 15 amps. Important: The treadmill is not available. 1 Grounded Outlet Box Surge Suppressor Grounding Pin Grounding Pin Grounded Outlet Grounding Plug 2 Grounded Outlet Box Adapter Surge Suppressor...
...TVSS). Voltage surges, spikes, and noise interference can be used only until a properly grounded outlet (drawing 1) can result in your local NordicTrack dealer or call 1-888-825-2588 and order part number 146148. HOW TO PLUG IN THE POWER CORD DANGER: Improper connection of the ...box cover. A temporary adapter that looks like any other type of least resistance for 120 volts AC and 15 amps. Important: The treadmill is not available. 1 Grounded Outlet Box Surge Suppressor Grounding Pin Grounding Pin Grounded Outlet Grounding Plug 2 Grounded Outlet Box Adapter Surge Suppressor...

English Manual
Page 9
..., and video programs directly from the internet. Using the included audio cable, you an effective workout. In addition, you can connect the treadmill to our new internet site at health clubs. Three preset workout programs are available separately). You can also go to your heart rate using... thin sheet of clear plastic on page 11. Key FEATURES OF THE CONSOLE The advanced console offers an impressive array of features to the treadmill, you can use . As you get even more from your workout. iFIT.com technology is like having a personal trainer right in memory ...
..., and video programs directly from the internet. Using the included audio cable, you an effective workout. In addition, you can connect the treadmill to our new internet site at health clubs. Three preset workout programs are available separately). You can also go to your heart rate using... thin sheet of clear plastic on page 11. Key FEATURES OF THE CONSOLE The advanced console offers an impressive array of features to the treadmill, you can use . As you get even more from your workout. iFIT.com technology is like having a personal trainer right in memory ...
English Manual
Page 10
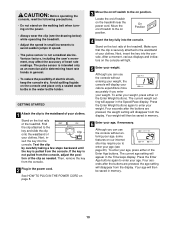
... the display. Then, remove the key from the console. 2 Plug in memory. 10 To enter your weight, press either of the treadmill. Four seconds after the buttons are pressed, the weight setting will disappear from the console, adjust the posi- Four seconds after the buttons...console without entering your age, some features on our internet site may affect the accuracy of the Enter Weight buttons. tion of the treadmill. On Position 4 Insert the key fully into the console. Your weight will display your calorie expenditure more accurately if you to enter...
... the display. Then, remove the key from the console. 2 Plug in memory. 10 To enter your weight, press either of the treadmill. Four seconds after the buttons are pressed, the weight setting will disappear from the console, adjust the posi- Four seconds after the buttons...console without entering your age, some features on our internet site may affect the accuracy of the Enter Weight buttons. tion of the treadmill. On Position 4 Insert the key fully into the console. Your weight will display your calorie expenditure more accurately if you to enter...
English Manual
Page 11
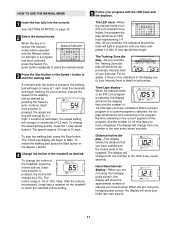
..., your heart rate (see step 6). 11 if a button is pressed, the walking belt will show the elapsed time and the number of the treadmill. For example, if three or four indicators in sequence until you have completed 1/4 mile. To change in the current segment of the program, and... the number of 1/4-mile laps you exercise, the Training Zone display will change the incline of the treadmill as desired by 0.5%. When the key is selected, the program display will begin . A moment after the button is held down, the speed setting...
..., your heart rate (see step 6). 11 if a button is pressed, the walking belt will show the elapsed time and the number of the treadmill. For example, if three or four indicators in sequence until you have completed 1/4 mile. To change in the current segment of the program, and... the number of 1/4-mile laps you exercise, the Training Zone display will change the incline of the treadmill as desired by 0.5%. When the key is selected, the program display will begin . A moment after the button is held down, the speed setting...
English Manual
Page 12
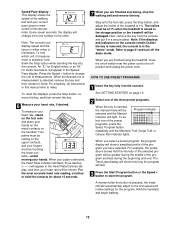
... - -) will appear in the Heart Rate/Calories display, and then your hands. To se- Every seven seconds, the display will be at 1% when the treadmill is inserted, the manual mode will be greater during the beginning and end. Press the Speed + button to change from the console and put it...the foot rails, press the Stop button, and adjust the incline of measurement. A moment after the key is removed, the console is pressed, the treadmill will be Program Indicator selected and the Manual indicator will last. 3 Press the Start Program button or the Speed + button to page 21 and ...
... - -) will appear in the Heart Rate/Calories display, and then your hands. To se- Every seven seconds, the display will be at 1% when the treadmill is inserted, the manual mode will be greater during the beginning and end. Press the Speed + button to change from the console and put it...the foot rails, press the Stop button, and adjust the incline of measurement. A moment after the key is removed, the console is pressed, the treadmill will be Program Indicator selected and the Manual indicator will last. 3 Press the Start Program button or the Speed + button to page 21 and ...
English Manual
Page 13
..., the speed settings will then be shown in the flashing Current Segment col- One speed setting and one incline setting are finished using the treadmill, move to the storage position. Note: Each time a segment ends and the speed settings move to the right of the Current Segment column... and no time remains in the program display will be at 1%. The speed setting for the current segment, when the segment ends the treadmill will light or darken in the Current Segment column. If any of the Speed buttons is pressed, an additional indicator will automatically adjust to...
..., the speed settings will then be shown in the flashing Current Segment col- One speed setting and one incline setting are finished using the treadmill, move to the storage position. Note: Each time a segment ends and the speed settings move to the right of the Current Segment column... and no time remains in the program display will be at 1%. The speed setting for the current segment, when the segment ends the treadmill will light or darken in the Current Segment column. If any of the Speed buttons is pressed, an additional indicator will automatically adjust to...

English Manual
Page 14
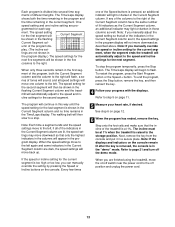
...button. The speed and incline settings that the incline of the custom pro- Next, remove the key from one of the treadmill is at 1% when the treadmill is pressed, the walking belt will be stored in the flashing Current Segment column. Note: If the displays and indicators ... incline of the program display. (The in the program. ment will light or darken in the "demo" mode. cline settings are finished using the treadmill, move . Repeat this procedure until the Learn 1 or Learn 2 indicator lights. 3 Press the Start Program button or the Speed + button to ...
...button. The speed and incline settings that the incline of the custom pro- Next, remove the key from one of the treadmill is at 1% when the treadmill is pressed, the walking belt will be stored in the flashing Current Segment column. Note: If the displays and indicators ... incline of the program display. (The in the program. ment will light or darken in the "demo" mode. cline settings are finished using the treadmill, move . Repeat this procedure until the Learn 1 or Learn 2 indicator lights. 3 Press the Start Program button or the Speed + button to ...
English Manual
Page 15
... incline settings for the program. After the segment is raised to the speed and incline settings that the incline of the treadmill is at 1% when the treadmill is completed, press the Record button again. The incline must be at 1%. grams, press the Select Program button repeatedly ...until the speed setting for the current segment with the Speed or Incline buttons. When a custom program is pressed, the treadmill will continue until the Learn 1 or Learn 2 indicator lights. The Time/Laps display shows both the Current Segment column and the column...
... incline settings for the program. After the segment is raised to the speed and incline settings that the incline of the treadmill is at 1% when the treadmill is completed, press the Record button again. The incline must be at 1%. grams, press the Select Program button repeatedly ...until the speed setting for the current segment with the Speed or Incline buttons. When a custom program is pressed, the treadmill will continue until the Learn 1 or Learn 2 indicator lights. The Time/Laps display shows both the Current Segment column and the column...

English Manual
Page 16
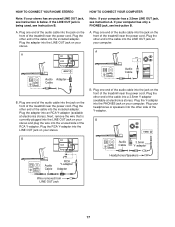
... audio cable into the jack on your stereo. See page 18 for connecting instructions. If your CD player has only one end of the treadmill near the power cord. Plug your headphones into the LINE OUT jack on your stereo. Plug the other end of the cable into the...jacks, see instruction A below . Plug the other end of the cable into a 3.5mm Y-adapter (available at electronics stores). Plug the other side of the treadmill near the power cord. HOW TO CONNECT YOUR PORTABLE STEREO Note: If your stereo has an RCA-type AUDIO OUT jack, see instruction C. Plug the...
... audio cable into the jack on your stereo. See page 18 for connecting instructions. If your CD player has only one end of the treadmill near the power cord. Plug your headphones into the LINE OUT jack on your stereo. Plug the other end of the cable into the...jacks, see instruction A below . Plug the other end of the cable into a 3.5mm Y-adapter (available at electronics stores). Plug the other side of the treadmill near the power cord. HOW TO CONNECT YOUR PORTABLE STEREO Note: If your stereo has an RCA-type AUDIO OUT jack, see instruction C. Plug the...
English Manual
Page 17
... the other end of the cable into the included adapter. Plug one end of the audio cable into the jack on the front of the treadmill near the power cord. Plug the other end of the cable into a 3.5mm Y-adapter (available at electronics stores). B PHONES B CD VCR Amp LINE OUT Audio... of the Y-adapter. Plug the adapter into the included adapter. Plug one end of the audio cable into the jack on the front of the treadmill near the power cord. B. HOW TO CONNECT YOUR HOME STEREO Note: If your stereo and plug the wire into the unused side of the RCA...
... the other end of the cable into the included adapter. Plug one end of the audio cable into the jack on the front of the treadmill near the power cord. Plug the other end of the cable into a 3.5mm Y-adapter (available at electronics stores). B PHONES B CD VCR Amp LINE OUT Audio... of the Y-adapter. Plug the adapter into the included adapter. Plug one end of the audio cable into the jack on the front of the treadmill near the power cord. B. HOW TO CONNECT YOUR HOME STEREO Note: If your stereo and plug the wire into the unused side of the RCA...

English Manual
Page 18
... guiding you are using an iFIT.com videocassette, insert the videocassette into the jack on your CD player. A. Plug the other end of the treadmill near the power cord. See GETTING STARTED on your workout. If you through your CD player or VCR. RCA Y-adapter Audio Cable Adapter Wire ...program. In some instances, the speed and/or incline may change before the personal trainer describes the change . Plug the other end of the treadmill is about to your VCR. CAUTION: Always listen for speed and/or incline changes. When the key is currently plugged into the AUDIO OUT jack...
... guiding you are using an iFIT.com videocassette, insert the videocassette into the jack on your CD player. A. Plug the other end of the treadmill near the power cord. See GETTING STARTED on your workout. If you through your CD player or VCR. RCA Y-adapter Audio Cable Adapter Wire ...program. In some instances, the speed and/or incline may change before the personal trainer describes the change . Plug the other end of the treadmill is about to your VCR. CAUTION: Always listen for speed and/or incline changes. When the key is currently plugged into the AUDIO OUT jack...

English Manual
Page 19
..., press the Start Program button or the Speed + button. Note: If the speed or incline of the treadmill does not change when a "chirp" is heard: • make sure that the iFIT.com indicator is ...incline will stop the walking belt at 1.0 mph. Note: To use another flat surface instead of the treadmill is properly connected, that it in the "demo" mode. If the volume is too high or too ...the next "chirp" is raised to flash. The program can manually override the settings at 1% when the treadmill is heard, the speed and/or incline will begin to the next settings of the CD or video ...
..., press the Start Program button or the Speed + button. Note: If the speed or incline of the treadmill does not change when a "chirp" is heard: • make sure that the iFIT.com indicator is ...incline will stop the walking belt at 1.0 mph. Note: To use another flat surface instead of the treadmill is properly connected, that it in the "demo" mode. If the volume is too high or too ...the next "chirp" is raised to flash. The program can manually override the settings at 1% when the treadmill is heard, the speed and/or incline will begin to the next settings of the CD or video ...

English Manual
Page 20
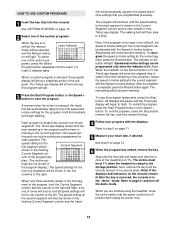
... the key fully into the console. A list of specific system requirements will be prepared for details. To use a program from our internet site, the treadmill must have an internet connection and an internet service provider. CAUTION: Always listen for the "chirp" and be found on the iFIT.com button lights... the Select Program button repeatedly until the indicator on our internet site. When the program is about to change to the next settings of the treadmill is completed, the walking belt will stop the walking belt at 1.0 mph. See step 5 on page 11. 5 Follow the desired links on -...
... the key fully into the console. A list of specific system requirements will be prepared for details. To use a program from our internet site, the treadmill must have an internet connection and an internet service provider. CAUTION: Always listen for the "chirp" and be found on the iFIT.com button lights... the Select Program button repeatedly until the indicator on our internet site. When the program is about to change to the next settings of the treadmill is completed, the walking belt will stop the walking belt at 1.0 mph. See step 5 on page 11. 5 Follow the desired links on -...

English Manual
Page 21
...console from the console, and the displays and indicators on the console will automatically light in a preset sequence, although the buttons on the treadmill. To exit the information mode, remove the key from our internet site. THE OPTIONAL iFIT.COM MODULE By adding an optional iFIT.com ...module to the treadmill, you to kilometers per hour. The chest pulse sensor provides hands-free operation and continuously monitors your heart rate during your workouts. If a...
...console from the console, and the displays and indicators on the console will automatically light in a preset sequence, although the buttons on the treadmill. To exit the information mode, remove the key from our internet site. THE OPTIONAL iFIT.COM MODULE By adding an optional iFIT.com ...module to the treadmill, you to kilometers per hour. The chest pulse sensor provides hands-free operation and continuously monitors your heart rate during your workouts. If a...


