

English Manual
Page 1
... the limited warranty on the back cover of this manual) before using this equipment. MT ON THE WEB: www.nordictrackservice.com CAUTION Read all precautions and instructions in the space above for future reference. MT Sat. 8 a.m.-4 p.m. Keep this manual before contacting Customer Care. NTEX03810.1 Serial No. Write the serial number in this manual for reference. Serial Number Decal QUESTIONS? CALL TOLL-FREE: 1-800-TO-BE-FIT...
... the limited warranty on the back cover of this manual) before using this equipment. MT ON THE WEB: www.nordictrackservice.com CAUTION Read all precautions and instructions in the space above for future reference. MT Sat. 8 a.m.-4 p.m. Keep this manual before contacting Customer Care. NTEX03810.1 Serial No. Write the serial number in this manual for reference. Serial Number Decal QUESTIONS? CALL TOLL-FREE: 1-800-TO-BE-FIT...
English Manual
Page 2
... this manual and request a free replacement decal. Note: The decal(s) may not be shown at actual size. NordicTrack is missing or illegible, see the front cover of ICON IP, Inc. 2 TABLE OF CONTENTS WARNING DECAL PLACEMENT 2 IMPORTANT PRECAUTIONS 3 BEFORE YOU BEGIN 4 ASSEMBLY 5 HOW TO USE THE EXERCISE BIKE 13 MAINTENANCE AND TROUBLESHOOTING 21 EXERCISE GUIDELINES 22 PART LIST 24 EXPLODED DRAWING 26 ORDERING REPLACEMENT PARTS Back Cover LIMITED WARRANTY Back Cover WARNING...
... this manual and request a free replacement decal. Note: The decal(s) may not be shown at actual size. NordicTrack is missing or illegible, see the front cover of ICON IP, Inc. 2 TABLE OF CONTENTS WARNING DECAL PLACEMENT 2 IMPORTANT PRECAUTIONS 3 BEFORE YOU BEGIN 4 ASSEMBLY 5 HOW TO USE THE EXERCISE BIKE 13 MAINTENANCE AND TROUBLESHOOTING 21 EXERCISE GUIDELINES 22 PART LIST 24 EXPLODED DRAWING 26 ORDERING REPLACEMENT PARTS Back Cover LIMITED WARRANTY Back Cover WARNING...
English Manual
Page 3
...-existing health problems. 2. The pulse sensor is the responsibility of the owner to ensure that could become caught on your exercise bike. Always keep your back straight while using your exercise bike before using the exercise bike; Use the exercise bike only as an exercise aid in determining heart rate trends in general. 12. Keep children under the exercise bike. 11. If you feel faint or if you experience pain while exercising, stop...
...-existing health problems. 2. The pulse sensor is the responsibility of the owner to ensure that could become caught on your exercise bike. Always keep your back straight while using your exercise bike before using the exercise bike; Use the exercise bike only as an exercise aid in determining heart rate trends in general. 12. Keep children under the exercise bike. 11. If you feel faint or if you experience pain while exercising, stop...
English Manual
Page 4
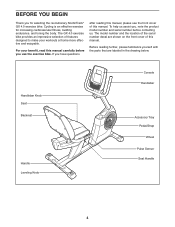
... revolutionary NordicTrack® GX 4.0 exercise bike. To help us assist you, note the product model number and serial number before you have questions after reading this manual, please see the front cover of this manual. Handlebar Knob Seat Backrest Handle Leveling Knob Console Handlebar Accessory Tray Pedal/Strap Wheel Pulse Sensor Seat Handle 4 For your workouts at home more effective and enjoyable. Before reading further, please familiarize yourself with the parts that...
... revolutionary NordicTrack® GX 4.0 exercise bike. To help us assist you, note the product model number and serial number before you have questions after reading this manual, please see the front cover of this manual. Handlebar Knob Seat Backrest Handle Leveling Knob Console Handlebar Accessory Tray Pedal/Strap Wheel Pulse Sensor Seat Handle 4 For your workouts at home more effective and enjoyable. Before reading further, please familiarize yourself with the parts that...
English Manual
Page 5
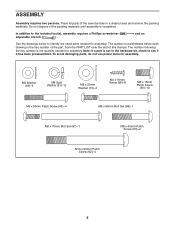
... Bolt Set (67)-1 M8 x 45mm Patch Screw (63)-2 M10 x 95mm Patch Screw (62)-4 5 Place all parts of this manual. ASSEMBLY Assembly requires two persons. The number in parentheses below to the included tool(s), assembly requires a Phillips screwdriver adjustable wrench . and an See the drawings below each drawing is not in a cleared area and remove the packing materials. To avoid damaging parts, do not use power...
... Bolt Set (67)-1 M8 x 45mm Patch Screw (63)-2 M10 x 95mm Patch Screw (62)-4 5 Place all parts of this manual. ASSEMBLY Assembly requires two persons. The number in parentheses below to the included tool(s), assembly requires a Phillips screwdriver adjustable wrench . and an See the drawings below each drawing is not in a cleared area and remove the packing materials. To avoid damaging parts, do not use power...
English Manual
Page 10
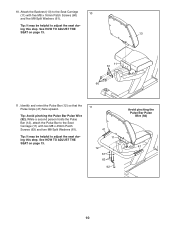
... two M8 x 45mm Patch Screws (63) and two M8 Split Washers (61). See HOW TO ADJUST THE SEAT on page 13. 13 11 61 60 11. Attach the Backrest (13) to adjust the seat during this step. See HOW TO ADJUST THE SEAT on page 13. 11 41 11 12 61 63 92 Avoid pinching the Pulse Bar Pulse Wire (92) 41 10...
... two M8 x 45mm Patch Screws (63) and two M8 Split Washers (61). See HOW TO ADJUST THE SEAT on page 13. 13 11 61 60 11. Attach the Backrest (13) to adjust the seat during this step. See HOW TO ADJUST THE SEAT on page 13. 11 41 11 12 61 63 92 Avoid pinching the Pulse Bar Pulse Wire (92) 41 10...
English Manual
Page 11
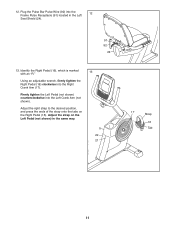
... is marked with an "R." 13 Using an adjustable wrench, firmly tighten the Right Pedal (16) clockwise into the Left Crank Arm (not shown). Plug the Pulse Bar Pulse Wire (92) into the Frame Pulse Receptacle (91) located in the same way. 5 22 21 17 Strap 16 Tab 11 Adjust the right strap to the desired position, and press the ends of the strap onto the tabs on the...
... is marked with an "R." 13 Using an adjustable wrench, firmly tighten the Right Pedal (16) clockwise into the Left Crank Arm (not shown). Plug the Pulse Bar Pulse Wire (92) into the Frame Pulse Receptacle (91) located in the same way. 5 22 21 17 Strap 16 Tab 11 Adjust the right strap to the desired position, and press the ends of the strap onto the tabs on the...
English Manual
Page 12
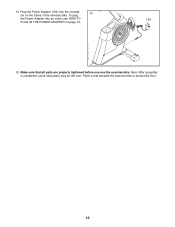
To plug 14 the Power Adapter into the receptacle on page 13. 15. Place a mat beneath the exercise bike to protect the floor. 12 Make sure that all parts are properly tightened before you use the exercise bike. Note: After assembly is completed, some extra parts may be left over. 14. Plug the Power Adapter (104) into an outlet, see HOW TO 104 PLUG IN THE POWER ADAPTER on the frame of the exercise bike.
To plug 14 the Power Adapter into the receptacle on page 13. 15. Place a mat beneath the exercise bike to protect the floor. 12 Make sure that all parts are properly tightened before you use the exercise bike. Note: After assembly is completed, some extra parts may be left over. 14. Plug the Power Adapter (104) into an outlet, see HOW TO 104 PLUG IN THE POWER ADAPTER on the frame of the exercise bike.

English Manual
Page 13
... console displays or other electronic components. Then, plug the power adapter into the receptacle on the frame of the exercise bike. To adjust the seat, push downward on the seat handle, slide the seat to the desired position, and then pull upward on the pedals. Plug the power adapter into an appropriate outlet that is properly installed in one of the handlebar, first loosen the knob a few turns. Power Adapter...
... console displays or other electronic components. Then, plug the power adapter into the receptacle on the frame of the exercise bike. To adjust the seat, push downward on the seat handle, slide the seat to the desired position, and then pull upward on the pedals. Plug the power adapter into an appropriate outlet that is properly installed in one of the handlebar, first loosen the knob a few turns. Power Adapter...

English Manual
Page 15
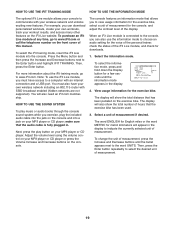
... download personalized workouts, create your own workouts, track your favorite music or audio books while you can change the resistance of the pedals with your heart rate using the handgrip pulse sensor. The console also offers twenty-four preset twelve hill climbing workouts and twelve interval workouts. With the iFit Live mode, you exercise, the console will display continuous exercise feedback. You can also measure your wireless network through an effective workout. To use...
... download personalized workouts, create your own workouts, track your favorite music or audio books while you can change the resistance of the pedals with your heart rate using the handgrip pulse sensor. The console also offers twenty-four preset twelve hill climbing workouts and twelve interval workouts. With the iFit Live mode, you exercise, the console will display continuous exercise feedback. You can also measure your wireless network through an effective workout. To use...

English Manual
Page 16
..., this display mode will show a profile of the pedals by pressing the Resistance Increase and Decrease buttons. Distance-This display mode will show the distance you have selected a workout or the iFit Training mode, press the Menu button to return to the target pedaling speed and prompt you pedal, change the resistance of the resistance levels for the pedals to operate the exercise bike. Speed-This display mode will show your heart rate when you turn on page 13. The console offers...
..., this display mode will show a profile of the pedals by pressing the Resistance Increase and Decrease buttons. Distance-This display mode will show the distance you have selected a workout or the iFit Training mode, press the Menu button to return to the target pedaling speed and prompt you pedal, change the resistance of the resistance levels for the pedals to operate the exercise bike. Speed-This display mode will show your heart rate when you turn on page 13. The console offers...
English Manual
Page 17
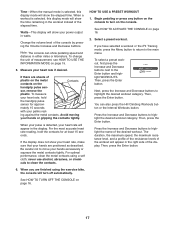
... the metal contacts using the exercise bike, the console will show pedaling speed and distance in watts. Then, press the Enter button. Next, press the Increase and Decrease buttons to turn off automatically. You can show the time remaining in the workout instead of the workout will appear in the right side of the display. Time-When the manual mode is selected, this display mode will turn on page 19...
... the metal contacts using the exercise bike, the console will show pedaling speed and distance in watts. Then, press the Enter button. Next, press the Increase and Decrease buttons to turn off automatically. You can show the time remaining in the workout instead of the workout will appear in the right side of the display. Time-When the manual mode is selected, this display mode will turn on page 19...

English Manual
Page 18
... progress. As you are programmed for the current segment. 3. Begin pedaling to the resistance level for a few seconds to pedal at any time, stop the workout at a speed that is divided into one target speed are finished using the exercise bike, the console will show your pedaling speed and the target speed for each segment. The workout profile will continue in the display for the next segment...
... progress. As you are programmed for the current segment. 3. Begin pedaling to the resistance level for a few seconds to pedal at any time, stop the workout at a speed that is divided into one target speed are finished using the exercise bike, the console will show your pedaling speed and the target speed for each segment. The workout profile will continue in the display for the next segment...
English Manual
Page 19
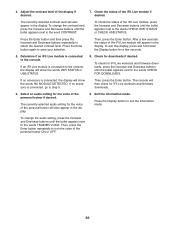
... the personal trainer, check the status of the iFit Live module, and check for downloads. 1. Adjust the volume level using the volume control on your MP3 player or CD player or press the Volume Increase and Decrease buttons on the exercise bike. When an iFit Live module is fully plugged in. For more information about the iFit training mode, go to the console, you exercise, plug the included audio cable into...
... the personal trainer, check the status of the iFit Live module, and check for downloads. 1. Adjust the volume level using the volume control on your MP3 player or CD player or press the Volume Increase and Decrease buttons on the exercise bike. When an iFit Live module is fully plugged in. For more information about the iFit training mode, go to the console, you exercise, plug the included audio cable into...
English Manual
Page 20
... voice of the iFit Live module, press the Increase and Decrease buttons until the bullet appears next to the console. Select an audio setting for iFit Live workouts and firmware downloads. 6. Check the status of the iFit Live module will also appear in the display. The console will also appear in the display. Exit the information mode. Determine if an iFit Live module is connected to exit the information mode.
... voice of the iFit Live module, press the Increase and Decrease buttons until the bullet appears next to the console. Select an audio setting for iFit Live workouts and firmware downloads. 6. Check the status of the iFit Live module will also appear in the display. The console will also appear in the display. Exit the information mode. Determine if an iFit Live module is connected to exit the information mode.

English Manual
Page 21
... with the Reed Switch. there are pedaling, even while the resistance is tight, tighten the M6 x 20mm Hex Screw. Replace any worn parts immediately. Then, you are three sizes of screws in the Front Shields-note which size of the exercise bike regularly. To clean the exercise bike, use a damp cloth and a small amount of direct sunlight. When the reed switch is tight. HOW TO ADJUST THE DRIVE BELT If the pedals slip while...
... with the Reed Switch. there are pedaling, even while the resistance is tight, tighten the M6 x 20mm Hex Screw. Replace any worn parts immediately. Then, you are three sizes of screws in the Front Shields-note which size of the exercise bike regularly. To clean the exercise bike, use a damp cloth and a small amount of direct sunlight. When the reed switch is tight. HOW TO ADJUST THE DRIVE BELT If the pedals slip while...

English Manual
Page 22
... exercise program. A warm-up to burn fat, adjust the intensity of rest between workouts. Remember, the key to success is to strengthen your goal is intended only as you must exercise at least one day of your exercise until your heart rate is the heart rate for fat burning and aerobic exercise. The pulse sensor is to five workouts each week, with pre-existing health problems. The pulse sensor...
... exercise program. A warm-up to burn fat, adjust the intensity of rest between workouts. Remember, the key to success is to strengthen your goal is intended only as you must exercise at least one day of your exercise until your heart rate is the heart rate for fat burning and aerobic exercise. The pulse sensor is to five workouts each week, with pre-existing health problems. The pulse sensor...
English Manual
Page 24
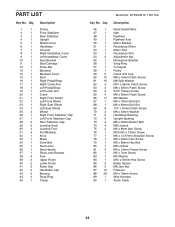
... Stabilizer Rear Stabilizer Upright Shield Cover Handlebar Console Right Handlebar Cover Left Handlebar Cover Seat Bracket Seat Carriage Pulse Bar Backrest Backrest Cover Seat Right Pedal/Strap Right Crank Arm Left Pedal/Strap Left Crank Arm Crank Right Front Shield Left Front Shield Right Seat Shield Left Seat Shield Wheel Right Front Stabilizer Cap Left Front Stabilizer Cap Rear Stabilizer Cap Leveling Knob Leveling Foot Foot/Bumper Knob Brake Drive Belt Seat Lever Seat Handle Seat Lever Bracket Axle Upper Roller Lower Roller Pulse Grip...
... Stabilizer Rear Stabilizer Upright Shield Cover Handlebar Console Right Handlebar Cover Left Handlebar Cover Seat Bracket Seat Carriage Pulse Bar Backrest Backrest Cover Seat Right Pedal/Strap Right Crank Arm Left Pedal/Strap Left Crank Arm Crank Right Front Shield Left Front Shield Right Seat Shield Left Seat Shield Wheel Right Front Stabilizer Cap Left Front Stabilizer Cap Rear Stabilizer Cap Leveling Knob Leveling Foot Foot/Bumper Knob Brake Drive Belt Seat Lever Seat Handle Seat Lever Bracket Axle Upper Roller Lower Roller Pulse Grip...

English Manual
Page 25
... x 12mm Screw 100 3 M4 x 25mm Screw 101 1 Snap Fastener 102 1 103 10 104 1 105 2 106 4 107 2 108 1 * - * - * - For information about ordering replacement parts, see the back cover of this manual. *These parts are subject to change without notice. Qty. Description Key No. M6 x 18mm Washer M6 Split Washer Power Adapter Seat Carriage Cap Wire Clamp Magnet M4 x 16mm Phillips Screw Userʼs Manual Assembly Tool Grease Packet Note: Specifications are...
... x 12mm Screw 100 3 M4 x 25mm Screw 101 1 Snap Fastener 102 1 103 10 104 1 105 2 106 4 107 2 108 1 * - * - * - For information about ordering replacement parts, see the back cover of this manual. *These parts are subject to change without notice. Qty. Description Key No. M6 x 18mm Washer M6 Split Washer Power Adapter Seat Carriage Cap Wire Clamp Magnet M4 x 16mm Phillips Screw Userʼs Manual Assembly Tool Grease Packet Note: Specifications are...
English Manual
Page 28
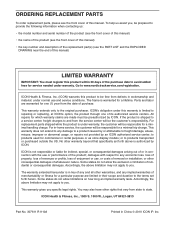
... of this manual) LIMITED WARRANTY IMPORTANT: You must be responsible for a minimal handling charge. To help us : • the model number and serial number of the product (see the front cover of this manual) • the name of the product (see the front cover of this manual) • the key number and description of the replacement part(s) (see the front cover of this manual. ICON Health & Fitness, Inc. (ICON) warrants this...
... of this manual) LIMITED WARRANTY IMPORTANT: You must be responsible for a minimal handling charge. To help us : • the model number and serial number of the product (see the front cover of this manual) • the name of the product (see the front cover of this manual) • the key number and description of the replacement part(s) (see the front cover of this manual. ICON Health & Fitness, Inc. (ICON) warrants this...


