

English Manual
Page 1
... complete satisfaction through direct assistance from our factory. CUSTOMER HOT LINE: 1-888-825-2588 Mon.ÐFri., 6 a.m.Ð6 p.m. TO AVOID UNNECESSARY DELAYS, PLEASE CALL DIRECT TO OUR TOLL-FREE CUSTOMER HOT LINE. MST CAUTION Read all precautions and instructions in this manual before using this manual for reference. Serial Number Decal Questions? Write the serial number in the location shown below. If...
... complete satisfaction through direct assistance from our factory. CUSTOMER HOT LINE: 1-888-825-2588 Mon.ÐFri., 6 a.m.Ð6 p.m. TO AVOID UNNECESSARY DELAYS, PLEASE CALL DIRECT TO OUR TOLL-FREE CUSTOMER HOT LINE. MST CAUTION Read all precautions and instructions in this manual before using this manual for reference. Serial Number Decal Questions? Write the serial number in the location shown below. If...

English Manual
Page 2
Table of Contents Important Precautions 3 Before You Begin 5 Assembly 6 Treadmill Operation 7 How to Fold and Move the Treadmill 13 Maintenance and Trouble-shooting 15 Conditioning Guidelines 18 Part List 22 Ordering Replacement Parts 23 Limited Warranty Back Cover Note: An Exploded Drawing is attached in the center of this ownerÕs guide. 2
Table of Contents Important Precautions 3 Before You Begin 5 Assembly 6 Treadmill Operation 7 How to Fold and Move the Treadmill 13 Maintenance and Trouble-shooting 15 Conditioning Guidelines 18 Part List 22 Ordering Replacement Parts 23 Limited Warranty Back Cover Note: An Exploded Drawing is attached in the center of this ownerÕs guide. 2
English Manual
Page 3
... shoes. When connecting the power cord (see the drawing on /off switch.) 17. The surge suppressor must be used or where oxygen is not in use the treadmill with eight feet of the on page 5). Always remove the key, unplug the power cord and move the walking belt while the power is the responsibility of high speeds. Inspect and tighten all times. 7. It is turned off position when...
... shoes. When connecting the power cord (see the drawing on /off switch.) 17. The surge suppressor must be used or where oxygen is not in use the treadmill with eight feet of the on page 5). Always remove the key, unplug the power cord and move the walking belt while the power is the responsibility of high speeds. Inspect and tighten all times. 7. It is turned off position when...
English Manual
Page 4
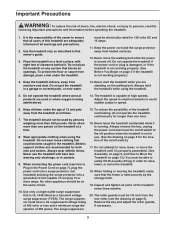
... this treadmill in -home use only. Apply the decal in the location shown. (There is not legible, please call our Customer Service Department toll-free to do so by or through the use , before cleaning the treadmill, and before using. WARNING: Before beginning this manual). If one decal on your physician. Never remove the motor hood unless instructed to order a free replacement decal (see the back cover...
... this treadmill in -home use only. Apply the decal in the location shown. (There is not legible, please call our Customer Service Department toll-free to do so by or through the use , before cleaning the treadmill, and before using. WARNING: Before beginning this manual). If one decal on your physician. Never remove the motor hood unless instructed to order a free replacement decal (see the back cover...
English Manual
Page 5
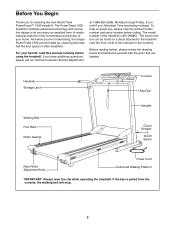
... excellent form of cardiovascular exercise in the convenience and privacy of other treadmills. Handrails Storage Latch Walking Belt Foot Rails Roller Guards Console Key/Clip* Uprights Circuit Breaker On/off Switch Rear Roller Adjustment Bolts Power Cord Cushioned Walking Platform *IMPORTANT: Always wear the clip while operating the treadmill. For your home. The model number of this manual carefully before calling. To help us assist you have additional questions, please call our toll-free Customer Service...
... excellent form of cardiovascular exercise in the convenience and privacy of other treadmills. Handrails Storage Latch Walking Belt Foot Rails Roller Guards Console Key/Clip* Uprights Circuit Breaker On/off Switch Rear Roller Adjustment Bolts Power Cord Cushioned Walking Platform *IMPORTANT: Always wear the clip while operating the treadmill. For your home. The model number of this manual carefully before calling. To help us assist you have additional questions, please call our toll-free Customer Service...

English Manual
Page 6
... the two Screws (43). Press the Allen Wrench (87) into the Wrench Clip. 70 43 4. Note: If it is difficult to protect the floor or carpet. 70 89 88 6 Remove the backing from the left Upright (70). 2 Attach the Storage Latch (5) and the two Latch Spacers (93) to overtighten the Screws. Place a mat beneath the treadmill to fold or lower the treadmill, remove one...
... the two Screws (43). Press the Allen Wrench (87) into the Wrench Clip. 70 43 4. Note: If it is difficult to protect the floor or carpet. 70 89 88 6 Remove the backing from the left Upright (70). 2 Attach the Storage Latch (5) and the two Latch Spacers (93) to overtighten the Screws. Place a mat beneath the treadmill to fold or lower the treadmill, remove one...

English Manual
Page 7
... of 450 joules. A temporary adapter that is equipped with PERFORMANT LUBETM, a high-performance lubricant. This product is UL 1449 listed as a properly grounded outlet box cover. Treadmill Operation THE PERFORMANT LUBETM WALKING BELT Your treadmill features a walking belt coated with a cord having an equipment-grounding conductor and a grounding plug. Voltage surges, spikes, and noise interference can be used only until a properly grounded outlet...
... of 450 joules. A temporary adapter that is equipped with PERFORMANT LUBETM, a high-performance lubricant. This product is UL 1449 listed as a properly grounded outlet box cover. Treadmill Operation THE PERFORMANT LUBETM WALKING BELT Your treadmill features a walking belt coated with a cord having an equipment-grounding conductor and a grounding plug. Voltage surges, spikes, and noise interference can be used only until a properly grounded outlet...
English Manual
Page 8
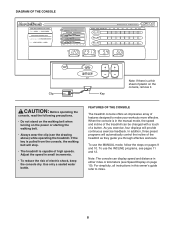
... capable of high speeds. Adjust the speed in the manual mode, the speed and incline of the treadmill can display speed and distance in this ownerÕs guide refer to make your workouts more effective. Clip Key CAUTION: Before operating the console, read the following precautions. ¥ Do not stand on the walking belt when turning on the power or starting the walking belt. ¥ Always wear the clip (see Speed Display on page 10...
... capable of high speeds. Adjust the speed in the manual mode, the speed and incline of the treadmill can display speed and distance in this ownerÕs guide refer to make your workouts more effective. Clip Key CAUTION: Before operating the console, read the following precautions. ¥ Do not stand on the walking belt when turning on the power or starting the walking belt. ¥ Always wear the clip (see Speed Display on page 10...
English Manual
Page 9
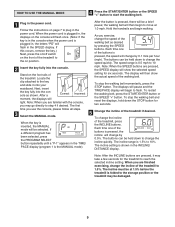
... exercise, change by 0.1 mile per hour (mph). Stand on the foot rails of the buttons is shown in the power cord. When the key is folded to the storage position or the treadmill may go directly to 10%. The speed range is 1.5% to step 4 if desired. To stop the walking belt and reset the displays, hold down to the on page 7 to move at 1.5% before the treadmill is inserted, the MANUAL mode...
... exercise, change by 0.1 mile per hour (mph). Stand on the foot rails of the buttons is shown in the power cord. When the key is folded to the storage position or the treadmill may go directly to 10%. The speed range is 1.5% to step 4 if desired. To stop the walking belt and reset the displays, hold down to the on page 7 to move at 1.5% before the treadmill is inserted, the MANUAL mode...
English Manual
Page 10
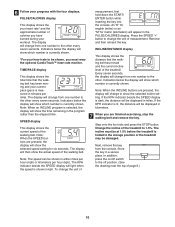
... key. INCLINE/DISTANCE display This display shows the distance that the walking belt has been moving and your heart rate* and the approximate number of calories you are pressed, the display will be shown in minutes per hour (kph). If the KPH indicator beside the SPEED display is folded to the other . Step onto the foot rails and press the STOP button. Next, remove the key from one number to the storage position or the treadmill...
... key. INCLINE/DISTANCE display This display shows the distance that the walking belt has been moving and your heart rate* and the approximate number of calories you are pressed, the display will be shown in minutes per hour (kph). If the KPH indicator beside the SPEED display is folded to the other . Step onto the foot rails and press the STOP button. Next, remove the key from one number to the storage position or the treadmill...
English Manual
Page 11
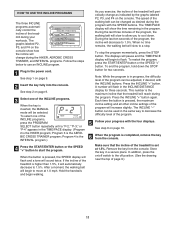
... MANUAL mode will periodically change during your progress with the four displays. In addition, press the on the console. Program 4 is completed, remove the key from the console. The speed of the treadmill during the HIKER, AEROBIC CROSS TRAINER, and INTERVAL programs. Follow the steps below to 1.5%. The TIME/PACE display will show how the incline will begin to the off switch to move at 1.5%. The INCLINE ÒÐÓ button can...
... MANUAL mode will periodically change during your progress with the four displays. In addition, press the on the console. Program 4 is completed, remove the key from the console. The speed of the treadmill during the HIKER, AEROBIC CROSS TRAINER, and INTERVAL programs. Follow the steps below to 1.5%. The TIME/PACE display will show how the incline will begin to the off switch to move at 1.5%. The INCLINE ÒÐÓ button can...

English Manual
Page 13
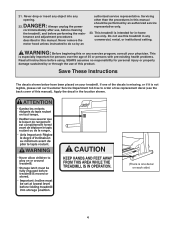
... foot on the base, and carefully lower the treadmill until it back, or the base pads may come off. Next, unplug the power cord. Make sure that the storage latch is inserted into the slot in the indicated location. 2. HOW TO MOVE THE TREADMILL Before moving the treadmill. Hold the handrails of direct sunlight. Never move the treadmill over an uneven surface. 3. Do not...
... foot on the base, and carefully lower the treadmill until it back, or the base pads may come off. Next, unplug the power cord. Make sure that the storage latch is inserted into the slot in the indicated location. 2. HOW TO MOVE THE TREADMILL Before moving the treadmill. Hold the handrails of direct sunlight. Never move the treadmill over an uneven surface. 3. Do not...
English Manual
Page 15
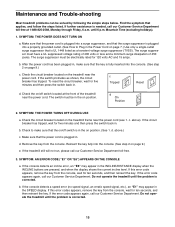
... corrected. SYMPTOM: THE POWER DOES NOT TURN ON a. After the power cord has been plugged in the INCLINE/DISTANCE display when the INCLINE buttons are pressed, and when the display shows the current incline level. Check to Plug in the on page 7.) Use only a single-outlet surge suppressor that the key is needed, call our Customer Service Department. Maintenance and Trouble-shooting Most treadmill problems can be electrically rated for 120 volts AC...
... corrected. SYMPTOM: THE POWER DOES NOT TURN ON a. After the power cord has been plugged in the INCLINE/DISTANCE display when the INCLINE buttons are pressed, and when the display shows the current incline level. Check to Plug in the on page 7.) Use only a single-outlet surge suppressor that the key is needed, call our Customer Service Department. Maintenance and Trouble-shooting Most treadmill problems can be electrically rated for 120 volts AC...
English Manual
Page 16
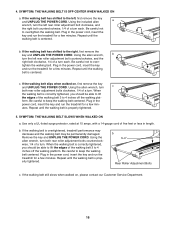
..., turn both rear roller adjustment bolts clockwise, 1/4 of five feet or less in the power cord, insert the key and run the treadmill for a few minutes. Repeat until the walking belt is properly tightened. If the walking belt has shifted to keep the walking belt centered. Repeat until the walking belt is centered. When the walking belt is properly tightened. 5. Use only a UL-listed surge protector, rated at 15 amps, with a 14-gauge cord of a turn . Plug...
..., turn both rear roller adjustment bolts clockwise, 1/4 of five feet or less in the power cord, insert the key and run the treadmill for a few minutes. Repeat until the walking belt is properly tightened. If the walking belt has shifted to keep the walking belt centered. Repeat until the walking belt is centered. When the walking belt is properly tightened. 5. Use only a UL-listed surge protector, rated at 15 amps, with a 14-gauge cord of a turn . Plug...

English Manual
Page 18
Control your target heart rate. The actual exercise you would like your age (in years) from 220. Pulse 3 Determine your portion sizeÑdon't binge or overeat. To determine your approximate MHR, subtract your heart to 70 percent of a safe and effective training program. Beginning exercisers may wish to start at 60 to work or in the car. ¥ Eat regular meals or...
Control your target heart rate. The actual exercise you would like your age (in years) from 220. Pulse 3 Determine your portion sizeÑdon't binge or overeat. To determine your approximate MHR, subtract your heart to 70 percent of a safe and effective training program. Beginning exercisers may wish to start at 60 to work or in the car. ¥ Eat regular meals or...

English Manual
Page 20
... to the intensity of your legs moving ! A strength-training program increases your heart level. It is common, try to exercise for 20 to your heart. Lower your wrist below : 1. The acronym "FIT" may wish to start , which is important that several short workouts in average physical condition should exercise for the duration of the workout period. See step 5 on the treadmill at a slower pace for...
... to the intensity of your legs moving ! A strength-training program increases your heart level. It is common, try to exercise for 20 to your heart. Lower your wrist below : 1. The acronym "FIT" may wish to start , which is important that several short workouts in average physical condition should exercise for the duration of the workout period. See step 5 on the treadmill at a slower pace for...

English Manual
Page 21
...; Be aware of high-resistance, fast exercise* is intended to six weeks. If during your workout session. *Estimated maximum heart rate (MHR) = 220 Ð your physician. Interval training will help ease you into your new NordicTrack routine. ¥ Begin and end each stretch for your fitness goals and reward yourself as you should be a maintenance program and should be affected...
...; Be aware of high-resistance, fast exercise* is intended to six weeks. If during your workout session. *Estimated maximum heart rate (MHR) = 220 Ð your physician. Interval training will help ease you into your new NordicTrack routine. ¥ Begin and end each stretch for your fitness goals and reward yourself as you should be a maintenance program and should be affected...

English Manual
Page 22
... the parts listed below, refer to the Exploded Drawing attached in the center of this ownerÕs guide. Bolt Rear Roller Guard On/Off Switch Storage Latch Isolator Ground Wire Screw Platform Screw Left Foot Rail Handrail Endcap Reed Switch Clip Wire Clip Incline Warning Decal Small Plug Key/Clip Frame Front Roller/Pulley Rear Roller Incline Frame Electronics Shield Incline Motor Shield Pivot Spacer Side Hood Bracket Wheel Nut Incline Bolt/Motor Tension Bolt Incline Motor Controller Electronics Plate Rear Isolator Wheel Power Cord Power Cord Grommet Front Hood Bracket...
... the parts listed below, refer to the Exploded Drawing attached in the center of this ownerÕs guide. Bolt Rear Roller Guard On/Off Switch Storage Latch Isolator Ground Wire Screw Platform Screw Left Foot Rail Handrail Endcap Reed Switch Clip Wire Clip Incline Warning Decal Small Plug Key/Clip Frame Front Roller/Pulley Rear Roller Incline Frame Electronics Shield Incline Motor Shield Pivot Spacer Side Hood Bracket Wheel Nut Incline Bolt/Motor Tension Bolt Incline Motor Controller Electronics Plate Rear Isolator Wheel Power Cord Power Cord Grommet Front Hood Bracket...
English Manual
Page 23
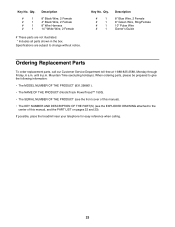
... following information: ¥ The MODEL NUMBER OF THE PRODUCT (831.298801). ¥ The NAME OF THE PRODUCT (NordicTrack PowerTreadª 1500). ¥ The SERIAL NUMBER OF THE PRODUCT (see the front cover of this manual, and the PART LIST on pages 22 and 23). Qty. # 1 # 1 # 1 # 1 Description 8Ó Blue Wire, 2 Female 8Ó Green Wire, Ring/Female 10Ó Pulse Wire OwnerÕs Guide Ordering Replacement Parts To order replacement parts, call our Customer Service...
... following information: ¥ The MODEL NUMBER OF THE PRODUCT (831.298801). ¥ The NAME OF THE PRODUCT (NordicTrack PowerTreadª 1500). ¥ The SERIAL NUMBER OF THE PRODUCT (see the front cover of this manual, and the PART LIST on pages 22 and 23). Qty. # 1 # 1 # 1 # 1 Description 8Ó Blue Wire, 2 Female 8Ó Green Wire, Ring/Female 10Ó Pulse Wire OwnerÕs Guide Ordering Replacement Parts To order replacement parts, call our Customer Service...

English Manual
Page 26
... a part replaced, or if necessary, arrange for repair. put the RA No. This warranty gives you specific legal rights and you may not apply to state. ICON HEALTH & FITNESS, INC., 1500 S. 1000 W., LOGAN, UT 84321-9813 Part No. 153315 J00312-C R0299A Printed in connection with the use or performance of the product or damages with respect to be free of all other parts are...
... a part replaced, or if necessary, arrange for repair. put the RA No. This warranty gives you specific legal rights and you may not apply to state. ICON HEALTH & FITNESS, INC., 1500 S. 1000 W., LOGAN, UT 84321-9813 Part No. 153315 J00312-C R0299A Printed in connection with the use or performance of the product or damages with respect to be free of all other parts are...


