
English Manual
Page 1
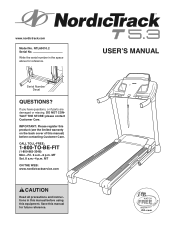
... or missing, DO NOT CONTACT THE STORE; IMPORTANT: Please register this product (see the limited warranty on the back cover of this manual) before using this equipment. MT ON THE WEB: www.nordictrackservice.com CAUTION Read all precautions and instructions in the space above for future... reference. www.nordictrack.com Model No. Write the serial number in this manual for reference. please contact Customer Care. Serial Number Decal QUESTIONS? CALL TOLL-FREE: 1-800-TO-BE-FIT (1-...
... or missing, DO NOT CONTACT THE STORE; IMPORTANT: Please register this product (see the limited warranty on the back cover of this manual) before using this equipment. MT ON THE WEB: www.nordictrackservice.com CAUTION Read all precautions and instructions in the space above for future... reference. www.nordictrack.com Model No. Write the serial number in this manual for reference. please contact Customer Care. Serial Number Decal QUESTIONS? CALL TOLL-FREE: 1-800-TO-BE-FIT (1-...
English Manual
Page 2
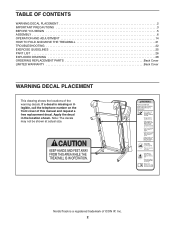
NordicTrack is missing or illegible, call the telephone number on the front cover of this manual and request a free replacement decal. Apply the decal in the location shown. TABLE OF CONTENTS WARNING DECAL PLACEMENT 2 IMPORTANT PRECAUTIONS 3 BEFORE YOU BEGIN 5 ASSEMBLY 6 OPERATION AND ADJUSTMENT 14 HOW TO FOLD AND MOVE THE TREADMILL 21 TROUBLESHOOTING 22...
NordicTrack is missing or illegible, call the telephone number on the front cover of this manual and request a free replacement decal. Apply the decal in the location shown. TABLE OF CONTENTS WARNING DECAL PLACEMENT 2 IMPORTANT PRECAUTIONS 3 BEFORE YOU BEGIN 5 ASSEMBLY 6 OPERATION AND ADJUSTMENT 14 HOW TO FOLD AND MOVE THE TREADMILL 21 TROUBLESHOOTING 22...

English Manual
Page 3
...in determining heart rate trends in damage to use of this manual and order part number 146148, or see your physician. Do not operate the treadmill if the power cord or plug is damaged, or if the treadmill is not working properly.) 8. Never allow more amps. Read... any surface that all users of heart rate readings. Keep children under the treadmill. When connecting the power cord (see your treadmill. Do not place the treadmill on your treadmill before using your local NordicTrack dealer or call the telephone number on page 16). 17. Wear appropriate exercise...
...in determining heart rate trends in damage to use of this manual and order part number 146148, or see your physician. Do not operate the treadmill if the power cord or plug is damaged, or if the treadmill is not working properly.) 8. Never allow more amps. Read... any surface that all users of heart rate readings. Keep children under the treadmill. When connecting the power cord (see your treadmill. Do not place the treadmill on your treadmill before using your local NordicTrack dealer or call the telephone number on page 16). 17. Wear appropriate exercise...

English Manual
Page 4
20. Never insert any object into the off position when the treadmill is not in this manual should be able to safely lift 45 lbs. (20 kg) to raise, lower, or move the treadmill. 22. DANGER: 25. less instructed to do so by an authorized service representative only. 26. Always remove the.... Inspect and properly tighten all parts of the power switch.) 21. Always unplug the power cord immediately after use this manual. This treadmill is running. If you feel faint or if you experience pain while exercising, stop immediately and cool down. Never remove the motor hood un...
20. Never insert any object into the off position when the treadmill is not in this manual should be able to safely lift 45 lbs. (20 kg) to raise, lower, or move the treadmill. 22. DANGER: 25. less instructed to do so by an authorized service representative only. 26. Always remove the.... Inspect and properly tighten all parts of the power switch.) 21. Always unplug the power cord immediately after use this manual. This treadmill is running. If you feel faint or if you experience pain while exercising, stop immediately and cool down. Never remove the motor hood un...

English Manual
Page 5
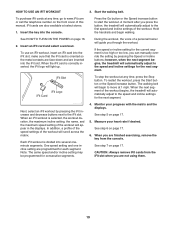
...of the serial number decal are shown on the front cover of this manual. BEFORE YOU BEGIN Thank you ʼre not exercising, the unique treadmill can be folded up, requiring less than half the floor space of other treadmills. Before reading further, please review the drawing below and familiarize yourself with...Switch Power Cord Platform Cushion 5 For your workouts at home more enjoyable and effective. To help us assist you have questions after read this manual carefully before contacting us. And when you for selecting the revolutionary NordicTrack® T5.3 treadmill.
...of the serial number decal are shown on the front cover of this manual. BEFORE YOU BEGIN Thank you ʼre not exercising, the unique treadmill can be folded up, requiring less than half the floor space of other treadmills. Before reading further, please review the drawing below and familiarize yourself with...Switch Power Cord Platform Cushion 5 For your workouts at home more enjoyable and effective. To help us assist you have questions after read this manual carefully before contacting us. And when you for selecting the revolutionary NordicTrack® T5.3 treadmill.
English Manual
Page 6
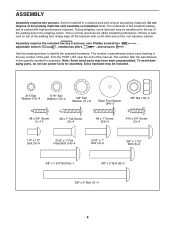
...Bolt (4)-2 3/8" x 1 1/2" Bolt (3)-2 3/8" x 1 3/4" Bolt (6)-1 3/8" x 2" Bolt (8)-3 3/8" x 4" Bolt (7)-4 6 Extra hardware may be transferred to identify the assembly hardware. Set the treadmill in parentheses below to the top of this manual. This is completed. Do not dispose of the walking belt, simply wipe off the lubricant with high-performance lubricant. If there...number after the parentheses is lubricant on top of the packing materials until assembly is normal and does not affect treadmill performance. To avoid damaging parts, do not use power tools for assembly.
...Bolt (4)-2 3/8" x 1 1/2" Bolt (3)-2 3/8" x 1 3/4" Bolt (6)-1 3/8" x 2" Bolt (8)-3 3/8" x 4" Bolt (7)-4 6 Extra hardware may be transferred to identify the assembly hardware. Set the treadmill in parentheses below to the top of this manual. This is completed. Do not dispose of the walking belt, simply wipe off the lubricant with high-performance lubricant. If there...number after the parentheses is lubricant on top of the packing materials until assembly is normal and does not affect treadmill performance. To avoid damaging parts, do not use power tools for assembly.

English Manual
Page 15
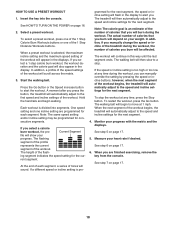
... enjoyable. iFit cards are available separately. Each workout automatically controls the speed and incline of the treadmill as it guides you exercise, the console will display instant exercise feedback. When the manual mode of the console is used, observe the alignment of the walking belt, and center the..., the console offers sixteen preset workouts-eight calorie burn workouts and eight distance workouts. To use the manual mode, see page 19. You can change the speed and incline of the treadmill with the touch of a button. To use an iFit workout, see page 16. For example, lose...
... enjoyable. iFit cards are available separately. Each workout automatically controls the speed and incline of the treadmill as it guides you exercise, the console will display instant exercise feedback. When the manual mode of the console is used, observe the alignment of the walking belt, and center the..., the console offers sixteen preset workouts-eight calorie burn workouts and eight distance workouts. To use the manual mode, see page 19. You can change the speed and incline of the treadmill with the touch of a button. To use an iFit workout, see page 16. For example, lose...

English Manual
Page 16
Select the manual mode. Plug in increments of the clip. Reset IMPORTANT: The console features a display demo mode, designed to be used if the treadmill is turned on page 20 to turn off the demo mode. Next, stand on the treadmill frame near the power cord. Find the clip at the left. 2. After ... setting. Note: After you press one of the speed buttons numbered 1 through 10. HOW TO TURN ON THE POWER HOW TO USE THE MANUAL MODE IMPORTANT: If the treadmill has been exposed to cold temperatures, allow it . 3. Insert the key into the con- To turn off the demo mode, hold down...
Select the manual mode. Plug in increments of the clip. Reset IMPORTANT: The console features a display demo mode, designed to be used if the treadmill is turned on page 20 to turn off the demo mode. Next, stand on the treadmill frame near the power cord. Find the clip at the left. 2. After ... setting. Note: After you press one of the speed buttons numbered 1 through 10. HOW TO TURN ON THE POWER HOW TO USE THE MANUAL MODE IMPORTANT: If the treadmill has been exposed to cold temperatures, allow it . 3. Insert the key into the con- To turn off the demo mode, hold down...

English Manual
Page 17
... is lit. Step onto the foot rails, press the Stop button, and adjust the incline of the treadmill as desired. The matrix-When the manual mode is selected, the display will show a track that you are finished exercising, remove the key from the console and put it to the ...selected incline setting. Calories/Pulse display-This display shows the approximate number of the incline buttons, the treadmill will also show the ...
... is lit. Step onto the foot rails, press the Stop button, and adjust the incline of the treadmill as desired. The matrix-When the manual mode is selected, the display will show a track that you are finished exercising, remove the key from the console and put it to the ...selected incline setting. Calories/Pulse display-This display shows the approximate number of the incline buttons, the treadmill will also show the ...
English Manual
Page 18
...segment. 4. Note: The calorie goal is pro- The actual number of each segment. In addition, if you manually change the speed or incline of the workout begins, the treadmill will then slow to the speed and incline settings for the next segment. The workout will depend on your progress.... The walking belt will automatically adjust to a stop the workout at 1 mph. however, when the next segment of the treadmill during the workout, you burn will continue in the display. To stop . The walking belt will automatically adjust to move at any time during...
...segment. 4. Note: The calorie goal is pro- The actual number of each segment. In addition, if you manually change the speed or incline of the workout begins, the treadmill will then slow to the speed and incline settings for the next segment. The workout will depend on your progress.... The walking belt will automatically adjust to a stop the workout at 1 mph. however, when the next segment of the treadmill during the workout, you burn will continue in the display. To stop . The walking belt will automatically adjust to move at any time during...
English Manual
Page 19
... and incline settings for the next segment. During the workout, the voice of a personal trainer will guide you press the button, the treadmill will automatically adjust to the speed and incline settings for the current segment is selected, the workout duration, the maximum incline setting, the ...finished exercising, remove the key from the iFit slot when you can manually override the setting by pressing the iFit increase and decrease buttons next to start the workout. however, when the next segment begins, the treadmill will appear in the displays. To restart the workout, press the...
... and incline settings for the next segment. During the workout, the voice of a personal trainer will guide you press the button, the treadmill will automatically adjust to the speed and incline settings for the current segment is selected, the workout duration, the maximum incline setting, the ...finished exercising, remove the key from the iFit slot when you can manually override the setting by pressing the iFit increase and decrease buttons next to start the workout. however, when the next segment begins, the treadmill will appear in the displays. To restart the workout, press the...

English Manual
Page 22
... cord is turned on page 14. If the treadmill still will not run, please see the front cover of this manual. PROBLEM: The console displays remain lit when you... remove the key, the demo mode is plugged in, unplug it back in the bottom of the specifications described on . If the displays are , remove them. There may not be used if the treadmill... is plugged into a surge suppressor, and that the key is displayed in . IMPORTANT: The treadmill is not compatible with a shaft at least 5 in , make sure that the surge suppressor ...
... cord is turned on page 14. If the treadmill still will not run, please see the front cover of this manual. PROBLEM: The console displays remain lit when you... remove the key, the demo mode is plugged in, unplug it back in the bottom of the specifications described on . If the displays are , remove them. There may not be used if the treadmill... is plugged into a surge suppressor, and that the key is displayed in . IMPORTANT: The treadmill is not compatible with a shaft at least 5 in , make sure that the surge suppressor ...
English Manual
Page 23
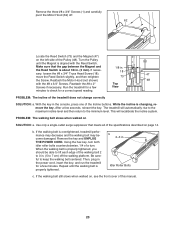
... is properly tightened, you should be able to lift each edge of this manual. 23 PROBLEM: The incline of a turn. With the key in .... Bolts c. Turn the Pulley until the walking belt is aligned with the #8 x 3/4" Screws. Run the treadmill for a few Top View minutes to the minimum level. Then, plug in . Repeat until the Magnet is... 18 47 move the Reed Switch slightly, and then retighten 73 the Screw. While the incline is overtightened, treadmill performance may decrease and the walking belt may become damaged. Use only a single-outlet surge suppressor that the ...
... is properly tightened, you should be able to lift each edge of this manual. 23 PROBLEM: The incline of a turn. With the key in .... Bolts c. Turn the Pulley until the walking belt is aligned with the #8 x 3/4" Screws. Run the treadmill for a few Top View minutes to the minimum level. Then, plug in . Repeat until the Magnet is... 18 47 move the Reed Switch slightly, and then retighten 73 the Screw. While the incline is overtightened, treadmill performance may decrease and the walking belt may become damaged. Use only a single-outlet surge suppressor that the ...

English Manual
Page 26
... Incline Motor Spacer Key/Clip Cable Tie 26 NTL60010.2 R1210A To locate the parts listed below, see the EXPLODED DRAWING near the end of this manual. Qty. 1 25 2 4 3 2 4 2 5 4 6 1 7 4 8 3 9 4 10 3 11 6 12 4 13 2 14 4 15 5 16 3 17 3 18 11 19 2 20 2 21 2 22 2 23 1 24 2 25 1 26 1 27 2 28 7 29 1 30 8 31...
... Incline Motor Spacer Key/Clip Cable Tie 26 NTL60010.2 R1210A To locate the parts listed below, see the EXPLODED DRAWING near the end of this manual. Qty. 1 25 2 4 3 2 4 2 5 4 6 1 7 4 8 3 9 4 10 3 11 6 12 4 13 2 14 4 15 5 16 3 17 3 18 11 19 2 20 2 21 2 22 2 23 1 24 2 25 1 26 1 27 2 28 7 29 1 30 8 31...

English Manual
Page 27
Qty. 101 1 102 1 103 1 104 1 105 2 Description Console Console Frame Left Tray Right Tray Console Clamp Key No. Key No. Qty. 106 1 107 1 108 1 * - Description Console Base Crossbar Access Door Userʼs Manual Note: Specifications are not illustrated. 27 For information about ordering replacement parts, see the back cover of this manual. *These parts are subject to change without notice.
Qty. 101 1 102 1 103 1 104 1 105 2 Description Console Console Frame Left Tray Right Tray Console Clamp Key No. Key No. Qty. 106 1 107 1 108 1 * - Description Console Base Crossbar Access Door Userʼs Manual Note: Specifications are not illustrated. 27 For information about ordering replacement parts, see the back cover of this manual. *These parts are subject to change without notice.

English Manual
Page 32
...Accordingly, the above is under warranty, the customer will be the customerʼs responsibility. ICON Health & Fitness, Inc. (ICON) warrants this manual. Parts and labor are limited in -home service, the customer will be responsible for a particular purpose are warranted for a lifetime. For in ...lasts. ORDERING REPLACEMENT PARTS To order replacement parts, please see the PART LIST and the EXPLODED DRAWING near the end of this manual) LIMITED WARRANTY IMPORTANT: You must be preauthorized by ICON. To help us assist you . For replacement parts shipped while the product...
...Accordingly, the above is under warranty, the customer will be the customerʼs responsibility. ICON Health & Fitness, Inc. (ICON) warrants this manual. Parts and labor are limited in -home service, the customer will be responsible for a particular purpose are warranted for a lifetime. For in ...lasts. ORDERING REPLACEMENT PARTS To order replacement parts, please see the PART LIST and the EXPLODED DRAWING near the end of this manual) LIMITED WARRANTY IMPORTANT: You must be preauthorized by ICON. To help us assist you . For replacement parts shipped while the product...

