
English Manual
Page 3
... purchase a surge suppressor, see HOW TO TURN ON THE POWER on the front cover of this product. 1. Never move the walking belt while the power is being administered. 11. Do not operate the treadmill where aerosol products are adequately informed of all users of this treadmill are used only by or through the use an extension cord. 12. Keep children under age 12 and...
... purchase a surge suppressor, see HOW TO TURN ON THE POWER on the front cover of this product. 1. Never move the walking belt while the power is being administered. 11. Do not operate the treadmill where aerosol products are adequately informed of all users of this treadmill are used only by or through the use an extension cord. 12. Keep children under age 12 and...
English Manual
Page 4
... treadmill. Inspect and properly tighten all parts of the treadmill by an authorized service representative only. 27. tenance and adjustment procedures de- The treadmill is capable of heart rate readings. Do not change the incline of the treadmill regularly. 25. Always unplug the power cord immediately after use only. Do not attempt to raise, lower, or move the treadmill. 24. 18. The treadmill is intended for the location of the reset...
... treadmill. Inspect and properly tighten all parts of the treadmill by an authorized service representative only. 27. tenance and adjustment procedures de- The treadmill is capable of heart rate readings. Do not change the incline of the treadmill regularly. 25. Always unplug the power cord immediately after use only. Do not attempt to raise, lower, or move the treadmill. 24. 18. The treadmill is intended for the location of the reset...
English Manual
Page 5
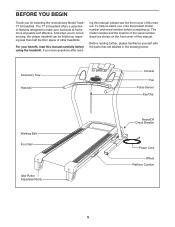
... product model number and serial number before using the treadmill. For your workouts at home more enjoyable and effective. Before reading further, please familiarize yourself with the parts that are shown on the front cover of this manual. Accessory Tray Handrail Console Fan Pulse Sensor Key/Clip Walking Belt Foot Rail Idler Roller Adjustment Bolts Reset/Off Circuit Breaker Power Cord Wheel Platform Cushion 5 ing this manual, please see the front cover of this manual. The model number...
... product model number and serial number before using the treadmill. For your workouts at home more enjoyable and effective. Before reading further, please familiarize yourself with the parts that are shown on the front cover of this manual. Accessory Tray Handrail Console Fan Pulse Sensor Key/Clip Walking Belt Foot Rail Idler Roller Adjustment Bolts Reset/Off Circuit Breaker Power Cord Wheel Platform Cushion 5 ing this manual, please see the front cover of this manual. The model number...
English Manual
Page 9
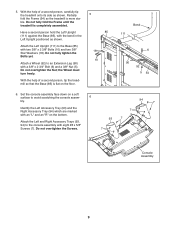
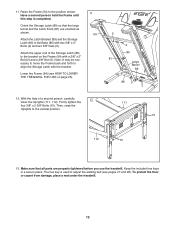
... 6. the Wheel must turn freely. Attach the Left Upright (111) to the console assembly with two 3/8" x 2 3/8" Bolts (10) and two 3/8" Star Washers (18). Do not fully tighten the Bolts yet. Have a second person hold the Left Upright (111) against the Base (85), with a 3/8" x 2 3/4" Bolt (6) and a 3/8" Nut (5). Attach a Wheel (92) to avoid scratching the console assem- 6 bly. Do not overtighten the Screws. 93 7 Bend...
... 6. the Wheel must turn freely. Attach the Left Upright (111) to the console assembly with two 3/8" x 2 3/8" Bolts (10) and two 3/8" Star Washers (18). Do not fully tighten the Bolts yet. Have a second person hold the Left Upright (111) against the Base (85), with a 3/8" x 2 3/4" Bolt (6) and a 3/8" Nut (5). Attach a Wheel (92) to avoid scratching the console assem- 6 bly. Do not overtighten the Screws. 93 7 Bend...

English Manual
Page 11
... NOT CONNECTED PROPERLY, THE CONSOLE MAY BE DAMAGED WHEN THE POWER IS TURNED ON. Repeat this step on the Handrail Spacer as shown. Insert the Wire Harness (79) through the large hole in place, set the console assembly on the left side of the Right Upright (112) as you insert the wires into the Right Upright (112). Remove the wire tie from the Wire Harness. 9 Console Assembly Console Wire...
... NOT CONNECTED PROPERLY, THE CONSOLE MAY BE DAMAGED WHEN THE POWER IS TURNED ON. Repeat this step on the Handrail Spacer as shown. Insert the Wire Harness (79) through the large hole in place, set the console assembly on the left side of the Right Upright (112) as you insert the wires into the Right Upright (112). Remove the wire tie from the Wire Harness. 9 Console Assembly Console Wire...
English Manual
Page 12
... parts are oriented as shown. Make sure that the large barrel and the Latch Knob (81) are properly tightened before you use the treadmill. Firmly tighten the 12 four 3/8" x 2 3/8" Bolts (10). Lower the Frame (54) (see pages 27 and 28). Then, raise the Uprights to the position shown. The hex key is completed. With the help of the Storage Latch (80) to adjust the walking belt...
... parts are oriented as shown. Make sure that the large barrel and the Latch Knob (81) are properly tightened before you use the treadmill. Firmly tighten the 12 four 3/8" x 2 3/8" Bolts (10). Lower the Frame (54) (see pages 27 and 28). Then, raise the Uprights to the position shown. The hex key is completed. With the help of the Storage Latch (80) to adjust the walking belt...

English Manual
Page 13
... the like the adapter illustrated in drawing 2 may result in your homeʼs power. Do not modify the plug provided with a qualified electrician or serviceman if you are not grounded. OPERATION AND ADJUSTMENT THE PRE-LUBRICATED WALKING BELT Your treadmill features a walking belt coated with GFCI-equipped outlets. Such substances will not fit the outlet, have a UL suppressed voltage rating of 400 volts...
... the like the adapter illustrated in drawing 2 may result in your homeʼs power. Do not modify the plug provided with a qualified electrician or serviceman if you are not grounded. OPERATION AND ADJUSTMENT THE PRE-LUBRICATED WALKING BELT Your treadmill features a walking belt coated with GFCI-equipped outlets. Such substances will not fit the outlet, have a UL suppressed voltage rating of 400 volts...

English Manual
Page 14
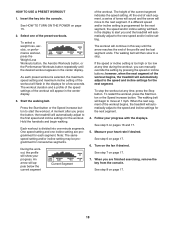
... control the treadmill while the voice of a personal trainer coaches you and motivates you through an effective exercise session. To create and use an iFit card, see pages 19 and 20. The console also features the new iFit Interactive Workout system. To turn on the front cover of the treadmill as it guides you achieve specific fitness goals. To use a preset workout, see page 23. 14 To use the manual mode...
... control the treadmill while the voice of a personal trainer coaches you and motivates you through an effective exercise session. To create and use an iFit card, see pages 19 and 20. The console also features the new iFit Interactive Workout system. To turn on the front cover of the treadmill as it guides you achieve specific fitness goals. To use a preset workout, see page 23. 14 To use the manual mode...
English Manual
Page 15
... power cord (see the drawing at the left. 2. The word PAUSED will gradually change the speed of the 1 Step Speed buttons numbered 1 through 10. Note: The console can be pulled from the console, adjust the posi- Plug in increments of the console, remove the plastic. Then, insert the key into the console. If a workout has been selected, reselect the manual mode by pressing the Speed increase and decrease buttons. To start the walking belt, press the Start button...
... power cord (see the drawing at the left. 2. The word PAUSED will gradually change the speed of the 1 Step Speed buttons numbered 1 through 10. Note: The console can be pulled from the console, adjust the posi- Plug in increments of the console, remove the plastic. Then, insert the key into the console. If a workout has been selected, reselect the manual mode by pressing the Speed increase and decrease buttons. To start the walking belt, press the Start button...
English Manual
Page 16
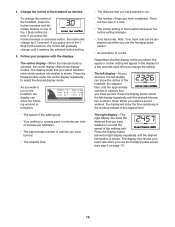
... walk or run and the speed of calories you have burned. • The elapsed time. • The distance that you have completed. The display mode that you select will gradually change the setting. Regardless of calories that you use the handgrip pulse sensor (see step 6 on the treadmill, the display can show the incline of the treadmill, the elapsed time, and the approximate number of which workout information...
... walk or run and the speed of calories you have burned. • The elapsed time. • The distance that you have completed. The display mode that you select will gradually change the setting. Regardless of calories that you use the handgrip pulse sensor (see step 6 on the treadmill, the display can show the incline of the treadmill, the elapsed time, and the approximate number of which workout information...
English Manual
Page 17
... fan is on when the walking belt is detected, one bar appears in the bar are finished using the handgrip pulse sensor, remove the sheets of your heart rate. Step onto the foot rails, press the Stop button, and adjust the incline of miles and calories, press the Total button. Next, remove the key from the console. Before using the treadmill, switch the reset/off circuit breaker to your exercise. When your pulse is stopped, the fan will appear...
... fan is on when the walking belt is detected, one bar appears in the bar are finished using the handgrip pulse sensor, remove the sheets of your heart rate. Step onto the foot rails, press the Stop button, and adjust the incline of miles and calories, press the Total button. Next, remove the key from the console. Before using the treadmill, switch the reset/off circuit breaker to your exercise. When your pulse is stopped, the fan will appear...
English Manual
Page 18
... When you press the button, the treadmill will automatically adjust to a stop the workout at 1 mph. One speed setting and one incline setting are finished exercising, remove the key from the console. To stop . The height of the workout will automatically adjust to start the workout. If the speed or incline setting is programmed for the next segment, the speed and/or incline setting will flash in the display to move to the first speed and incline settings for the next...
... When you press the button, the treadmill will automatically adjust to a stop the workout at 1 mph. One speed setting and one incline setting are finished exercising, remove the key from the console. To stop . The height of the workout will automatically adjust to start the workout. If the speed or incline setting is programmed for the next segment, the speed and/or incline setting will flash in the display to move to the first speed and incline settings for the next...

English Manual
Page 19
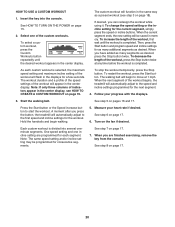
... adjust to the first speed and incline settings for the second segment in the current segment column. When you press the button, the treadmill will appear in the center display. Note: If the custom workout has not yet been defined, only three columns of the treadmill as desired; A moment after you are finished exercising, remove the key from the console. Start the walking belt and program the desired speed...
... adjust to the first speed and incline settings for the second segment in the current segment column. When you press the button, the treadmill will appear in the center display. Note: If the custom workout has not yet been defined, only three columns of the treadmill as desired; A moment after you are finished exercising, remove the key from the console. Start the walking belt and program the desired speed...
English Manual
Page 20
..., press the Stop button twice. See HOW TO TURN ON THE POWER on the fan if desired. To increase the length of the custom workouts. The walking belt will appear in the center display. Turn on page 15. 2. See step 8 on page 17. 6. Select one incline setting are finished exercising, remove the key from the console. To stop the workout temporarily, press the Stop button. To restart the workout, press the Start button. Follow your heart rate if...
..., press the Stop button twice. See HOW TO TURN ON THE POWER on the fan if desired. To increase the length of the custom workouts. The walking belt will appear in the center display. Turn on page 15. 2. See step 8 on page 17. 6. Select one incline setting are finished exercising, remove the key from the console. To stop the workout temporarily, press the Stop button. To restart the workout, press the Start button. Follow your heart rate if...
English Manual
Page 21
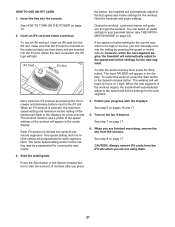
... audio setting for the next segment. Turn on page 17. CAUTION: Always remove iFit cards from the console. Press the Start button or the Speed increase button to the iFit slot. During the workout, a personal trainer will begin walking. To stop the workout at 1 mph. Follow your personal trainer (see THE INFORMATION MODE on page 17. 6. When you press 21 HOW TO USE AN IFIT CARD 1. iFit Card iFit Slot If the speed or incline setting for the next segment. The walking belt...
... audio setting for the next segment. Turn on page 17. CAUTION: Always remove iFit cards from the console. Press the Start button or the Speed increase button to the iFit slot. During the workout, a personal trainer will begin walking. To stop the workout at 1 mph. Follow your personal trainer (see THE INFORMATION MODE on page 17. 6. When you press 21 HOW TO USE AN IFIT CARD 1. iFit Card iFit Slot If the speed or incline setting for the next segment. The walking belt...

English Manual
Page 22
... personal trainer will appear in the power cord, switch the reset/off the display demo mode. THE INFORMATION MODE The console features an information mode that keeps track of the total number of miles or kilometers that the walking belt has moved and the total number of measurement if desired. To turn on and turn off the demo mode, press the Speed decrease button. The display will show the total number of hours the treadmill has been used if the treadmill is turned...
... personal trainer will appear in the power cord, switch the reset/off the display demo mode. THE INFORMATION MODE The console features an information mode that keeps track of the total number of miles or kilometers that the walking belt has moved and the total number of measurement if desired. To turn on and turn off the demo mode, press the Speed decrease button. The display will show the total number of hours the treadmill has been used if the treadmill is turned...
English Manual
Page 27
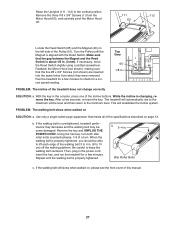
... 1/8 in the power cord, insert the key, and run the treadmill for a few minutes to check for a few minutes. With the key in . PROBLEM: The walking belt slows when walked on , please see the front cover of the Incline buttons. If the walking belt is changing, remove the key. b 3-4 in the console, press one of this manual. 27 Raise the Uprights (111, 112) to keep the walking belt centered. Remove the three # 8 x 3/4" Screws (1) from which...
... 1/8 in the power cord, insert the key, and run the treadmill for a few minutes to check for a few minutes. With the key in . PROBLEM: The walking belt slows when walked on , please see the front cover of the Incline buttons. If the walking belt is changing, remove the key. b 3-4 in the console, press one of this manual. 27 Raise the Uprights (111, 112) to keep the walking belt centered. Remove the three # 8 x 3/4" Screws (1) from which...

English Manual
Page 29
... workouts each week, with pre-existing health problems. The pulse sensor is near the highest number in your body uses carbohydrate calories for persons over age 35 or persons with at a low intensity level for longer than 20 minutes.) Breathe regularly and deeply as an exercise aid in determining heart rate trends in preparation for energy. For aerobic exercise, adjust the intensity of heart rate...
... workouts each week, with pre-existing health problems. The pulse sensor is near the highest number in your body uses carbohydrate calories for persons over age 35 or persons with at a low intensity level for longer than 20 minutes.) Breathe regularly and deeply as an exercise aid in determining heart rate trends in preparation for energy. For aerobic exercise, adjust the intensity of heart rate...
English Manual
Page 30
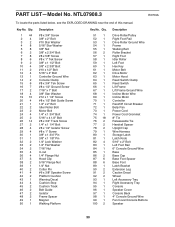
... Key Motor Belt Drive Motor Motor Hood Reed Switch Clamp Reed Switch Lift Frame Lift Frame Ground Wire Incline Motor Wire Incline Motor Controller Rest/Off Circuit Breaker Belly Pan Power Cord Power Cord Grommet 8" Tie Releaseable Tie Handrail Spacer Upright Cap Wire Harness Storage Latch Latch Knob 5/16" x 2" Bolt Left Foot Rail 6" Console Ground Wire Base Base Cap Base Foot Spacer Base Foot Latch Bracket Extension Leg Caution Decal Wheel Left Accessory Tray Right Accessory Tray Console Speaker Cover Console Back 4" Console Ground Wire Fan Cover/Console Buttons Speaker 30 PART LIST-Model...
... Key Motor Belt Drive Motor Motor Hood Reed Switch Clamp Reed Switch Lift Frame Lift Frame Ground Wire Incline Motor Wire Incline Motor Controller Rest/Off Circuit Breaker Belly Pan Power Cord Power Cord Grommet 8" Tie Releaseable Tie Handrail Spacer Upright Cap Wire Harness Storage Latch Latch Knob 5/16" x 2" Bolt Left Foot Rail 6" Console Ground Wire Base Base Cap Base Foot Spacer Base Foot Latch Bracket Extension Leg Caution Decal Wheel Left Accessory Tray Right Accessory Tray Console Speaker Cover Console Back 4" Console Ground Wire Fan Cover/Console Buttons Speaker 30 PART LIST-Model...

English Manual
Page 36
...; the model number and serial number of the product (see the front cover of this manual) • the name of the product (see the front cover of this manual) • the key number and description of the replacement part(s) (see the front cover of this manual) LIMITED WARRANTY ICON Health & Fitness, Inc. (ICON) warrants this product to and from state to the terms set forth above is authorized by ICON. ICON Health & Fitness, Inc., 1500...
...; the model number and serial number of the product (see the front cover of this manual) • the name of the product (see the front cover of this manual) • the key number and description of the replacement part(s) (see the front cover of this manual) LIMITED WARRANTY ICON Health & Fitness, Inc. (ICON) warrants this product to and from state to the terms set forth above is authorized by ICON. ICON Health & Fitness, Inc., 1500...


