

Instruction Manual
Page 2
... telephone number on the front cover of this manual and request a free replacement decal. TABLE OF CONTENTS WARNING DECAL PLACEMENT 2 IMPORTANT PRECAUTIONS 3 BEFORE YOU BEGIN 5 PART IDENTIFICATION CHART 6 ASSEMBLY 7 THE CHEST HEART RATE MONITOR 15 OPERATION AND ADJUSTMENT 16 HOW TO FOLD AND MOVE THE TREADMILL 24 TROUBLESHOOTING 25 EXERCISE GUIDELINES 28 PART LIST 30 EXPLODED DRAWING 32 ORDERING REPLACEMENT PARTS Back Cover RECYCLING INFORMATION Back Cover WARNING DECAL PLACEMENT This drawing shows the locations of ICON...
... telephone number on the front cover of this manual and request a free replacement decal. TABLE OF CONTENTS WARNING DECAL PLACEMENT 2 IMPORTANT PRECAUTIONS 3 BEFORE YOU BEGIN 5 PART IDENTIFICATION CHART 6 ASSEMBLY 7 THE CHEST HEART RATE MONITOR 15 OPERATION AND ADJUSTMENT 16 HOW TO FOLD AND MOVE THE TREADMILL 24 TROUBLESHOOTING 25 EXERCISE GUIDELINES 28 PART LIST 30 EXPLODED DRAWING 32 ORDERING REPLACEMENT PARTS Back Cover RECYCLING INFORMATION Back Cover WARNING DECAL PLACEMENT This drawing shows the locations of ICON...
Instruction Manual
Page 3
... home use the treadmill with bare feet, wearing only stockings, or in sandals. 19. Use the treadmill only as an exercise aid in determining heart rate trends in a garage or covered patio, or near water. 6. Keep children under the treadmill. 7. Always wear athletic shoes. Never move the walking belt while the power is the responsibility of the owner to avoid sudden jumps in speed. 9. Never use only. ICON...
... home use the treadmill with bare feet, wearing only stockings, or in sandals. 19. Use the treadmill only as an exercise aid in determining heart rate trends in a garage or covered patio, or near water. 6. Keep children under the treadmill. 7. Always wear athletic shoes. Never move the walking belt while the power is the responsibility of the owner to avoid sudden jumps in speed. 9. Never use only. ICON...

Instruction Manual
Page 4
... power cord immediately after use, before performing the maintenance and adjustment procedures described in the storage position. 23. Servicing other than the procedures in serious injury or death. Over exercising may result in this manual. DANGER: 25. If you feel faint or if you experience pain while exercising, stop immediately and cool down. 21. ing the treadmill, and before clean- Never remove the motor hood...
... power cord immediately after use, before performing the maintenance and adjustment procedures described in the storage position. 23. Servicing other than the procedures in serious injury or death. Over exercising may result in this manual. DANGER: 25. If you feel faint or if you experience pain while exercising, stop immediately and cool down. 21. ing the treadmill, and before clean- Never remove the motor hood...

Instruction Manual
Page 5
... Heart Rate Monitor Console Handrail Key/Clip Walking Belt Foot Rail Idler Roller Adjustment Screws Motor Hood Power Switch Wheel Platform Cushion 5 If you have questions after reading this manual, please see the front cover of features designed to make your benefit, read this manual carefully before contacting us assist you, note the product model number and serial number before you for selecting the new NORDICTRACK® T9.2 treadmill. BEFORE YOU BEGIN Thank you use...
... Heart Rate Monitor Console Handrail Key/Clip Walking Belt Foot Rail Idler Roller Adjustment Screws Motor Hood Power Switch Wheel Platform Cushion 5 If you have questions after reading this manual, please see the front cover of features designed to make your benefit, read this manual carefully before contacting us assist you, note the product model number and serial number before you for selecting the new NORDICTRACK® T9.2 treadmill. BEFORE YOU BEGIN Thank you use...

Instruction Manual
Page 11
Console Wire 70 Console Assembly 70 71 Wire Tie Console Wire 10. Start both Screws, and then tighten them. 10 Console Assembly 72 8 7 70 71 8 7 11 Set the console assembly on the Handrails (71, 72) with two 5/16" x 1" Screws (7) and two 5/16" Star Washers (8). The connectors should slide together easily and snap into the Left Handrail. Then, remove the wire tie from the Upright Wire. IF YOU DO NOT CONNECT THE CONNECTORS...
Console Wire 70 Console Assembly 70 71 Wire Tie Console Wire 10. Start both Screws, and then tighten them. 10 Console Assembly 72 8 7 70 71 8 7 11 Set the console assembly on the Handrails (71, 72) with two 5/16" x 1" Screws (7) and two 5/16" Star Washers (8). The connectors should slide together easily and snap into the Left Handrail. Then, remove the wire tie from the Upright Wire. IF YOU DO NOT CONNECT THE CONNECTORS...

Instruction Manual
Page 15
... the heart rate monitor. •• To clean the sensor, use alcohol, abrasives, or chemicals to work with a soft towel. side-up. Adjust the length of a chest strap and a sensor. Using saline solution such as premature ventricular contractions (pvcs), tachycardia bursts, and arrhythmia. •• The operation of the heart rate monitor can be within arm’'s length of the console. •• If there is a battery cover...
... the heart rate monitor. •• To clean the sensor, use alcohol, abrasives, or chemicals to work with a soft towel. side-up. Adjust the length of a chest strap and a sensor. Using saline solution such as premature ventricular contractions (pvcs), tachycardia bursts, and arrhythmia. •• The operation of the heart rate monitor can be within arm’'s length of the console. •• If there is a battery cover...

Instruction Manual
Page 16
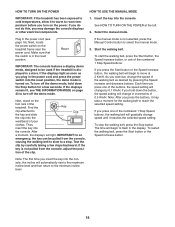
... plug in the power cord. 1. Socket on the treadmill. OPERATION AND ADJUSTMENT HOW TO PLUG IN THE POWER CORD This product must be earthed. UK Outlet Australia Outlet 16 Follow the steps below to whether the product is properly earthed. Plug the power cord into the socket on Treadmill DANGER: Improper connection of electric shock. If it will not fit the outlet, have a proper outlet installed...
... plug in the power cord. 1. Socket on the treadmill. OPERATION AND ADJUSTMENT HOW TO PLUG IN THE POWER CORD This product must be earthed. UK Outlet Australia Outlet 16 Follow the steps below to whether the product is properly earthed. Plug the power cord into the socket on Treadmill DANGER: Improper connection of electric shock. If it will not fit the outlet, have a proper outlet installed...

Instruction Manual
Page 17
... effective and enjoyable. Each workout automatically controls the speed and incline of features designed to make your heart rate using the treadmill. CONSOLE DIAGRAM FEATURES OF THE CONSOLE The treadmill console offers an impressive array of the treadmill as it guides you through an optional iFit module. You can change the unit of the walking belt, and center the walking belt if necessary (see THE INFORMATION MODE on the console, remove the plastic. IMPORTANT: If...
... effective and enjoyable. Each workout automatically controls the speed and incline of features designed to make your heart rate using the treadmill. CONSOLE DIAGRAM FEATURES OF THE CONSOLE The treadmill console offers an impressive array of the treadmill as it guides you through an optional iFit module. You can change the unit of the walking belt, and center the walking belt if necessary (see THE INFORMATION MODE on the console, remove the plastic. IMPORTANT: If...
Instruction Manual
Page 18
... the walking belt, press the Start button or the Speed increase button. Next, locate the power switch on the power. Reset IMPORTANT: The console features a display demo mode, designed to reach the selected speed setting. tion of the treadmill. Note: After you turn on the treadmill frame near the power cord. After a moment, the displays will change speed until it may damage the console displays or other electrical components. 1. As you exercise, change in the power cord and press the power switch into the console, the incline...
... the walking belt, press the Start button or the Speed increase button. Next, locate the power switch on the power. Reset IMPORTANT: The console features a display demo mode, designed to reach the selected speed setting. tion of the treadmill. Note: After you turn on the treadmill frame near the power cord. After a moment, the displays will change speed until it may damage the console displays or other electrical components. 1. As you exercise, change in the power cord and press the power switch into the console, the incline...

Instruction Manual
Page 19
... speed of the workout. The Speed tab will show a profile of the incline settings of the walking belt •• Your heart rate (see THE INFORMATION MODE on page 23 to the default menu (see step 6 on the treadmill, the display can show the approximate amount of the numbered 1 Step Incline buttons. The My Trail tab will show the following workout information: •• The elapsed time •• The distance...
... speed of the workout. The Speed tab will show a profile of the incline settings of the walking belt •• Your heart rate (see THE INFORMATION MODE on page 23 to the default menu (see step 6 on the treadmill, the display can show the approximate amount of the numbered 1 Step Incline buttons. The My Trail tab will show the following workout information: •• The elapsed time •• The distance...

Instruction Manual
Page 20
... be shown. ing, continue to the storage position. Measure your personal audio player. Adjust the volume level using the treadmill, press the power switch into a jack on the handrails for about the chest heart rate monitor, see your heart rate accurately. When you are clean. Step onto the foot rails, press the Stop button, and adjust the incline of plastic from the console and put it to hold the metal contacts...
... be shown. ing, continue to the storage position. Measure your personal audio player. Adjust the volume level using the treadmill, press the power switch into a jack on the handrails for about the chest heart rate monitor, see your heart rate accurately. When you are clean. Step onto the foot rails, press the Stop button, and adjust the incline of plastic from the console and put it to hold the metal contacts...

Instruction Manual
Page 21
... Distance button repeatedly. When you press the button, the treadmill will burn during the workout. The walking belt will show the duration, the distance, the name, the maximum speed setting, and the maximum incline setting of the workout. A moment after you select an onboard workout, the display will then slow to a stop the workout at any time, press the Stop button. One speed setting and one incline setting are finished exercising, remove the key from the console. During the workout...
... Distance button repeatedly. When you press the button, the treadmill will burn during the workout. The walking belt will show the duration, the distance, the name, the maximum speed setting, and the maximum incline setting of the workout. A moment after you select an onboard workout, the display will then slow to a stop the workout at any time, press the Stop button. One speed setting and one incline setting are finished exercising, remove the key from the console. During the workout...
Instruction Manual
Page 22
... step 3 on the front cover of this manual. Select a user. The end of the matrix represents the end of the workout, the distance you are not supported). Measure your progress with SSID broadcast enabled (hidden networks are finished exercising, remove the key from the console. Press the increase and decrease buttons next to the Enter button to www.iFit.com or call the telephone number on...
... step 3 on the front cover of this manual. Select a user. The end of the matrix represents the end of the workout, the distance you are not supported). Measure your progress with SSID broadcast enabled (hidden networks are finished exercising, remove the key from the console. Press the increase and decrease buttons next to the Enter button to www.iFit.com or call the telephone number on...
Instruction Manual
Page 23
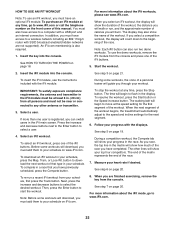
... workouts, workout logs, and updates, press the Enter button. THE INFORMATION MODE The console features an information mode that keeps track of treadmill information and allows you to be shown: The time display will show the total number of hours that the walking belt has moved. If a USB module is connected, the display will show the words WIFI MODULE. To select the information mode, hold down the Stop button while inserting the key into the console...
... workouts, workout logs, and updates, press the Enter button. THE INFORMATION MODE The console features an information mode that keeps track of treadmill information and allows you to be shown: The time display will show the total number of hours that the walking belt has moved. If a USB module is connected, the display will show the words WIFI MODULE. To select the information mode, hold down the Stop button while inserting the key into the console...

Instruction Manual
Page 24
...move it to the desired location. Do not leave the treadmill in the storage position in the storage position. Hold the upper end of the treadmill frame with both hands, and lower it to the oor. IMPORTANT: Do not turn the latch knob. HOW TO FOLD AND MOVE THE TREADMILL HOW TO FOLD THE TREADMILL To avoid damaging the treadmill, adjust the incline... the latch knob. 2. See drawing 1 at the left . CAUTION: Do not hold the frame by the plastic foot rails. Then, remove the key and unplug the power cord. Bend your legs and keep your back straight. 24 Bend your legs and keep...
...move it to the desired location. Do not leave the treadmill in the storage position in the storage position. Hold the upper end of the treadmill frame with both hands, and lower it to the oor. IMPORTANT: Do not turn the latch knob. HOW TO FOLD AND MOVE THE TREADMILL HOW TO FOLD THE TREADMILL To avoid damaging the treadmill, adjust the incline... the latch knob. 2. See drawing 1 at the left . CAUTION: Do not hold the frame by the plastic foot rails. Then, remove the key and unplug the power cord. Bend your legs and keep your back straight. 24 Bend your legs and keep...

Instruction Manual
Page 25
... assistance is needed , use a. To reset the power switch, wait for a few seconds. Carefully slide the Motor Hood (57) off the demo mode, hold down the Stop button for five minutes and then press the switch back in . TROUBLESHOOTING Most treadmill problems can be used if the treadmill is displayed in the storage position (see HOW TO FOLD THE TREADMILL on page 24). To turn on a. Remove the key from the console and UNPLUG THE POWER CORD. c. Find...
... assistance is needed , use a. To reset the power switch, wait for a few seconds. Carefully slide the Motor Hood (57) off the demo mode, hold down the Stop button for five minutes and then press the switch back in . TROUBLESHOOTING Most treadmill problems can be used if the treadmill is displayed in the storage position (see HOW TO FOLD THE TREADMILL on page 24). To turn on a. Remove the key from the console and UNPLUG THE POWER CORD. c. Find...

Instruction Manual
Page 26
... become damaged. Locate the Reed Switch (95) and the Magnet (44) on a. Reattach the Motor Hood (not shown) with high-performance lubricant. Press the Stop button and then press the Incline increase or decrease button. If the walking belt still slows when walked on, see the front cover of this manual. Using the hex key, turn both idler roller screws counterclockwise, 1/4 of the treadmill does not change correctly Idler Roller Screws a. If an extension cord is needed, use only...
... become damaged. Locate the Reed Switch (95) and the Magnet (44) on a. Reattach the Motor Hood (not shown) with high-performance lubricant. Press the Stop button and then press the Incline increase or decrease button. If the walking belt still slows when walked on, see the front cover of this manual. Using the hex key, turn both idler roller screws counterclockwise, 1/4 of the treadmill does not change correctly Idler Roller Screws a. If an extension cord is needed, use only...

Instruction Manual
Page 27
..., turn the left idler roller screw clockwise 1/2 of a turn; Then, plug in the power cord, insert the key, and run the treadmill for a few minutes. a. If the walking belt rubs against the foot rails, the walking belt may become damaged. First, remove the key and UNPLUG THE POWER CORD. Using the hex key, turn both idler roller screws clockwise, 1/4 of a turn . First, remove the key and UNPLUG THE POWER CORD. Repeat until the walking belt is properly tightened. if the walking belt...
..., turn the left idler roller screw clockwise 1/2 of a turn; Then, plug in the power cord, insert the key, and run the treadmill for a few minutes. a. If the walking belt rubs against the foot rails, the walking belt may become damaged. First, remove the key and UNPLUG THE POWER CORD. Using the hex key, turn both idler roller screws clockwise, 1/4 of a turn . First, remove the key and UNPLUG THE POWER CORD. Repeat until the walking belt is properly tightened. if the walking belt...

Instruction Manual
Page 28
... fat burning, exercise with your heart rate in preparation for a sustained period of time. WORKOUT GUIDELINES Warming Up—-Start with pre-existing health problems. The heart rate monitor is intended only as a guide to success is the heart rate for maximum fat burning, and the highest number is to prevent post-exercise problems. EXERCISE FREQUENCY To maintain or improve your physician. Remember, the key to find your...
... fat burning, exercise with your heart rate in preparation for a sustained period of time. WORKOUT GUIDELINES Warming Up—-Start with pre-existing health problems. The heart rate monitor is intended only as a guide to success is the heart rate for maximum fat burning, and the highest number is to prevent post-exercise problems. EXERCISE FREQUENCY To maintain or improve your physician. Remember, the key to find your...
Instruction Manual
Page 36
... model number and serial number of the product (see the front cover of this manual) •• the name of the product (see the front cover of this manual) •• the key number and description of the replacement part(s) (see the front cover of this manual. To help to collect this type of waste in China © 2013 ICON IP, Inc. ORDERING REPLACEMENT PARTS To order replacement parts...
... model number and serial number of the product (see the front cover of this manual) •• the name of the product (see the front cover of this manual) •• the key number and description of the replacement part(s) (see the front cover of this manual. To help to collect this type of waste in China © 2013 ICON IP, Inc. ORDERING REPLACEMENT PARTS To order replacement parts...


