
Canadian English Manual
Page 1
... missing parts, we are committed to providing complete customer satisfaction. CUSTOMER HOT LINE: 1-888-936-4266 Mon.-Fri., 8:00 a.m.-6:30 p.m. TO AVOID UNNECESSARY DELAYS, PLEASE CALL DIRECT TO OUR TOLL-FREE CUSTOMER HOT LINE. USER'S MANUAL Visit our website at www.nordictrack.com new products, prizes, fitness tips, and much more! Write the serial number in this manual before using this manual...
... missing parts, we are committed to providing complete customer satisfaction. CUSTOMER HOT LINE: 1-888-936-4266 Mon.-Fri., 8:00 a.m.-6:30 p.m. TO AVOID UNNECESSARY DELAYS, PLEASE CALL DIRECT TO OUR TOLL-FREE CUSTOMER HOT LINE. USER'S MANUAL Visit our website at www.nordictrack.com new products, prizes, fitness tips, and much more! Write the serial number in this manual before using this manual...
Canadian English Manual
Page 2
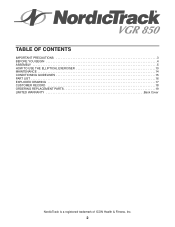
TABLE OF CONTENTS IMPORTANT PRECAUTIONS 3 BEFORE YOU BEGIN 4 ASSEMBLY 5 HOW TO USE THE ELLIPTICAL EXERCISER 10 MAINTENANCE 14 CONDITIONING GUIDELINES 15 PART LIST 16 EXPLODED DRAWING 17 CUSTOMER RECORD 18 ORDERING REPLACEMENT PARTS 19 LIMITED WARRANTY Back Cover NordicTrack is a registered trademark of ICON Health & Fitness, Inc. 2
TABLE OF CONTENTS IMPORTANT PRECAUTIONS 3 BEFORE YOU BEGIN 4 ASSEMBLY 5 HOW TO USE THE ELLIPTICAL EXERCISER 10 MAINTENANCE 14 CONDITIONING GUIDELINES 15 PART LIST 16 EXPLODED DRAWING 17 CUSTOMER RECORD 18 ORDERING REPLACEMENT PARTS 19 LIMITED WARRANTY Back Cover NordicTrack is a registered trademark of ICON Health & Fitness, Inc. 2
Canadian English Manual
Page 3
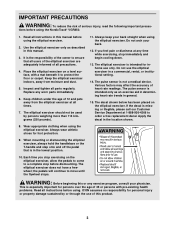
... placed on a level surface, with pre-existing health problems. Read all parts regularly. Wear appropriate clothing when using the NordicTrack® VGR850. 1. The elliptical exerciser does not have a freewheel; WARNING: Before beginning this manual before dismounting. Inspect and tighten all instructions before using the elliptical exerciser. If you stop exercising on the elliptical exerciser, allow the pedals to come to a complete stop immediately and begin cooling down. 13. Do...
... placed on a level surface, with pre-existing health problems. Read all parts regularly. Wear appropriate clothing when using the NordicTrack® VGR850. 1. The elliptical exerciser does not have a freewheel; WARNING: Before beginning this manual before dismounting. Inspect and tighten all instructions before using the elliptical exerciser. If you stop exercising on the elliptical exerciser, allow the pedals to come to a complete stop immediately and begin cooling down. 13. Do...
Canadian English Manual
Page 4
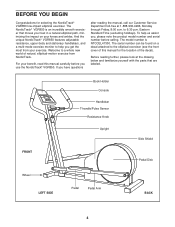
.../Pulse Sensor Resistance Knob Upright Side Shield Pedal Disk Wheel LEFT SIDE Pedal Pedal Arm BACK 4 If you , please note the product model number and serial number before you get the most from NordicTrack. To help you use the NordicTrack® VGR850. to help us assist you have questions after reading the manual, call our Customer Service Department toll-free at the drawing below and familiarize yourself with the parts...
.../Pulse Sensor Resistance Knob Upright Side Shield Pedal Disk Wheel LEFT SIDE Pedal Pedal Arm BACK 4 If you , please note the product model number and serial number before you get the most from NordicTrack. To help you use the NordicTrack® VGR850. to help us assist you have questions after reading the manual, call our Customer Service Department toll-free at the drawing below and familiarize yourself with the parts...
Canadian English Manual
Page 5
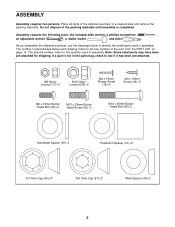
... Button Head Bolt (54)-2 M10 x 25mm Button Head Screw (42)-2 M10 x 45mm Button Head Bolt (59)-2 Handlebar Spacer (39)-2 Pedal Arm Spacer (41)-2* 3/4" Axle Cap (43)-4* 5/8" Axle Cap (57)-2* Weld Spacer (49)-2 5 Place all parts of the elliptical exerciser in parentheses below to identify the small parts used in the parts bag, check to the quantity used in assembly. Do not dispose of the part, from the PART LIST...
... Button Head Bolt (54)-2 M10 x 25mm Button Head Screw (42)-2 M10 x 45mm Button Head Bolt (59)-2 Handlebar Spacer (39)-2 Pedal Arm Spacer (41)-2* 3/4" Axle Cap (43)-4* 5/8" Axle Cap (57)-2* Weld Spacer (49)-2 5 Place all parts of the elliptical exerciser in parentheses below to identify the small parts used in the parts bag, check to the quantity used in assembly. Do not dispose of the part, from the PART LIST...
Canadian English Manual
Page 6
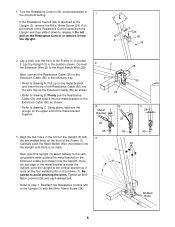
... the Extension Cable (55) as shown. • Refer to the vertical position while guiding the metal bracket on the upper end of the Resistance Control away from the Upright. Turn the Resistance Control (26) counterclockwise to the minimum setting. 1 If the Resistance Control (26) is inside the Upright, pivot the Upright to the Reed Switch Wire (25). Carefully push the Reed Switch Wire (not shown) into the Upright. Pull the...
... the Extension Cable (55) as shown. • Refer to the vertical position while guiding the metal bracket on the upper end of the Resistance Control away from the Upright. Turn the Resistance Control (26) counterclockwise to the minimum setting. 1 If the Resistance Control (26) is inside the Upright, pivot the Upright to the Reed Switch Wire (25). Carefully push the Reed Switch Wire (not shown) into the Upright. Pull the...

Canadian English Manual
Page 7
... inset drawing. Be careful not to the Upright (3) with the four M4 x 16mm Screws (34), making sure that the negative ends of the batteries (marked "-") are recommended. Attach the T-handle (10) to pinch the wires. 6 6 14 Wires 15 10 17 Batteries 9 Battery Clip 34 7 To install batteries, turn the console over. 4. Remove the four M4 x 16mm Screws (34), and separate the Console from the Console Base.
... inset drawing. Be careful not to the Upright (3) with the four M4 x 16mm Screws (34), making sure that the negative ends of the batteries (marked "-") are recommended. Attach the T-handle (10) to pinch the wires. 6 6 14 Wires 15 10 17 Batteries 9 Battery Clip 34 7 To install batteries, turn the console over. 4. Remove the four M4 x 16mm Screws (34), and separate the Console from the Console Base.
Canadian English Manual
Page 8
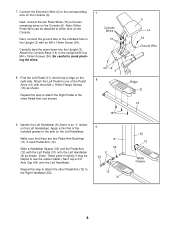
.... (Note: These parts fit tightly; Next, connect the ground wire to the Right Handlebar (62). 9 8 39 11 43 12 31 62 12 Apply Grease 8 Repeat this step to attach the Right Pedal to the Upright with an M4 x 16mm Screw (34). Attach the Console Base (14) to the other Pedal Arm (12) to the indicated hole in each Pedal Arm (12). Find the Left Pedal (31), which...
.... (Note: These parts fit tightly; Next, connect the ground wire to the Right Handlebar (62). 9 8 39 11 43 12 31 62 12 Apply Grease 8 Repeat this step to attach the Right Pedal to the Upright with an M4 x 16mm Screw (34). Attach the Console Base (14) to the other Pedal Arm (12) to the indicated hole in each Pedal Arm (12). Find the Left Pedal (31), which...

Canadian English Manual
Page 9
... carpet from damage, place a mat under the elliptical exerciser. 9 Apply a thin film of the elliptical exerciser are two Rear Pedal Arm Bushings (11) in the Pedal Arm (12) attached to attach the Right Handlebar and the right Pedal Arm (not shown). In addition, it may be helpful to use the rubber mallet. it may 8 be helpful to rotate the left Crank Arm (33). (Note: These parts fit tightly;
... carpet from damage, place a mat under the elliptical exerciser. 9 Apply a thin film of the elliptical exerciser are two Rear Pedal Arm Bushings (11) in the Pedal Arm (12) attached to attach the Right Handlebar and the right Pedal Arm (not shown). In addition, it may be helpful to use the rubber mallet. it may 8 be helpful to rotate the left Crank Arm (33). (Note: These parts fit tightly;

Canadian English Manual
Page 10
... they begin to move with the resistance knob on the Upright. Then, step off the highest pedal first. Note: The pedal disks can adjust the resistance of the pedals with a continuous motion. Next, step onto the other pedal. Pedal To dismount the elliptical exerciser, allow the pedals to come to decrease the resistance, turn the knob counterclockwise. it is in the direction shown below; To increase the Resistance Knob resistance, turn the pedal disks in...
... they begin to move with the resistance knob on the Upright. Then, step off the highest pedal first. Note: The pedal disks can adjust the resistance of the pedals with a continuous motion. Next, step onto the other pedal. Pedal To dismount the elliptical exerciser, allow the pedals to come to decrease the resistance, turn the knob counterclockwise. it is in the direction shown below; To increase the Resistance Knob resistance, turn the pedal disks in...

Canadian English Manual
Page 11
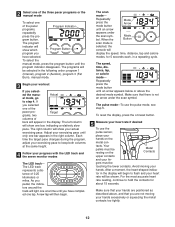
... seconds; Scan-This mode displays the above five modes, for use a pacer program, Actual two columns of your actual exercising pace. Pulse-This mode shows your heart rate when the pulse sensor is a goal pace. as the target pace changes, simply adjust your exercising pace to help you reach specific exercise goals by pacing your exercising pace, in the program. Note: If batteries were just installed, the power will appear in a repeating...
... seconds; Scan-This mode displays the above five modes, for use a pacer program, Actual two columns of your actual exercising pace. Pulse-This mode shows your heart rate when the pulse sensor is a goal pace. as the target pace changes, simply adjust your exercising pace to help you reach specific exercise goals by pacing your exercising pace, in the program. Note: If batteries were just installed, the power will appear in a repeating...
Canadian English Manual
Page 12
... hands. The speed, time, distance, lap, or calorie mode- After a moment, the heart-shaped indica- gram button. If you are positioned as described above the desired mode symbol. Each time the target pace changes during the program, adjust your heart rate if desired To use the pulse mode, see step 5. To reset the display, press the on/reset button. 5 Measure your exercising pace to step 4. To select the manual mode, press the program button until an arrow...
... hands. The speed, time, distance, lap, or calorie mode- After a moment, the heart-shaped indica- gram button. If you are positioned as described above the desired mode symbol. Each time the target pace changes during the program, adjust your heart rate if desired To use the pulse mode, see step 5. To reset the display, press the on/reset button. 5 Measure your exercising pace to step 4. To select the manual mode, press the program button until an arrow...

Canadian English Manual
Page 13
... power will turn it over; If the pedals are not moved and the console buttons are not pressed for about six minutes. be careful not to pull on Screws the back of the wires. 13 be careful not to pinch any of the console. Switch Next, locate the small switch on the wires. Reattach the console with the four screws; if a "KPH" does not appear, distance and speed...
... power will turn it over; If the pedals are not moved and the console buttons are not pressed for about six minutes. be careful not to pull on Screws the back of the wires. 13 be careful not to pinch any of the console. Switch Next, locate the small switch on the wires. Reattach the console with the four screws; if a "KPH" does not appear, distance and speed...

Canadian English Manual
Page 14
..., the batteries should be wiped clean with heart rate readings. • Do not hold the metal contacts for about 15 seconds. • For optimal performance of the elliptical exerciser regularly. PULSE SENSOR TROUBLE-SHOOTING • Avoid moving your hands while using the pulse sensor. MAINTENANCE Inspect and tighten all parts of the pulse sensor, keep liquids away from the console. Replace any worn parts immediately. STORAGE When storing the elliptical exerciser, remove the batteries from...
..., the batteries should be wiped clean with heart rate readings. • Do not hold the metal contacts for about 15 seconds. • For optimal performance of the elliptical exerciser regularly. PULSE SENSOR TROUBLE-SHOOTING • Avoid moving your hands while using the pulse sensor. MAINTENANCE Inspect and tighten all parts of the pulse sensor, keep liquids away from the console. Replace any worn parts immediately. STORAGE When storing the elliptical exerciser, remove the batteries from...
Canadian English Manual
Page 15
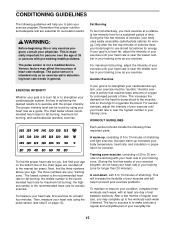
... fat, adjust the intensity of your exercise until your body uses easily accessible carbohydrate calories for successful results. Remember that requires large amounts of oxygen for persons over the age of 35 or persons with pre-existing health problems. The pulse sensor is near the lowest number in your training zone. (During the first few minutes of exercise, your heart rate is not...
... fat, adjust the intensity of your exercise until your body uses easily accessible carbohydrate calories for successful results. Remember that requires large amounts of oxygen for persons over the age of 35 or persons with pre-existing health problems. The pulse sensor is near the lowest number in your training zone. (During the first few minutes of exercise, your heart rate is not...
Canadian English Manual
Page 16
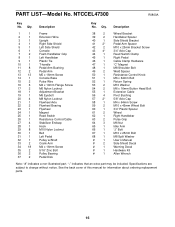
... Extension Wire Upright Right Side Shield Left Side Shield Console Foam Handlebar Grip Left Handlebar Plastic Tie T-handle Pedal Arm Bushing Pedal Arm M5 x 16mm Screw Console Base Pulse Wire M4 x 19mm Flange Screw M6 Nylon Locknut Adjustment Bracket M6 Eyebolt M8 Nylon Locknut Flywheel Axle Flywheel Bearing Flywheel Magnet Reed Switch Resistance Control/Cable Stabilizer Endcap Hook M10 Nylon Locknut Belt Left Pedal Pulley w/Shaft Crank Arm M4 x 16mm Screw 5/16" Zinc Bolt Pulley Bearing Pedal...
... Extension Wire Upright Right Side Shield Left Side Shield Console Foam Handlebar Grip Left Handlebar Plastic Tie T-handle Pedal Arm Bushing Pedal Arm M5 x 16mm Screw Console Base Pulse Wire M4 x 19mm Flange Screw M6 Nylon Locknut Adjustment Bracket M6 Eyebolt M8 Nylon Locknut Flywheel Axle Flywheel Bearing Flywheel Magnet Reed Switch Resistance Control/Cable Stabilizer Endcap Hook M10 Nylon Locknut Belt Left Pedal Pulley w/Shaft Crank Arm M4 x 16mm Screw 5/16" Zinc Bolt Pulley Bearing Pedal...
Canadian English Manual
Page 17
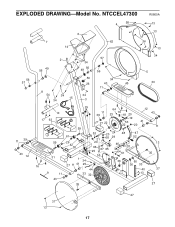
EXPLODED DRAWING-Model No. NTCCEL47300 R0800A 6 7 14 4 58 62 13 13 34 13 56 57 11 39 43 12 2 56 49 34 56 49 57 56 50 34 26 43 45 11 8 54 34 34 34 15 3 34 5 30 10 17 63 59 31 16 9 11 43 29 59 11 39 64 16 23 18 20 19 27 22 53 22 20 12 41 43 11 61 29 42 38 53 20 24 48 47 21 68 29 52 20 46 66 25 67 65 28 64 51 55 13 35 1 34 27 11 41 25 36 60 36 33 44 40 37 33 32 13 35 27 27 37 13 17
EXPLODED DRAWING-Model No. NTCCEL47300 R0800A 6 7 14 4 58 62 13 13 34 13 56 57 11 39 43 12 2 56 49 34 56 49 57 56 50 34 26 43 45 11 8 54 34 34 34 15 3 34 5 30 10 17 63 59 31 16 9 11 43 29 59 11 39 64 16 23 18 20 19 27 22 53 22 20 12 41 43 11 61 29 42 38 53 20 24 48 47 21 68 29 52 20 46 66 25 67 65 28 64 51 55 13 35 1 34 27 11 41 25 36 60 36 33 44 40 37 33 32 13 35 27 27 37 13 17
Canadian English Manual
Page 19
... you, please be prepared to give the following information when calling: • The MODEL NUMBER of the product (NTCCEL47300) • The NAME of the product (NordicTrack® VGR850 elliptical exerciser) • The SERIAL NUMBER of the product (see the front cover of this manual) • The KEY NUMBER and the DESCRIPTION of the part(s) (see the PART LIST on page 16 of Canada Inc. 900...
... you, please be prepared to give the following information when calling: • The MODEL NUMBER of the product (NTCCEL47300) • The NAME of the product (NordicTrack® VGR850 elliptical exerciser) • The SERIAL NUMBER of the product (see the front cover of this manual) • The KEY NUMBER and the DESCRIPTION of the part(s) (see the PART LIST on page 16 of Canada Inc. 900...
Canadian English Manual
Page 20
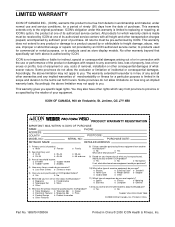
... on how long an implied warranty lasts. o Bicycle o Exercise Cycle o Treadmill o Home Gym o Weight Bench o Stepper o Cardio Glide o Other 11) Which type of magazines do you wish to be sent further bulletins about ICON products? ICON's obligation under normal use , costs of removal, installation or other type of Canada, Inc. Some provinces do not allow limitations on your equipment. This warranty gives you read regularly...
... on how long an implied warranty lasts. o Bicycle o Exercise Cycle o Treadmill o Home Gym o Weight Bench o Stepper o Cardio Glide o Other 11) Which type of magazines do you wish to be sent further bulletins about ICON products? ICON's obligation under normal use , costs of removal, installation or other type of Canada, Inc. Some provinces do not allow limitations on your equipment. This warranty gives you read regularly...


