
Instruction Manual
Page 2
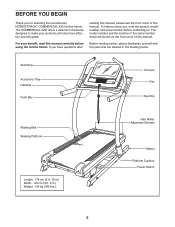
... BEGIN 5 PART IDENTIFICATION CHART 6 ASSEMBLY 7 THE CHEST HEART RATE MONITOR 12 HOW TO USE THE INCLINE TRAINER 13 HOW TO MOVE THE INCLINE TRAINER 25 MAINTENANCE AND TROUBLESHOOTING 26 EXERCISE GUIDELINES 30 PART LIST 33 EXPLODED DRAWING 35 ORDERING REPLACEMENT PARTS Back Cover RECYCLING INFORMATION Back Cover WARNING DECAL PLACEMENT This drawing shows the locations of Google LLC. Google Maps is a registered trademark of this manual and request a free replacement decal. and are trademarks of ICON Health & Fitness, Inc. WPA...
... BEGIN 5 PART IDENTIFICATION CHART 6 ASSEMBLY 7 THE CHEST HEART RATE MONITOR 12 HOW TO USE THE INCLINE TRAINER 13 HOW TO MOVE THE INCLINE TRAINER 25 MAINTENANCE AND TROUBLESHOOTING 26 EXERCISE GUIDELINES 30 PART LIST 33 EXPLODED DRAWING 35 ORDERING REPLACEMENT PARTS Back Cover RECYCLING INFORMATION Back Cover WARNING DECAL PLACEMENT This drawing shows the locations of Google LLC. Google Maps is a registered trademark of this manual and request a free replacement decal. and are trademarks of ICON Health & Fitness, Inc. WPA...

Instruction Manual
Page 3
... turned off. Athletic support clothes are used only by someone responsible for home use the incline trainer in this product. 1. Always wear athletic shoes. When connecting the power cord (see page 13), plug the power cord into the fuse carrier. 14. Do not operate the incline trainer if the power cord or plug is damaged, or if the incline trainer is not working properly.) 17. The incline trainer is the responsibility of the owner...
... turned off. Athletic support clothes are used only by someone responsible for home use the incline trainer in this product. 1. Always wear athletic shoes. When connecting the power cord (see page 13), plug the power cord into the fuse carrier. 14. Do not operate the incline trainer if the power cord or plug is damaged, or if the incline trainer is not working properly.) 17. The incline trainer is the responsibility of the owner...

Instruction Manual
Page 4
... incline trainer. 26. Always unplug the power cord immediately after use . 24. SAVE THESE INSTRUCTIONS 4 The heart rate monitor is not a medical device. Never remove the motor hood unless instructed to raise, lower, or move the incline trainer until it is used. Over exercising may affect the accuracy of high speeds. Various factors, including the user's movement, may result in general. 23. The heart rate monitor is intended only as an exercise aid in determining heart rate...
... incline trainer. 26. Always unplug the power cord immediately after use . 24. SAVE THESE INSTRUCTIONS 4 The heart rate monitor is not a medical device. Never remove the motor hood unless instructed to raise, lower, or move the incline trainer until it is used. Over exercising may affect the accuracy of high speeds. Various factors, including the user's movement, may result in general. 23. The heart rate monitor is intended only as an exercise aid in determining heart rate...
Instruction Manual
Page 5
... revolutionary NORDICTRACK® COMMERCIAL X22I incline trainer. The COMMERCIAL X22I offers a selection of the serial number decal are labeled in .) Weight: 155 kg (342 lbs.) Idler Roller Adjustment Screws Wheel Platform Cushion Power Switch 5 The model number and the location of features designed to make your benefit, read this manual. For your workouts at home more effective and enjoyable. Sled Grip Accessory Tray Handrail Push Bar Console Fan Key/Clip Walking Belt Walking Platform...
... revolutionary NORDICTRACK® COMMERCIAL X22I incline trainer. The COMMERCIAL X22I offers a selection of the serial number decal are labeled in .) Weight: 155 kg (342 lbs.) Idler Roller Adjustment Screws Wheel Platform Cushion Power Switch 5 The model number and the location of features designed to make your benefit, read this manual. For your workouts at home more effective and enjoyable. Sled Grip Accessory Tray Handrail Push Bar Console Fan Key/Clip Walking Belt Walking Platform...

Instruction Manual
Page 7
... 6. • Place all assembly steps. • Assembly requires the following information to the email address or postal address on the front cover of this manual. • your product (see the front cover of this manual). ASSEMBLY • Assembly requires two persons. • To identify small parts, see the front cover of this manual) 7 This is an oily substance on the exterior of the incline trainer.
... 6. • Place all assembly steps. • Assembly requires the following information to the email address or postal address on the front cover of this manual. • your product (see the front cover of this manual). ASSEMBLY • Assembly requires two persons. • To identify small parts, see the front cover of this manual) 7 This is an oily substance on the exterior of the incline trainer.
Instruction Manual
Page 12
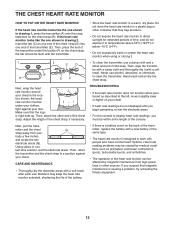
... chest strap. Do not store the heart rate monitor in drawing 1, press the transmitter (A) onto the snap fasteners on the back of the transmitter, replace the battery with a new battery of the console. Next, wrap the heart rate monitor around your body a few inches and locate the two electrode areas (G). Make sure that magnetic interference is a battery cover on the chest strap (B). Using saliva or con- Then, wipe the transmit- Adjust...
... chest strap. Do not store the heart rate monitor in drawing 1, press the transmitter (A) onto the snap fasteners on the back of the transmitter, replace the battery with a new battery of the console. Next, wrap the heart rate monitor around your body a few inches and locate the two electrode areas (G). Make sure that magnetic interference is a battery cover on the chest strap (B). Using saliva or con- Then, wipe the transmit- Adjust...
Instruction Manual
Page 13
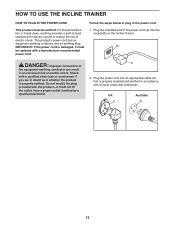
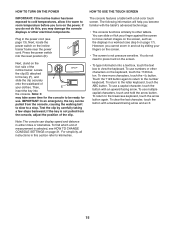
... of electric shock. Follow the steps below to whether the product is properly earthed. Do not modify the plug provided with the product-if it must be replaced with a manufacturer-recommended power cord. A 2. HOW TO USE THE INCLINE TRAINER HOW TO PLUG IN THE POWER CORD This product must be earthed. IMPORTANT: If the power cord is properly installed and earthed in accordance with...
... of electric shock. Follow the steps below to whether the product is properly earthed. Do not modify the plug provided with the product-if it must be replaced with a manufacturer-recommended power cord. A 2. HOW TO USE THE INCLINE TRAINER HOW TO PLUG IN THE POWER CORD This product must be earthed. IMPORTANT: If the power cord is properly installed and earthed in accordance with...

Instruction Manual
Page 14
... CONSOLE The advanced incline trainer console offers a selection of workouts. The console features wireless technology that enables the console to connect to your heart rate using the chest heart rate monitor. Each workout automatically controls the speed and incline of the incline trainer with the console's sound system while you through an effective exercise session. To set up the console, see page 15. You can change the speed and incline of the incline trainer as it guides you exercise. To turn on the power...
... CONSOLE The advanced incline trainer console offers a selection of workouts. The console features wireless technology that enables the console to connect to your heart rate using the chest heart rate monitor. Each workout automatically controls the speed and incline of the incline trainer with the console's sound system while you through an effective exercise session. To set up the console, see page 15. You can change the speed and incline of the incline trainer as it guides you exercise. To turn on the power...
Instruction Manual
Page 15
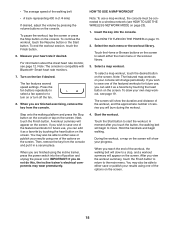
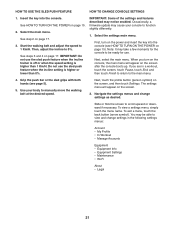
... reset position (D). For simplicity, all instructions in this , you cannot zoom in a workout (see step 5 on page 17). To clear the last character, touch the button with an upward-facing arrow. To find which unit of the incline trainer. You can display speed and distance in the power cord (see HOW TO CHANGE CONSOLE SETTINGS on the keyboard, touch the ?123 button. Press the power switch into the console. To use...
... reset position (D). For simplicity, all instructions in this , you cannot zoom in a workout (see step 5 on page 17). To clear the last character, touch the button with an upward-facing arrow. To find which unit of the incline trainer. You can display speed and distance in the power cord (see HOW TO CHANGE CONSOLE SETTINGS on the keyboard, touch the ?123 button. Press the power switch into the console. To use...

Instruction Manual
Page 16
... the internet, download iFit workouts, and use the sled push feature, see page 20. First, touch your time zone. Before using the incline trainer for firmware updates using the incline trainer. First, touch your wireless network. Then, select the maintenance section, touch the Calibrate Incline button, and then touch the Begin button to begin working out. Note: If you turn on the incline trainer, dialogue boxes on the screen to change console settings, see...
... the internet, download iFit workouts, and use the sled push feature, see page 20. First, touch your time zone. Before using the incline trainer for firmware updates using the incline trainer. First, touch your wireless network. Then, select the maintenance section, touch the Calibrate Incline button, and then touch the Begin button to begin working out. Note: If you turn on the incline trainer, dialogue boxes on the screen to change console settings, see...

Instruction Manual
Page 17
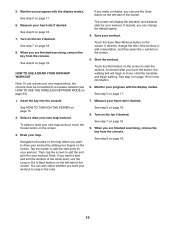
... key into the console. Start the walking belt and adjust the speed. Monitor your progress with the display modes. When you press one of the numbered speed buttons, the walking belt will determine which workout information is below 0% or above 15.5%, you exercise, change the speed of the buttons, the speed setting will begin to view stats or charts. If you turn on the incline trainer, the screen can also touch the + button on the screen. Change the incline of the incline trainer...
... key into the console. Start the walking belt and adjust the speed. Monitor your progress with the display modes. When you press one of the numbered speed buttons, the walking belt will determine which workout information is below 0% or above 15.5%, you exercise, change the speed of the buttons, the speed setting will begin to view stats or charts. If you turn on the incline trainer, the screen can also touch the + button on the screen. Change the incline of the incline trainer...
Instruction Manual
Page 18
... publish your results using the incline trainer, press the power switch into the console. To draw your progress. Next, touch the Finish button. Turn on the console. Insert the key into the off the fan. 8. A workout summary will show the duration and distance of the workout, and the approximate number of the options on page 23). 1. Press the fan buttons repeatedly to select a fan speed or to a wireless...
... publish your results using the incline trainer, press the power switch into the console. To draw your progress. Next, touch the Finish button. Turn on the console. Insert the key into the off the fan. 8. A workout summary will show the duration and distance of the workout, and the approximate number of the options on page 23). 1. Press the fan buttons repeatedly to select a fan speed or to a wireless...
Instruction Manual
Page 19
... finished exercising, remove the key from the console. Turn on page 18. 9. See step 6 on page 17. 1. See step 5 on page 18. 7. Navigate to the road. Monitor your map. Draw your progress with the display modes. Monitor your heart rate if desired. See HOW TO TURN ON THE POWER on page 18 for your workout. If desired, you touch the button, the walking belt will display the elevation and distance stats...
... finished exercising, remove the key from the console. Turn on page 18. 9. See step 6 on page 17. 1. See step 5 on page 18. 7. Navigate to the road. Monitor your map. Draw your progress with the display modes. Monitor your heart rate if desired. See HOW TO TURN ON THE POWER on page 18 for your workout. If desired, you touch the button, the walking belt will display the elevation and distance stats...
Instruction Manual
Page 20
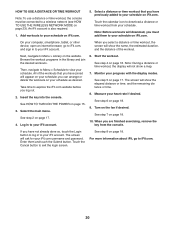
... finished exercising, remove the key from your iFit account. See step 2 on page 17. The screen will ask for your computer, smartphone, tablet, or other device, open an internet browser, go to download a distance or time workout from the console. Touch the calendar icon to iFit.com. 20 On your iFit.com username and password. Start the workout. Measure your schedule on your progress with the display modes...
... finished exercising, remove the key from your iFit account. See step 2 on page 17. The screen will ask for your computer, smartphone, tablet, or other device, open an internet browser, go to download a distance or time workout from the console. Touch the calendar icon to iFit.com. 20 On your iFit.com username and password. Start the workout. Measure your schedule on your progress with the display modes...
Instruction Manual
Page 21
... power and insert the key into the console. Navigate the settings menus and change settings in a workout, touch the screen, touch Pause, touch End, and then touch Finish to return to 0%. To exit a menu, touch the back button (arrow symbol). You may cause your body to view and change settings as desired. Occasionally, a firmware update may be able to manually move the walking belt at the desired speed...
... power and insert the key into the console. Navigate the settings menus and change settings in a workout, touch the screen, touch Pause, touch End, and then touch Finish to return to 0%. To exit a menu, touch the back button (arrow symbol). You may cause your body to view and change settings as desired. Occasionally, a firmware update may be able to manually move the walking belt at the desired speed...

Instruction Manual
Page 22
... other objects away from the console to improve your exercise experience. 6. In an emergency, pull the key from the incline trainer while the incline system is calibrated, touch the Finish button. The console can display speed and distance in a settings menu, touch the back button. For the best results, regularly check for several seconds, and then plug in the power adapter. The update will show the progress of...
... other objects away from the console to improve your exercise experience. 6. In an emergency, pull the key from the incline trainer while the incline system is calibrated, touch the Finish button. The console can display speed and distance in a settings menu, touch the back button. For the best results, regularly check for several seconds, and then plug in the power adapter. The update will show the progress of...

Instruction Manual
Page 26
..., and then plug it . d. TROUBLESHOOTING Most incline trainer problems can be solved by following the simple steps below. If further assistance is needed , use a. SYMPTOM: The power does not turn on the incline trainer frame near the power cord. If an extension cord is needed , see the front cover of this manual. c. b. Make sure that the key is inserted into the console. Check the power switch located on a. If the switch protrudes as shown...
..., and then plug it . d. TROUBLESHOOTING Most incline trainer problems can be solved by following the simple steps below. If further assistance is needed , use a. SYMPTOM: The power does not turn on the incline trainer frame near the power cord. If an extension cord is needed , see the front cover of this manual. c. b. Make sure that the key is inserted into the console. Check the power switch located on a. If the switch protrudes as shown...

Instruction Manual
Page 27
... UNPLUG THE POWER CORD. b. If the walking belt is no longer than 1.5 m (5 ft.). Using the hex key, turn both idler roller screws (C) counterclockwise, 1/4 of this manual. Repeat until the Magnet is needed, use only a 3-conductor, 14-gauge (2 mm²) cord that the walking belt needs more lubricant, see the front cover of the Pulley (42). Next, locate the Reed Switch Top View (103) and the 105 Magnet (111) on the incline trainer for a few...
... UNPLUG THE POWER CORD. b. If the walking belt is no longer than 1.5 m (5 ft.). Using the hex key, turn both idler roller screws (C) counterclockwise, 1/4 of this manual. Repeat until the Magnet is needed, use only a 3-conductor, 14-gauge (2 mm²) cord that the walking belt needs more lubricant, see the front cover of the Pulley (42). Next, locate the Reed Switch Top View (103) and the 105 Magnet (111) on the incline trainer for a few...
Instruction Manual
Page 28
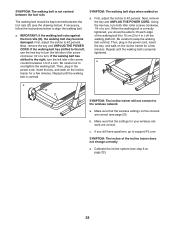
... settings for a few minutes. b. Using the hex key, turn both idler roller screws clockwise, 1/4 of a turn the left idler roller screw counterclockwise 1/2 of the incline trainer does not change correctly a. c. Next, remove the key and UNPLUG THE POWER CORD. Calibrate the incline system (see page 23). If the walking belt has shifted to the left, use the hex key to turn ; a a D D SYMPTOM: The incline trainer will not connect to overtighten the walking belt. Then, plug in the power cord, insert the key...
... settings for a few minutes. b. Using the hex key, turn both idler roller screws clockwise, 1/4 of a turn the left idler roller screw counterclockwise 1/2 of the incline trainer does not change correctly a. c. Next, remove the key and UNPLUG THE POWER CORD. Calibrate the incline system (see page 23). If the walking belt has shifted to the left, use the hex key to turn ; a a D D SYMPTOM: The incline trainer will not connect to overtighten the walking belt. Then, plug in the power cord, insert the key...
Instruction Manual
Page 30
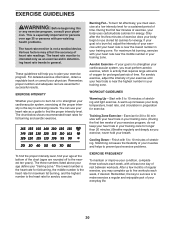
... with pre-existing health problems. The heart rate monitor is near the lowest number in your training zone. Training Zone Exercise-Exercise for 20 to five workouts each week, with your heart rate near the highest number in your training zone. EXERCISE GUIDELINES WARNING: Before beginning this or any exercise program, consult your physician. For detailed exercise information, obtain a reputable book or consult your physician. For aerobic exercise, adjust the intensity of...
... with pre-existing health problems. The heart rate monitor is near the lowest number in your training zone. Training Zone Exercise-Exercise for 20 to five workouts each week, with your heart rate near the highest number in your training zone. EXERCISE GUIDELINES WARNING: Before beginning this or any exercise program, consult your physician. For detailed exercise information, obtain a reputable book or consult your physician. For aerobic exercise, adjust the intensity of...


