
Instruction Manual
Page 1
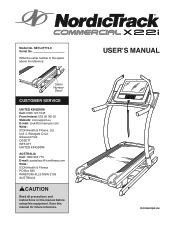
Write the serial number in this manual before using this manual for reference. Save this equipment. Model No. Unit 4, Westgate Court Silkwood Park OSSETT WF5 9TT UNITED KINGDOM AUSTRALIA Call: 1800 993 770 E-mail: australiacc@iconfitness....: ICON Health & Fitness PO Box 635 WINSTON HILLS NSW 2153 AUSTRALIA CAUTION Read all precautions and instructions in the space above for future reference. USER'S MANUAL iconeurope.eu NETL27719.0 Serial No. Serial Number Decal CUSTOMER SERVICE UNITED KINGDOM Call: 0330 123 1045 From Ireland: 053 92 36102 Website: iconsupport.eu E-mail...
Write the serial number in this manual before using this manual for reference. Save this equipment. Model No. Unit 4, Westgate Court Silkwood Park OSSETT WF5 9TT UNITED KINGDOM AUSTRALIA Call: 1800 993 770 E-mail: australiacc@iconfitness....: ICON Health & Fitness PO Box 635 WINSTON HILLS NSW 2153 AUSTRALIA CAUTION Read all precautions and instructions in the space above for future reference. USER'S MANUAL iconeurope.eu NETL27719.0 Serial No. Serial Number Decal CUSTOMER SERVICE UNITED KINGDOM Call: 0330 123 1045 From Ireland: 053 92 36102 Website: iconsupport.eu E-mail...
Instruction Manual
Page 2
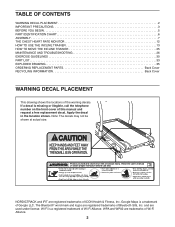
Apply the decal in the location shown. Google Maps is a registered trademark of Wi-Fi Alliance. NORDICTRACK and IFIT are registered trademarks of Google LLC. Wi-Fi is a trademark of Bluetooth SIG, Inc. The Bluetooth® word mark and logos are registered ... PART LIST 33 EXPLODED DRAWING 35 ORDERING REPLACEMENT PARTS Back Cover RECYCLING INFORMATION Back Cover WARNING DECAL PLACEMENT This drawing shows the locations of this manual and request a free replacement decal. If a decal is missing or illegible, call the telephone number on the front cover of the warning decals...
Apply the decal in the location shown. Google Maps is a registered trademark of Wi-Fi Alliance. NORDICTRACK and IFIT are registered trademarks of Google LLC. Wi-Fi is a trademark of Bluetooth SIG, Inc. The Bluetooth® word mark and logos are registered ... PART LIST 33 EXPLODED DRAWING 35 ORDERING REPLACEMENT PARTS Back Cover RECYCLING INFORMATION Back Cover WARNING DECAL PLACEMENT This drawing shows the locations of this manual and request a free replacement decal. If a decal is missing or illegible, call the telephone number on the front cover of the warning decals...

Instruction Manual
Page 3
..., rental, or institutional setting. 6. The incline trainer is the responsibility of the owner to persons, read all important precautions and instructions in this manual. 5. Do not wear loose clothes that blocks air openings. When connecting the power cord (see page 13), plug the power cord into the ...fuse carrier. 14. Use the incline trainer only as described in this manual and all warnings and precautions. 2. Athletic support clothes are recommended for persons over age 35 or persons with at all times. 10. It...
..., rental, or institutional setting. 6. The incline trainer is the responsibility of the owner to persons, read all important precautions and instructions in this manual. 5. Do not wear loose clothes that blocks air openings. When connecting the power cord (see page 13), plug the power cord into the ...fuse carrier. 14. Use the incline trainer only as described in this manual and all warnings and precautions. 2. Athletic support clothes are recommended for persons over age 35 or persons with at all times. 10. It...

Instruction Manual
Page 4
...You must 25. Do not attempt to avoid sudden jumps in serious injury or death. DANGER: 27. Servicing other than the procedures in this manual should be able to safely lift 20 kg (45 lbs.) to do so by an authorized ser- Over exercising may affect the accuracy of ... when the incline trainer is not in use , before cleaning the incline trainer, and before performing the maintenance and adjustment procedures described in this manual. Adjust the speed in general. 23. Inspect and properly tighten all parts each time the incline trainer is running. If you feel faint, ...
...You must 25. Do not attempt to avoid sudden jumps in serious injury or death. DANGER: 27. Servicing other than the procedures in this manual should be able to safely lift 20 kg (45 lbs.) to do so by an authorized ser- Over exercising may affect the accuracy of ... when the incline trainer is not in use , before cleaning the incline trainer, and before performing the maintenance and adjustment procedures described in this manual. Adjust the speed in general. 23. Inspect and properly tighten all parts each time the incline trainer is running. If you feel faint, ...
Instruction Manual
Page 5
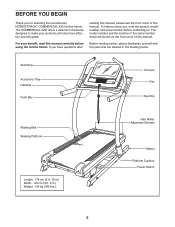
... Length: 178 cm (5 ft. 10 in.) Width: 99 cm (3 ft. 3 in the drawing below. If you for selecting the revolutionary NORDICTRACK® COMMERCIAL X22I incline trainer. The COMMERCIAL X22I offers a selection of this manual. For your workouts at home more effective and enjoyable. The model number and the location of the serial number decal...
... Length: 178 cm (5 ft. 10 in.) Width: 99 cm (3 ft. 3 in the drawing below. If you for selecting the revolutionary NORDICTRACK® COMMERCIAL X22I incline trainer. The COMMERCIAL X22I offers a selection of this manual. For your workouts at home more effective and enjoyable. The model number and the location of the serial number decal...

Instruction Manual
Page 6
Extra parts may be included. 3/8" Star Washer (3)-12 3/8" x 5 1/2" Screw (1)-4 6 The number in the hardware kit, check to identify small parts used for assembly. The number following the key number is the quantity used for assembly. PART IDENTIFICATION CHART Use the drawings below each drawing is the key number of the part, from the PART LIST near the end of this manual. Note: If a part is not in parentheses below to see whether it is preattached.
Extra parts may be included. 3/8" Star Washer (3)-12 3/8" x 5 1/2" Screw (1)-4 6 The number in the hardware kit, check to identify small parts used for assembly. The number following the key number is the quantity used for assembly. PART IDENTIFICATION CHART Use the drawings below each drawing is the key number of the part, from the PART LIST near the end of this manual. Note: If a part is not in parentheses below to see whether it is preattached.

Instruction Manual
Page 7
...8226; Place all assembly steps. • Assembly requires the following information to the email address or postal address on the front cover of this manual) 7 This is an oily substance on the exterior of the incline trainer. To avoid damaging parts, do not have internet access, call Customer... go to keep a copy) • your name, address, and telephone number • the model number, serial number, and name of this manual. • your receipt (make sure to iconsupport.eu. To register your product and activate your warranty in Australia, email or post the following tools:...
...8226; Place all assembly steps. • Assembly requires the following information to the email address or postal address on the front cover of this manual) 7 This is an oily substance on the exterior of the incline trainer. To avoid damaging parts, do not have internet access, call Customer... go to keep a copy) • your name, address, and telephone number • the model number, serial number, and name of this manual. • your receipt (make sure to iconsupport.eu. To register your product and activate your warranty in Australia, email or post the following tools:...

Instruction Manual
Page 14
... can even listen to your workouts more effective and enjoyable. To turn on the power, see page 16. 14 To learn how to use the manual mode, you can change the speed and incline of the incline trainer with the console's sound system while you through an effective exercise session. The...
... can even listen to your workouts more effective and enjoyable. To turn on the power, see page 16. 14 To learn how to use the manual mode, you can change the speed and incline of the incline trainer with the console's sound system while you through an effective exercise session. The...

Instruction Manual
Page 16
... up the console. 1. The first time you turn on the incline trainer, dialogue boxes on the screen and touch the Settings button. To use the manual mode, see HOW TO CHANGE CONSOLE SETTINGS on the screen. The first time you use the wireless network mode, see pages 27-28). 5. Follow the...
... up the console. 1. The first time you turn on the incline trainer, dialogue boxes on the screen and touch the Settings button. To use the manual mode, see HOW TO CHANGE CONSOLE SETTINGS on the screen. The first time you use the wireless network mode, see pages 27-28). 5. Follow the...

Instruction Manual
Page 17
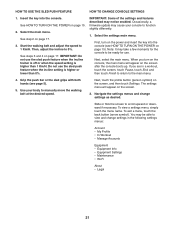
...; Your pace To change the speed of the walking belt may take some time for the console to select the highest speed settings. Touch the Manual Start button on the screen or press the Start button on page 15. To restart the walking belt, press the Start button. 4. HOW TO... USE THE MANUAL MODE 1. if you will determine which workout information is moving at a low speed. Note: It may automatically decrease. The console offers several display modes. ...
...; Your pace To change the speed of the walking belt may take some time for the console to select the highest speed settings. Touch the Manual Start button on the screen or press the Start button on page 15. To restart the walking belt, press the Start button. 4. HOW TO... USE THE MANUAL MODE 1. if you will determine which workout information is moving at a low speed. Note: It may automatically decrease. The console offers several display modes. ...
Instruction Manual
Page 21
... may cause your body to be ready for use. IMPORTANT: Some of the settings and features described may take a few moments for the console to manually move the walking belt at the desired speed. Note: It may not be able to the main menu. 4. When you are in the following settings...
... may cause your body to be ready for use. IMPORTANT: Some of the settings and features described may take a few moments for the console to manually move the walking belt at the desired speed. Note: It may not be able to the main menu. 4. When you are in the following settings...

Instruction Manual
Page 26
... to reduce wear. Then, thoroughly dry the incline trainer with a damp cloth and a small amount of this manual. Find the symptom that is plugged into a properly earthed outlet (see the front cover of this manual. 26 b. After the power cord has been plugged in, make sure that the key is used. Check...
... to reduce wear. Then, thoroughly dry the incline trainer with a damp cloth and a small amount of this manual. Find the symptom that is plugged into a properly earthed outlet (see the front cover of this manual. 26 b. After the power cord has been plugged in, make sure that the key is used. Check...

Instruction Manual
Page 27
...is needed, use only a 3-conductor, 14-gauge (2 mm²) cord that the walking belt needs more lubricant, see the front cover of this manual. Then, remove the key and UNPLUG THE POWER CORD. When the walking belt is properly tightened, you suspect that is overtightened, incline trainer performance ...may decrease and the walking belt may deteriorate the walking belt and cause excessive wear. See the drawing at the top of this manual. 27 b 8-10 cm C c. If the walking belt is no longer than 1.5 m (5 ft.). The gap between the Magnet and the Reed Switch ...
...is needed, use only a 3-conductor, 14-gauge (2 mm²) cord that the walking belt needs more lubricant, see the front cover of this manual. Then, remove the key and UNPLUG THE POWER CORD. When the walking belt is properly tightened, you suspect that is overtightened, incline trainer performance ...may decrease and the walking belt may deteriorate the walking belt and cause excessive wear. See the drawing at the top of this manual. 27 b 8-10 cm C c. If the walking belt is no longer than 1.5 m (5 ft.). The gap between the Magnet and the Reed Switch ...

Instruction Manual
Page 34
Qty. 101 5 102 8 103 1 104 1 105 1 106 1 107 2 Description #8 x 3/4" Machine Screw 5/16" x 3/4" Screw Reed Switch Reed Switch Clip #8 x 3/4" Clip Screw Motor Isolator Motor Bushing Key No. Description 5/16" Washer #8 Nut Filter Magnet Ferrite Box User's Manual Note: Specifications are not illustrated. 34 Key No. Qty. 108 2 109 1 110 1 111 1 112 1 * - For information about ordering replacement parts, see the back cover of this manual. *These parts are subject to change without notice.
Qty. 101 5 102 8 103 1 104 1 105 1 106 1 107 2 Description #8 x 3/4" Machine Screw 5/16" x 3/4" Screw Reed Switch Reed Switch Clip #8 x 3/4" Clip Screw Motor Isolator Motor Bushing Key No. Description 5/16" Washer #8 Nut Filter Magnet Ferrite Box User's Manual Note: Specifications are not illustrated. 34 Key No. Qty. 108 2 109 1 110 1 111 1 112 1 * - For information about ordering replacement parts, see the back cover of this manual. *These parts are subject to change without notice.
Instruction Manual
Page 40
In doing so, you purchased this manual) • the key number and description of the replacement part(s) (see the PART LIST and the EXPLODED DRAWING near the end of environmental protection. If ... office or the establishment where you will help us : • the model number and serial number of the product (see the front cover of this manual) • the name of the product (see the front cover of this product. To preserve the environment, this product must not be disposed of this...
In doing so, you purchased this manual) • the key number and description of the replacement part(s) (see the PART LIST and the EXPLODED DRAWING near the end of environmental protection. If ... office or the establishment where you will help us : • the model number and serial number of the product (see the front cover of this manual) • the name of the product (see the front cover of this product. To preserve the environment, this product must not be disposed of this...


