
PrintSuperVision Configuration Guide
Page 15
...; Method 1 - Enter the email address of the email message. Finally, another added convenience allows the admin to save your print/copy devices. Set to the next setup module. 15 • Setup and Configuration Indicate the interval time (in the Admin Email field. 5. Permits streaming. Add the word PrintSuperVision to the Email From field and add the word Alerts to obtain device status. Test the email connection by clicking the Test button. PSV will attempt to send an email to...
...; Method 1 - Enter the email address of the email message. Finally, another added convenience allows the admin to save your print/copy devices. Set to the next setup module. 15 • Setup and Configuration Indicate the interval time (in the Admin Email field. 5. Permits streaming. Add the word PrintSuperVision to the Email From field and add the word Alerts to obtain device status. Test the email connection by clicking the Test button. PSV will attempt to send an email to...
CX3641MFP Basic User's Guide
Page 14
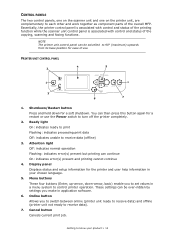
... this button again for a soft shutdown. Cancel button Cancels current print job. Online button Allows you make in your product > 14 Essentially, the printer control panel is associated with control and status of the printing function while the scanner unit control panel is associated with control and status of the overall MFP. CONTROL PANELS The two control panels, one on the scanner unit and one on the printer unit, are complementary to each other and work together as component parts of the copying, scanning and faxing functions. PRINTER UNIT CONTROL PANEL...
... this button again for a soft shutdown. Cancel button Cancels current print job. Online button Allows you make in your product > 14 Essentially, the printer control panel is associated with control and status of the printing function while the scanner unit control panel is associated with control and status of the overall MFP. CONTROL PANELS The two control panels, one on the scanner unit and one on the printer unit, are complementary to each other and work together as component parts of the copying, scanning and faxing functions. PRINTER UNIT CONTROL PANEL...
CX3641MFP Basic User's Guide
Page 30
... drivers use the printer hardware for print data. PCL is dependent on the printer for creating some cases, of higher quality than one type of the print data and does not rely on the print device. Widely supported in many different Operating Systems. DISADVANTAGES The same print job may perform these tasks differently, giving you set and then translates all this information into a finished print job. Your printer is controlled...
... drivers use the printer hardware for print data. PCL is dependent on the printer for creating some cases, of higher quality than one type of the print data and does not rely on the print device. Widely supported in many different Operating Systems. DISADVANTAGES The same print job may perform these tasks differently, giving you set and then translates all this information into a finished print job. Your printer is controlled...

CX3641MFP Basic User's Guide
Page 35
... features installed in the PCL driver. 5. In the PS driver click Add to move the option to close the window and save your computer knows they are listed in the PCL driver. 4. Accessories such as hard disk, duplex unit (two sided printing), additional paper trays, etc., will only be adjusted on your changes. Select the Device Options (PCL driver) or Installable Options (PS driver) tab. MAC OS X 1. NOTE Remember that your printer model is shared between users on...
... features installed in the PCL driver. 5. In the PS driver click Add to move the option to close the window and save your computer knows they are listed in the PCL driver. 4. Accessories such as hard disk, duplex unit (two sided printing), additional paper trays, etc., will only be adjusted on your changes. Select the Device Options (PCL driver) or Installable Options (PS driver) tab. MAC OS X 1. NOTE Remember that your printer model is shared between users on...
CX3641MFP Technician's Installation Guide (English, French)
Page 21
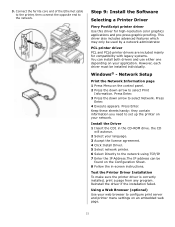
... need to configure print server and printer menu settings on the Configuration Sheet. 8 Follow the in the CD-ROM drive. 3. This driver also includes advanced features which may only be installed individually. PCL printer driver PCL and PCL6 printer drivers are included mainly for high-resolution color graphics applications and pre-press graphic proofing. Install the Driver 1 Insert the CD1 in -screen instructions. Network Setup Print the Network Information page 1 Press Menu on the control panel. 2 Press the...
... need to configure print server and printer menu settings on the Configuration Sheet. 8 Follow the in the CD-ROM drive. 3. This driver also includes advanced features which may only be installed individually. PCL printer driver PCL and PCL6 printer drivers are included mainly for high-resolution color graphics applications and pre-press graphic proofing. Install the Driver 1 Insert the CD1 in -screen instructions. Network Setup Print the Network Information page 1 Press Menu on the control panel. 2 Press the...
CX3641MFP Technician's Installation Guide (English, French)
Page 22
... the Driver Setup tab from the CD1 installer menu bar. 2 Click on -line manuals, you can automatically update your printer driver to complete the installation. 4 To view the manuals, click Start>Programs>OkiData C3641MFP User Guide. To Configure PostScript and PCL Driver Options Manually 1 Click Start>Settings>Printers (and faxes) on the Windows taskbar. 2 Right-click the printer icon and choose Properties. 3 Click on the utilities and downloads you want to Installable Options and select options; Click on the Installable Options...
... the Driver Setup tab from the CD1 installer menu bar. 2 Click on -line manuals, you can automatically update your printer driver to complete the installation. 4 To view the manuals, click Start>Programs>OkiData C3641MFP User Guide. To Configure PostScript and PCL Driver Options Manually 1 Click Start>Settings>Printers (and faxes) on the Windows taskbar. 2 Right-click the printer icon and choose Properties. 3 Click on the utilities and downloads you want to Installable Options and select options; Click on the Installable Options...

CX3641MFP Technician's Installation Guide (English, French)
Page 23
... User Software. 4 Double-click the OSX icon. 5 Double-click Mac Color Files to the utilities you must open the printer driver and activate the device. 1 Click Start>Settings>Printers (and faxes) on the Windows taskbar. 2 Right-click the printer icon and choose Properties. 3 Click on -screen instructions. Add the Printer 1 Run the Print Center or Print Setup Utility. Settings for the system and network ports can use a web browser to display the printer or job printing status and to change settings. Activate Optional Accessories If your CD-ROM drive. 2 Double...
... User Software. 4 Double-click the OSX icon. 5 Double-click Mac Color Files to the utilities you must open the printer driver and activate the device. 1 Click Start>Settings>Printers (and faxes) on the Windows taskbar. 2 Right-click the printer icon and choose Properties. 3 Click on -screen instructions. Add the Printer 1 Run the Print Center or Print Setup Utility. Settings for the system and network ports can use a web browser to display the printer or job printing status and to change settings. Activate Optional Accessories If your CD-ROM drive. 2 Double...

EFI Fiery Print Options Technical Reference
Page 16
Select Print and Hold to print black text and graphics as a one-color black, using black toner only. size, use when you want the job to create variable data in options Specify the target print size (sheet size) for NOTE: To specify the document's page your Master page. Select Pure Black to save the raster file after printing. For more information, see Color Printing. For more information, see Color Printing. NOTE: Applicable click charges occur when you are printing. Punch...
Select Print and Hold to print black text and graphics as a one-color black, using black toner only. size, use when you want the job to create variable data in options Specify the target print size (sheet size) for NOTE: To specify the document's page your Master page. Select Pure Black to save the raster file after printing. For more information, see Color Printing. For more information, see Color Printing. NOTE: Applicable click charges occur when you are printing. Punch...
EFI Fiery Printing from Macintosh Technical Reference
Page 6
... Printer Setup Utility (or Print Center) is not running , you cannot select the associated printer model until you restart. 3 Insert the CX3641 Series MFP Drivers, Manuals & Utilities CD into the CD-ROM drive. 4 Open the OSX:Printer Driver folder on the CX3641 Series MFP Drivers, Manuals & Utilities CD. 5 Double-click the OSX Installer icon to communicate information about print jobs between your copier/printer. Printer drivers provide a way to start installing the printer driver. 6 Follow the on-screen instructions. Installing Mac OS X printer drivers and printer description files...
... Printer Setup Utility (or Print Center) is not running , you cannot select the associated printer model until you restart. 3 Insert the CX3641 Series MFP Drivers, Manuals & Utilities CD into the CD-ROM drive. 4 Open the OSX:Printer Driver folder on the CX3641 Series MFP Drivers, Manuals & Utilities CD. 5 Double-click the OSX Installer icon to communicate information about print jobs between your copier/printer. Printer drivers provide a way to start installing the printer driver. 6 Follow the on-screen instructions. Installing Mac OS X printer drivers and printer description files...

EFI Fiery Printing from Macintosh Technical Reference
Page 7
... start Printer Setup Utility (or Print Center). If the zone is not listed as the Default Zone, or one of the CX3641MFP. This section describes how to step 5. SETTING UP PRINTING ON MAC OS X 7 Setting up the CX3641MFP on Mac OS X After you must set up the CX3641MFP in the Printer Setup Utility (or Print Center). Proceed to set up the CX3641MFP and configure the CX3641MFP for the options installed on Mac OS X, you install the printer driver files on the copier/ printer...
... start Printer Setup Utility (or Print Center). If the zone is not listed as the Default Zone, or one of the CX3641MFP. This section describes how to step 5. SETTING UP PRINTING ON MAC OS X 7 Setting up the CX3641MFP on Mac OS X After you must set up the CX3641MFP in the Printer Setup Utility (or Print Center). Proceed to set up the CX3641MFP and configure the CX3641MFP for the options installed on Mac OS X, you install the printer driver files on the copier/ printer...

EFI Fiery Printing from Macintosh Technical Reference
Page 14
... folder. Before you use any published virtual printer are displayed. For more information about installing screen fonts, see WebTools Configure Help. For more information about configuring FTP Services, see "Installing fonts on Mac OS X computers" on a Mac OS X computer, You can send jobs to the CX3641MFP using FTP printing. • User name and password (if required) You can send PostScript (PS), Tagged Image File Format (TIFF), and Portable Document Format (PDF) files to the folder representing the print connection...
... folder. Before you use any published virtual printer are displayed. For more information about installing screen fonts, see WebTools Configure Help. For more information about configuring FTP Services, see "Installing fonts on Mac OS X computers" on a Mac OS X computer, You can send jobs to the CX3641MFP using FTP printing. • User name and password (if required) You can send PostScript (PS), Tagged Image File Format (TIFF), and Portable Document Format (PDF) files to the folder representing the print connection...

EFI FIery Printing from Windows Technical Reference
Page 9
... Print to install the driver and configure the printing connection to set up (direct, hold, or print). 5 Windows 2000: Click Start, choose Settings, and then choose Printers. Windows Vista: Click the Start button, choose Settings, and then choose Printers. Windows Server 2003: Click Start, choose Control Panel, and then choose Printers and Faxes. Windows Vista: Right-click Network and choose Open from the EFI Utilities(windows) CD. NOTE: For a description of the CX3641MFP in the Search field and click Enter. Windows...
... Print to install the driver and configure the printing connection to set up (direct, hold, or print). 5 Windows 2000: Click Start, choose Settings, and then choose Printers. Windows Vista: Click the Start button, choose Settings, and then choose Printers. Windows Server 2003: Click Start, choose Control Panel, and then choose Printers and Faxes. Windows Vista: Right-click Network and choose Open from the EFI Utilities(windows) CD. NOTE: For a description of the CX3641MFP in the Search field and click Enter. Windows...

EFI FIery Printing from Windows Technical Reference
Page 11
.../IP Printer Port Wizard dialog box appears. 5 Type the IP address of this procedure. This procedure describes the installation of port menu, and then click Next. Windows Server 2003: Click Start, choose Control Panel, and then choose Printers and Faxes. To install the printer driver on the network, it is not powered on page 17 and follow steps 11 through 14 before proceeding to set up the port by configuring the port manually. Windows Server 2003: Choose Add a printer...
.../IP Printer Port Wizard dialog box appears. 5 Type the IP address of this procedure. This procedure describes the installation of port menu, and then click Next. Windows Server 2003: Click Start, choose Control Panel, and then choose Printers and Faxes. To install the printer driver on the network, it is not powered on page 17 and follow steps 11 through 14 before proceeding to set up the port by configuring the port manually. Windows Server 2003: Choose Add a printer...

EFI FIery Printing from Windows Technical Reference
Page 14
... connections are displayed in the Printers or Printers and Faxes window. Windows XP: Click Start and choose Printers and Faxes. You can print to a virtual printer, your administrator. 3 Double-click the name of the CX3641MFP or the IP address and click Search Now. For more information about configuring installable options, see Utilities. Installable options are set print options manually. If you cannot locate the CX3641MFP, contact your administrator must install the printer driver from the menu. 2 Type the name of the CX3641MFP to display enabled print connections...
... connections are displayed in the Printers or Printers and Faxes window. Windows XP: Click Start and choose Printers and Faxes. You can print to a virtual printer, your administrator. 3 Double-click the name of the CX3641MFP or the IP address and click Search Now. For more information about configuring installable options, see Utilities. Installable options are set print options manually. If you cannot locate the CX3641MFP, contact your administrator must install the printer driver from the menu. 2 Type the name of the CX3641MFP to display enabled print connections...

EFI FIery Printing from Windows Technical Reference
Page 17
...) connection as an add-on Windows component with Windows 2000/XP/ Server 2003. For more information, see Configure Help. • Enable LPD or Port 9100 on the Windows computer. For Port 9100, you can add or configure the setup for the TCP/IP connection. SETTING UP PRINTING CONNECTIONS 17 Completing Standard TCP/IP Port (Raw or LPR) printing connections After you install the PostScript and printer driver files, you can set up the connection and install the printer driver in...
...) connection as an add-on Windows component with Windows 2000/XP/ Server 2003. For more information, see Configure Help. • Enable LPD or Port 9100 on the Windows computer. For Port 9100, you can add or configure the setup for the TCP/IP connection. SETTING UP PRINTING CONNECTIONS 17 Completing Standard TCP/IP Port (Raw or LPR) printing connections After you install the PostScript and printer driver files, you can set up the connection and install the printer driver in...
EFI FIery Printing from Windows Technical Reference
Page 27
... 27 Configuring installed options and updating print options settings automatically If you enabled a TCP/IP network, you allow the printer driver to retrieve the settings from the File menu. 4 Click the Installable Options tab. 5 Select Two-Way Communication. 6 Type the CX3641MFP IP address or DNS name. 7 Select Update Fiery Driver When Opened to display the printer's current default settings when the printer driver is opened. 8 Click Update. For more information, see Color Printing. Windows Server 2003: Click Start, choose Control Panel, and then choose Printers and Faxes. Windows...
... 27 Configuring installed options and updating print options settings automatically If you enabled a TCP/IP network, you allow the printer driver to retrieve the settings from the File menu. 4 Click the Installable Options tab. 5 Select Two-Way Communication. 6 Type the CX3641MFP IP address or DNS name. 7 Select Update Fiery Driver When Opened to display the printer's current default settings when the printer driver is opened. 8 Click Update. For more information, see Color Printing. Windows Server 2003: Click Start, choose Control Panel, and then choose Printers and Faxes. Windows...

CX3641MFP Advanced Technical User's Guide
Page 18
... that have every page Print multiple copies of how the Scan-to-E-mail function works Set the default settings for e-mailing scanned originals. E-Mail-Related Functions To do this . . . SCAN TO E-MAIL 18 Introduction: E-Mail-Related Functions TABLE 1-1. "About the Scan to specific instructions and settings for all scan-related functions Save the scanned file as a PDF Save the scanned file as a TIFF Save the scanned file as a JPEG Go to this Section . . . Remove the colored background on page 53 CX3641 Advanced Technical User Guide
... that have every page Print multiple copies of how the Scan-to-E-mail function works Set the default settings for e-mailing scanned originals. E-Mail-Related Functions To do this . . . SCAN TO E-MAIL 18 Introduction: E-Mail-Related Functions TABLE 1-1. "About the Scan to specific instructions and settings for all scan-related functions Save the scanned file as a PDF Save the scanned file as a TIFF Save the scanned file as a JPEG Go to this Section . . . Remove the colored background on page 53 CX3641 Advanced Technical User Guide

CX3641MFP Advanced Technical User's Guide
Page 22
... all scan-related functions Save the scanned file as a PDF Save the scanned file as a JPEG/TIFF Save the scanned file as a MS Word/RTF Print a scanned document using SendMe Edit a scanned document using SendMe tools Clean-up a scanned document (remove borders, straighten images, remove speckles, rotate images) using SendMe. TABLE 1-4. SCAN SendMe 22 Introduction: SendMe-Related Functions SendMe-Related Functions See Table 1-4 for references to specific instructions and settings for using SendMe tools Store a scanned document in the Hold Queue for future printing Use passwords to...
... all scan-related functions Save the scanned file as a PDF Save the scanned file as a JPEG/TIFF Save the scanned file as a MS Word/RTF Print a scanned document using SendMe Edit a scanned document using SendMe tools Clean-up a scanned document (remove borders, straighten images, remove speckles, rotate images) using SendMe. TABLE 1-4. SCAN SendMe 22 Introduction: SendMe-Related Functions SendMe-Related Functions See Table 1-4 for references to specific instructions and settings for using SendMe tools Store a scanned document in the Hold Queue for future printing Use passwords to...

CX3641MFP Advanced Technical User's Guide
Page 141
... File Size (E-mail): Specify the maximum image size that the MFP uses if it detects a legal-size document when Original Size is set , password authentication is paused until the CX3641 displays the "waiting" screen. • Job Reset Timer: Specify the length of time (1 day, 1 week, or manual) before all operations for your dealer. Select Manual to delete files/images using the Delete All Scan Job parameter. • Delete All Scan Job: Manually delete all the Mailboxes on the printer's hard drive. Timer Sets the default timing settings: • Copy Reset Timer...
... File Size (E-mail): Specify the maximum image size that the MFP uses if it detects a legal-size document when Original Size is set , password authentication is paused until the CX3641 displays the "waiting" screen. • Job Reset Timer: Specify the length of time (1 day, 1 week, or manual) before all operations for your dealer. Select Manual to delete files/images using the Delete All Scan Job parameter. • Delete All Scan Job: Manually delete all the Mailboxes on the printer's hard drive. Timer Sets the default timing settings: • Copy Reset Timer...
CX3641 MFP Fax Board Installation (English, Fran栩s, Espa?ol. Portugu鱩
Page 3
... stored in the Fax driver software) - The FAX driver default settings are • Paper Size: Letter • Quality: Fine • Orientation: Portrait • Cover Sheet (three templates are done, click the Save button and close the dialog box. Add the recipient's FAX number - Click FAX number (or the appropriate icon below it) - to add a new recipient - When you are provided in the Phone Book) - Click Properties and make any changes in your CX3641MFP unit. Click OK...
... stored in the Fax driver software) - The FAX driver default settings are • Paper Size: Letter • Quality: Fine • Orientation: Portrait • Cover Sheet (three templates are done, click the Save button and close the dialog box. Add the recipient's FAX number - Click FAX number (or the appropriate icon below it) - to add a new recipient - When you are provided in the Phone Book) - Click Properties and make any changes in your CX3641MFP unit. Click OK...


