ML1120 User's Guide (English)
Page 3
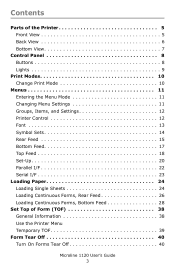
... Panel 8 Buttons 8 Lights 9 Print Modes 10 Change Print Mode 10 Menus 11 Entering the Menu Mode 11 Changing Menu Settings 11 Groups, Items, and Settings 12 Printer Control 12 Font 13 Symbol Sets 14 Rear Feed 15 Bottom Feed 17 Top Feed 18 Set-Up 20 Parallel I/F 22 Serial I/F 23 Loading Paper 24 Loading Single Sheets 24 Loading Continuous Forms, Rear Feed 26 Loading Continuous Forms, Bottom Feed 28 Set Top of Form (TOF 38 General Information 38 Use the Printer Menu panel.jpg 38 Temporary TOF 39 Form Tear Off 40 Turn On Forms Tear Off 40 Microline 1120 User's Guide...
... Panel 8 Buttons 8 Lights 9 Print Modes 10 Change Print Mode 10 Menus 11 Entering the Menu Mode 11 Changing Menu Settings 11 Groups, Items, and Settings 12 Printer Control 12 Font 13 Symbol Sets 14 Rear Feed 15 Bottom Feed 17 Top Feed 18 Set-Up 20 Parallel I/F 22 Serial I/F 23 Loading Paper 24 Loading Single Sheets 24 Loading Continuous Forms, Rear Feed 26 Loading Continuous Forms, Bottom Feed 28 Set Top of Form (TOF 38 General Information 38 Use the Printer Menu panel.jpg 38 Temporary TOF 39 Form Tear Off 40 Turn On Forms Tear Off 40 Microline 1120 User's Guide...

ML1120 User's Guide (English)
Page 4
... the Head Gap 41 Troubleshooting 42 Paper Jams, Individual Sheets 42 Paper Jams, Continuous Forms 42 Part Numbers 43 Ribbon 43 Specifications 44 Print Method 44 Printhead 44 Ribbon Life 44 Emulations 44 Interfaces (Standard 44 Receive Buffer Size 44 Print Speed 44 Reliability 45 Print Media Specifications 45 Printer Dimensions 48 Printer Weight 48 Environmental Requirements 48 Electrical Requirements 48 Utilities 49 Overview 49 Accessing 49 Descriptions of Utilities 50 Installing the Utilities 51 OKI DIPUS (Dot Impact Printer Utilities 52 Microline 1120 User's Guide 4
... the Head Gap 41 Troubleshooting 42 Paper Jams, Individual Sheets 42 Paper Jams, Continuous Forms 42 Part Numbers 43 Ribbon 43 Specifications 44 Print Method 44 Printhead 44 Ribbon Life 44 Emulations 44 Interfaces (Standard 44 Receive Buffer Size 44 Print Speed 44 Reliability 45 Print Media Specifications 45 Printer Dimensions 48 Printer Weight 48 Environmental Requirements 48 Electrical Requirements 48 Utilities 49 Overview 49 Accessing 49 Descriptions of Utilities 50 Installing the Utilities 51 OKI DIPUS (Dot Impact Printer Utilities 52 Microline 1120 User's Guide 4
ML1120 User's Guide (English)
Page 8
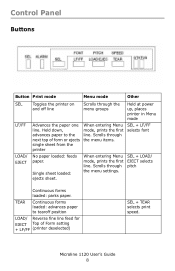
... Menu mode, prints the first line. Single sheet loaded: ejects sheet. TEAR Continuous forms loaded: advances paper to the next top of Form setting + LF/FF (printer deselected) SEL + TEAR selects print speed. Control Panel Buttons panel.jpg Button Print mode Menu mode Other SEL LF/FF LOAD/ EJECT Toggles the printer on and off line Scrolls through the menu settings. Scrolls through the menu groups Held at power up, places printer in Menu mode Advances the paper one line. SEL + LOAD/ EJECT selects pitch Continuous forms loaded: parks paper. Microline 1120 User's Guide...
... Menu mode, prints the first line. Single sheet loaded: ejects sheet. TEAR Continuous forms loaded: advances paper to the next top of Form setting + LF/FF (printer deselected) SEL + TEAR selects print speed. Control Panel Buttons panel.jpg Button Print mode Menu mode Other SEL LF/FF LOAD/ EJECT Toggles the printer on and off line Scrolls through the menu settings. Scrolls through the menu groups Held at power up, places printer in Menu mode Advances the paper one line. SEL + LOAD/ EJECT selects pitch Continuous forms loaded: parks paper. Microline 1120 User's Guide...
ML1120 User's Guide (English)
Page 9
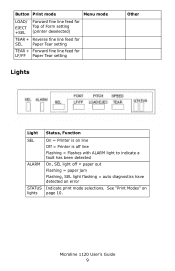
.... Microline 1120 User's Guide 9 Button Print mode Menu mode LOAD/ EJECT +SEL Forward fine line feed for Top of Form setting (printer deselected) TEAR + Reverse fine line feed for SEL Paper Tear setting TEAR + Forward fine line feed for LF/FF Paper Tear setting Lights panel.jpg Other Light Status, Function SEL On = Printer is off line Flashing = Flashes with ALARM light to indicate a fault has been detected ALARM On, SEL light off = paper out Flashing = paper jam Flashing, SEL light flashing = auto diagnostics have detected an error STATUS Indicate print mode selections.
.... Microline 1120 User's Guide 9 Button Print mode Menu mode LOAD/ EJECT +SEL Forward fine line feed for Top of Form setting (printer deselected) TEAR + Reverse fine line feed for SEL Paper Tear setting TEAR + Forward fine line feed for LF/FF Paper Tear setting Lights panel.jpg Other Light Status, Function SEL On = Printer is off line Flashing = Flashes with ALARM light to indicate a fault has been detected ALARM On, SEL light off = paper out Flashing = paper jam Flashing, SEL light flashing = auto diagnostics have detected an error STATUS Indicate print mode selections.
ML1120 User's Guide (English)
Page 10
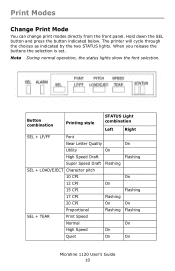
...buttons the selection is set. panel.jpg Button combination Printing style STATUS Light combination Left Right SEL + LF/FF Font Near Letter Quality On Utility On High Speed Draft Flashing Super Speed Draft Flashing SEL + LOAD/EJECT Character pitch 10 CPI On 12 CPI On 15 CPI Flashing 17 CPI Flashing 20 CPI On On Proportional Flashing Flashing SEL + TEAR Print Speed Normal On High Speed On Quiet On On Microline 1120 User's Guide 10 Nota During normal operation, the status lights show the font selection. Print Modes Change Print Mode You can change print modes...
...buttons the selection is set. panel.jpg Button combination Printing style STATUS Light combination Left Right SEL + LF/FF Font Near Letter Quality On Utility On High Speed Draft Flashing Super Speed Draft Flashing SEL + LOAD/EJECT Character pitch 10 CPI On 12 CPI On 15 CPI Flashing 17 CPI Flashing 20 CPI On On Proportional Flashing Flashing SEL + TEAR Print Speed Normal On High Speed On Quiet On On Microline 1120 User's Guide 10 Nota During normal operation, the status lights show the font selection. Print Modes Change Print Mode You can change print modes...
ML1120 User's Guide (English)
Page 15
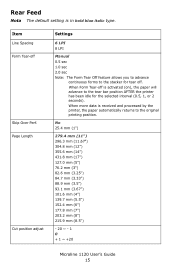
...printer, the paper automatically returns to the stacker for the selected interval (0.5, 1, or 2 seconds). Page Length Cut position adjust Settings 6 LPI 8 LPI Manual 0.5 sec 1.0 sec 2.0 sec Note: The Form Tear Off feature allows you to advance continuous forms to the original printing position. Item Line Spacing Form Tear-off is in bold blue italic type. When Form Tear-off Skip...215.9 mm (8.5") - 20 ~ - 1 0 + 1 ~ +20 Microline 1120 User's Guide 15 Rear Feed Nota The default setting is activated (on), the paper will advance to the tear bar position AFTER the printer has been idle for...
...printer, the paper automatically returns to the stacker for the selected interval (0.5, 1, or 2 seconds). Page Length Cut position adjust Settings 6 LPI 8 LPI Manual 0.5 sec 1.0 sec 2.0 sec Note: The Form Tear Off feature allows you to advance continuous forms to the original printing position. Item Line Spacing Form Tear-off is in bold blue italic type. When Form Tear-off Skip...215.9 mm (8.5") - 20 ~ - 1 0 + 1 ~ +20 Microline 1120 User's Guide 15 Rear Feed Nota The default setting is activated (on), the paper will advance to the tear bar position AFTER the printer has been idle for...
ML1120 User's Guide (English)
Page 20
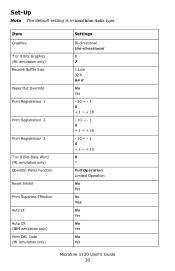
... emulation only) Receive Buffer Size Paper Out Override Print Registration 1 Print Registration 2 Print Registration 3 7 or 8 Bits Data Word (ML emulation only) Operator Panel Function Reset Inhibit Print Suppress Effective Auto LF Auto CR (IBM emulation only) Print DEL Code (ML emulation only) Settings Bi-directional Uni-directional 8 7 1 Line 32 K 64 K No Yes - 10 ~ - 1 0 + 1 ~ + 10 - 10 ~ - 1 0 + 1 ~ + 10 - 10 ~ - 1 0 + 1 ~ + 10 8 7 Full Operation Limited Operation No Yes No Yes No Yes No Yes No Yes Microline 1120 User's Guide 20 Set...
... emulation only) Receive Buffer Size Paper Out Override Print Registration 1 Print Registration 2 Print Registration 3 7 or 8 Bits Data Word (ML emulation only) Operator Panel Function Reset Inhibit Print Suppress Effective Auto LF Auto CR (IBM emulation only) Print DEL Code (ML emulation only) Settings Bi-directional Uni-directional 8 7 1 Line 32 K 64 K No Yes - 10 ~ - 1 0 + 1 ~ + 10 - 10 ~ - 1 0 + 1 ~ + 10 - 10 ~ - 1 0 + 1 ~ + 10 8 7 Full Operation Limited Operation No Yes No Yes No Yes No Yes No Yes Microline 1120 User's Guide 20 Set...
ML1120 User's Guide (English)
Page 22
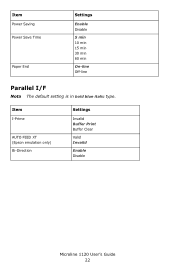
Item I /F Nota The default setting is in bold blue italic type. Item Power Saving Power Save Time Paper End Settings Enable Disable 5 min 10 min 15 min 30 min 60 min On-line Off-line Parallel I -Prime AUTO FEED XT (Epson emulation only) Bi-Direction Settings Invalid Buffer Print Buffer Clear Valid Invalid Enable Disable Microline 1120 User's Guide 22
Item I /F Nota The default setting is in bold blue italic type. Item Power Saving Power Save Time Paper End Settings Enable Disable 5 min 10 min 15 min 30 min 60 min On-line Off-line Parallel I -Prime AUTO FEED XT (Epson emulation only) Bi-Direction Settings Invalid Buffer Print Buffer Clear Valid Invalid Enable Disable Microline 1120 User's Guide 22

ML1120 User's Guide (English)
Page 26
Push down and out to remove the paper separator along with the piece on the right side of the printer-toward the front of the printer to the continuous forms symbol. icon_forms.jpg 3. Make sure the printer is turned off. 2. Place the stack of the printer that holds it in place. F4_65.jpg Microline 1120 User's Guide 26 Move the paper lever-on the back of continuous forms paper behind the printer. 4. Loading Continuous Forms, Rear Feed 1.
Push down and out to remove the paper separator along with the piece on the right side of the printer-toward the front of the printer to the continuous forms symbol. icon_forms.jpg 3. Make sure the printer is turned off. 2. Place the stack of the printer that holds it in place. F4_65.jpg Microline 1120 User's Guide 26 Move the paper lever-on the back of continuous forms paper behind the printer. 4. Loading Continuous Forms, Rear Feed 1.

ML1120 User's Guide (English)
Page 27
F4-35.jpg 6. Adjust the wheels so the sprockets align with the holes in position. 8. Press the Load/Eject button. F4-36.jpg 7. Turn the printer on the sprocket wheels forward and open the sprocket covers. Do not use the platen knob to the print position. Microline 1120 User's Guide 27 5. The paper advances to adjust the paper. Replace the paper separator. 9. Pull the lock levers on . 10. Close the sprocket covers and push the levers back to lock the sprocket wheels in the continuous forms you are using.
F4-35.jpg 6. Adjust the wheels so the sprockets align with the holes in position. 8. Press the Load/Eject button. F4-36.jpg 7. Turn the printer on the sprocket wheels forward and open the sprocket covers. Do not use the platen knob to the print position. Microline 1120 User's Guide 27 5. The paper advances to adjust the paper. Replace the paper separator. 9. Pull the lock levers on . 10. Close the sprocket covers and push the levers back to lock the sprocket wheels in the continuous forms you are using.

ML1120 User's Guide (English)
Page 37
The paper advances to lock the sprocket wheels in position. 1120_bottomfeed_26.jpg 8. Close the sprocket covers and push the levers back to the print position. Turn the printer on. 10. Microline 1120 User's Guide 37 Replace the top cover. 9. Press the Load/Eject button. 7. Do not use the platen knob to adjust the paper.
The paper advances to lock the sprocket wheels in position. 1120_bottomfeed_26.jpg 8. Close the sprocket covers and push the levers back to the print position. Turn the printer on. 10. Microline 1120 User's Guide 37 Replace the top cover. 9. Press the Load/Eject button. 7. Do not use the platen knob to adjust the paper.

ML1120 User's Guide (English)
Page 38
... PAPER TOP OF FORM or CUT SHEET TOP OF FORM prints. 4. Turn the printer on while holding down from the top of the sheet to change the TOF appears: REAR FEED or TOP FEED. 3. Microline 1120 User's Guide 38 TOF.jpg You can also use the control panel switches to engage prints. Press LF/FF repeatedly until the setting you wish to the horizontal midpoint of the first line of printed characters. Use the Printer Menu panel.jpg Nota The printer default for TOF...
... PAPER TOP OF FORM or CUT SHEET TOP OF FORM prints. 4. Turn the printer on while holding down from the top of the sheet to change the TOF appears: REAR FEED or TOP FEED. 3. Microline 1120 User's Guide 38 TOF.jpg You can also use the control panel switches to engage prints. Press LF/FF repeatedly until the setting you wish to the horizontal midpoint of the first line of printed characters. Use the Printer Menu panel.jpg Nota The printer default for TOF...

ML1120 User's Guide (English)
Page 40
... the SEL button. 2. Microline 1120 User's Guide 40 To use this feature, you want to select (2 seconds, 1 second, or 500 milliseconds) prints. 6. Turn On Forms Tear Off panel.jpg 1. Press LF/FF repeatedly until REAR FEED prints. 4. Press and hold TEAR, then LOAD/EJECT, then LF/FF. Form Tear Off The Form Tear Off feature allows you to advance continuous forms to the stacker for tear off position. PRINTER CONTROL prints. 3. This saves your setting and exits the menu mode. Turn the printer...
... the SEL button. 2. Microline 1120 User's Guide 40 To use this feature, you want to select (2 seconds, 1 second, or 500 milliseconds) prints. 6. Turn On Forms Tear Off panel.jpg 1. Press LF/FF repeatedly until REAR FEED prints. 4. Press and hold TEAR, then LOAD/EJECT, then LF/FF. Form Tear Off The Form Tear Off feature allows you to advance continuous forms to the stacker for tear off position. PRINTER CONTROL prints. 3. This saves your setting and exits the menu mode. Turn the printer...
ML1120 User's Guide (English)
Page 41
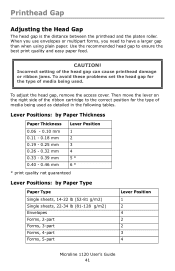
... Position 1 2 3 4 5 * 6 * * print quality not guaranteed Lever Positions: by Paper Type Paper Type Single sheets, 14-22 lb (52-81 g/m2) Single sheets, 22-34 lb (81-128 g/m2) Envelopes Forms, 2-part Forms, 3-part Forms, 4-part Forms, 5-part Lever Position 1 2 4 2 2 3 4 Microline 1120 User's Guide 41 Incorrect setting of the head gap can cause printhead damage or ribbon jams. To avoid these problems set the head gap for the type of media being used . Printhead Gap Adjusting the Head Gap The head gap is the distance between the printhead and the platen roller...
... Position 1 2 3 4 5 * 6 * * print quality not guaranteed Lever Positions: by Paper Type Paper Type Single sheets, 14-22 lb (52-81 g/m2) Single sheets, 22-34 lb (81-128 g/m2) Envelopes Forms, 2-part Forms, 3-part Forms, 4-part Forms, 5-part Lever Position 1 2 4 2 2 3 4 Microline 1120 User's Guide 41 Incorrect setting of the head gap can cause printhead damage or ribbon jams. To avoid these problems set the head gap for the type of media being used . Printhead Gap Adjusting the Head Gap The head gap is the distance between the printhead and the platen roller...

ML1120 User's Guide (English)
Page 44
... cpi only Microline 1120 User's Guide 44 Print Method • Impact dot matrix Printhead • 9 pin, 0.3 mm diameter • Thermal protection • Life: 400 million strokes / wire (200 million characters) Ribbon Life • 4 million characters (Utility) Emulations • IBM Proprinter • Epson FX • ML Interfaces (Standard) • Centronics Parallel, IEEE-1284 compliant • USB 2.0 • RS232-C Serial Receive Buffer Size • Selectable 0 or 128 Kbytes Print Speed Print speed varies according to change without notice. Specifications Specifications...
... cpi only Microline 1120 User's Guide 44 Print Method • Impact dot matrix Printhead • 9 pin, 0.3 mm diameter • Thermal protection • Life: 400 million strokes / wire (200 million characters) Ribbon Life • 4 million characters (Utility) Emulations • IBM Proprinter • Epson FX • ML Interfaces (Standard) • Centronics Parallel, IEEE-1284 compliant • USB 2.0 • RS232-C Serial Receive Buffer Size • Selectable 0 or 128 Kbytes Print Speed Print speed varies according to change without notice. Specifications Specifications...
ML1120 User's Guide (English)
Page 52
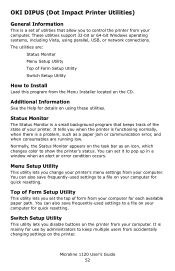
... that allow you to control the printer from the Menu Installer located on the CD. The utilities are running low. These utilities support 32-bit or 64-bit Windows operating systems, including Vista, using these utilities. You can also save frequently-used settings to keep multiple users from your computer for each available paper path. Additional Information See the Help for details on using parallel, USB, or network connections. OKI DIPUS (Dot Impact Printer Utilities) General Information This is...
... that allow you to control the printer from the Menu Installer located on the CD. The utilities are running low. These utilities support 32-bit or 64-bit Windows operating systems, including Vista, using these utilities. You can also save frequently-used settings to keep multiple users from your computer for each available paper path. Additional Information See the Help for details on using parallel, USB, or network connections. OKI DIPUS (Dot Impact Printer Utilities) General Information This is...

ML1120 Safety, Warranty and Regulatory Information - (Multi-Lingual)
Page 1
... replaced. Here are following the operating instructions. 1: English If you clean it may be blocked, causing the printer to overheat. • Protect your printer serviced by all the equipment on the extension is not working properly or has been damaged, unplug it immediately and follow all electrical equipment, there are using an extension cord or power strip with the printer, make...
... replaced. Here are following the operating instructions. 1: English If you clean it may be blocked, causing the printer to overheat. • Protect your printer serviced by all the equipment on the extension is not working properly or has been damaged, unplug it immediately and follow all electrical equipment, there are using an extension cord or power strip with the printer, make...

ML1120 Safety, Warranty and Regulatory Information - (Multi-Lingual)
Page 2
.... Operation of electric shock, fire and/or injury. Keep the product away from a dust explosion. To avoid risk of fire and electric shock, do not touch the fuser unit or print head as this product for use liquid or aerosol cleaners. Use only the power cable supplied. Unplug the mains connector and contact your dealer or check with any covers...
.... Operation of electric shock, fire and/or injury. Keep the product away from a dust explosion. To avoid risk of fire and electric shock, do not touch the fuser unit or print head as this product for use liquid or aerosol cleaners. Use only the power cable supplied. Unplug the mains connector and contact your dealer or check with any covers...
ML1120 Safety, Warranty and Regulatory Information - (Multi-Lingual)
Page 3
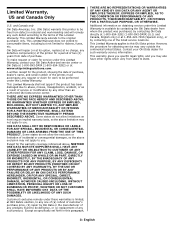
...specifically set forth in material and workmanship and will repair (or at its option, replace) at OKI Data's election, to any one of the printer, must accompany any request or claim for a period of two (2) years from defect in this printer to be free from date of any other rights...ARISING FROM THE USE OF THIS PRODUCT. Customer's exclusive remedy under this Limited Warranty, contact your Oki Data dealer for the product, showing the date of purchase, dealer's name, and serial number of the listed service locations. and Canada only Oki Data Americas, Inc. (Oki Data) warrants this...
...specifically set forth in material and workmanship and will repair (or at its option, replace) at OKI Data's election, to any one of the printer, must accompany any request or claim for a period of two (2) years from defect in this printer to be free from date of any other rights...ARISING FROM THE USE OF THIS PRODUCT. Customer's exclusive remedy under this Limited Warranty, contact your Oki Data dealer for the product, showing the date of purchase, dealer's name, and serial number of the listed service locations. and Canada only Oki Data Americas, Inc. (Oki Data) warrants this...
ML1120 Safety, Warranty and Regulatory Information - (Multi-Lingual)
Page 4
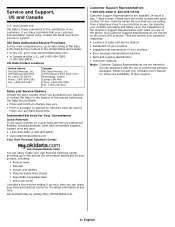
...-minute Oki information specifically for a local Sales and Service Authorized Reseller, including products, parts and consumable supplies, contact us at any time: • 1-800-654-3282 (1-800-OKI-DATA) • www.okiprintingsolutions.com Your Own Personal Solutions Center Customer Support Representatives 1-800-654-3282 (1-800-OKI-DATA) Customer Support Representatives are on all current OKI products. Please have a problem that you purchased your software user's manual for...
...-minute Oki information specifically for a local Sales and Service Authorized Reseller, including products, parts and consumable supplies, contact us at any time: • 1-800-654-3282 (1-800-OKI-DATA) • www.okiprintingsolutions.com Your Own Personal Solutions Center Customer Support Representatives 1-800-654-3282 (1-800-OKI-DATA) Customer Support Representatives are on all current OKI products. Please have a problem that you purchased your software user's manual for...


