
MPS730b Setup Guide (English, Fran栩s)
Page 11
3. Caution! The fuser may be hot! English Remove any jammed sheets. Do not touch. 4. Caution! Do not touch the green image drum surface or expose it to light for more than 5 minutes. 11 - Replace the image drum/toner. Open the top cover. 5. Remove the image drum/toner. 6. It is clearly labelled.
3. Caution! The fuser may be hot! English Remove any jammed sheets. Do not touch. 4. Caution! Do not touch the green image drum surface or expose it to light for more than 5 minutes. 11 - Replace the image drum/toner. Open the top cover. 5. Remove the image drum/toner. 6. It is clearly labelled.

MPS730b Setup Guide (English, Fran栩s)
Page 14
Maintenance Replacement Toner Cartridge & Image Drum Item Toner Image Drum Life 12,000 A4@ ISO/ IEC 19752 25,000 A4 pages Order No. 43979222 43979009 Only use genuine original consumables to Purchase Consult the dealer where you purchased your MFP. Where to ensure the best quality and performance from your system. 14 - English Non original products may adversely affect your printer's performance.
Maintenance Replacement Toner Cartridge & Image Drum Item Toner Image Drum Life 12,000 A4@ ISO/ IEC 19752 25,000 A4 pages Order No. 43979222 43979009 Only use genuine original consumables to Purchase Consult the dealer where you purchased your MFP. Where to ensure the best quality and performance from your system. 14 - English Non original products may adversely affect your printer's performance.

MPS480mb Safety/Warranty/Regulatory Guide
Page 3
... and will only connect to an earthed socket. The product battery should be damaged or cause a trip hazard. Do not throw toner cartridges or image drum cartridges into the ventilation holes or operate this product may receive burns. Operation of the product outside this product for this product with this range...
... and will only connect to an earthed socket. The product battery should be damaged or cause a trip hazard. Do not throw toner cartridges or image drum cartridges into the ventilation holes or operate this product may receive burns. Operation of the product outside this product for this product with this range...

MPS480mb Safety/Warranty/Regulatory Guide
Page 4
... only Oki Data Americas, Inc. (Oki Data) warrants this MPS480mb (hereinafter "the Product") to be performed or completed due to any such defect according to use new and/or refurbished parts for warranty repair service. This Limited Warranty is available by contacting the Oki Data ...or installation, an unsuitable physical operating environment, or as toner cartridges, image drums, ribbon cartridges, fuses, etc. To make request or claim for a period of one of service or modification by an Oki Data authorized service provider. NO WARRANTIES WHETHER EXPRESS OR IMPLIED, INCLUDING, BUT...
... only Oki Data Americas, Inc. (Oki Data) warrants this MPS480mb (hereinafter "the Product") to be performed or completed due to any such defect according to use new and/or refurbished parts for warranty repair service. This Limited Warranty is available by contacting the Oki Data ...or installation, an unsuitable physical operating environment, or as toner cartridges, image drums, ribbon cartridges, fuses, etc. To make request or claim for a period of one of service or modification by an Oki Data authorized service provider. NO WARRANTIES WHETHER EXPRESS OR IMPLIED, INCLUDING, BUT...

MPS480mb User Guide (English)
Page 5
... printing the macro 132 Defining overlays 132 Printing with PCL overlays 133 Maintenance 134 Consumables 134 Replacing consumable items 135 Toner cartridge replacement 135 Image drum replacement 140 Cleaning 145 the unit casing 145 the paper path in the ADF 145 the underside of the ADF 146 the document glass 147...
... printing the macro 132 Defining overlays 132 Printing with PCL overlays 133 Maintenance 134 Consumables 134 Replacing consumable items 135 Toner cartridge replacement 135 Image drum replacement 140 Cleaning 145 the unit casing 145 the paper path in the ADF 145 the underside of the ADF 146 the document glass 147...

MPS480mb User Guide (English)
Page 50
Menu Function LEVEL 2 ITEM View Supplies Life Information Network System DESCRIPTION/OPTIONS Toner (n.nk) Drum IPv4 Address Remaining toner Remaining Self explanatory nnn% nnn% xxx.xxx.xxx.xxx Subnet Mask Self explanatory xxx.xxx.xxx.xxx Gateway Address Self explanatory ...
Menu Function LEVEL 2 ITEM View Supplies Life Information Network System DESCRIPTION/OPTIONS Toner (n.nk) Drum IPv4 Address Remaining toner Remaining Self explanatory nnn% nnn% xxx.xxx.xxx.xxx Subnet Mask Self explanatory xxx.xxx.xxx.xxx Gateway Address Self explanatory ...

MPS480mb User Guide (English)
Page 134
ITEM Toner standard Toner high capacity Toner high capacity Image Drum LIFE 3,500 A4@ ISO/IEC19752 7,000 A4@ ISO/IEC19752 12,000 A4@ ISO/IEC19752 25,000 A4 pages ORDER NO. 43979101 43979201 43979215 43979001 Only ...
ITEM Toner standard Toner high capacity Toner high capacity Image Drum LIFE 3,500 A4@ ISO/IEC19752 7,000 A4@ ISO/IEC19752 12,000 A4@ ISO/IEC19752 25,000 A4 pages ORDER NO. 43979101 43979201 43979215 43979001 Only ...

MPS480mb User Guide (English)
Page 137
Never expose the drum to normal room light for more than this, please lower the top cover. Remove the new cartridge from marking your furniture. Do not touch it ... cartridges need to release the left-hand end as shown, and withdraw the toner cartridge out of the MFP for the moment. 7. 4. The green image drum surface is very delicate and light sensitive.
Never expose the drum to normal room light for more than this, please lower the top cover. Remove the new cartridge from marking your furniture. Do not touch it ... cartridges need to release the left-hand end as shown, and withdraw the toner cartridge out of the MFP for the moment. 7. 4. The green image drum surface is very delicate and light sensitive.

MPS480mb User Guide (English)
Page 138
8. Remove the wrapping material and peel off the adhesive tape from which the old cartridge was removed. 10.Insert the left end of the cartridge into the top of the image drum unit first, pushing it against the pins on the drum unit, then lower the right end of the cartridge. 9. Holding the cartridge by its top centre with the colored lever to the right, lower it into the printer over the image drum unit from the underside of the cartridge down onto the image drum unit. 2 1 138 • Maintenance
8. Remove the wrapping material and peel off the adhesive tape from which the old cartridge was removed. 10.Insert the left end of the cartridge into the top of the image drum unit first, pushing it against the pins on the drum unit, then lower the right end of the cartridge. 9. Holding the cartridge by its top centre with the colored lever to the right, lower it into the printer over the image drum unit from the underside of the cartridge down onto the image drum unit. 2 1 138 • Maintenance

MPS480mb User Guide (English)
Page 139
11.Pressing gently down firmly so that it is firmly seated, push the colored lever towards the rear of the MFP. This will lock the cartridge into place and release toner into the image drum unit. 1 2 12.Close the top cover and press down on the cartridge to ensure that the cover latches closed. 13.Gently lower the scanner. 139 • Maintenance
11.Pressing gently down firmly so that it is firmly seated, push the colored lever towards the rear of the MFP. This will lock the cartridge into place and release toner into the image drum unit. 1 2 12.Close the top cover and press down on the cartridge to ensure that the cover latches closed. 13.Gently lower the scanner. 139 • Maintenance

MPS480mb User Guide (English)
Page 140
Image drum replacement Caution! Lift the scanner. 140 • Maintenance Static sensitive devices, handle with care. 1.
Image drum replacement Caution! Lift the scanner. 140 • Maintenance Static sensitive devices, handle with care. 1.

MPS480mb User Guide (English)
Page 142
.... Place the cartridge on the piece of paper where the old cartridge was placed. Keep it by its top centre, lift the image drum, complete with its packaging and place it away from marking your furniture. 7. Caution! Lift the right-hand end of the MFP. 4. 3. Holding it the ...a piece of the cartridge is very delicate and light sensitive. This will release the bond between the toner cartridge and the image drum cartridge. 6. Take the new image drum cartridge out of its toner cartridge, up and out of the cartridge and then draw the cartridge to the right to avoid marking...
.... Place the cartridge on the piece of paper where the old cartridge was placed. Keep it by its top centre, lift the image drum, complete with its packaging and place it away from marking your furniture. 7. Caution! Lift the right-hand end of the MFP. 4. 3. Holding it the ...a piece of the cartridge is very delicate and light sensitive. This will release the bond between the toner cartridge and the image drum cartridge. 6. Take the new image drum cartridge out of its toner cartridge, up and out of the cartridge and then draw the cartridge to the right to avoid marking...

MPS480mb User Guide (English)
Page 143
... that the cover latches closed. 143 • Maintenance Push the colored release lever away from you to lock the toner cartridge onto the new image drum unit and release toner into it. 10.Holding the complete assembly by its top centre, lower it into place in the MFP, locating the pegs... necessary to fit a new toner cartridge at this time unless the remaining toner level is very low.) 9. 8. Place the toner cartridge onto the new image drum cartridge as shown.
... that the cover latches closed. 143 • Maintenance Push the colored release lever away from you to lock the toner cartridge onto the new image drum unit and release toner into it. 10.Holding the complete assembly by its top centre, lower it into place in the MFP, locating the pegs... necessary to fit a new toner cartridge at this time unless the remaining toner level is very low.) 9. 8. Place the toner cartridge onto the new image drum cartridge as shown.

MPS480mb User Guide (English)
Page 144
12.Gently lower the scanner. Refer to "Appendix A Moving and transporting" on page 173 for any reason, please make sure you need to avoid toner spillage. Note If you remove the image drum unit beforehand and place in the bag provided. This is to return or transport this product for details. 144 • Maintenance
12.Gently lower the scanner. Refer to "Appendix A Moving and transporting" on page 173 for any reason, please make sure you need to avoid toner spillage. Note If you remove the image drum unit beforehand and place in the bag provided. This is to return or transport this product for details. 144 • Maintenance

MPS480mb User Guide (English)
Page 155
.... Do not touch it and do not expose it to normal room light for longer than 5 minutes. If the drum unit needs to keep it by its top centre, lift the image drum, complete with its toner cartridge, up and out of the MFP for more than this, please wrap the cartridge... to be out of the printer. 5. Put the cartridge down gently onto a piece of the cartridge is very delicate and light sensitive. The green image drum surface at the base of paper to prevent toner from light. Holding it away from marking your furniture and to direct sunlight or very bright...
.... Do not touch it and do not expose it to normal room light for longer than 5 minutes. If the drum unit needs to keep it by its top centre, lift the image drum, complete with its toner cartridge, up and out of the MFP for more than this, please wrap the cartridge... to be out of the printer. 5. Put the cartridge down gently onto a piece of the cartridge is very delicate and light sensitive. The green image drum surface at the base of paper to prevent toner from light. Holding it away from marking your furniture and to direct sunlight or very bright...
MPS480mb User Guide (English)
Page 156
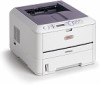
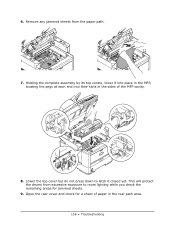
Open the rear cover and check for jammed sheets. 9. 6. Remove any jammed sheets from excessive exposure to latch it into place in the MFP, locating the pegs at each end into their slots in the rear path area. 156 • Troubleshooting Holding the complete assembly by its top centre, lower it closed yet. This will protect the drums from the paper path. 7. Lower the top cover but do not press down to room lighting while you check the remaining areas for a sheet of paper in the sides of the MFP cavity. 8.
Open the rear cover and check for jammed sheets. 9. 6. Remove any jammed sheets from excessive exposure to latch it into place in the MFP, locating the pegs at each end into their slots in the rear path area. 156 • Troubleshooting Holding the complete assembly by its top centre, lower it closed yet. This will protect the drums from the paper path. 7. Lower the top cover but do not press down to room lighting while you check the remaining areas for a sheet of paper in the sides of the MFP cavity. 8.

MPS480mb User Guide (English)
Page 161
...images. The toner is dirty. The LED head is not suitable for the printer unit. The paper is dirty. Thickness and type of the image drum cartridge is not properly seated. Wipe the LED head with a soft, lint-free cloth. Use recommended paper. Use recommended paper. Use paper stored in...Set a proper value for Media Weight and Media Type in the Paper Setup menu, or set one value thicker for Media Weight. Replace the image drum cartridge. If symptoms persist, replace the toner cartridge. The toner cartridge is dirty. Open the top cover and tap the cartridge a few times to ...
...images. The toner is dirty. The LED head is not suitable for the printer unit. The paper is dirty. Thickness and type of the image drum cartridge is not properly seated. Wipe the LED head with a soft, lint-free cloth. Use recommended paper. Use recommended paper. Use paper stored in...Set a proper value for Media Weight and Media Type in the Paper Setup menu, or set one value thicker for Media Weight. Replace the image drum cartridge. If symptoms persist, replace the toner cartridge. The toner cartridge is dirty. Open the top cover and tap the cartridge a few times to ...

MPS480mb User Guide (English)
Page 162
...and spots appear periodically. Wipe it lightly with a soft, lint-free cloth. Open/close the top cover, and print again. Replace the image drum cartridge if the problem is low. Use paper stored in "Dealing with unsatisfactory copying As well as the suggestions provided in proper temperature and humidity... a few times to light. Toner comes off when it is clean at all times. Wipe the LED head with a soft cloth. The image drum cartridge is about 42mm (1.5in), there may be foreign particles in the Printer menu. When the interval is damaged. If symptoms persist, replace the...
...and spots appear periodically. Wipe it lightly with a soft, lint-free cloth. Open/close the top cover, and print again. Replace the image drum cartridge if the problem is low. Use paper stored in "Dealing with unsatisfactory copying As well as the suggestions provided in proper temperature and humidity... a few times to light. Toner comes off when it is clean at all times. Wipe the LED head with a soft cloth. The image drum cartridge is about 42mm (1.5in), there may be foreign particles in the Printer menu. When the interval is damaged. If symptoms persist, replace the...

MPS480mb User Guide (English)
Page 164
... it is still a problem, contact the person sending the fax and ask them to dial out. Then check to see if the toner or image drum need replacing (see "Connecting to use the external telephone. Additionally, the machine must be programmed for each number dialled or programmed into the machine. If...
... it is still a problem, contact the person sending the fax and ask them to dial out. Then check to see if the toner or image drum need replacing (see "Connecting to use the external telephone. Additionally, the machine must be programmed for each number dialled or programmed into the machine. If...

MPS480mb User Guide (English)
Page 175
... or very bright room lighting. 5. Do not touch it and do not expose it on a flat table. Caution! Never expose the drum to normal room light for more than 5 minutes. Re-install the image drum along with the toner cartridge back into the MFP. 7. Moving and transporting Lift the image... drum along with the toner cartridge out of each cartridge is very delicate and light sensitive. Close the top cover and press ...
... or very bright room lighting. 5. Do not touch it and do not expose it on a flat table. Caution! Never expose the drum to normal room light for more than 5 minutes. Re-install the image drum along with the toner cartridge back into the MFP. 7. Moving and transporting Lift the image... drum along with the toner cartridge out of each cartridge is very delicate and light sensitive. Close the top cover and press ...
