
PrintView for Oki Installation and Quick Setup
Page 1
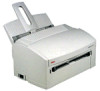
... need to run Active Directory services on the boot drive; See the on-line User Guide on the CD-ROM for Oki Installation and Quick Setup This booklet covers the basics of Microsoft's Active Directory technology. Windows NT4 systems do not provide these services by default. A folder named PrintView is required: • Active Directory Client Support 1 PrintView for details on the target hard drive and shortcuts are installing...
... need to run Active Directory services on the boot drive; See the on-line User Guide on the CD-ROM for Oki Installation and Quick Setup This booklet covers the basics of Microsoft's Active Directory technology. Windows NT4 systems do not provide these services by default. A folder named PrintView is required: • Active Directory Client Support 1 PrintView for details on the target hard drive and shortcuts are installing...
PrintView for Oki Installation and Quick Setup
Page 2
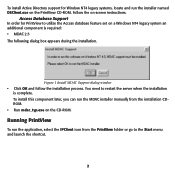
... CD-ROM. Access Database Support In order for Window NT4 legacy systems, locate and run the MDAC installer manually from the PrintView folder or go to the Start menu and launch the shortcut. 2 You need to utilize the Access database feature set on the CD...install this component later, you can run the installer named DSClient.exe on -screen instructions. To install Active Directory support for PrintView to restart the server when the installation is required: • MDAC 2.5 The following dialog box appears during the installation. Figure 1 Install MDAC Support dialog window...
... CD-ROM. Access Database Support In order for Window NT4 legacy systems, locate and run the MDAC installer manually from the PrintView folder or go to the Start menu and launch the shortcut. 2 You need to utilize the Access database feature set on the CD...install this component later, you can run the installer named DSClient.exe on -screen instructions. To install Active Directory support for PrintView to restart the server when the installation is required: • MDAC 2.5 The following dialog box appears during the installation. Figure 1 Install MDAC Support dialog window...

PrintView for Oki Installation and Quick Setup
Page 3
... unintstall program is configured to "Always Spool Raw Data Type" (use the following instructions to change the NT default configuration): • In the Printers folder, select the printer whose properties you work through this section to set up PrintView and test configurations for a new PrintView installation The following conditions is provided as a short cut in the online User Guide. Note For Windows NT 4 Users Currently PrintView only supports color detection and logging with...
... unintstall program is configured to "Always Spool Raw Data Type" (use the following instructions to change the NT default configuration): • In the Printers folder, select the printer whose properties you work through this section to set up PrintView and test configurations for a new PrintView installation The following conditions is provided as a short cut in the online User Guide. Note For Windows NT 4 Users Currently PrintView only supports color detection and logging with...

PrintView for Oki Installation and Quick Setup
Page 5
... the Tools menu item, then select Manage Users and Groups. Input" at the end of group in the User Guide. See Also: Print Clusters & Printers in the tree. The parent group node is General Users, to which any level of the actual printer name.) Make sure to select Share as the Output printer. • Select Keep existing driver. • Change the Printer name. (We suggest using " - It...
... the Tools menu item, then select Manage Users and Groups. Input" at the end of group in the User Guide. See Also: Print Clusters & Printers in the tree. The parent group node is General Users, to which any level of the actual printer name.) Make sure to select Share as the Output printer. • Select Keep existing driver. • Change the Printer name. (We suggest using " - It...
Users' Guide for the OKIPAGE6w
Page 4
Using A Cleaning Page ...44 Cleaning the Image Drum Contacts 45 Cleaning the LED Array...46 Problem Solving ...47 Clearing Paper Jams...48 Paper Feeding Problem ...49 Print Quality Problems...50 Blank sheets are printed...55 Entire page prints faintly...56 Page has gray background...57 Page prints all black...58 Page has repetitive marks...59 An oblong area of faint print appears on each page 60 Vertical white streaking or faint areas on page 61 Vertical black lines appear on page...63 Print is...
Using A Cleaning Page ...44 Cleaning the Image Drum Contacts 45 Cleaning the LED Array...46 Problem Solving ...47 Clearing Paper Jams...48 Paper Feeding Problem ...49 Print Quality Problems...50 Blank sheets are printed...55 Entire page prints faintly...56 Page has gray background...57 Page prints all black...58 Page has repetitive marks...59 An oblong area of faint print appears on each page 60 Vertical white streaking or faint areas on page 61 Vertical black lines appear on page...63 Print is...

Users' Guide for the OKIPAGE6w
Page 6
OKIPAGE 6w User's Manual Introduction Paper and Media Maintenance Problem Solving Service and Support Supplies Specifications Index 6 OKIPAGE 6w
OKIPAGE 6w User's Manual Introduction Paper and Media Maintenance Problem Solving Service and Support Supplies Specifications Index 6 OKIPAGE 6w
Users' Guide for the OKIPAGE6w
Page 14
...: Smooth vs. Selecting Paper • For best results, choose paper made for laser printers or copiers. • Page printers and laser printers require smooth, moisture-controlled paper of the proper basis weightclick on the topics below for samples before you buy in bulk. • Improper storage can reduce print quality and may cause damage with extended use. • Always try...
...: Smooth vs. Selecting Paper • For best results, choose paper made for laser printers or copiers. • Page printers and laser printers require smooth, moisture-controlled paper of the proper basis weightclick on the topics below for samples before you buy in bulk. • Improper storage can reduce print quality and may cause damage with extended use. • Always try...

Users' Guide for the OKIPAGE6w
Page 26
Important! Labels should cover the entire carrier sheetcarrier and adhesive must be exposed to feed transparencies and label sheets manually, one at a time. Transparencies and Adhesive Labels Use the front feeder to any part of 392ºF (200ºC) for laser printers or photocopiers. Caution! Transparencies and adhesive labels and their carriers must not be able to withstand a temperature of the printer. 26 OKIPAGE 6w Choosing Transparencies and Adhesive Labels Use transparencies and labels that are specifically made for 0.1 second.
Important! Labels should cover the entire carrier sheetcarrier and adhesive must be exposed to feed transparencies and label sheets manually, one at a time. Transparencies and Adhesive Labels Use the front feeder to any part of 392ºF (200ºC) for laser printers or photocopiers. Caution! Transparencies and adhesive labels and their carriers must not be able to withstand a temperature of the printer. 26 OKIPAGE 6w Choosing Transparencies and Adhesive Labels Use transparencies and labels that are specifically made for 0.1 second.
Users' Guide for the OKIPAGE6w
Page 58
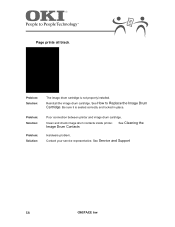
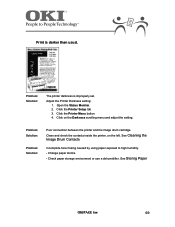
Page prints all black. Be sure it is not properly installed. Poor connection between printer and image drum cartridge. Contact your service representative. See How to Replace the Image Drum Cartridge. Clean and check image drum contacts inside printer. See Service and Support 58 OKIPAGE 6w Image Drum Contacts See Cleaning the Hardware problem. Reinstall the image drum cartridge. Problem: Solution: Problem: Solution: Problem: Solution: The image drum cartridge is seated correctly and locked in place.
Page prints all black. Be sure it is not properly installed. Poor connection between printer and image drum cartridge. Contact your service representative. See How to Replace the Image Drum Cartridge. Clean and check image drum contacts inside printer. See Service and Support 58 OKIPAGE 6w Image Drum Contacts See Cleaning the Hardware problem. Reinstall the image drum cartridge. Problem: Solution: Problem: Solution: Problem: Solution: The image drum cartridge is seated correctly and locked in place.
Users' Guide for the OKIPAGE6w
Page 61
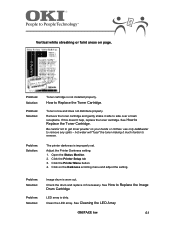
... Image Drum Cartridge LED array is worn out. hot water will "fuse" the toner making it side to Replace the Toner Cartridge. Toner is improperly set. See Cleaning the LED Array OKIPAGE 6w 61 If this doesn't help, replace the toner cartridge. The printer darkness is low and does not distribute properly. Adjust the Printer Darkness setting: 1. Check the drum and replace it if necessary. Click the Printer Setup tab 3. Click on page. Click the Printer Menu button 4. Problem: Solution: Problem: Solution: Problem...
... Image Drum Cartridge LED array is worn out. hot water will "fuse" the toner making it side to Replace the Toner Cartridge. Toner is improperly set. See Cleaning the LED Array OKIPAGE 6w 61 If this doesn't help, replace the toner cartridge. The printer darkness is low and does not distribute properly. Adjust the Printer Darkness setting: 1. Check the drum and replace it if necessary. Click the Printer Setup tab 3. Click on page. Click the Printer Menu button 4. Problem: Solution: Problem: Solution: Problem...
Users' Guide for the OKIPAGE6w
Page 65
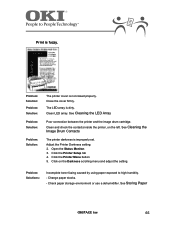
...the image drum cartridge. See Cleaning the Image Drum Contacts The printer darkness is dirty. Print is not closed properly. Adjust the Printer Darkness setting: 2. Click the Printer Menu button 5. Check paper storage environment or use a dehumidifier. See Storing Paper OKIPAGE 6w 65 Clean LED array. Click the Printer Setup tab 4. Close the cover firmly. Problem: Solutions: Incomplete toner fusing caused by using paper exposed to high humidity. - Problem: Solution: Problem: Solution: Problem: Solution: Problem: Solution: The printer cover is fuzzy. Change paper...
...the image drum cartridge. See Cleaning the Image Drum Contacts The printer darkness is dirty. Print is not closed properly. Adjust the Printer Darkness setting: 2. Click the Printer Menu button 5. Check paper storage environment or use a dehumidifier. See Storing Paper OKIPAGE 6w 65 Clean LED array. Click the Printer Setup tab 4. Close the cover firmly. Problem: Solutions: Incomplete toner fusing caused by using paper exposed to high humidity. - Problem: Solution: Problem: Solution: Problem: Solution: Problem: Solution: The printer cover is fuzzy. Change paper...
Users' Guide for the OKIPAGE6w
Page 67
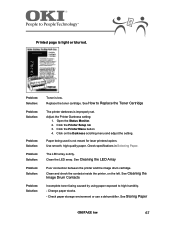
...Check specifications in Selecting Paper. See Storing Paper OKIPAGE 6w 67 See Cleaning the LED Array Poor connection between the printer and the image drum cartridge. Change paper stocks. - Problem: Solution: Problem: Solution: Problem: Solution: Problem: Solution: Problem: Solution: Problem: Solution: Toner is not meant for laser printers/copiers. Open the Status Monitor. 2. Paper being used is low. Clean and check the contacts inside the printer, on the Darkness scrolling menu and adjust the setting. Clean the LED array. Replace the toner cartridge. Printed page...
...Check specifications in Selecting Paper. See Storing Paper OKIPAGE 6w 67 See Cleaning the LED Array Poor connection between the printer and the image drum cartridge. Change paper stocks. - Problem: Solution: Problem: Solution: Problem: Solution: Problem: Solution: Problem: Solution: Problem: Solution: Toner is not meant for laser printers/copiers. Open the Status Monitor. 2. Paper being used is low. Clean and check the contacts inside the printer, on the Darkness scrolling menu and adjust the setting. Clean the LED array. Replace the toner cartridge. Printed page...
Users' Guide for the OKIPAGE6w
Page 69
... the printer and the image drum cartridge. Print is improperly set. Adjust the Printer Darkness setting: 1. Click on the left. See Storing Paper OKIPAGE 6w 69 See Cleaning the Image Drum Contacts Incomplete toner fusing caused by using paper exposed to high humidity. - Change paper stocks. - Problem: Solution: The printer darkness is darker than usual. Clean and check the contacts inside the printer, on the Darkness scrolling menu and adjust the setting. Open the Status Monitor. 2. Click the Printer Menu button 4.
... the printer and the image drum cartridge. Print is improperly set. Adjust the Printer Darkness setting: 1. Click on the left. See Storing Paper OKIPAGE 6w 69 See Cleaning the Image Drum Contacts Incomplete toner fusing caused by using paper exposed to high humidity. - Change paper stocks. - Problem: Solution: The printer darkness is darker than usual. Clean and check the contacts inside the printer, on the Darkness scrolling menu and adjust the setting. Open the Status Monitor. 2. Click the Printer Menu button 4.

Users' Guide for the OKIPAGE6w
Page 78
... the printer does not print. Verify that the printer is powered on the Status Monitor. 1. Click OKIPAGE 6w. Click Port Settings in the software is available through Okidata. Much of top margin increases with the printer. (Also, see Hardware Problems). Many software packages assume 66 lines per page in the printer's soft operator panel to this port). 3. Software Problems Problem: Solution: A communications problem is indicated on . 2. Do not connect the printer to a network Note: A Bi-directional Cable...
... the printer does not print. Verify that the printer is powered on the Status Monitor. 1. Click OKIPAGE 6w. Click Port Settings in the software is available through Okidata. Much of top margin increases with the printer. (Also, see Hardware Problems). Many software packages assume 66 lines per page in the printer's soft operator panel to this port). 3. Software Problems Problem: Solution: A communications problem is indicated on . 2. Do not connect the printer to a network Note: A Bi-directional Cable...

Users' Guide for the OKIPAGE6w
Page 79
... a driver for another printer already installed which controls the parallel port, it is printing in the Status Monitor. Switch to the printer. Printer output, such as the number of the other printer driver software (contact the manufacturer of copies, does not match the settings you need instructions on . 4. Individual settings made in your software application. Reboot Windows. If you have selected a system font: system fonts will override the settings in a very small size. Remove or disable...
... a driver for another printer already installed which controls the parallel port, it is printing in the Status Monitor. Switch to the printer. Printer output, such as the number of the other printer driver software (contact the manufacturer of copies, does not match the settings you need instructions on . 4. Individual settings made in your software application. Reboot Windows. If you have selected a system font: system fonts will override the settings in a very small size. Remove or disable...

Users' Guide for the OKIPAGE6w
Page 83
...). The Okidata Information System Automated Attendant Recorded information is available 24 hours a day, 7 days a week. Please check your printer, so you can answer your questions about: → Installation of your OKI printer → Determination of printer issues that require service → Availability and installation of printer drivers → Consumer relations → CSRs are not trained to your software user's manual for immediate help with the use of support...
...). The Okidata Information System Automated Attendant Recorded information is available 24 hours a day, 7 days a week. Please check your printer, so you can answer your questions about: → Installation of your OKI printer → Determination of printer issues that require service → Availability and installation of printer drivers → Consumer relations → CSRs are not trained to your software user's manual for immediate help with the use of support...
Quick Start Guide for the OKIPAGE6w
Page 3
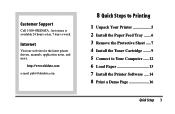
Customer Support Call 1-800-OKIDATA. Internet Visit our web site for the latest printer drivers, manuals, application notes, and more. http://www.okidata.com e-mail: pubs@okidata.com 8 Quick Steps to Printing 1 Unpack Your Printer 5 2 Install the Paper Feed Tray .......6 3 Remove the Protective Sheet .....7 4 Install the Toner Cartridge ........9 5 Connect to Your Computer ......12 6 Load Paper 13 7 Install the Printer Software .....14 8 Print a Demo Page 16 Quick Setup 3 Assistance is available 24 hours a day, 7 days a week.
Customer Support Call 1-800-OKIDATA. Internet Visit our web site for the latest printer drivers, manuals, application notes, and more. http://www.okidata.com e-mail: pubs@okidata.com 8 Quick Steps to Printing 1 Unpack Your Printer 5 2 Install the Paper Feed Tray .......6 3 Remove the Protective Sheet .....7 4 Install the Toner Cartridge ........9 5 Connect to Your Computer ......12 6 Load Paper 13 7 Install the Printer Software .....14 8 Print a Demo Page 16 Quick Setup 3 Assistance is available 24 hours a day, 7 days a week.
Quick Start Guide for the OKIPAGE6w
Page 4
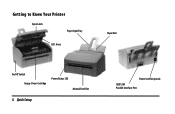
Getting to Know Your Printer Open Latch Paper Input Tray LED Array Paper Exit On/Off Switch Image Drum Cartridge Power/Status LED Manual Feed Slot 4 Quick Setup Power Cord Receptacle IEEE 1284 Parallel Interface Port
Getting to Know Your Printer Open Latch Paper Input Tray LED Array Paper Exit On/Off Switch Image Drum Cartridge Power/Status LED Manual Feed Slot 4 Quick Setup Power Cord Receptacle IEEE 1284 Parallel Interface Port

Quick Start Guide for the OKIPAGE6w
Page 14
... the Okidata web site at http://www.okidata.com or find someone who has a CD-ROM drive and make a set of printer status and features s Readme files - To access Printer Properties, right click on the CD. Windows 95/98/NT 4.0 1. Close all printer features s Status Monitor software - needed to install the printer software. Insert the OKIPAGE 6w CD into your printer. Download the printer drivers from the menu. 14 Quick Setup After the installation is your operating system...
... the Okidata web site at http://www.okidata.com or find someone who has a CD-ROM drive and make a set of printer status and features s Readme files - To access Printer Properties, right click on the CD. Windows 95/98/NT 4.0 1. Close all printer features s Status Monitor software - needed to install the printer software. Insert the OKIPAGE 6w CD into your printer. Download the printer drivers from the menu. 14 Quick Setup After the installation is your operating system...
Quick Start Guide for the OKIPAGE6w
Page 21
... behind faxes, letters and memos, or mark a draft document. 2-up/4-up Layout Multiple-up with or without a border. Image Settings Select mirror or negative print, dithering, gray scale printing and print quality settings. Paper Setting Select paper size, orientation, thickness, multipleup printing, and page sequence. Quick Setup 21 Watermarks A watermark is at the bottom of the stack. You can show a company's name in the Printers dialog box, then open...
... behind faxes, letters and memos, or mark a draft document. 2-up/4-up Layout Multiple-up with or without a border. Image Settings Select mirror or negative print, dithering, gray scale printing and print quality settings. Paper Setting Select paper size, orientation, thickness, multipleup printing, and page sequence. Quick Setup 21 Watermarks A watermark is at the bottom of the stack. You can show a company's name in the Printers dialog box, then open...


