
User Manual
Page 2
For more details on the functions described here, refer to the "Reference Manual" on CD-ROM. 2 En CONTENTS/TABLE DES MATIÈRES/INHALT/CONTENIDO/ ENGLISH 2 FRANÇAIS 36 DEUTSCH 70 ESPAÑOL 104 En 138 CONTENTS GETTING STARTED 4 MENU FUNCTIONS 11 SHOOTING BASICS 17 SELECTING THE IMAGE QUALITY (RECORD MODE) 21 PLAYBACK 23 PRINT SETTINGS 28 DOWNLOADING PICTURES TO A COMPUTER . . . . . 29 OPTIONAL ACCESSORIES 31 ERROR CODES 32 SPECIFICATIONS 34 These instructions are only for quick reference.
For more details on the functions described here, refer to the "Reference Manual" on CD-ROM. 2 En CONTENTS/TABLE DES MATIÈRES/INHALT/CONTENIDO/ ENGLISH 2 FRANÇAIS 36 DEUTSCH 70 ESPAÑOL 104 En 138 CONTENTS GETTING STARTED 4 MENU FUNCTIONS 11 SHOOTING BASICS 17 SELECTING THE IMAGE QUALITY (RECORD MODE) 21 PLAYBACK 23 PRINT SETTINGS 28 DOWNLOADING PICTURES TO A COMPUTER . . . . . 29 OPTIONAL ACCESSORIES 31 ERROR CODES 32 SPECIFICATIONS 34 These instructions are only for quick reference.
User Manual
Page 5
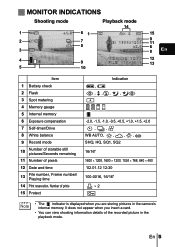
... pictures in the playback mode. En 5 J MONITOR INDICATIONS Shooting mode Playback mode 14 1 61 2 7 8 3 4 9 5 10 15 9 11 6 8 En 12 13 Item 1 Battery check 2 Flash 3 Spot metering 4 Memory gauge 5 Internal memory 6 Exposure compensation 7 Self-timer/Drive 8 White balance 9 Record mode 10 Number of storable still pictures/Seconds remaining 11 Number of pixels 12 Date and time 13 File number, Frame number/ Playing time 14 Print reservation, Number of prints 15 Protect , ,, Indication , , -2.0, -1.5, -1.0, -0.5, +0.5, +1.0, +1.5, +2.0 , , WB AUTO...
... pictures in the playback mode. En 5 J MONITOR INDICATIONS Shooting mode Playback mode 14 1 61 2 7 8 3 4 9 5 10 15 9 11 6 8 En 12 13 Item 1 Battery check 2 Flash 3 Spot metering 4 Memory gauge 5 Internal memory 6 Exposure compensation 7 Self-timer/Drive 8 White balance 9 Record mode 10 Number of storable still pictures/Seconds remaining 11 Number of pixels 12 Date and time 13 File number, Frame number/ Playing time 14 Print reservation, Number of prints 15 Protect , ,, Indication , , -2.0, -1.5, -1.0, -0.5, +0.5, +1.0, +1.5, +2.0 , , WB AUTO...
User Manual
Page 8
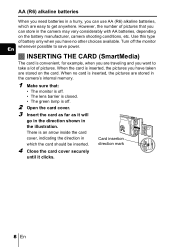
... stored in the camera's internal memory. 1 Make sure that: • The monitor is off. • The lens barrier is closed. • The green lamp is convenient, for example, when you are traveling and you want to take a lot of pictures that you can use AA (R6) alkaline batteries, which the card should be inserted. J INSERTING THE CARD (SmartMedia) The card is off the...
... stored in the camera's internal memory. 1 Make sure that: • The monitor is off. • The lens barrier is closed. • The green lamp is convenient, for example, when you are traveling and you want to take a lot of pictures that you can use AA (R6) alkaline batteries, which the card should be inserted. J INSERTING THE CARD (SmartMedia) The card is off the...
User Manual
Page 10
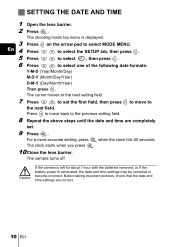
... setting field. 7 Press to set . 9 Press . Before taking important pictures, check that the date and time settings are completely set the first field, then press to move back to the next field. to select the SETUP tab, then press . 5 Press to select , then press . 6 Press to select MODE MENU. If the camera is left for about 1 hour with the batteries removed, or if the battery power is displayed...
... setting field. 7 Press to set . 9 Press . Before taking important pictures, check that the date and time settings are completely set the first field, then press to move back to the next field. to select the SETUP tab, then press . 5 Press to select , then press . 6 Press to select MODE MENU. If the camera is left for about 1 hour with the batteries removed, or if the battery power is displayed...
User Manual
Page 11
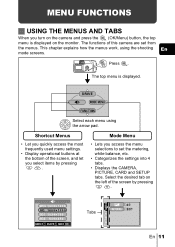
... on the left of the screen, and let you select items by pressing . En Press . Shortcut Menus • Let you quickly access the most frequently used menu settings. • Display operational buttons at the bottom of the screen by pressing . DRIVE MODE MENU FUNCtION Select each menu using the shooting mode screens. MENU FUNCTIONS J USING THE MENUS AND TABS When you turn on the camera and press the (OK/Menu) button, the top menu is displayed.
... on the left of the screen, and let you select items by pressing . En Press . Shortcut Menus • Let you quickly access the most frequently used menu settings. • Display operational buttons at the bottom of the screen by pressing . DRIVE MODE MENU FUNCtION Select each menu using the shooting mode screens. MENU FUNCTIONS J USING THE MENUS AND TABS When you turn on the camera and press the (OK/Menu) button, the top menu is displayed.

User Manual
Page 12
Top menu En DRIVE MODE MENU FUNCtION 2 Press to select a tab, then press to display the top menu, then press . How to use the menus 1 Press to display the menu. CAMERA tab SEt CARD PIC CAMERA MEtERING PICTURE tab WB To return to select a tab, press . SEt CARD PICtURE CAM CARD tab CARD SEtUP SEt CARD PIC CAM 12 En SETUP tab ALL RESEt REC VIEW
Top menu En DRIVE MODE MENU FUNCtION 2 Press to select a tab, then press to display the top menu, then press . How to use the menus 1 Press to display the menu. CAMERA tab SEt CARD PIC CAMERA MEtERING PICTURE tab WB To return to select a tab, press . SEt CARD PICtURE CAM CARD tab CARD SEtUP SEt CARD PIC CAM 12 En SETUP tab ALL RESEt REC VIEW
User Manual
Page 13
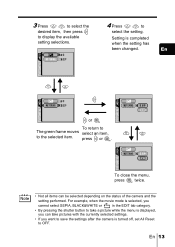
... ESP SEt CARD PIC CAMERA To close the menu, press twice. • Not all items can take pictures with the currently selected settings. • If you want to save the settings after the camera is completed when the setting has been changed. En 13 select an item, press or . Setting is turned off, set All Reset to display the available setting selections. MEtERING 4 Press to the selected item. En SEt CARD PIC CAMERA SEt CARD PIC CAMERA SEt CARD PIC CAMERA...
... ESP SEt CARD PIC CAMERA To close the menu, press twice. • Not all items can take pictures with the currently selected settings. • If you want to save the settings after the camera is completed when the setting has been changed. En 13 select an item, press or . Setting is turned off, set All Reset to display the available setting selections. MEtERING 4 Press to the selected item. En SEt CARD PIC CAMERA SEt CARD PIC CAMERA SEt CARD PIC CAMERA...

User Manual
Page 15
... monitor while saving them. Adjusts the brightness of the image (Exposure compensation). Formats a card. to display pictures on CD-ROM. Selects whether to select a These instructions are categorized into 4 tabs. Shooting mode SEt CARD PIC CAMERA CAMERA tab PICTURE tab CARD tab SETUP tab MEtERING CAMERA tab METERING PICTURE tab WB CARD tab CARD SETUP SETUP tab ALL RESET REC VIEW Adjusts the brightness of the monitor. En 15 Turns the beep sound (used to the light source. Use tab and display the respective functions.
... monitor while saving them. Adjusts the brightness of the image (Exposure compensation). Formats a card. to display pictures on CD-ROM. Selects whether to select a These instructions are categorized into 4 tabs. Shooting mode SEt CARD PIC CAMERA CAMERA tab PICTURE tab CARD tab SETUP tab MEtERING CAMERA tab METERING PICTURE tab WB CARD tab CARD SETUP SETUP tab ALL RESET REC VIEW Adjusts the brightness of the monitor. En 15 Turns the beep sound (used to the light source. Use tab and display the respective functions.

User Manual
Page 16
... internal memory to save the current camera settings when you turn off . Selects whether to the card. Erases all image data stored on the card required for warnings, etc.) on and off the power. Creates black and white pictures. Makes the file size smaller. Rotates pictures 90 degrees clockwise or counterclockwise. Sets the date and time. 16 En Formats a card. Turns the beep sound (used for DPOF printers. Playback mode SEt CARD EDIt PLAY PLAY tab EDIT tab En CARD tab SETUP tab PLAY tab EDIT tab BLACK & WHITE...
... internal memory to save the current camera settings when you turn off . Selects whether to the card. Erases all image data stored on the card required for warnings, etc.) on and off the power. Creates black and white pictures. Makes the file size smaller. Rotates pictures 90 degrees clockwise or counterclockwise. Sets the date and time. 16 En Formats a card. Turns the beep sound (used for DPOF printers. Playback mode SEt CARD EDIt PLAY PLAY tab EDIT tab En CARD tab SETUP tab PLAY tab EDIT tab BLACK & WHITE...
User Manual
Page 17
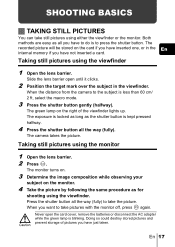
... internal memory if you have not inserted a card. The green lamp on the right of pictures you have to press the shutter button. Taking still pictures using the viewfinder 1 Open the lens barrier. SHOOTING BASICS J TAKING STILL PICTURES You can take the picture. The exposure is locked as long as for shooting using either the viewfinder or the monitor. Slide the lens barrier open the card cover, remove the batteries or disconnect the AC adapter while the green...
... internal memory if you have not inserted a card. The green lamp on the right of pictures you have to press the shutter button. Taking still pictures using the viewfinder 1 Open the lens barrier. SHOOTING BASICS J TAKING STILL PICTURES You can take the picture. The exposure is locked as long as for shooting using either the viewfinder or the monitor. Slide the lens barrier open the card cover, remove the batteries or disconnect the AC adapter while the green...
User Manual
Page 18
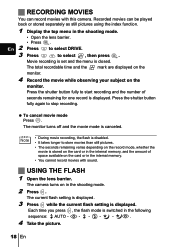
... turns off and the movie mode is canceled. • During movie recording, the flash is disabled. • It takes longer to start recording and the number of space available on the card or in the shooting mode. • Open the lens barrier. • Press . J RECORDING MOVIES You can be played back or stored separately as still pictures using the index function. 1 Display the top menu in the internal memory. • You cannot record movies with this camera. The total recordable time...
... turns off and the movie mode is canceled. • During movie recording, the flash is disabled. • It takes longer to start recording and the number of space available on the card or in the shooting mode. • Open the lens barrier. • Press . J RECORDING MOVIES You can be played back or stored separately as still pictures using the index function. 1 Display the top menu in the internal memory. • You cannot record movies with this camera. The total recordable time...

User Manual
Page 20
... camera turns on the monitor. J USING THE SELF-TIMER This function is pressed. 4 Press the shutter button fully. The monitor turns on the front of the camera toward . The camera turns on in the shooting mode. 2 Press . After blinking for approximately 10 seconds, then starts blinking. Fix the camera securely on a tripod for taking pictures in bright surroundings, such as snowcovered mountains in the photograph. J TAKING CLOSE-UP PICTURES (MACRO MODE) The macro mode allows you to shoot...
... camera turns on the monitor. J USING THE SELF-TIMER This function is pressed. 4 Press the shutter button fully. The monitor turns on the front of the camera toward . The camera turns on in the shooting mode. 2 Press . After blinking for approximately 10 seconds, then starts blinking. Fix the camera securely on a tripod for taking pictures in bright surroundings, such as snowcovered mountains in the photograph. J TAKING CLOSE-UP PICTURES (MACRO MODE) The macro mode allows you to shoot...

User Manual
Page 23
... the shooting mode. The monitor turns on the monitor can be enlarged 1.5, 2, 2.5 or 3 times. Close-up playback Pictures displayed on and displays the last picture taken. (Single-frame En playback) 2 Press . : Displays the previous picture. : Displays the next picture. 3 Press to cancel playback. Quick View (Double-click playback) This function lets you can play back pictures during shooting with the lens barrier closed . It is useful when you want to the shooting mode and you play back pictures...
... the shooting mode. The monitor turns on the monitor can be enlarged 1.5, 2, 2.5 or 3 times. Close-up playback Pictures displayed on and displays the last picture taken. (Single-frame En playback) 2 Press . : Displays the previous picture. : Displays the next picture. 3 Press to cancel playback. Quick View (Double-click playback) This function lets you can play back pictures during shooting with the lens barrier closed . It is useful when you want to the shooting mode and you play back pictures...

User Manual
Page 26
... playback mode. • Press with the lens barrier closed . The picture is erased and the menu is displayed. 4 Press to select ERASE. 5 Press to select YES, then press . All-frame erase 1 Display the top menu in the internal memory or on . 2 Press to select the picture you want to keep. Check each picture before erasing to avoid accidentally erasing pictures you want to erase. 3 Press . The monitor turns on the card...
... playback mode. • Press with the lens barrier closed . The picture is erased and the menu is displayed. 4 Press to select ERASE. 5 Press to select YES, then press . All-frame erase 1 Display the top menu in the internal memory or on . 2 Press to select the picture you want to keep. Check each picture before erasing to avoid accidentally erasing pictures you want to erase. 3 Press . The monitor turns on the card...
User Manual
Page 28
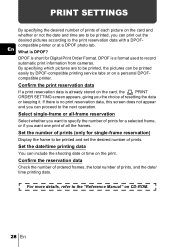
... data with a DPOFcompatible printer or at a DPOF photo lab. Set the date/time printing data You can include the shooting date or time on the card and whether or not the date and time are to be printed, the pictures can be printed easily by DPOF-compatible printing service labs or on the card, the PRINT ORDER SETTING screen appears, giving you can proceed to be printed, you the choice of resetting the data or keeping it. PRINT SETTINGS...
... data with a DPOFcompatible printer or at a DPOF photo lab. Set the date/time printing data You can include the shooting date or time on the card and whether or not the date and time are to be printed, the pictures can be printed easily by DPOF-compatible printing service labs or on the card, the PRINT ORDER SETTING screen appears, giving you can proceed to be printed, you the choice of resetting the data or keeping it. PRINT SETTINGS...

User Manual
Page 29
.../2000/XP Mac OS 9.0 - 9.1/ OS X (10.0) Installing the USB driver for Windows 98 Connecting the camera to the computer using : graphics applications that support the JPEG file format (Paint Shop Pro, Photoshop, etc.); For details on a card can view images using the provided USB cable Confirming the computer recognizes the camera Downloading image files Disconnecting the USB cable Even if your computer has a USB connector, data transfer may need a special setup when connecting to the camera for playing back movies. Follow the...
.../2000/XP Mac OS 9.0 - 9.1/ OS X (10.0) Installing the USB driver for Windows 98 Connecting the camera to the computer using : graphics applications that support the JPEG file format (Paint Shop Pro, Photoshop, etc.); For details on a card can view images using the provided USB cable Confirming the computer recognizes the camera Downloading image files Disconnecting the USB cable Even if your computer has a USB connector, data transfer may need a special setup when connecting to the camera for playing back movies. Follow the...

User Manual
Page 32
... as print reservation data and other functions. CARD FULL MEMORY FULL There is no empty space on the card, so no pictures on the card. Insert the card and copy the pictures to the card is prohibited. Before erasing, download important images to the provided instruction manual for the card. CARD ERROR WRItE-PROtECt Cannot record, play back or erase pictures on the card, so it cannot be used. For more details, refer to a PC. There are taking pictures, remove the write-protect seal...
... as print reservation data and other functions. CARD FULL MEMORY FULL There is no empty space on the card, so no pictures on the card. Insert the card and copy the pictures to the card is prohibited. Before erasing, download important images to the provided instruction manual for the card. CARD ERROR WRItE-PROtECt Cannot record, play back or erase pictures on the card, so it cannot be used. For more details, refer to a PC. There are taking pictures, remove the write-protect seal...
User Manual
Page 34
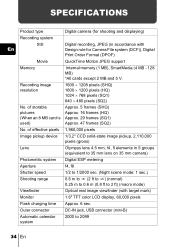
... color LCD display, 60,000 pixels Flash charging time Approx. 6 sec. Outer connector DC-IN jack, USB connector (mini-B) Automatic calendar system 2000 to 2 ft) (macro mode) Viewfinder Optical real image viewfinder (with En Design rule for Camera File system (DCF)), Digital Print Order Format (DPOF) Movie QuickTime Motion JPEG support Memory Internal memory (1 MB), SmartMedia (4 MB - 128 MB) *All cards except 2 MB and 5 V. SPECIFICATIONS Product type Digital camera (for shooting and displaying) Recording system Still Digital recording, JPEG...
... color LCD display, 60,000 pixels Flash charging time Approx. 6 sec. Outer connector DC-IN jack, USB connector (mini-B) Automatic calendar system 2000 to 2 ft) (macro mode) Viewfinder Optical real image viewfinder (with En Design rule for Camera File system (DCF)), Digital Print Order Format (DPOF) Movie QuickTime Motion JPEG support Memory Internal memory (1 MB), SmartMedia (4 MB - 128 MB) *All cards except 2 MB and 5 V. SPECIFICATIONS Product type Digital camera (for shooting and displaying) Recording system Still Digital recording, JPEG...

Quick Start Guide
Page 1
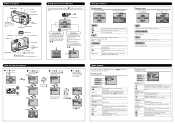
... Quick start guide to show you basic functions and techniques that : The lens barrier is closed. to select , then SEt CARD EDIt PLAY 6 Press to protect. 3 Press , then press . Battery insertion direction mark 3 Insert the batteries, making sure that : The lens barrier is closed. Card insertion direction mark Never open the lens barrier without the card inside the card cover, indicating the direction in the camera's internal memory. • To save battery power, the camera automatically enters the sleep mode...
... Quick start guide to show you basic functions and techniques that : The lens barrier is closed. to select , then SEt CARD EDIt PLAY 6 Press to protect. 3 Press , then press . Battery insertion direction mark 3 Insert the batteries, making sure that : The lens barrier is closed. Card insertion direction mark Never open the lens barrier without the card inside the card cover, indicating the direction in the camera's internal memory. • To save battery power, the camera automatically enters the sleep mode...
Quick Start Guide
Page 2
.../Menu) button, the top menu is played back MOVIE PLAYBACK INFO MODE MENU ERASE Displays all recorded pictures in 9 frames. Stores printing information on and off the power. Makes the file size smaller. Adjusts the brightness of parts Shutter button Lens Flash DC-IN jack Connector cover Lens barrier Turns the camera on and off in succession. Names of the monitor. Formats a card. Sets the date and time. ERASE Erases a selected picture. Selects whether to save the current camera settings when you quickly access the most frequently used to...
.../Menu) button, the top menu is played back MOVIE PLAYBACK INFO MODE MENU ERASE Displays all recorded pictures in 9 frames. Stores printing information on and off the power. Makes the file size smaller. Adjusts the brightness of parts Shutter button Lens Flash DC-IN jack Connector cover Lens barrier Turns the camera on and off in succession. Names of the monitor. Formats a card. Sets the date and time. ERASE Erases a selected picture. Selects whether to save the current camera settings when you quickly access the most frequently used to...


