
Instruction Manual
Page 1
INSTRUCTIONS • Before using your camera, read this manual carefully to ensure correct use. • We recommend that you take test shots to get accustomed to your camera before taking important photographs.
INSTRUCTIONS • Before using your camera, read this manual carefully to ensure correct use. • We recommend that you take test shots to get accustomed to your camera before taking important photographs.
Instruction Manual
Page 2
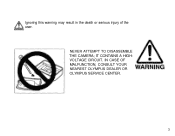
IN CASE OF MALFUNCTION, CONSULT YOUR NEAREST OLYMPUS DEALER OR OLYMPUS SERVICE CENTER. 3 NEVER ATTEMPT TO DISASSEMBLE THE CAMERA; IT CONTAINS A HIGHVOLTAGE CIRCUIT. Ignoring this warning may result in the death or serious injury of the user.
IN CASE OF MALFUNCTION, CONSULT YOUR NEAREST OLYMPUS DEALER OR OLYMPUS SERVICE CENTER. 3 NEVER ATTEMPT TO DISASSEMBLE THE CAMERA; IT CONTAINS A HIGHVOLTAGE CIRCUIT. Ignoring this warning may result in the death or serious injury of the user.

Instruction Manual
Page 4
... mode ... 43 † QD models only ‡ Panorama model only Spot metering 44 Exposure compensation 46 Remote control 48 Correcting the data 50 Printing the date and time 51 TAKING BETTER Effects of zoom and its advantages ... 52 Autofocus (AF 54 PICTURES Exposure 56 Film speed 58 Metering the amount of...
... mode ... 43 † QD models only ‡ Panorama model only Spot metering 44 Exposure compensation 46 Remote control 48 Correcting the data 50 Printing the date and time 51 TAKING BETTER Effects of zoom and its advantages ... 52 Autofocus (AF 54 PICTURES Exposure 56 Film speed 58 Metering the amount of...
Instruction Manual
Page 8
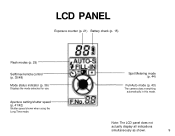
LCD PANEL Exposure counter (p. 21) Battery check (p. 15) Flash modes (p. 29) Selftimer/remote control (p. 35/48) Mode status indicator (p. 36) Displays the mode selected for use. Note: The LCD panel does not actually display all indications simultaneously as shown. 9 Spot Metering mode (p. 44) Full-Auto mode (p. 43) The camera does everything automatically in this mode. Aperture setting/shutter speed (p. 41/42) Shutter speed shown when using the Long Time mode.
LCD PANEL Exposure counter (p. 21) Battery check (p. 15) Flash modes (p. 29) Selftimer/remote control (p. 35/48) Mode status indicator (p. 36) Displays the mode selected for use. Note: The LCD panel does not actually display all indications simultaneously as shown. 9 Spot Metering mode (p. 44) Full-Auto mode (p. 43) The camera does everything automatically in this mode. Aperture setting/shutter speed (p. 41/42) Shutter speed shown when using the Long Time mode.
Instruction Manual
Page 14
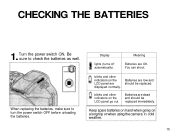
... sure to check the batteries as well. Batteries are low and should be replaced. blinks and other indicators on a long trip or when using the camera in cold weather. 15 CHECKING THE BATTERIES 1. Batteries are displayed normally.
... sure to check the batteries as well. Batteries are low and should be replaced. blinks and other indicators on a long trip or when using the camera in cold weather. 15 CHECKING THE BATTERIES 1. Batteries are displayed normally.
Instruction Manual
Page 15
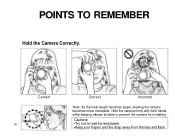
Cautions: •Try not to prevent the camera from the lens and flash. Correct 16 Correct Incorrect Note: As the focal length becomes larger, shaking the camera becomes more noticeable. Hold the camera firmly with both hands while keeping elbows at sides to hold the lens barrel. •Keep your fingers and the strap away from shaking. POINTS TO REMEMBER Hold the Camera Correctly.
Cautions: •Try not to prevent the camera from the lens and flash. Correct 16 Correct Incorrect Note: As the focal length becomes larger, shaking the camera becomes more noticeable. Hold the camera firmly with both hands while keeping elbows at sides to hold the lens barrel. •Keep your fingers and the strap away from shaking. POINTS TO REMEMBER Hold the Camera Correctly.
Instruction Manual
Page 16
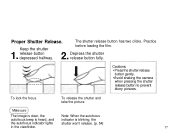
..., the the autofocus indicator lights shutter won't release. (p. 54) in the viewfinder. 17 Cautions: • Press the shutter release button gently. •Avoid shaking the camera when pressing the shutter release button to prevent blurry pictures. The shutter release button has two clicks. Practice Keep the shutter before loading the film...
..., the the autofocus indicator lights shutter won't release. (p. 54) in the viewfinder. 17 Cautions: • Press the shutter release button gently. •Avoid shaking the camera when pressing the shutter release button to prevent blurry pictures. The shutter release button has two clicks. Practice Keep the shutter before loading the film...
Instruction Manual
Page 17
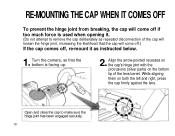
... joint has been engaged securely. 18 Open and close the cap to remove the cap deliberately as repeated disconnection of the lens barrel. Turn the camera, so that the cap will come off.) If the cap comes off if too much force is facing up. 2. RE-MOUNTING THE CAP WHEN IT...
... joint has been engaged securely. 18 Open and close the cap to remove the cap deliberately as repeated disconnection of the lens barrel. Turn the camera, so that the cap will come off.) If the cap comes off if too much force is facing up. 2. RE-MOUNTING THE CAP WHEN IT...
Instruction Manual
Page 21
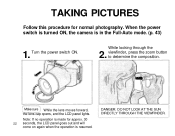
Note: If no operation is made for normal photography. DANGER: DO NOT LOOK AT THE SUN DIRECTLY THROUGH THE VIEWFINDER. While looking through the 2. viewfinder, press the zoom button to determine the composition. Make sure While the lens moves forward, the lens cap opens, and the LCD panel lights. Turn the power switch ON. TAKING PICTURES Follow this procedure for approx. 30 22 seconds, the LCD panel goes out and will come on again when the operation is resumed. When the power switch is turned ON, the camera is in the Full-Auto mode. (p. 43) 1.
Note: If no operation is made for normal photography. DANGER: DO NOT LOOK AT THE SUN DIRECTLY THROUGH THE VIEWFINDER. While looking through the 2. viewfinder, press the zoom button to determine the composition. Make sure While the lens moves forward, the lens cap opens, and the LCD panel lights. Turn the power switch ON. TAKING PICTURES Follow this procedure for approx. 30 22 seconds, the LCD panel goes out and will come on again when the operation is resumed. When the power switch is turned ON, the camera is in the Full-Auto mode. (p. 43) 1.
Instruction Manual
Page 25
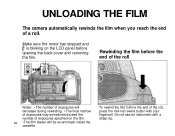
.... To rewind the film before opening the back cover and removing the film. Do not use an instrument with your fingernail. UNLOADING THE FILM The camera automatically rewinds the film when you reach the end of the roll, press the mid-roll rewind button with a sharp tip. Make sure the motor...
.... To rewind the film before opening the back cover and removing the film. Do not use an instrument with your fingernail. UNLOADING THE FILM The camera automatically rewinds the film when you reach the end of the roll, press the mid-roll rewind button with a sharp tip. Make sure the motor...

Instruction Manual
Page 26
don't stop it halfway. •The date and time are not printed on Panorama format prints. Otherwise the camera may malfunction. Push the switch down to return to the Panorama mode. Viewfinder in the Panorama mode. Do not open the back cover and touch the panorama mask in the Standard mode ADDITIONAL FUNCTIONS Notes: • Push the switch all the way; Viewfinder in the Panorama mode 27 TAKING PANORAMA PICTURES Panorama model only Selecting the Panorama Mode Push the panorama switch up to change to the Standard mode.
don't stop it halfway. •The date and time are not printed on Panorama format prints. Otherwise the camera may malfunction. Push the switch down to return to the Panorama mode. Viewfinder in the Panorama mode. Do not open the back cover and touch the panorama mask in the Standard mode ADDITIONAL FUNCTIONS Notes: • Push the switch all the way; Viewfinder in the Panorama mode 27 TAKING PANORAMA PICTURES Panorama model only Selecting the Panorama Mode Push the panorama switch up to change to the Standard mode.
Instruction Manual
Page 28
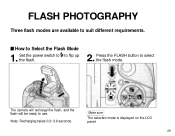
Press the FLASH button to use. Make sure The selected mode is displayed on the LCD panel. 29 The camera will recharge the flash, and the flash will be ready to select the flash mode. Note: Recharging takes 0.2~3.9 seconds. FLASH PHOTOGRAPHY Three flash modes are available to flip up the flash. 2. Set the power switch to to suit different requirements. How to Select the Flash Mode 1.
Press the FLASH button to use. Make sure The selected mode is displayed on the LCD panel. 29 The camera will recharge the flash, and the flash will be ready to select the flash mode. Note: Recharging takes 0.2~3.9 seconds. FLASH PHOTOGRAPHY Three flash modes are available to flip up the flash. 2. Set the power switch to to suit different requirements. How to Select the Flash Mode 1.
Instruction Manual
Page 29
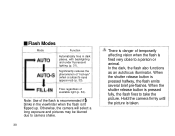
Note: Use of temporarily affecting vision when the flash is fired very close to a person or animal. Otherwise, the camera will select a long exposure and pictures may be blurred due to take the picture. In the dark, the flash also functions as an autofocus ... up. Significantly reduces the phenomenon of available light (p. 34). When the shutter release button is taken. Hold the camera firmly until the picture is pressed fully, the flash fires to camera shake. 30 There is danger of the flash is pressed halfway, the flash emits several brief pre-flashes. Fires regardless...
Note: Use of temporarily affecting vision when the flash is fired very close to a person or animal. Otherwise, the camera will select a long exposure and pictures may be blurred due to take the picture. In the dark, the flash also functions as an autofocus ... up. Significantly reduces the phenomenon of available light (p. 34). When the shutter release button is taken. Hold the camera firmly until the picture is pressed fully, the flash fires to camera shake. 30 There is danger of the flash is pressed halfway, the flash emits several brief pre-flashes. Fires regardless...
Instruction Manual
Page 32
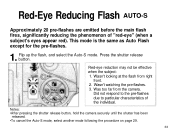
..."red-eye" (when a subject's eyes appear red). Flip up the flash, and select the Auto-S mode. Wasn't looking at the flash from the camera. Was too far from right front. 2. Red-Eye Reducing Flash AUTO-S Approximately 20 pre-flashes are emitted before the main flash fires, significantly reducing the... the pre-flashes. 3. Red-eye reduction may not be effective when the subject: 1. Notes: •After pressing the shutter release button, hold the camera securely until the shutter has been released. •To cancel the Auto-S mode, select another mode following the procedure on page 29. 33
..."red-eye" (when a subject's eyes appear red). Flip up the flash, and select the Auto-S mode. Wasn't looking at the flash from the camera. Was too far from right front. 2. Red-Eye Reducing Flash AUTO-S Approximately 20 pre-flashes are emitted before the main flash fires, significantly reducing the... the pre-flashes. 3. Red-eye reduction may not be effective when the subject: 1. Notes: •After pressing the shutter release button, hold the camera securely until the shutter has been released. •To cancel the Auto-S mode, select another mode following the procedure on page 29. 33
Instruction Manual
Page 34
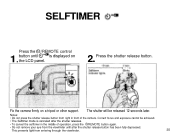
.... • Do not remove your eye from the viewfinder until is canceled after the shutter releases. • To cancel the selftimer in front of the camera. Press the shutter release button. Fix the...
.... • Do not remove your eye from the viewfinder until is canceled after the shutter releases. • To cancel the selftimer in front of the camera. Press the shutter release button. Fix the...

Instruction Manual
Page 35
... F8. 36 For more creative lighting effects: Aperture-Preferred Auto (p. 41) Set the aperture manually. Landscape (p. 39) For pictures with subjects in -focus background. The camera will automatically select the correct shutter speed. Night Scene (p. 40) For night scenes or night scenes with extended in the foreground, using the flash. USING...
... F8. 36 For more creative lighting effects: Aperture-Preferred Auto (p. 41) Set the aperture manually. Landscape (p. 39) For pictures with subjects in -focus background. The camera will automatically select the correct shutter speed. Night Scene (p. 40) For night scenes or night scenes with extended in the foreground, using the flash. USING...
Instruction Manual
Page 36
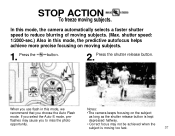
... autofocus helps achieve more precise focusing on the subject as long as the shutter release button is moving subjects. 1. Press the button. 2. Notes: •The camera keeps focusing on moving too fast. 37 In this mode, we recommend that you to reduce blurring of moving subjects. If you select the Auto... focus may cause you choose the Auto Flash mode. STOP ACTION To freeze moving subjects. (Max. shutter speed: 1/2000-sec.) Also in this mode, the camera automatically selects a faster shutter speed to miss the photo opportunity.
... autofocus helps achieve more precise focusing on the subject as long as the shutter release button is moving subjects. 1. Press the button. 2. Notes: •The camera keeps focusing on moving too fast. 37 In this mode, we recommend that you to reduce blurring of moving subjects. If you select the Auto... focus may cause you choose the Auto Flash mode. STOP ACTION To freeze moving subjects. (Max. shutter speed: 1/2000-sec.) Also in this mode, the camera automatically selects a faster shutter speed to miss the photo opportunity.

Instruction Manual
Page 39
Press the button. 2. In this mode, the camera automatically selects the ideal exposure for shooting night scenes, and for shooting night scenes with subjects in the foreground, flip up the flash. 1. Press the ... night scenes. When subjects are no foreground subjects, do not flip up , flash power is automatically adjusted according to the subject. 40 •Since the camera may select a shutter speed as slow as 4-sec maximum, use of a tripod is recommended to prevent...
Press the button. 2. In this mode, the camera automatically selects the ideal exposure for shooting night scenes, and for shooting night scenes with subjects in the foreground, flip up the flash. 1. Press the ... night scenes. When subjects are no foreground subjects, do not flip up , flash power is automatically adjusted according to the subject. 40 •Since the camera may select a shutter speed as slow as 4-sec maximum, use of a tripod is recommended to prevent...
Instruction Manual
Page 40
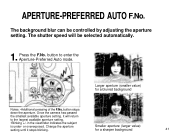
... of the F.No. Press the F.No. button to the largest available aperture setting. •Blinking +/- Larger aperture (smaller value) for a sharper background 41 Once the camera has passed the smallest available aperture setting, it stops blinking. button stops down the aperture. APERTURE-PREFERRED AUTO F.No.
... of the F.No. Press the F.No. button to the largest available aperture setting. •Blinking +/- Larger aperture (smaller value) for a sharper background 41 Once the camera has passed the smallest available aperture setting, it stops blinking. button stops down the aperture. APERTURE-PREFERRED AUTO F.No.
Instruction Manual
Page 41
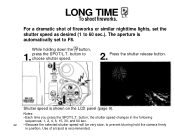
... shutter speed will be very slow, to choose shutter speed. 2. Shutter speed is recommended. While holding down the button, 1. button to prevent blurring hold the camera firmly in position. Use of fireworks or similar nighttime lights, set to 60 sec.). Press the shutter release button. The aperture is automatically set the...
... shutter speed will be very slow, to choose shutter speed. 2. Shutter speed is recommended. While holding down the button, 1. button to prevent blurring hold the camera firmly in position. Use of fireworks or similar nighttime lights, set to 60 sec.). Press the shutter release button. The aperture is automatically set the...

